Super Mario Fans: How to Draw a Perfect Goomba
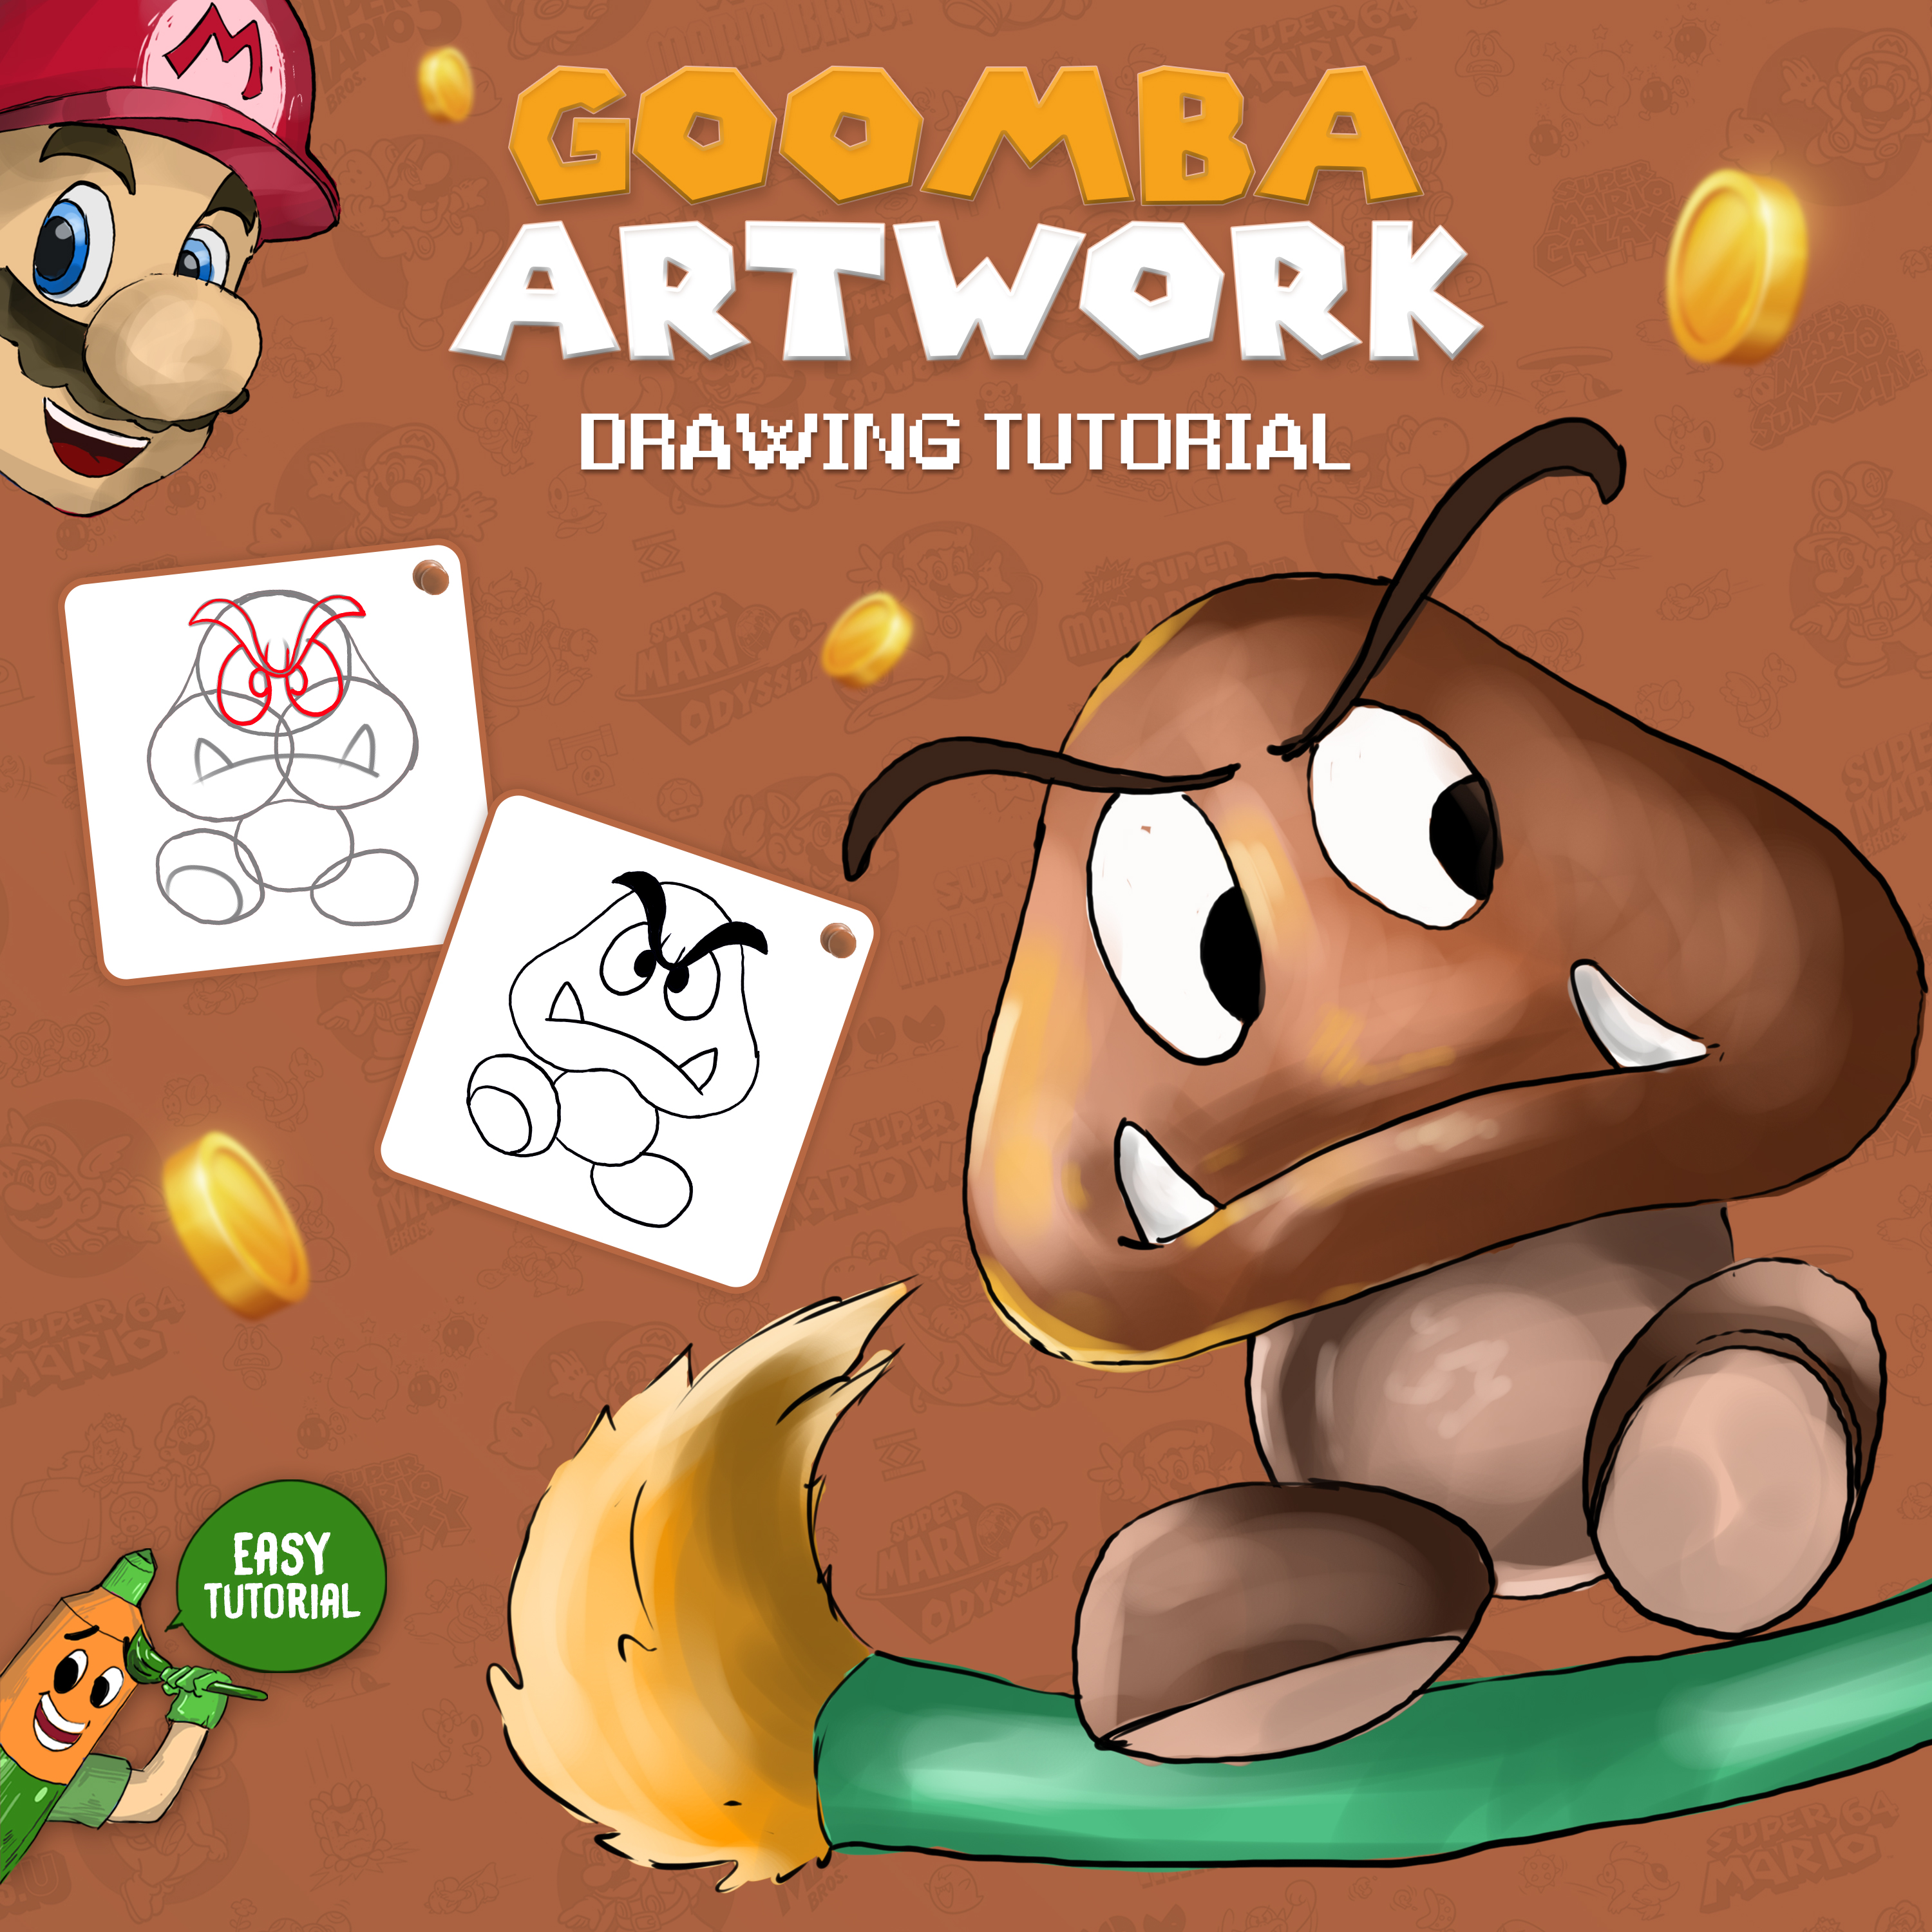
Enjoy this step-by-step tutorial on how to draw the Goomba, Mario's well-known foe. This step-by-step tutorial will provide you with a clear outline and guide to sketch your own Goomba character. Get ready to bring this classic video game creature to life on paper!
You guys must have heard about the Super Mario Bros universe, its amazing characters, and its thrilling adventures. But an adventure is incomplete without any obstacles. Similarly, the Super Mario bros universe is incomplete without having Goomba, an enemy character in it.
Goomba has a huge fan following due to his unique appearance and troublesome ideas. Not just Super Mario bros, but his remarkable performance in various other video games has impressed the fans. He is famous for his role in "Goomba's Shoe" and "Goomba's Great Adventure."
To all the fans out there, this article will give you a complete guide on how to draw Mario Goomba step by step. So, grab your sketch pencils, and let’s get started!
How to Draw Goomba From Mario- Step-by-Step Guide!
When you start drawing, ensure you have all the essential stationary at your table. Have a sketch pencil of B- series, an eraser, a piece of paper, and a sharpener.
Got all of that? Let’s get started:
Step 1 - Draw a Circle
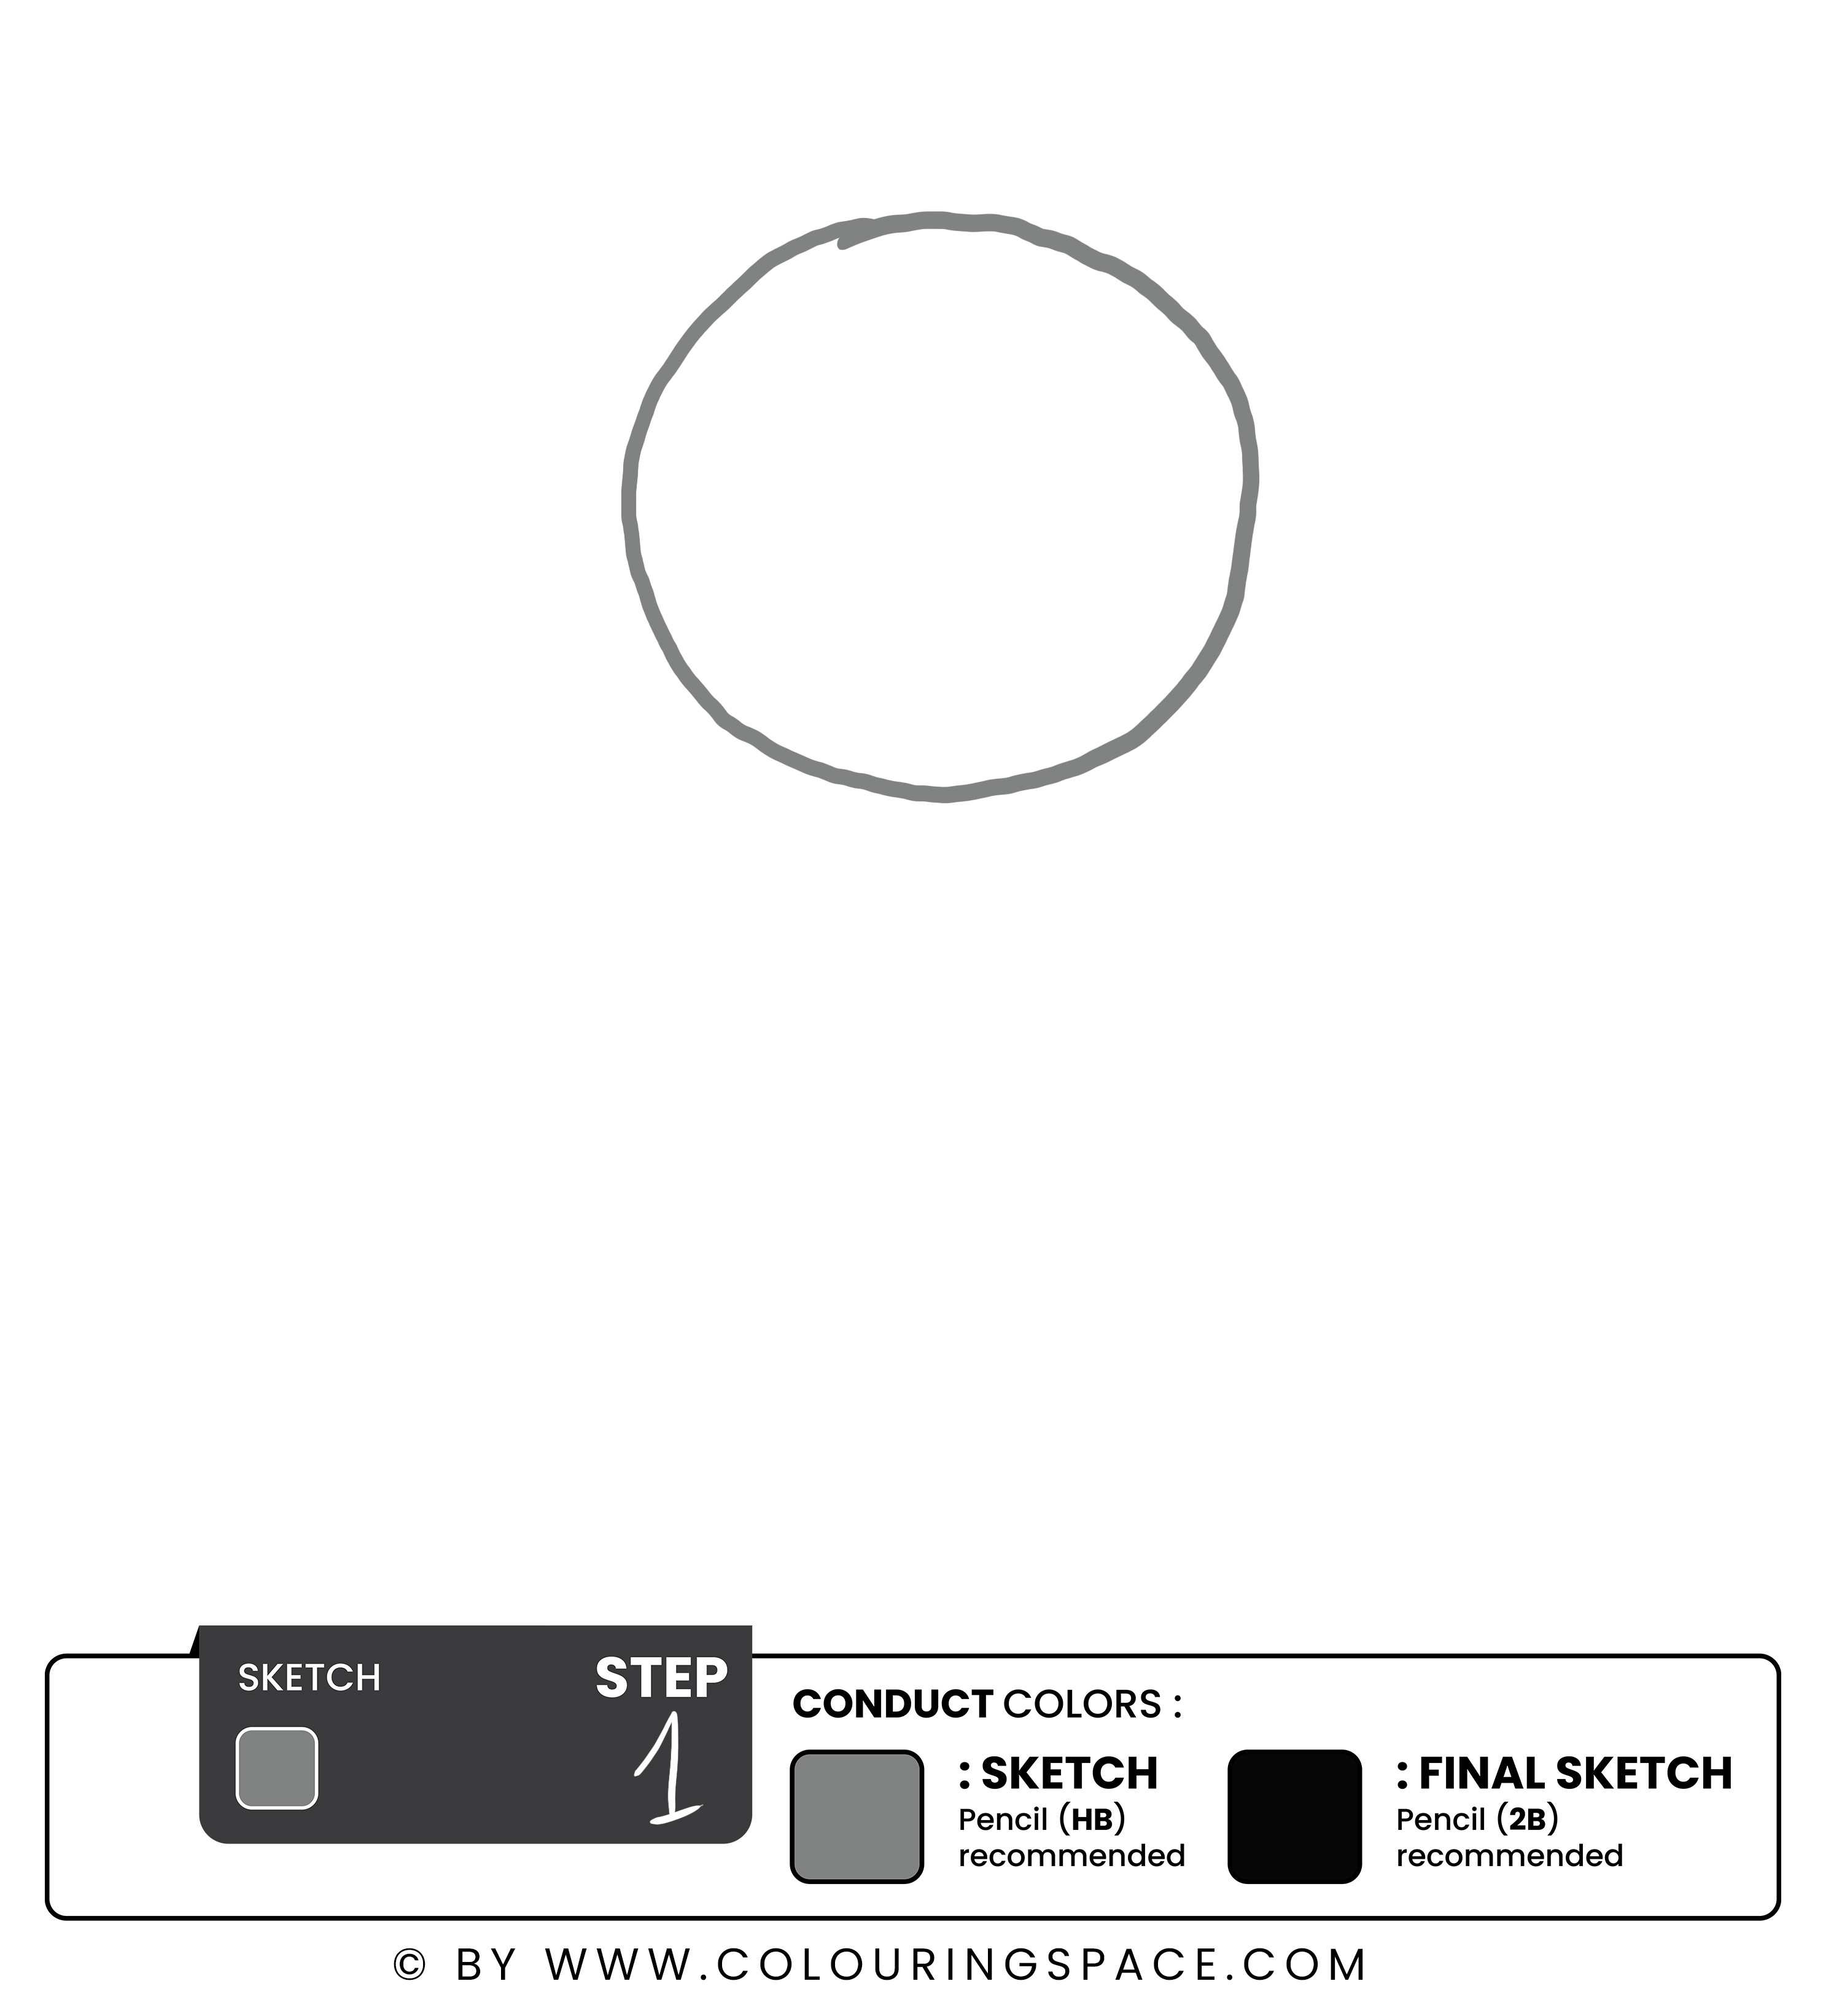
The first step is relatively easy. You have to look at Goomba’s character, point out a reference mark, and that's it. Since Goomba’s character is like a circular mushroom. You should sketch out a circle first. This circle will be a reference point from where all the other secondary lines will be drawn.
Just make sure you draw a fine circle. You can also use a protector if you don’t have a steady hand.
Step 2 - Draw Two More Geometrical Circles
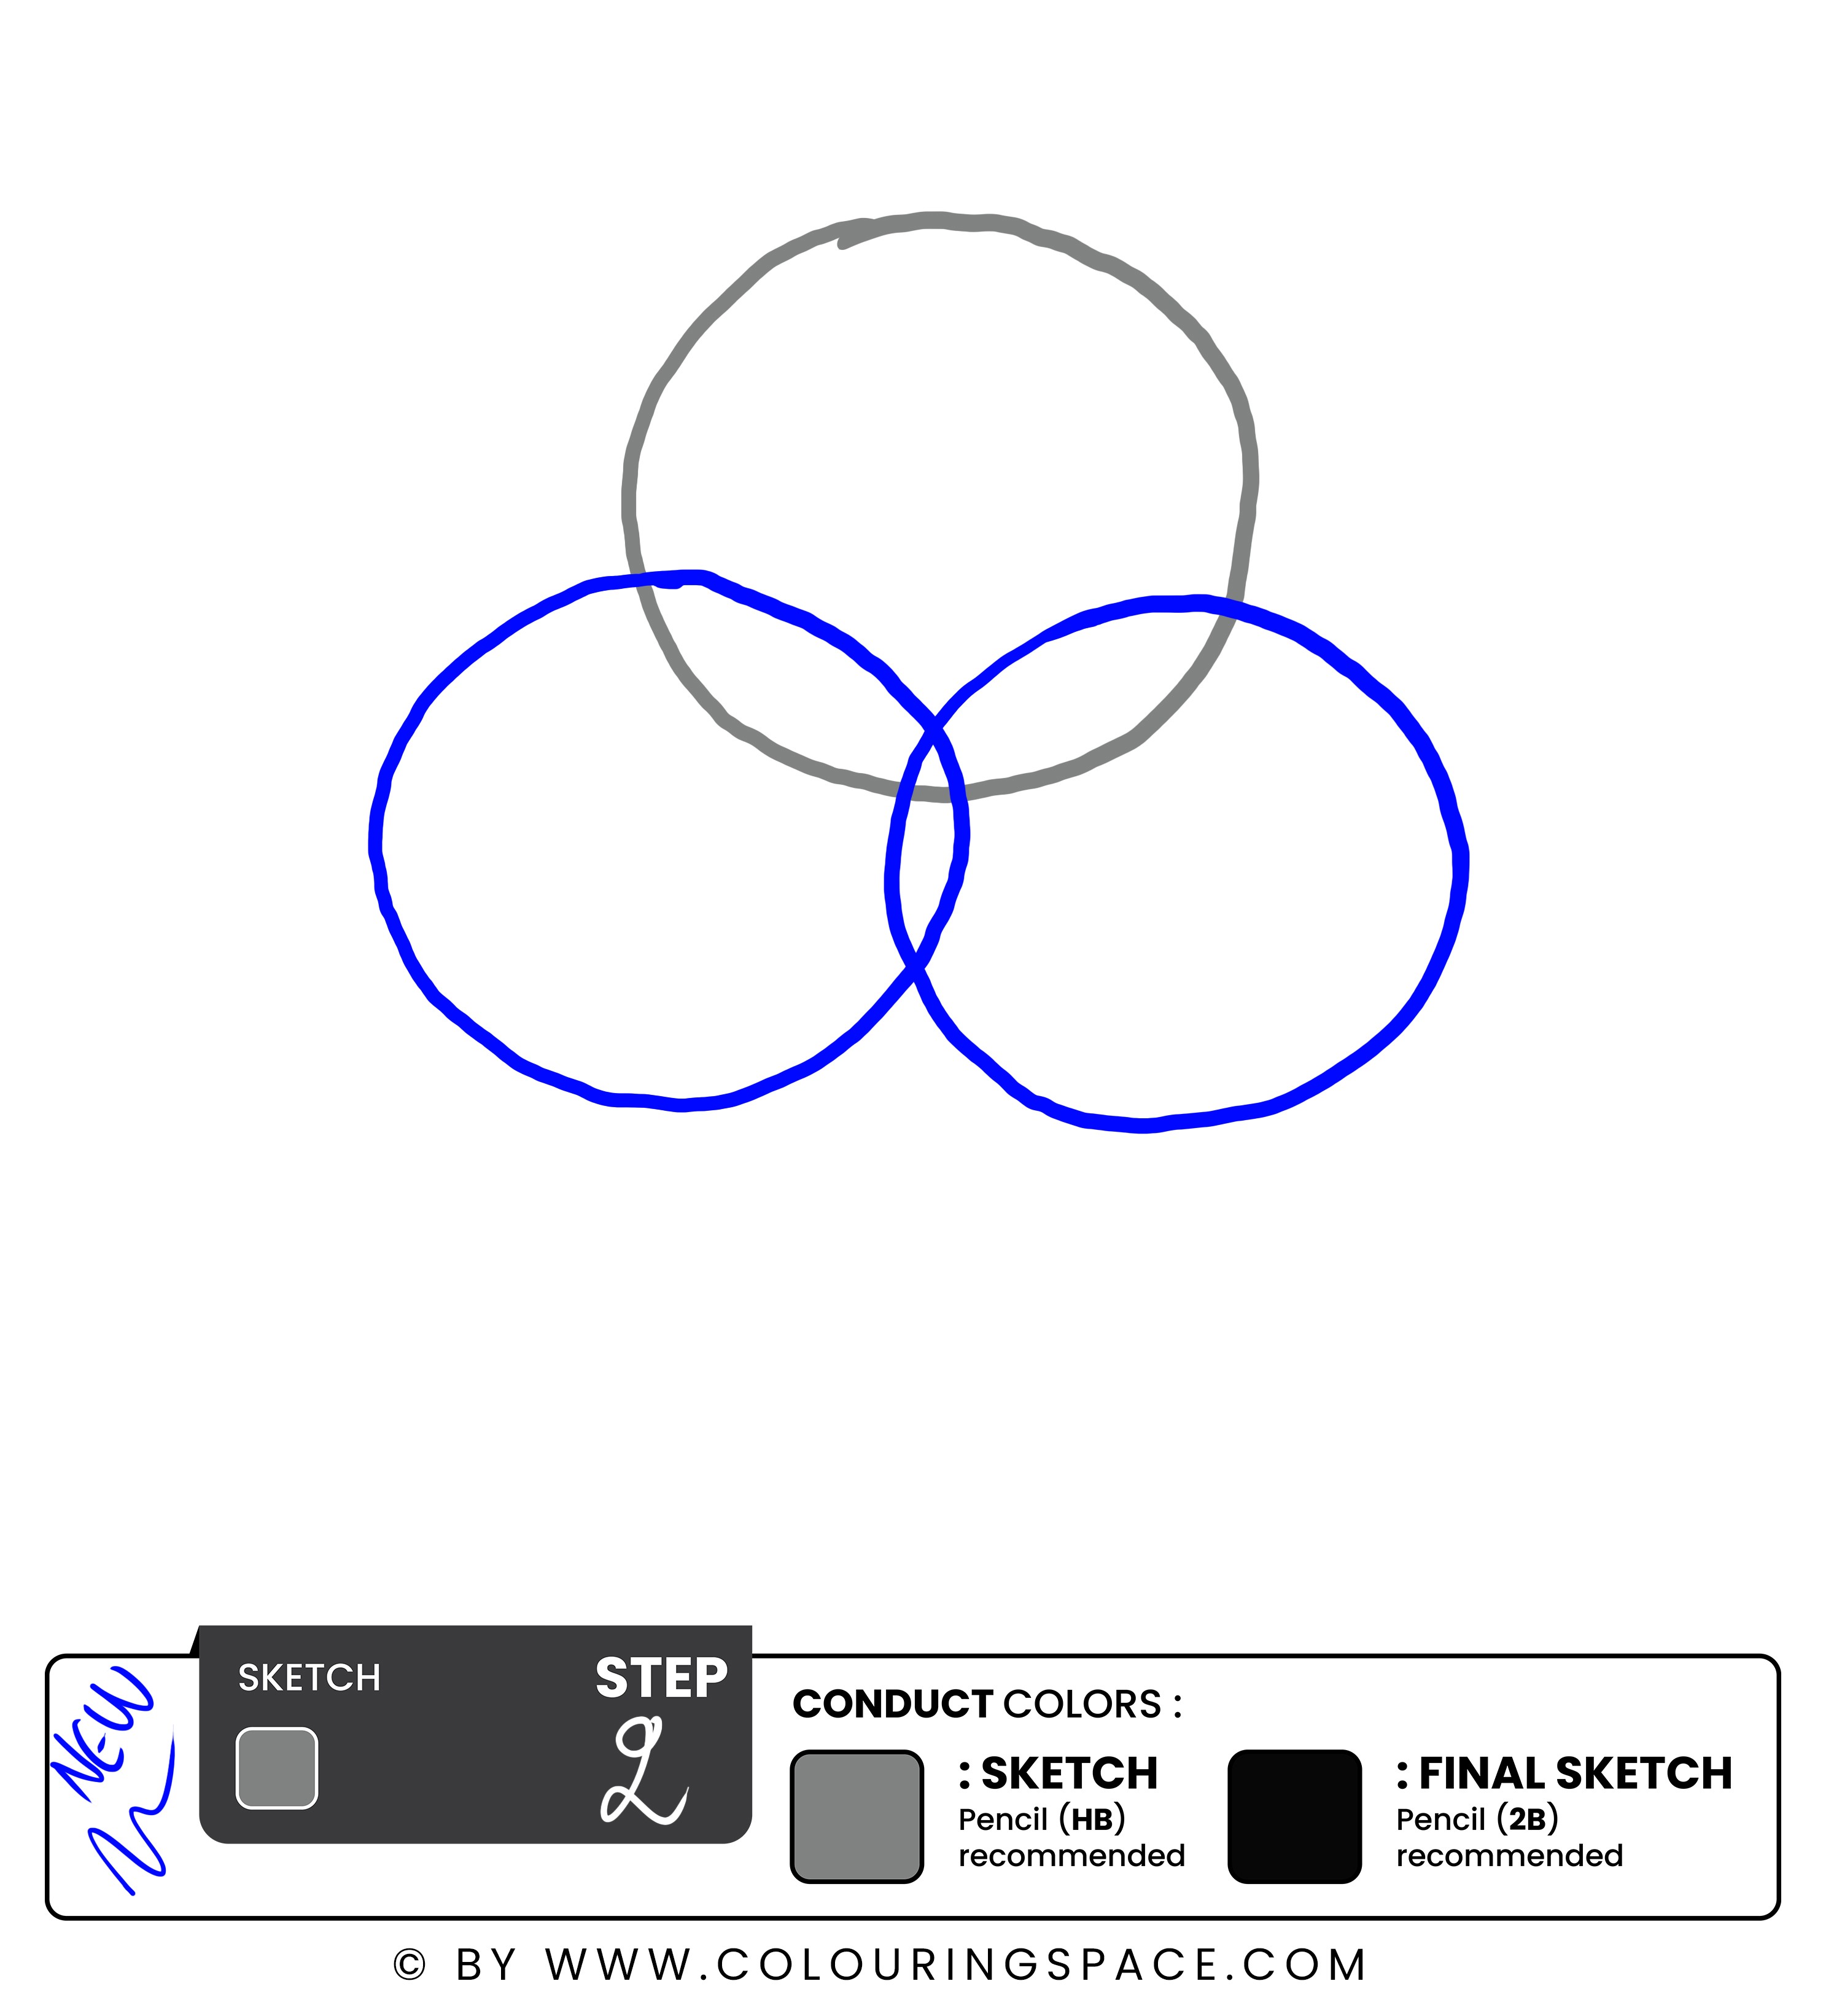
The second step might look confusing but don't worry. We are here to help you out.
You have to draw two more geometrical circles in close proximity to the first one. Hold a protector, and keep the pencil tip inside the first circle. Make sure you keep the tip near the boundary of the first circle, not in the middle of it.
Then start drawing the second circle. Repeat this process again on the right edge. You will see three geometrical circles emerging out of your sketch, making a flower-type pattern.
There you go! Isn’t that amazing?
Let’s move on to the next step.
Step 3 - Connect the Boundaries
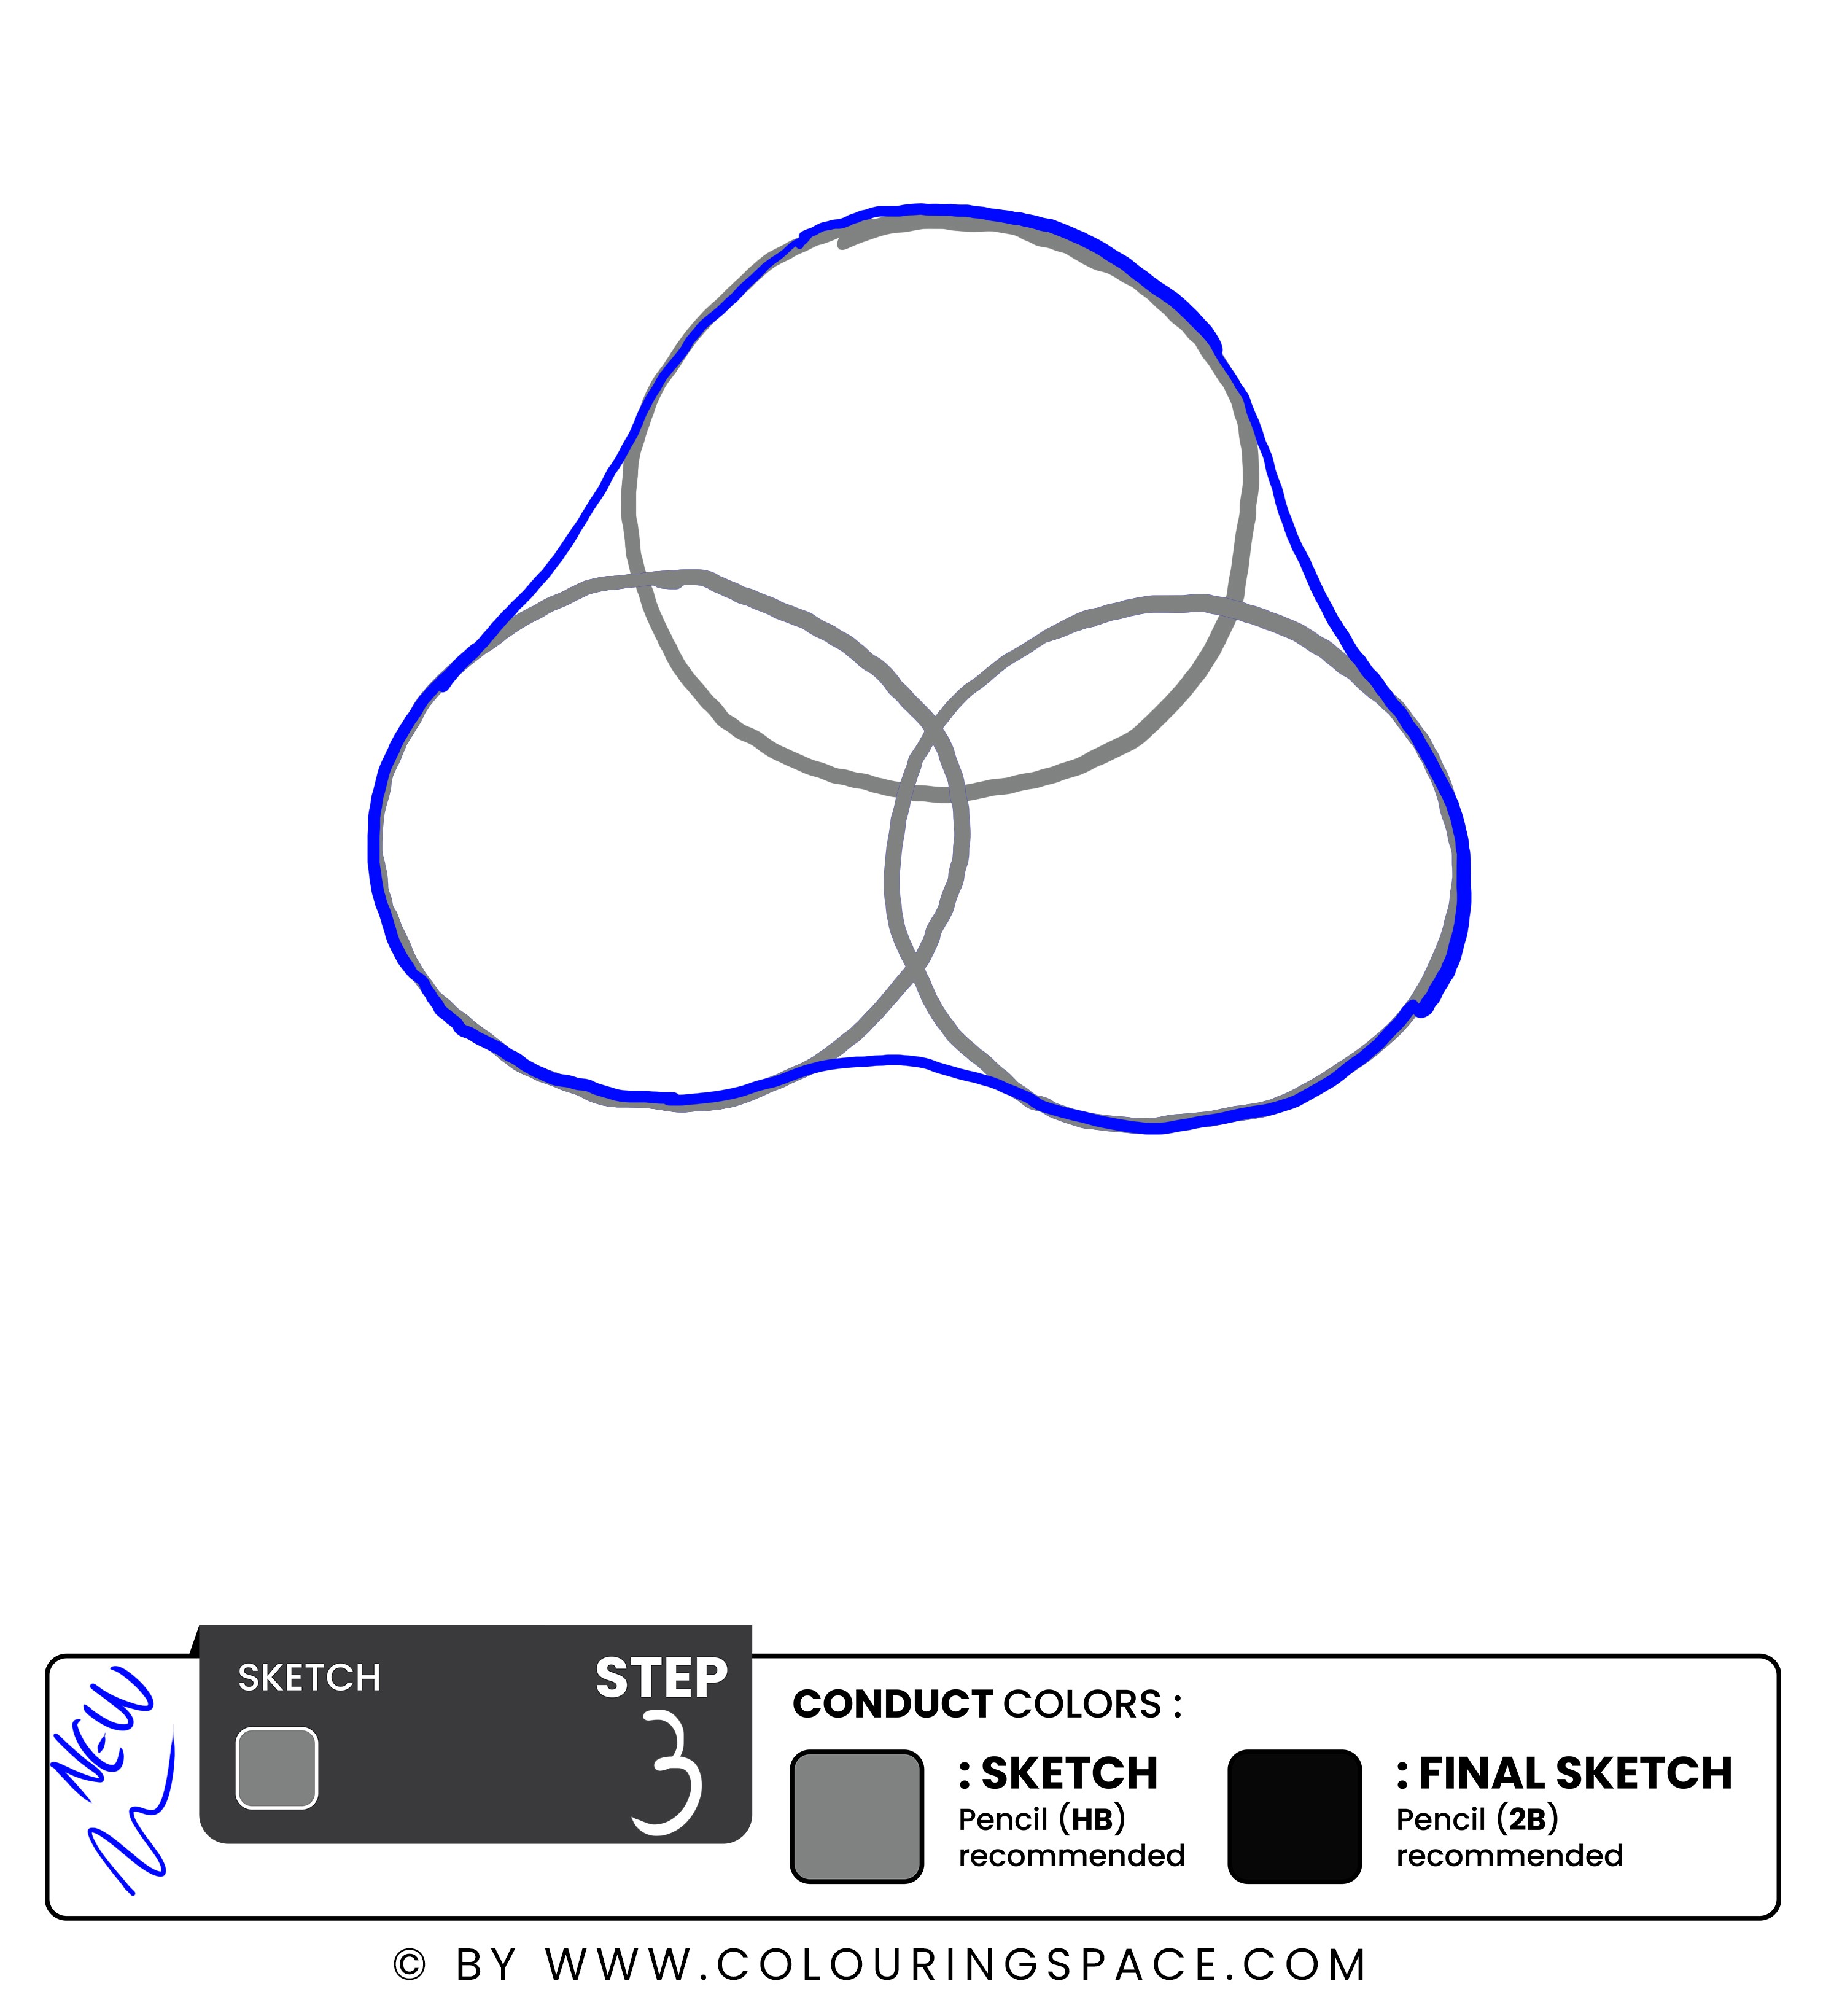
You already have three circles. You just have to connect their boundaries with a curved line. Starting from the top circle, make a curved line on the right edge towards the second circle. Then repeat the process on the left edge as well. This way, you will connect three circles from the left and right sides.
Make another curved line at the bottom and connect the two circles you had drawn in step two. As you can see, all three (3) circles now act as a single entity, or you can say a single shape representing Goomba’s body posture.
Step 4 - Draw the Body Parts
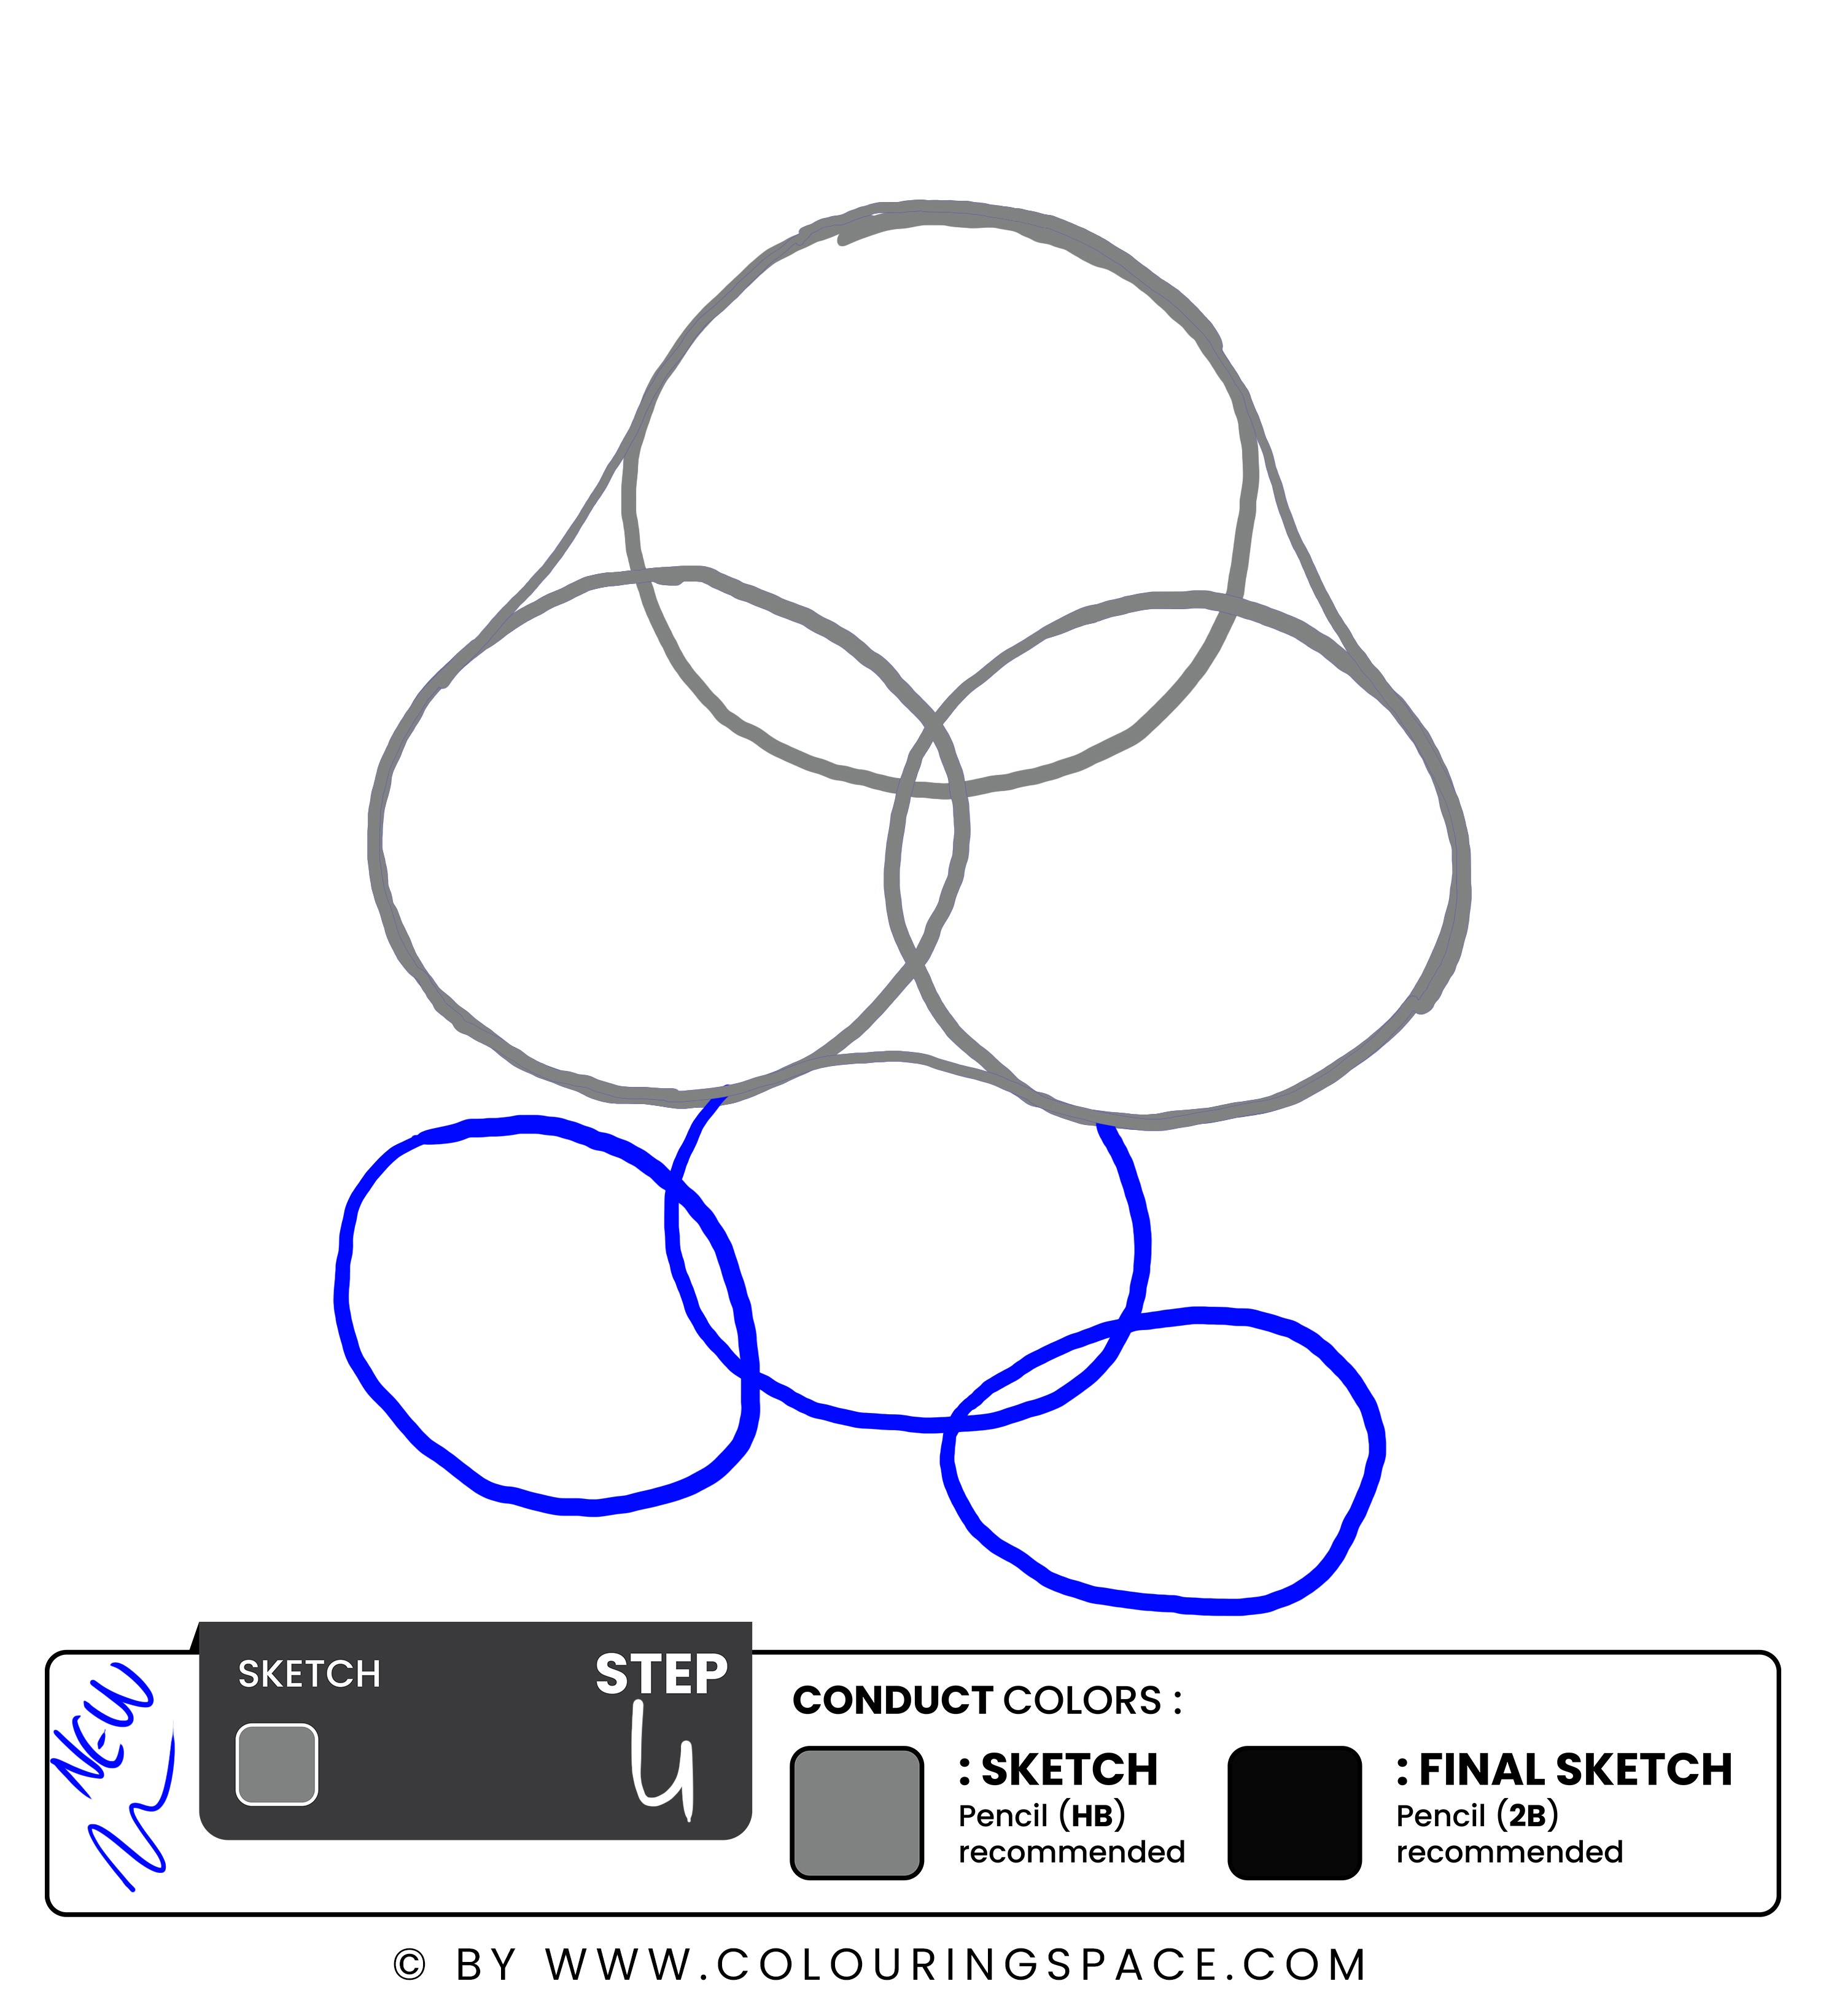
Step four is about making other body parts of Mario Goomba’s character. So as you can see, the character has tiny legs and a mini stomach. You just have to draw a fine circle with your hand at the bottom for the stomach. No need to use a protector for that.
Then, make two more oval shapes alongside the circle at the bottom for his tiny legs. One oval shape on the right side and one on the left.
There is a tip to make it realistic; ensure the ovals vary in shape. The left one should be bigger than the right one as Goomba’s real character. And it should be slightly tilted. There you go, you can see his legs and body coming shaping out in this sketch!
Step 5 - Sketch Out the Eyebrows
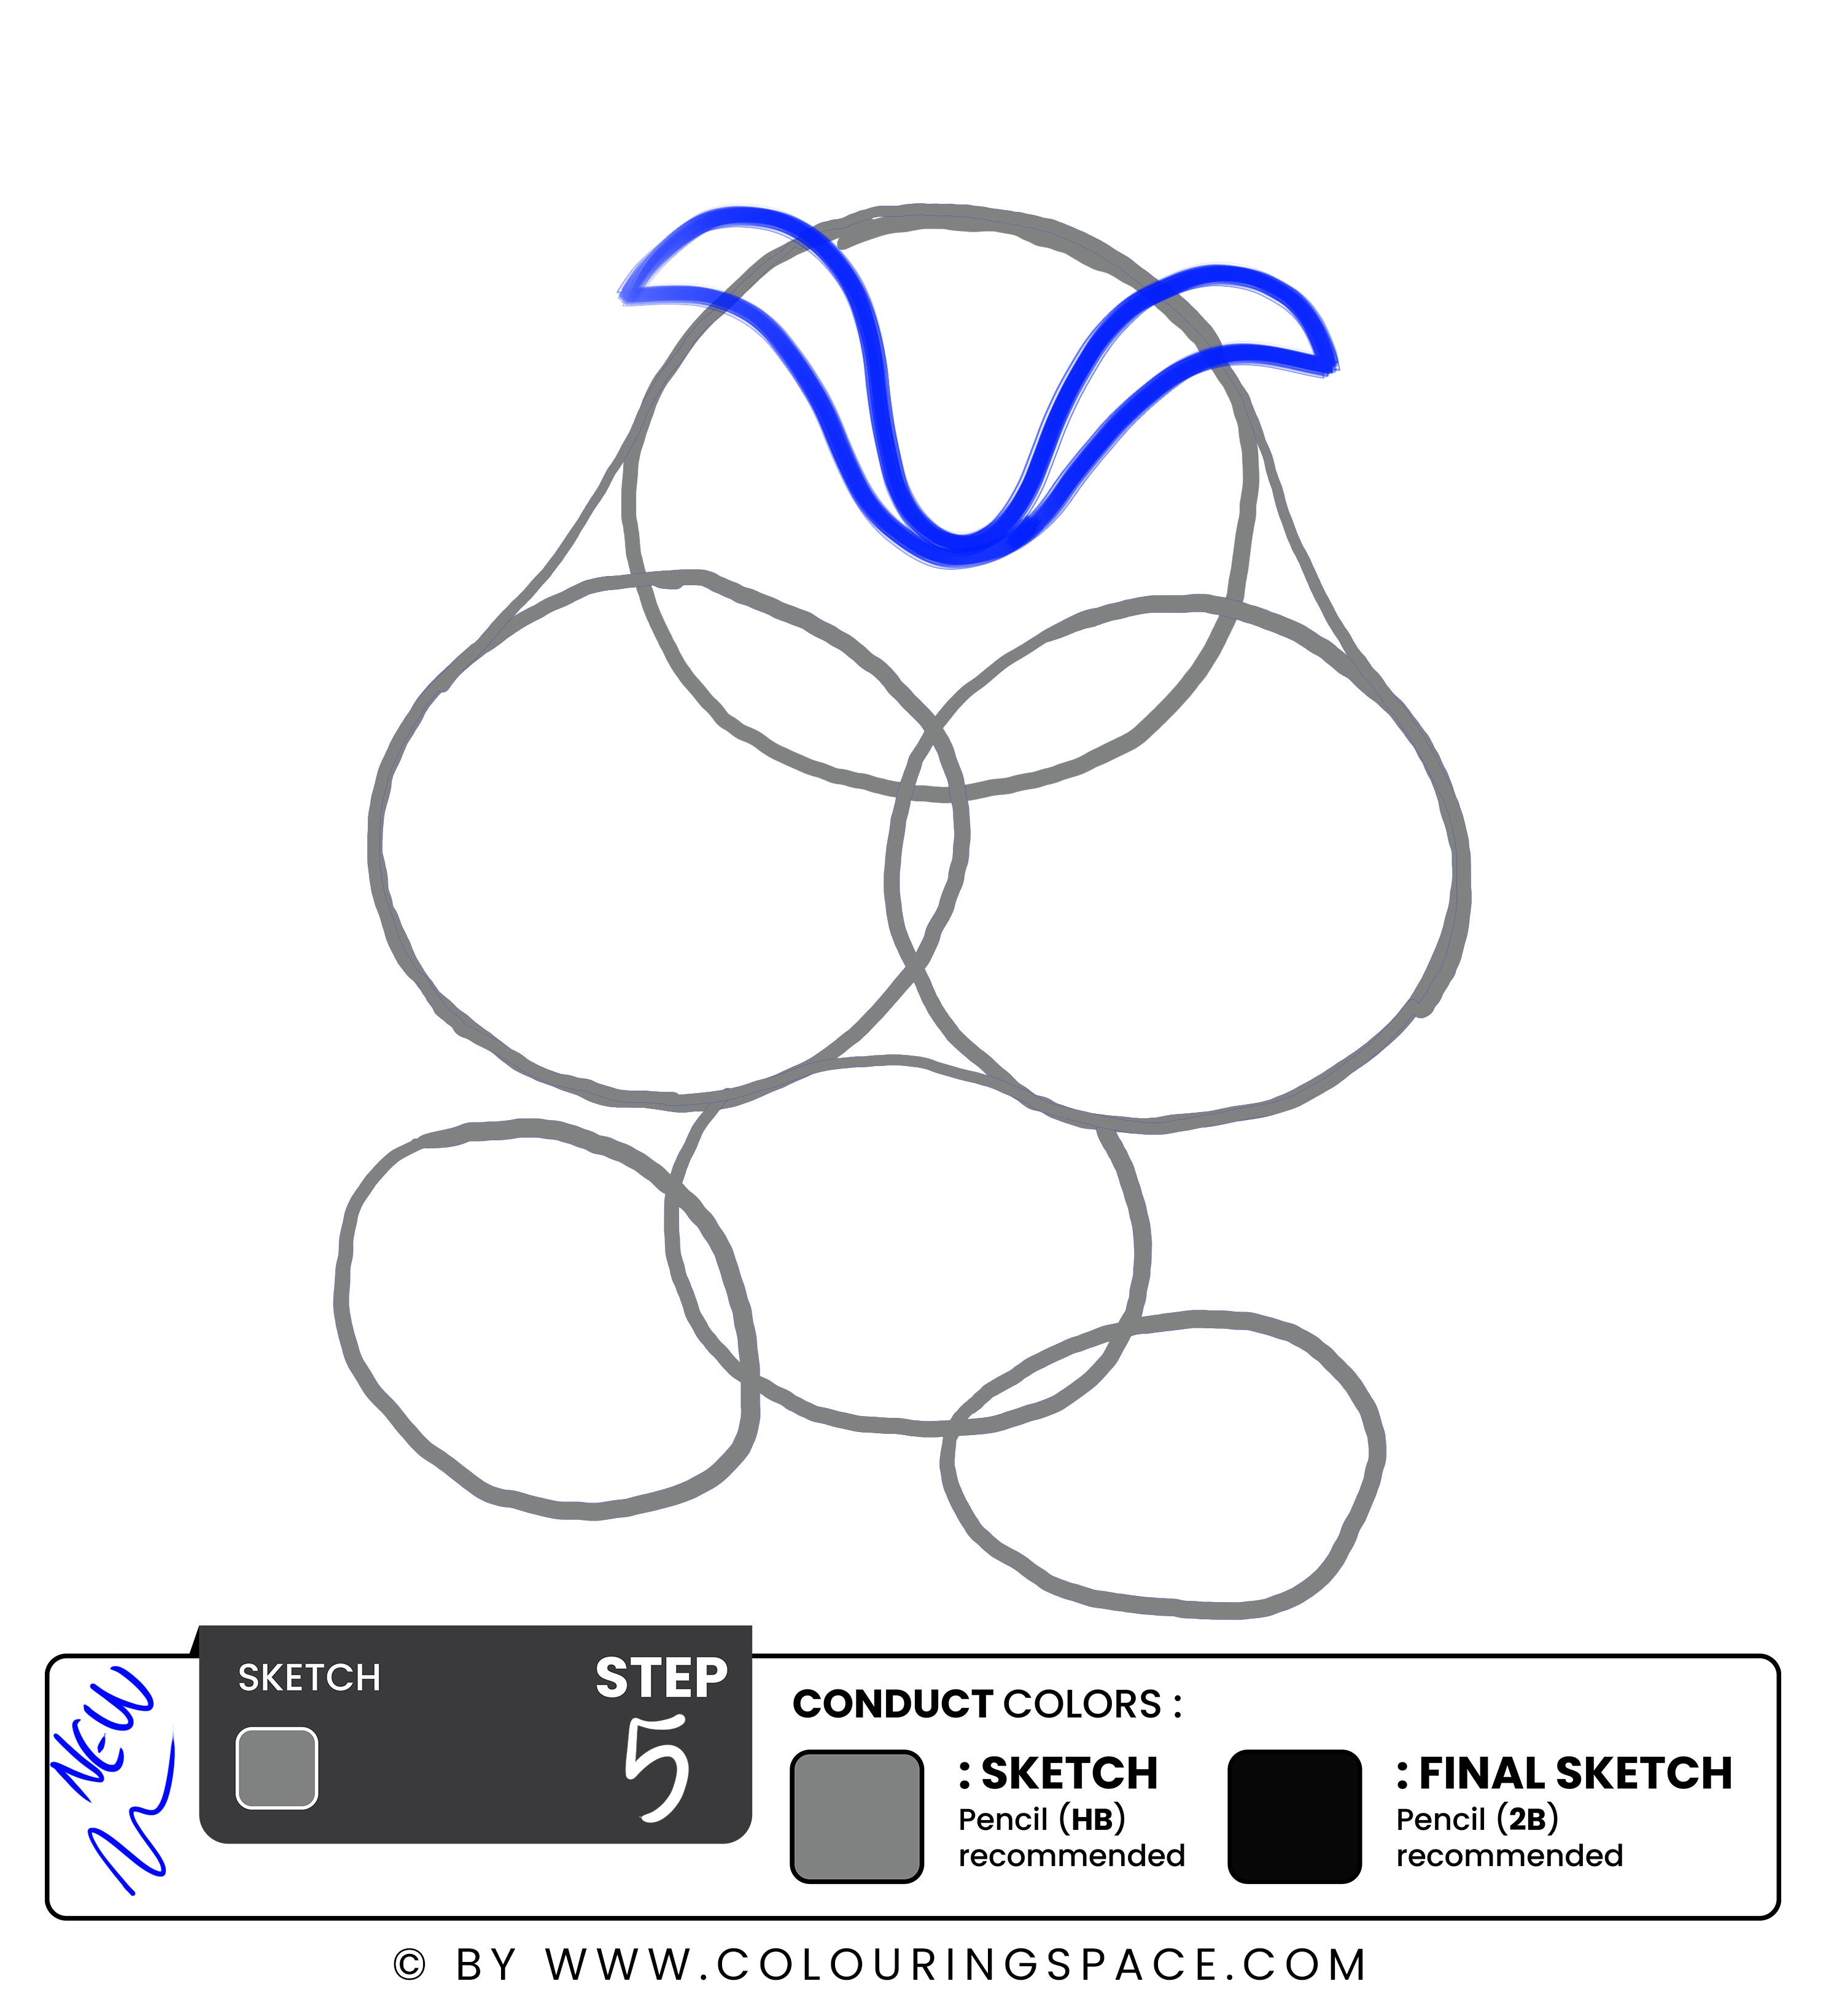
In this step, we will work on Mario Goomba’s facial details. Starting off with his spooky eyebrows. If you recall the character’s facial expression, it's quite serious, frowned face with something fishy in his eyes. We will try to sketch out a similar look.
Let’s focus now.
Start by making a u shape on the top of his head. Extend the u shape in both directions and make the edges slightly curved. Now make another u shape in close proximity to the first one. But make It curvilinear and attach it with the first one at the end by closing the loop. In this way, you can easily draw those fierce eyebrows of Mario Goomba.
This step is slightly tough because you will need a strong grip on your pencil. Just take it slow and practice hard. I am sure you will get there in no time.
Step 6 - Draw the Eyes
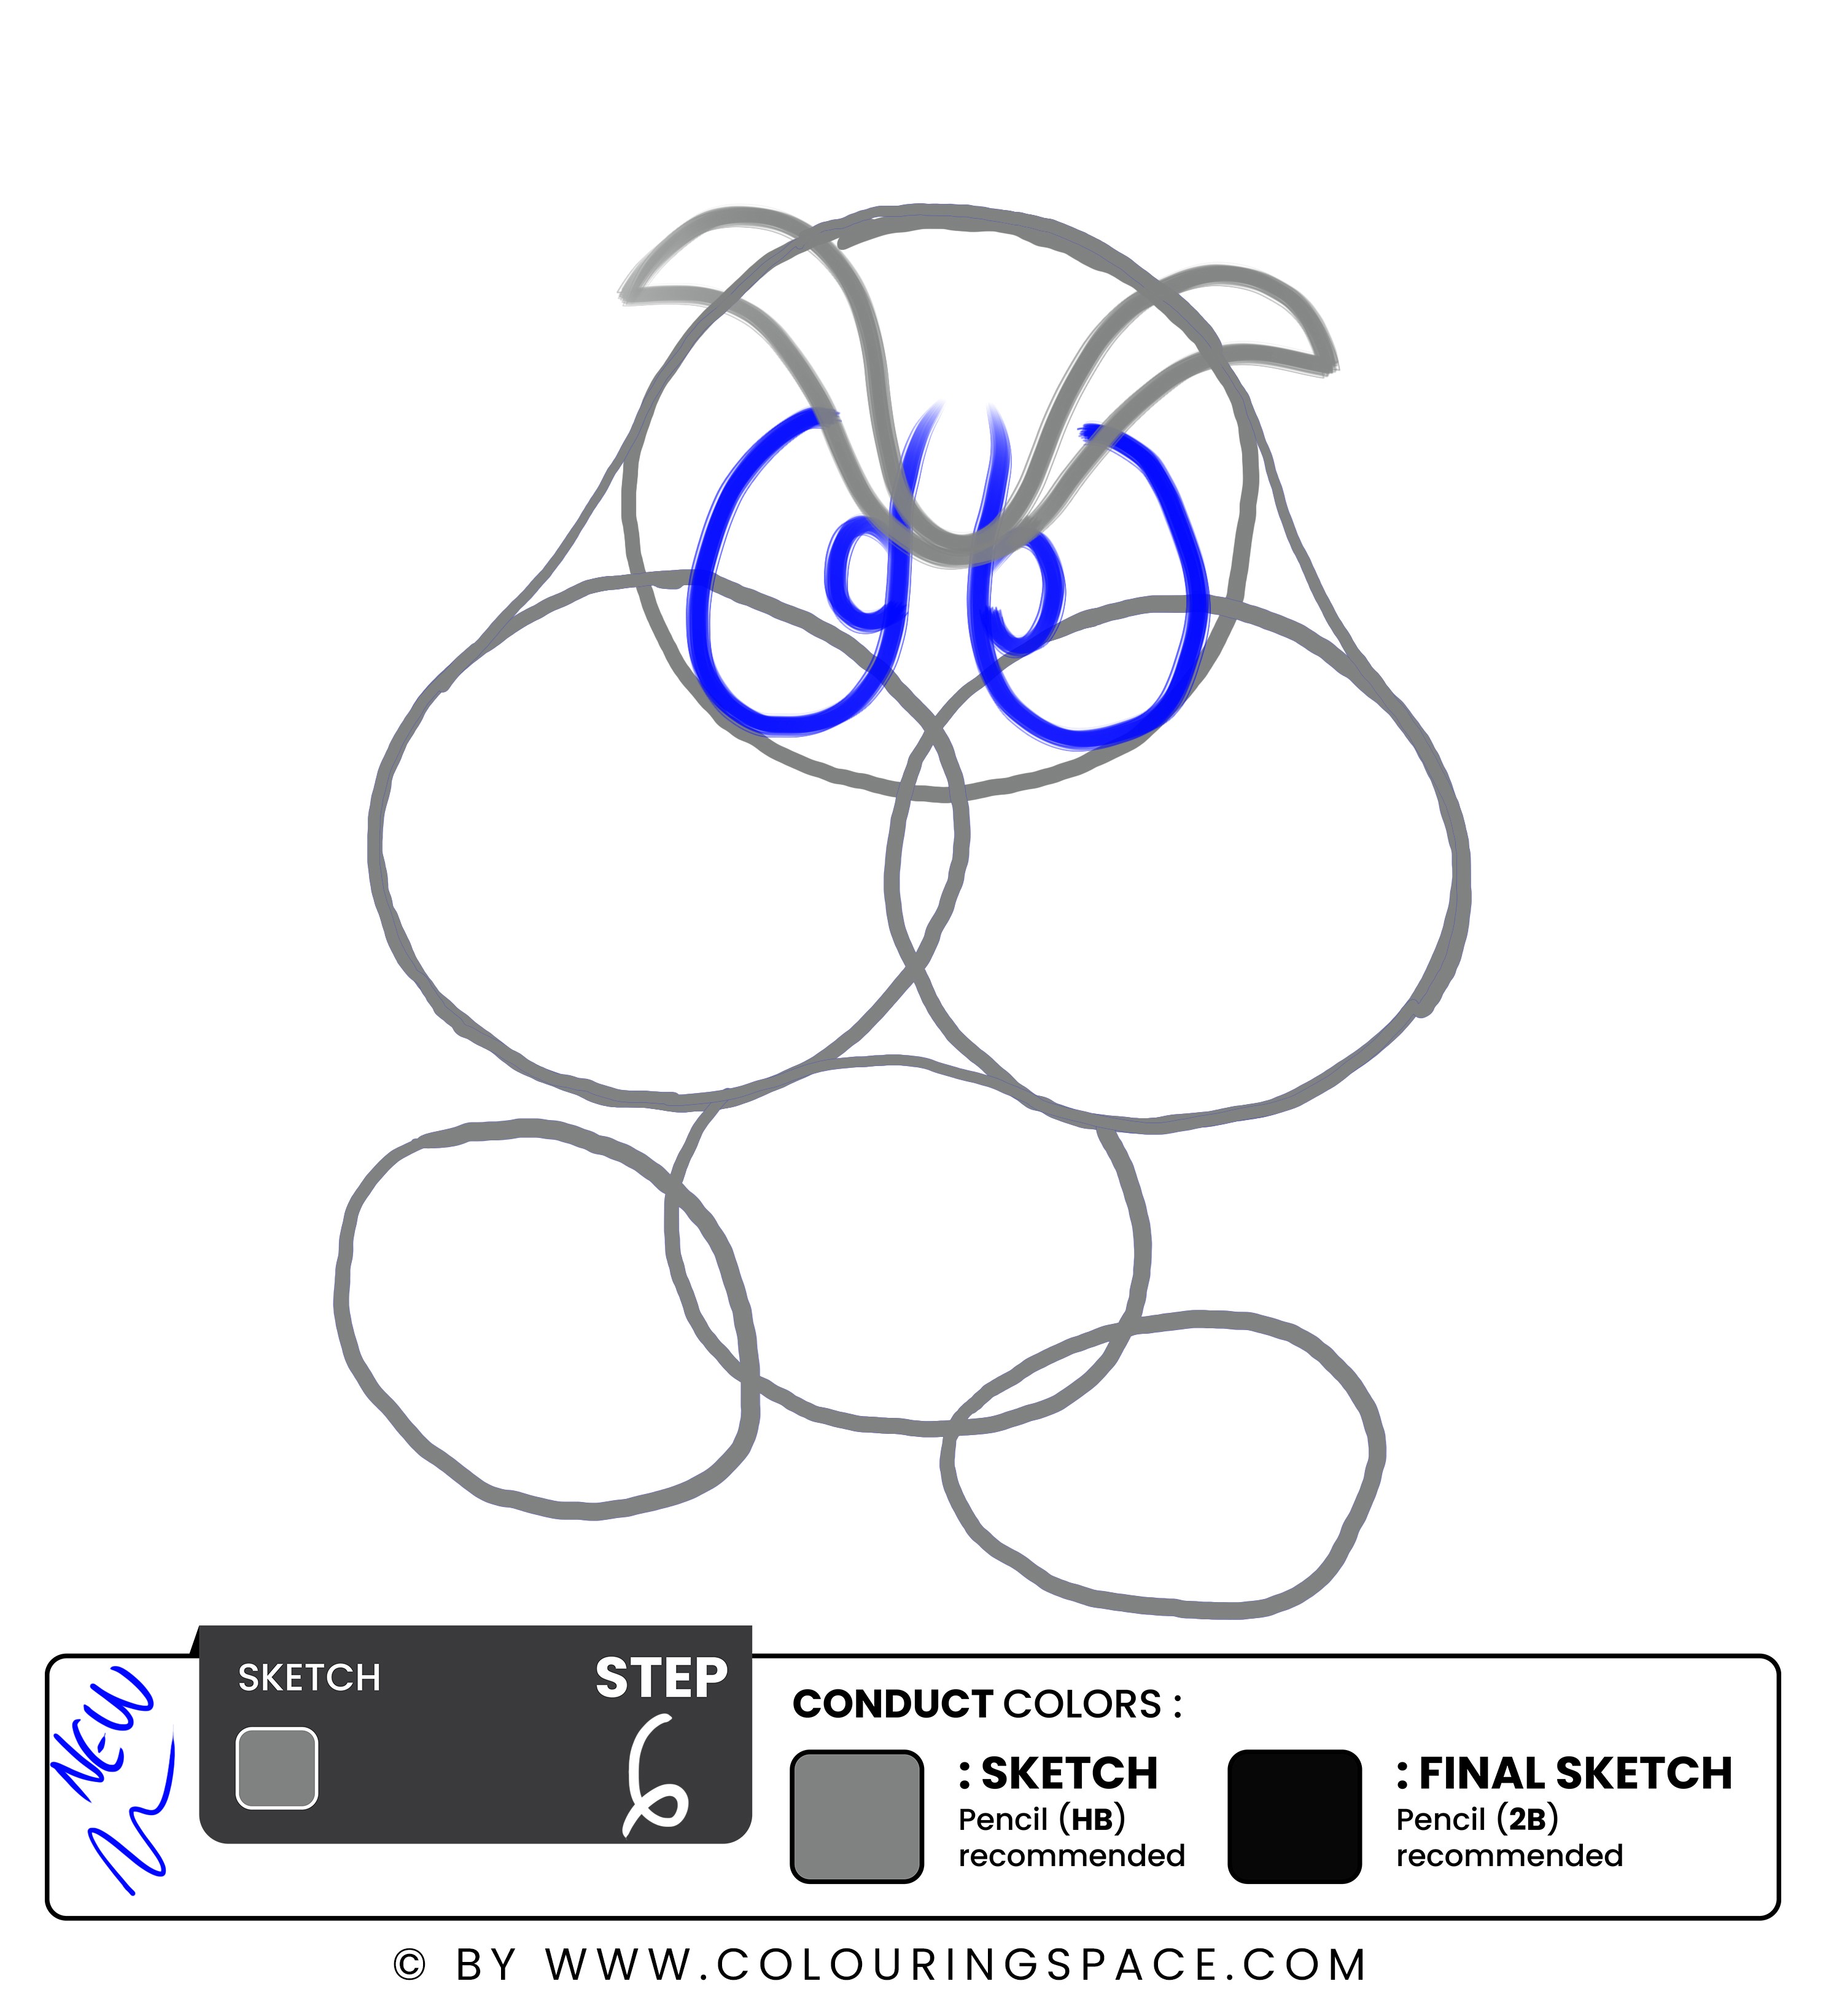
This step is about making eyes for this troublemaker. Let’s start with two oval shapes and make them around the edge of his eyebrows. You don’t need to make a fine shape. Just go with the flow and draw an oval shape for both eyes. One at the left and the other at the right. Both will be of the same size.
After drawing two bigger oval shapes, draw two more small ovals inside the bigger ones. These shapes will represent Mario Goomba’s eyeballs. Add two curve lines around the top edge of both eyes to add more details. This will give an impression of his aggressive facial expression.
I know it's not easy as it sounds, but you have been doing great up till now. Keep going and start making these troublesome eyes!
Step 7 - Drawing the Teeth and Lips
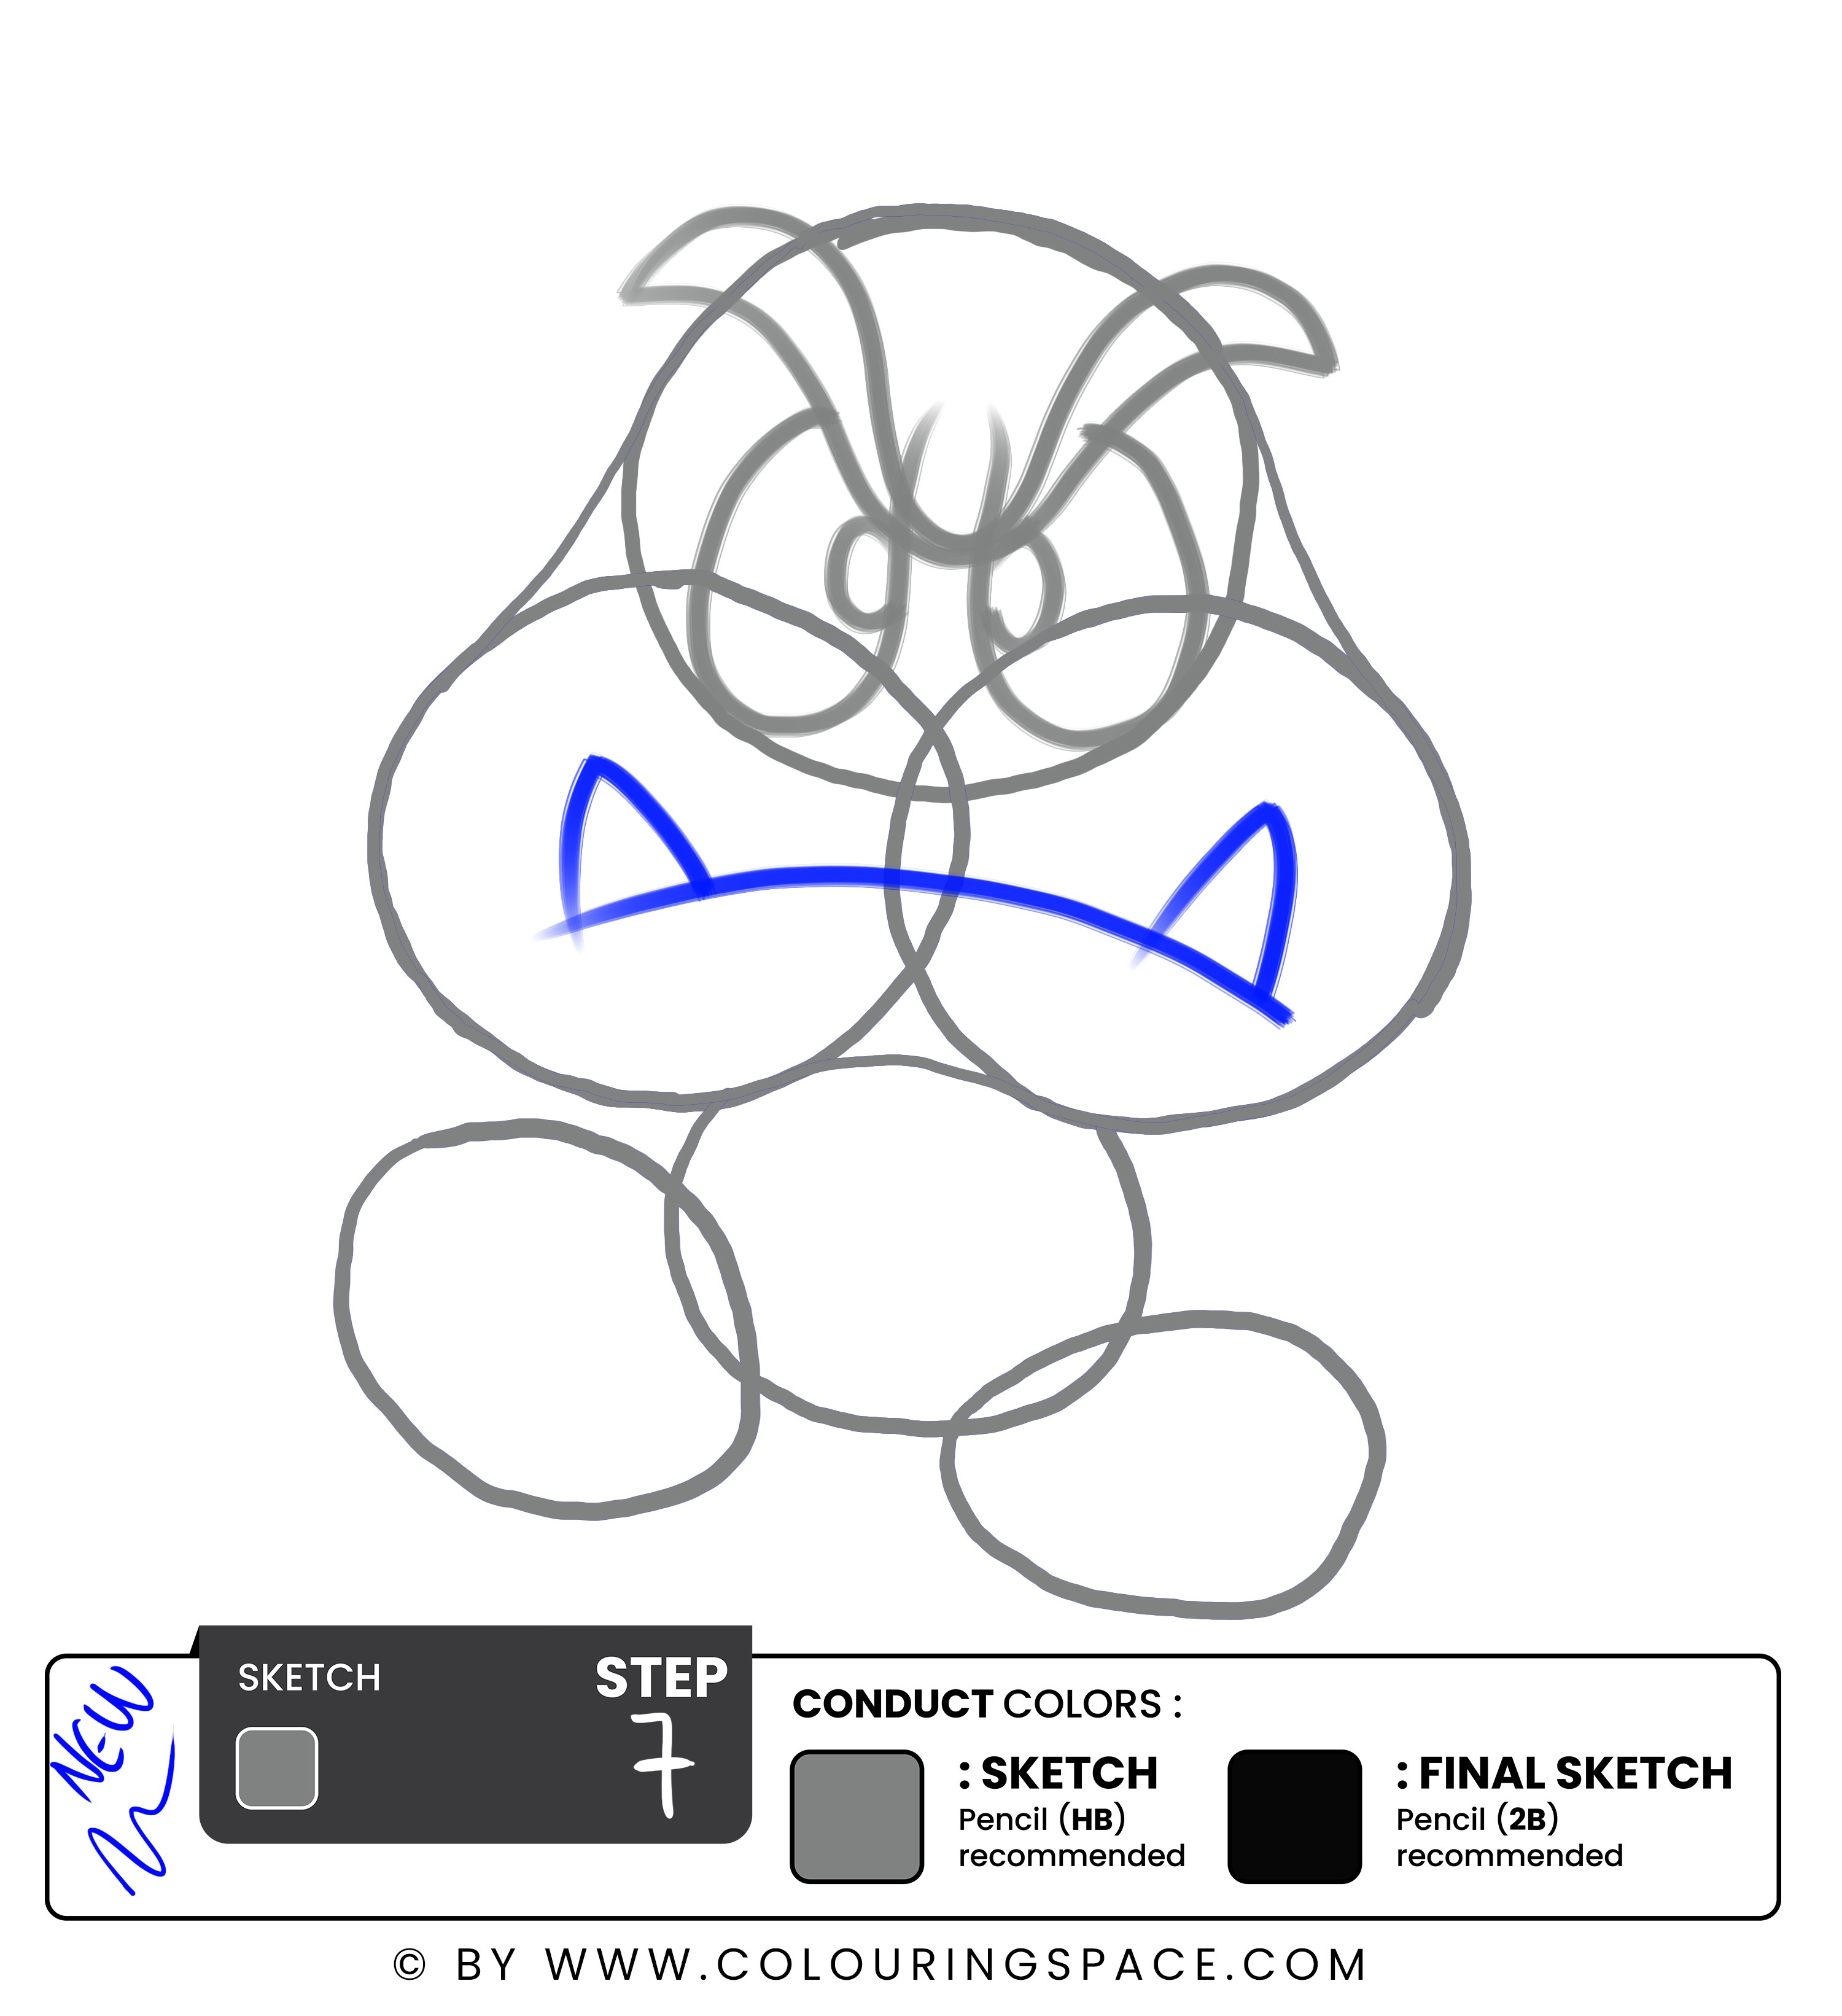
Now it's time to complete the entire face by adding the giant teeth and lips of Mario Goomba. This step is pretty straightforward. You have to make a sleek curve beneath the character's eyes. Then, draw two triangles on the top of this curve. One at the right and the other one at the left corner.
As you can see, your sketch evolved quite nicely. You can easily read it out as Mario Goomba. There is no doubt about it. You just have to make it presentable now. For that, you have to go into details.
So, let's get started with our next step.
Step 8 - Drawing the Paw Pad
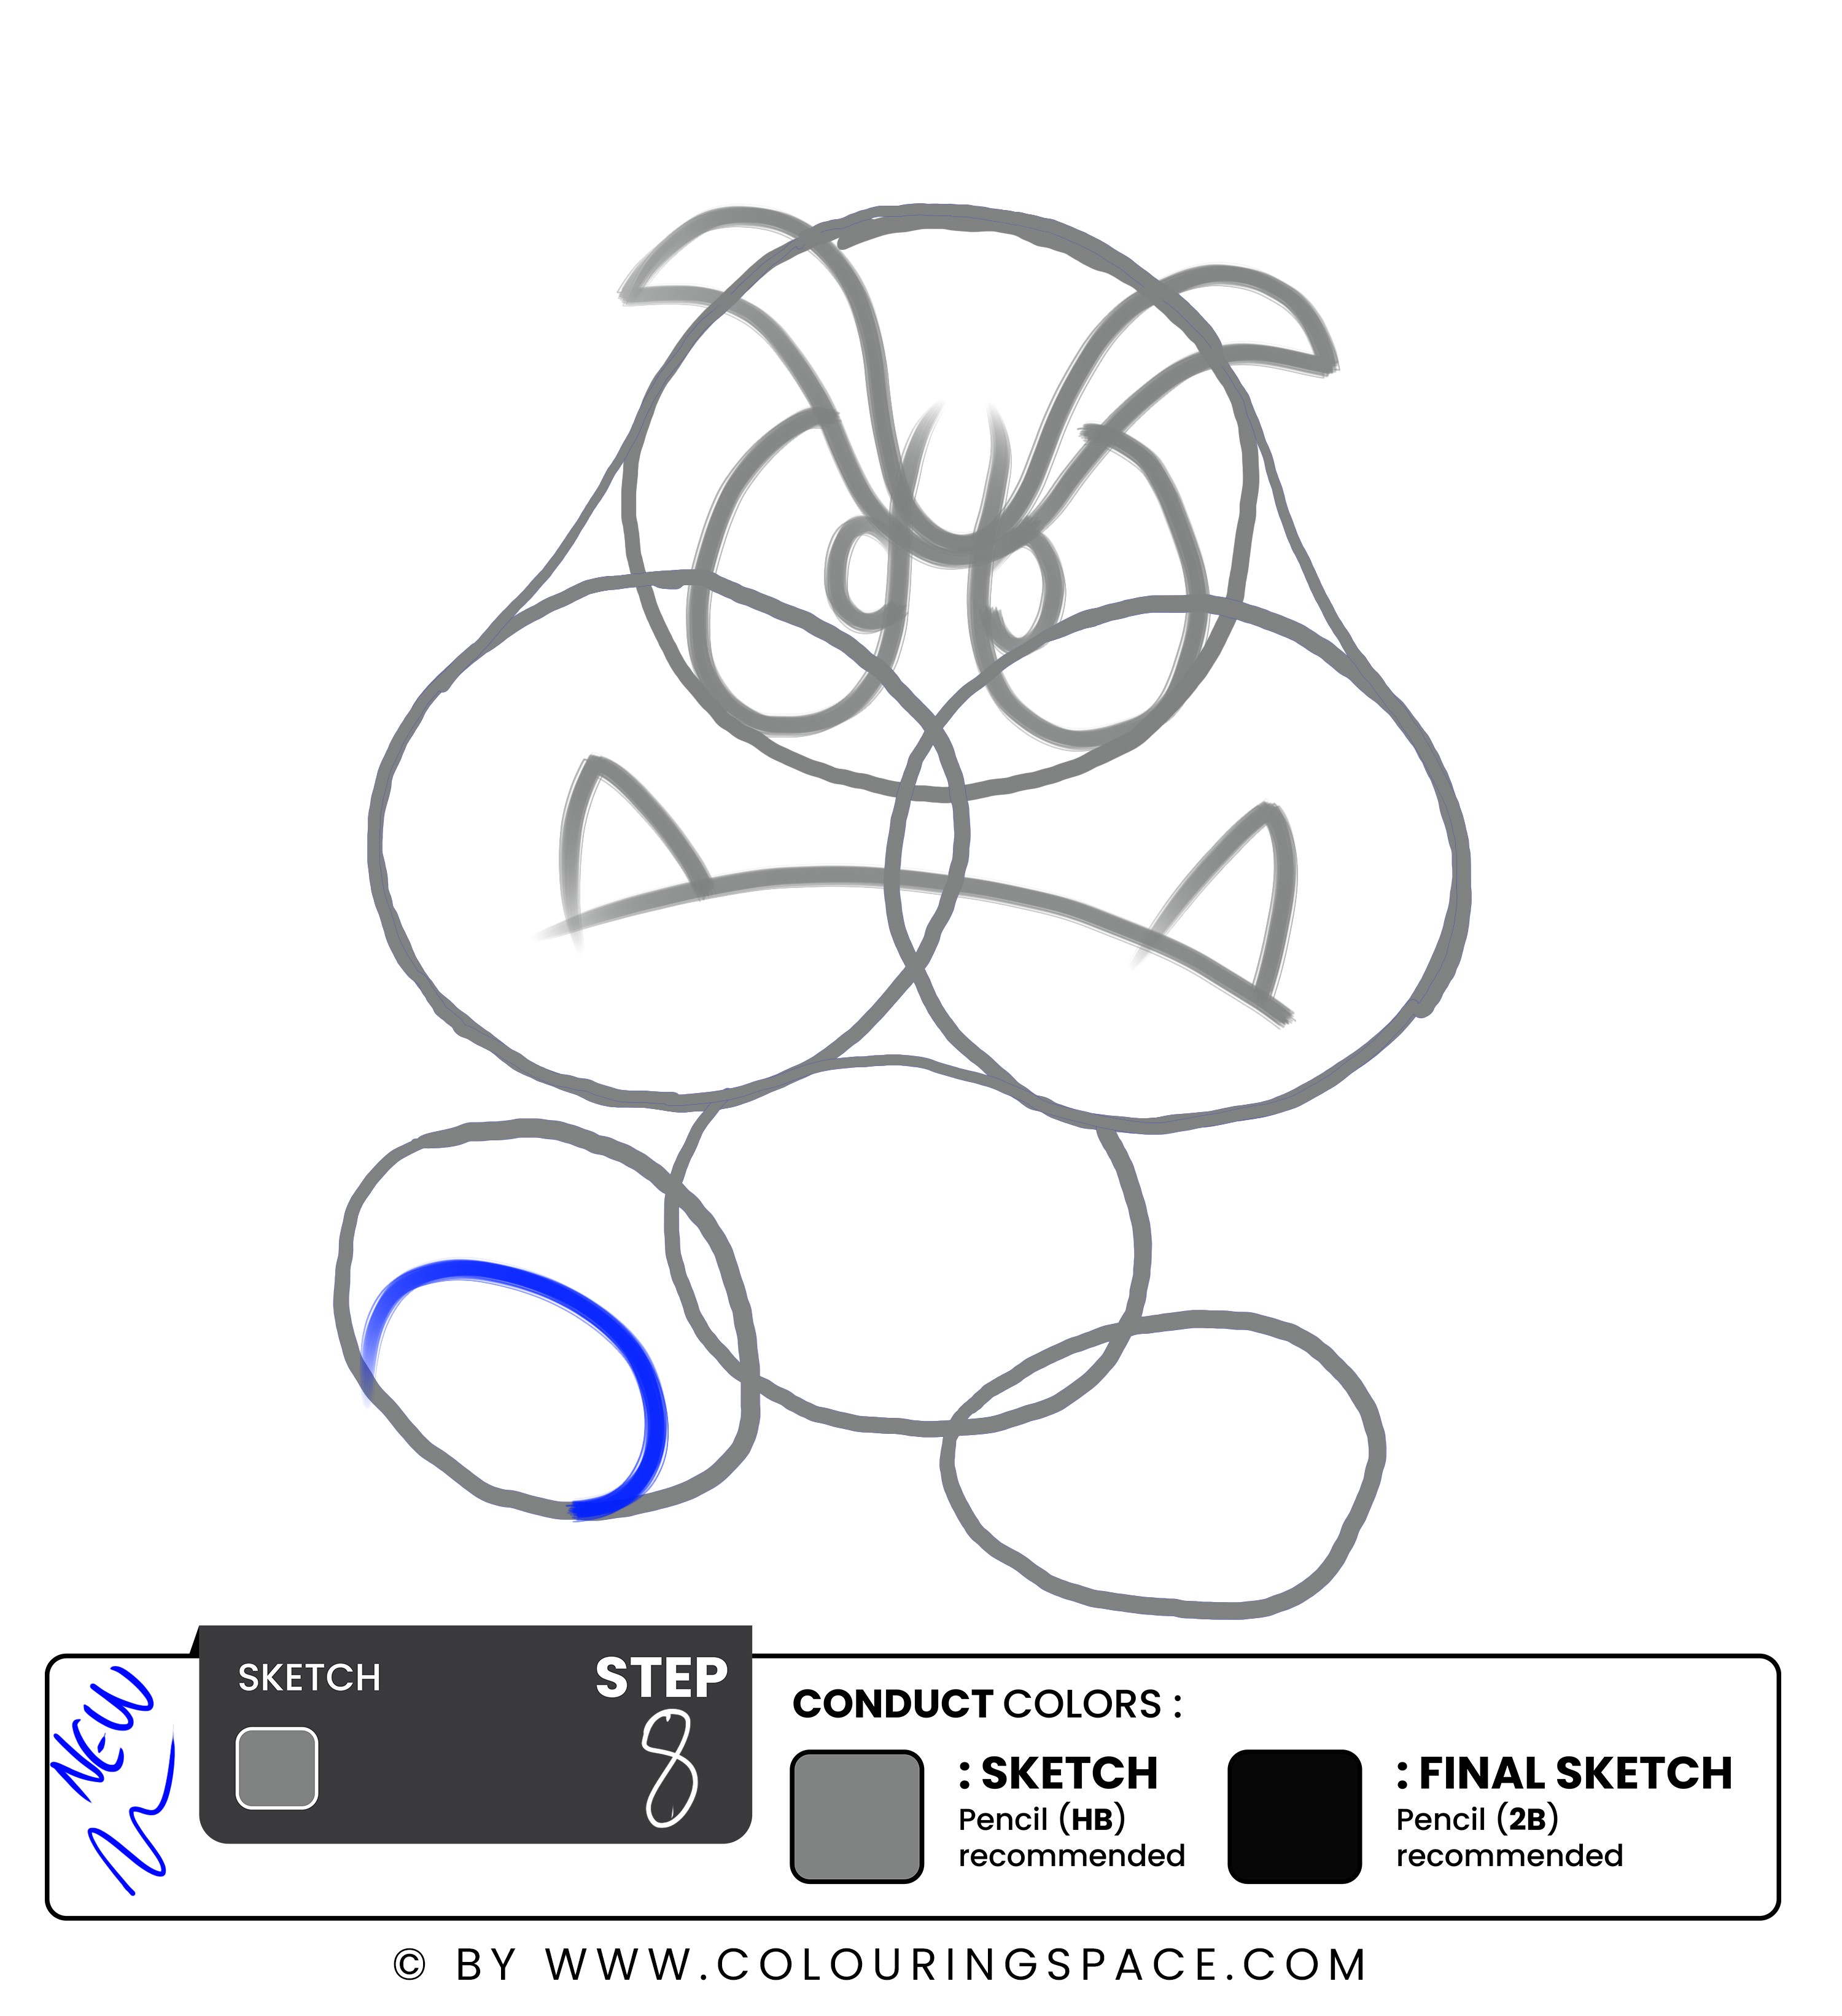
This step is quite simple. You are almost done with the face. Now move on to the bottom part, which is Goomba’s feet.
Remember, Mario Goomba has a paw pad underneath his feet. And it's pretty visible from his left foot. So, draw another irregular circle under his left foot and consider it his paw pad.
Isn't it relatively easy? Try it on yourself!
Steps 9-10-11 & 12 - Outline Facial Features and Upper Body Sketch, then Erase the sketch Guidelines
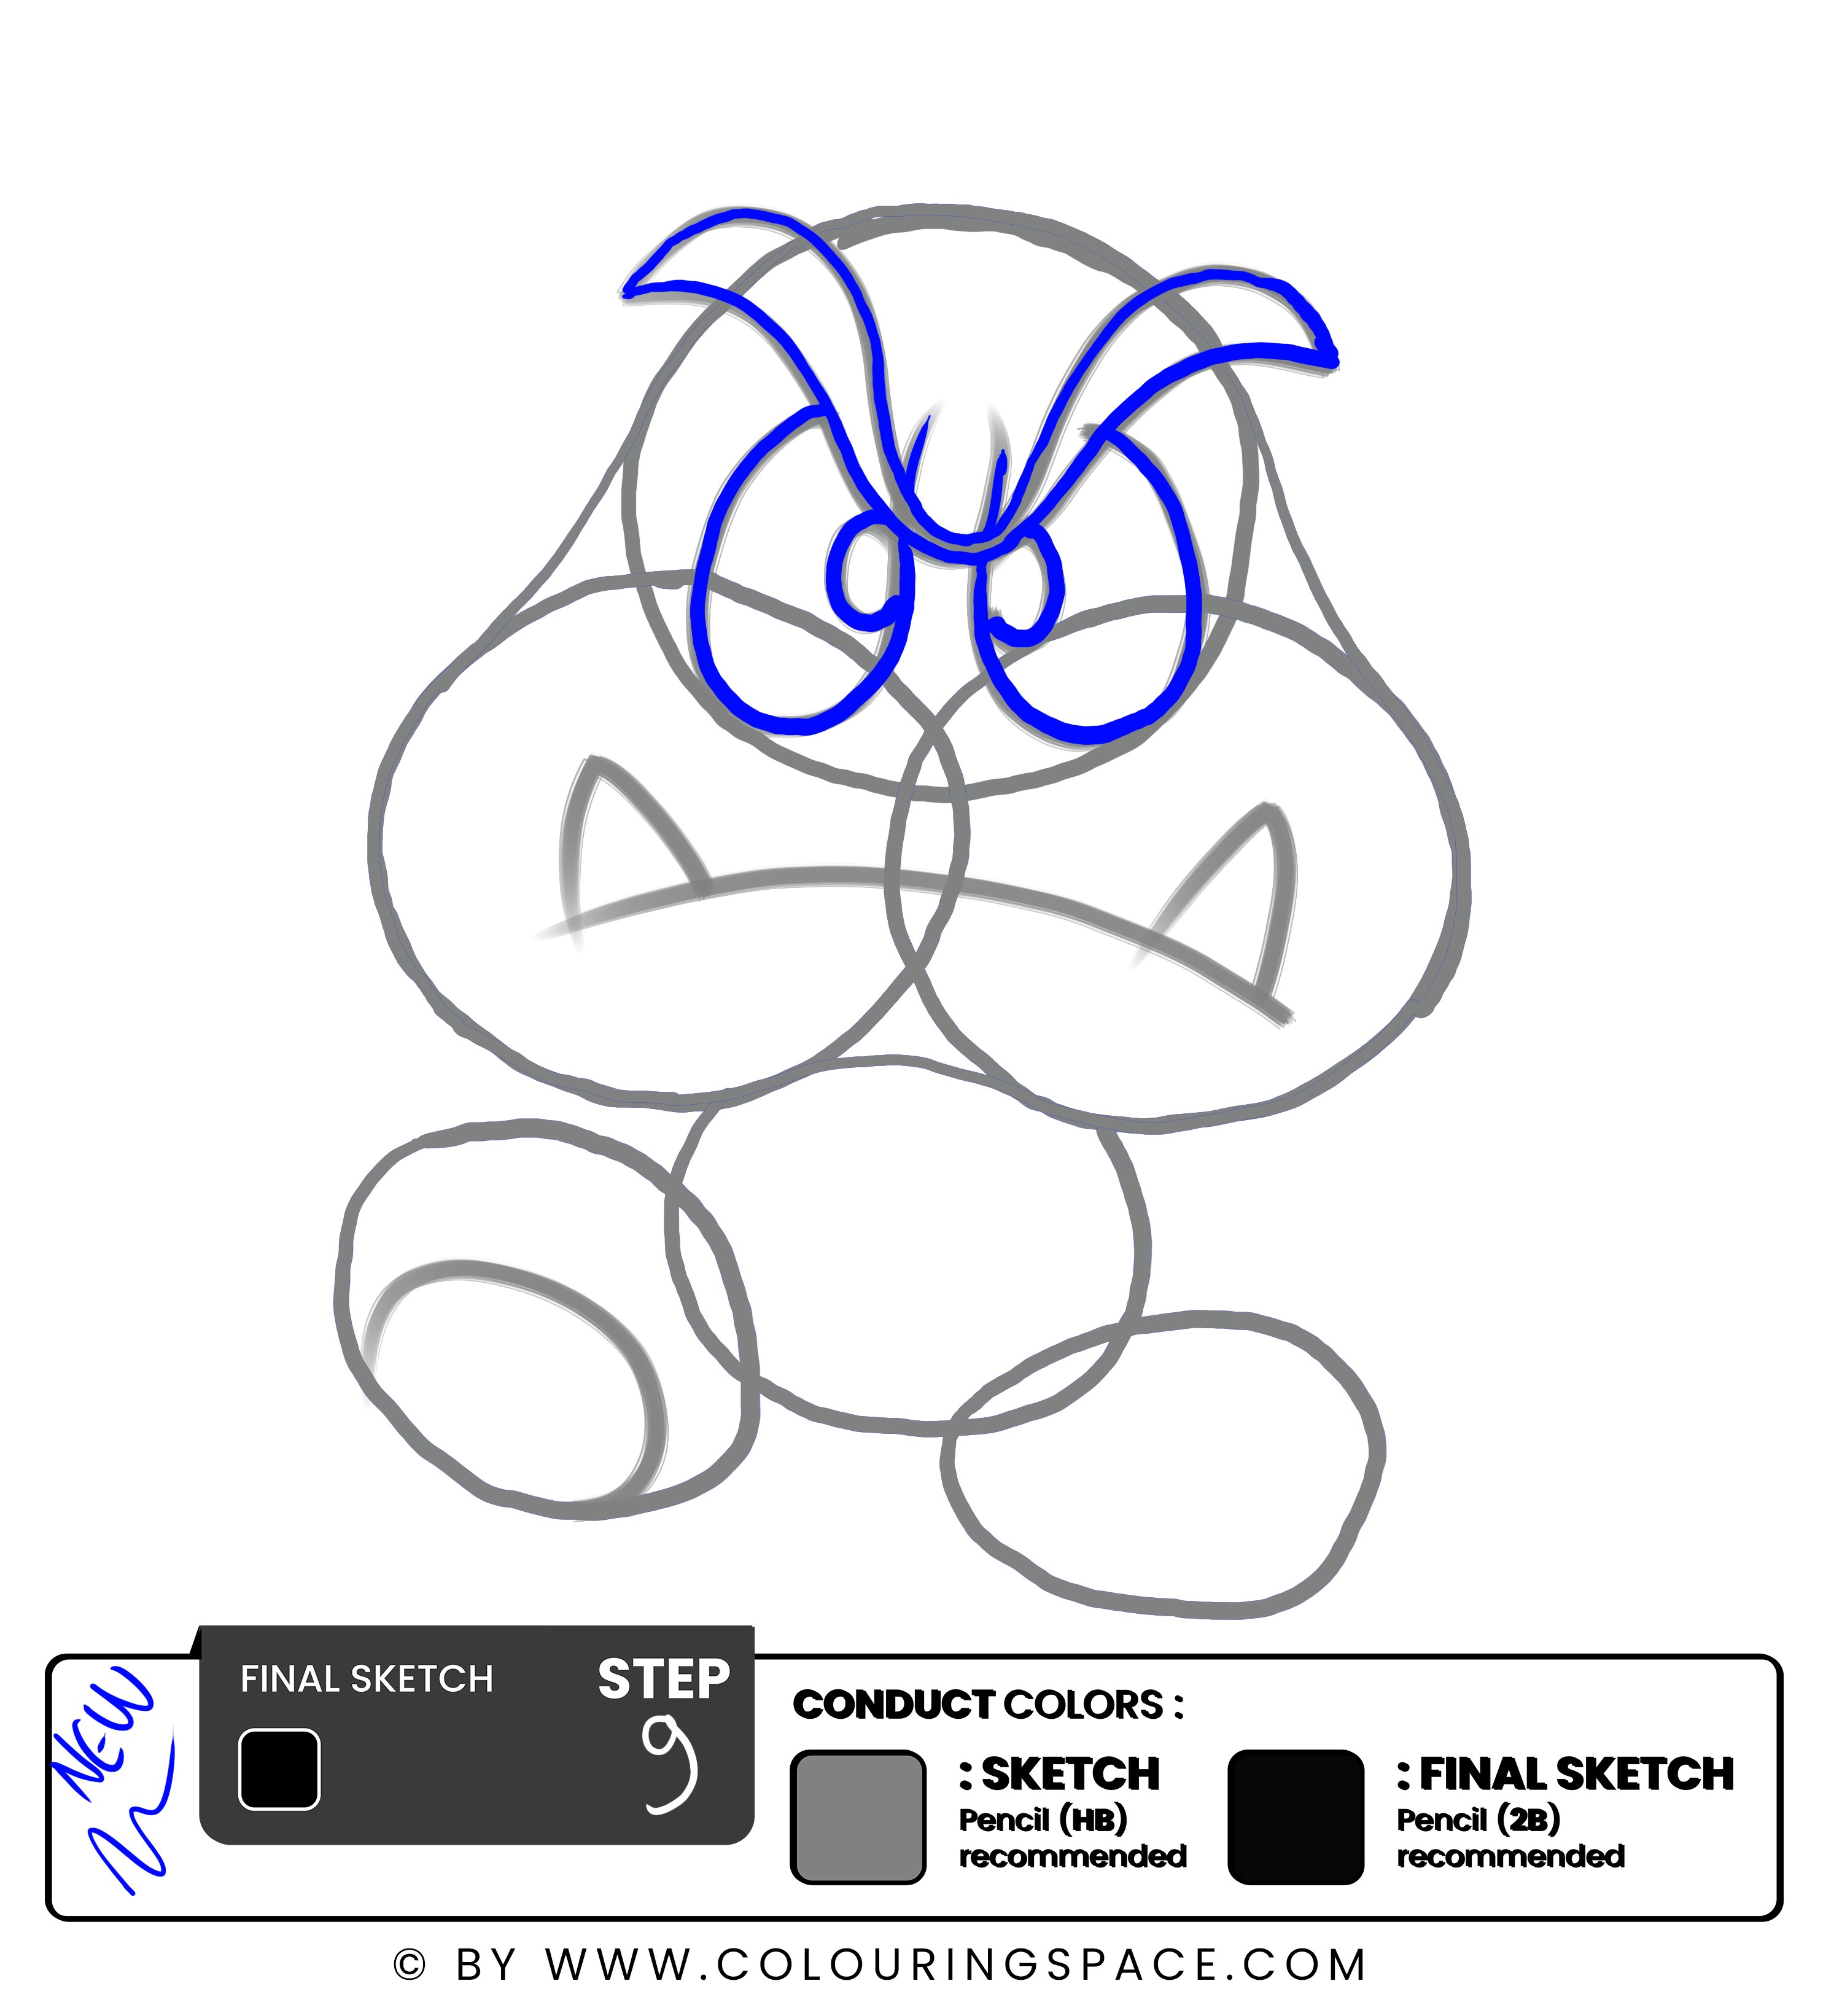
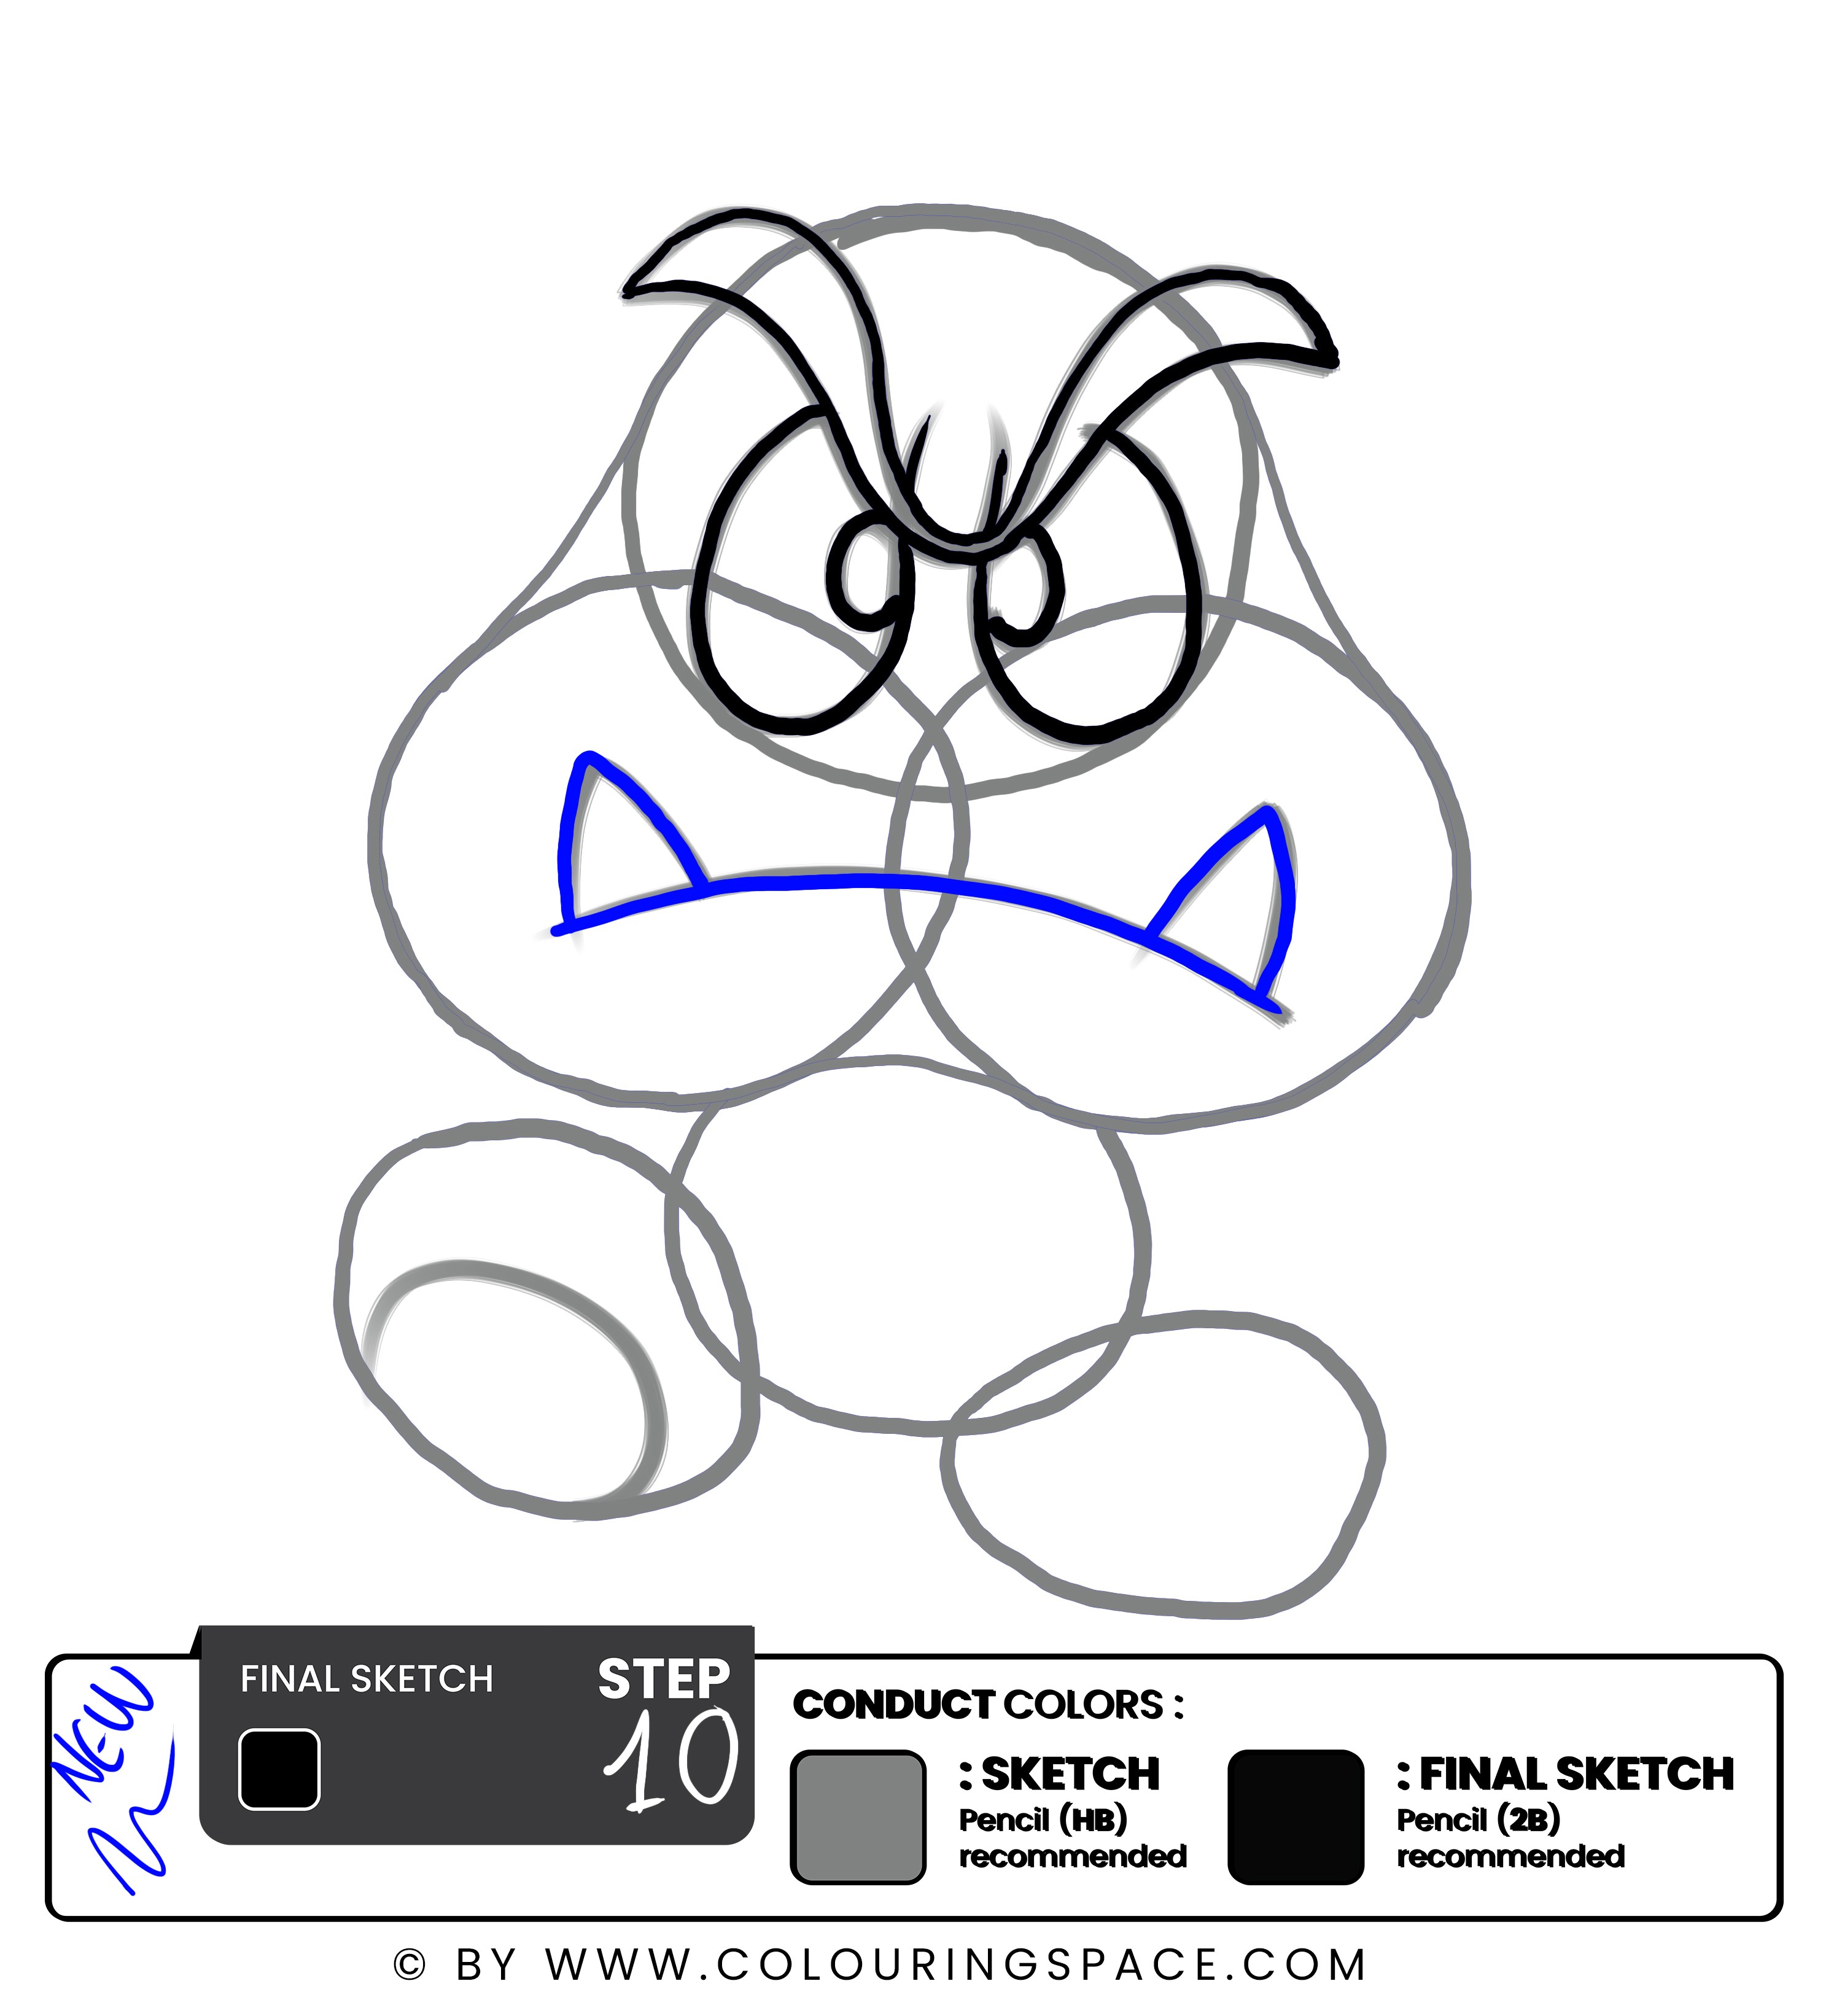
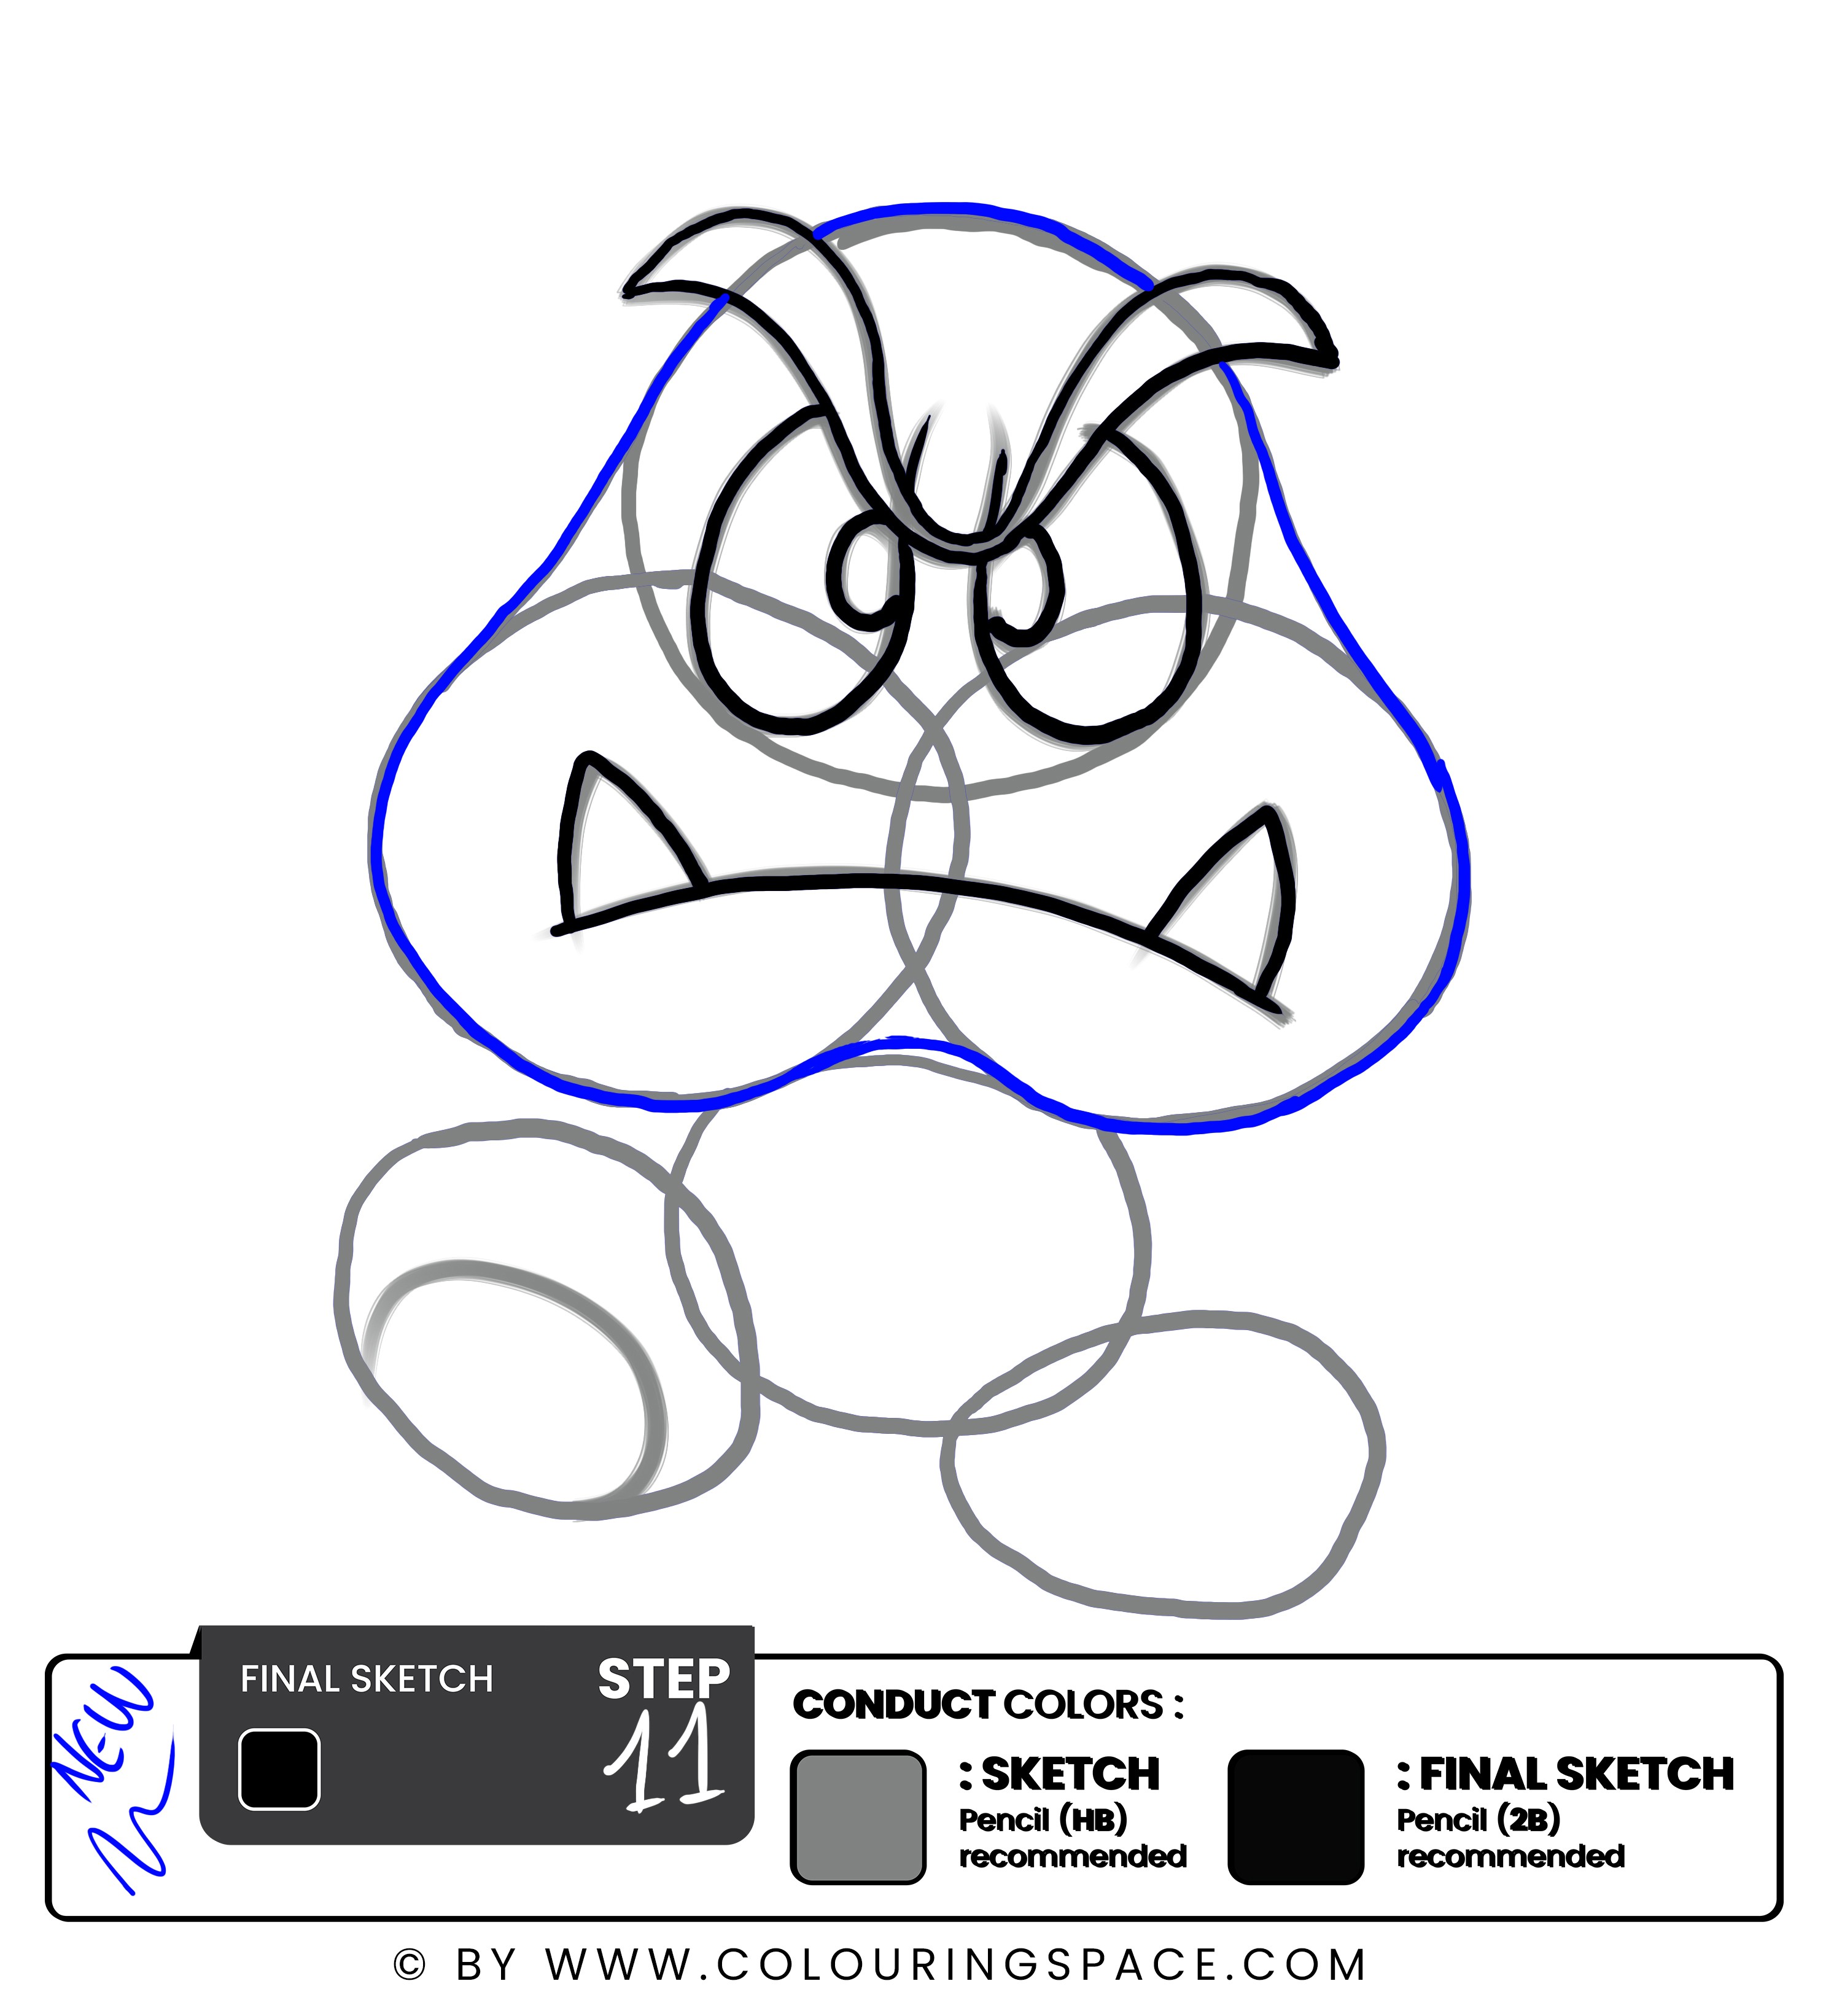

Throughout steps 9 and 10, you will be working on the upper part of Goomba’s body.
This step is pretty straightforward. After finishing this step, you will realize that you succeeded in making Mario Goomba’s main body part.
All you have to do now is remove the three geometrical circles you had drawn in steps two and three. Since those circles, you will have a fine body shape. There is no need to keep them now. In the last step, erase them all at once!
Just be careful when you remove the circles. The curved lines must remain intact. After removing the circles, make the curved edges smooth by outlying them again. This will close all the loopholes, and you will have a fine boundary. So, start doing it.
Step 13: Outline the Lower Body Part
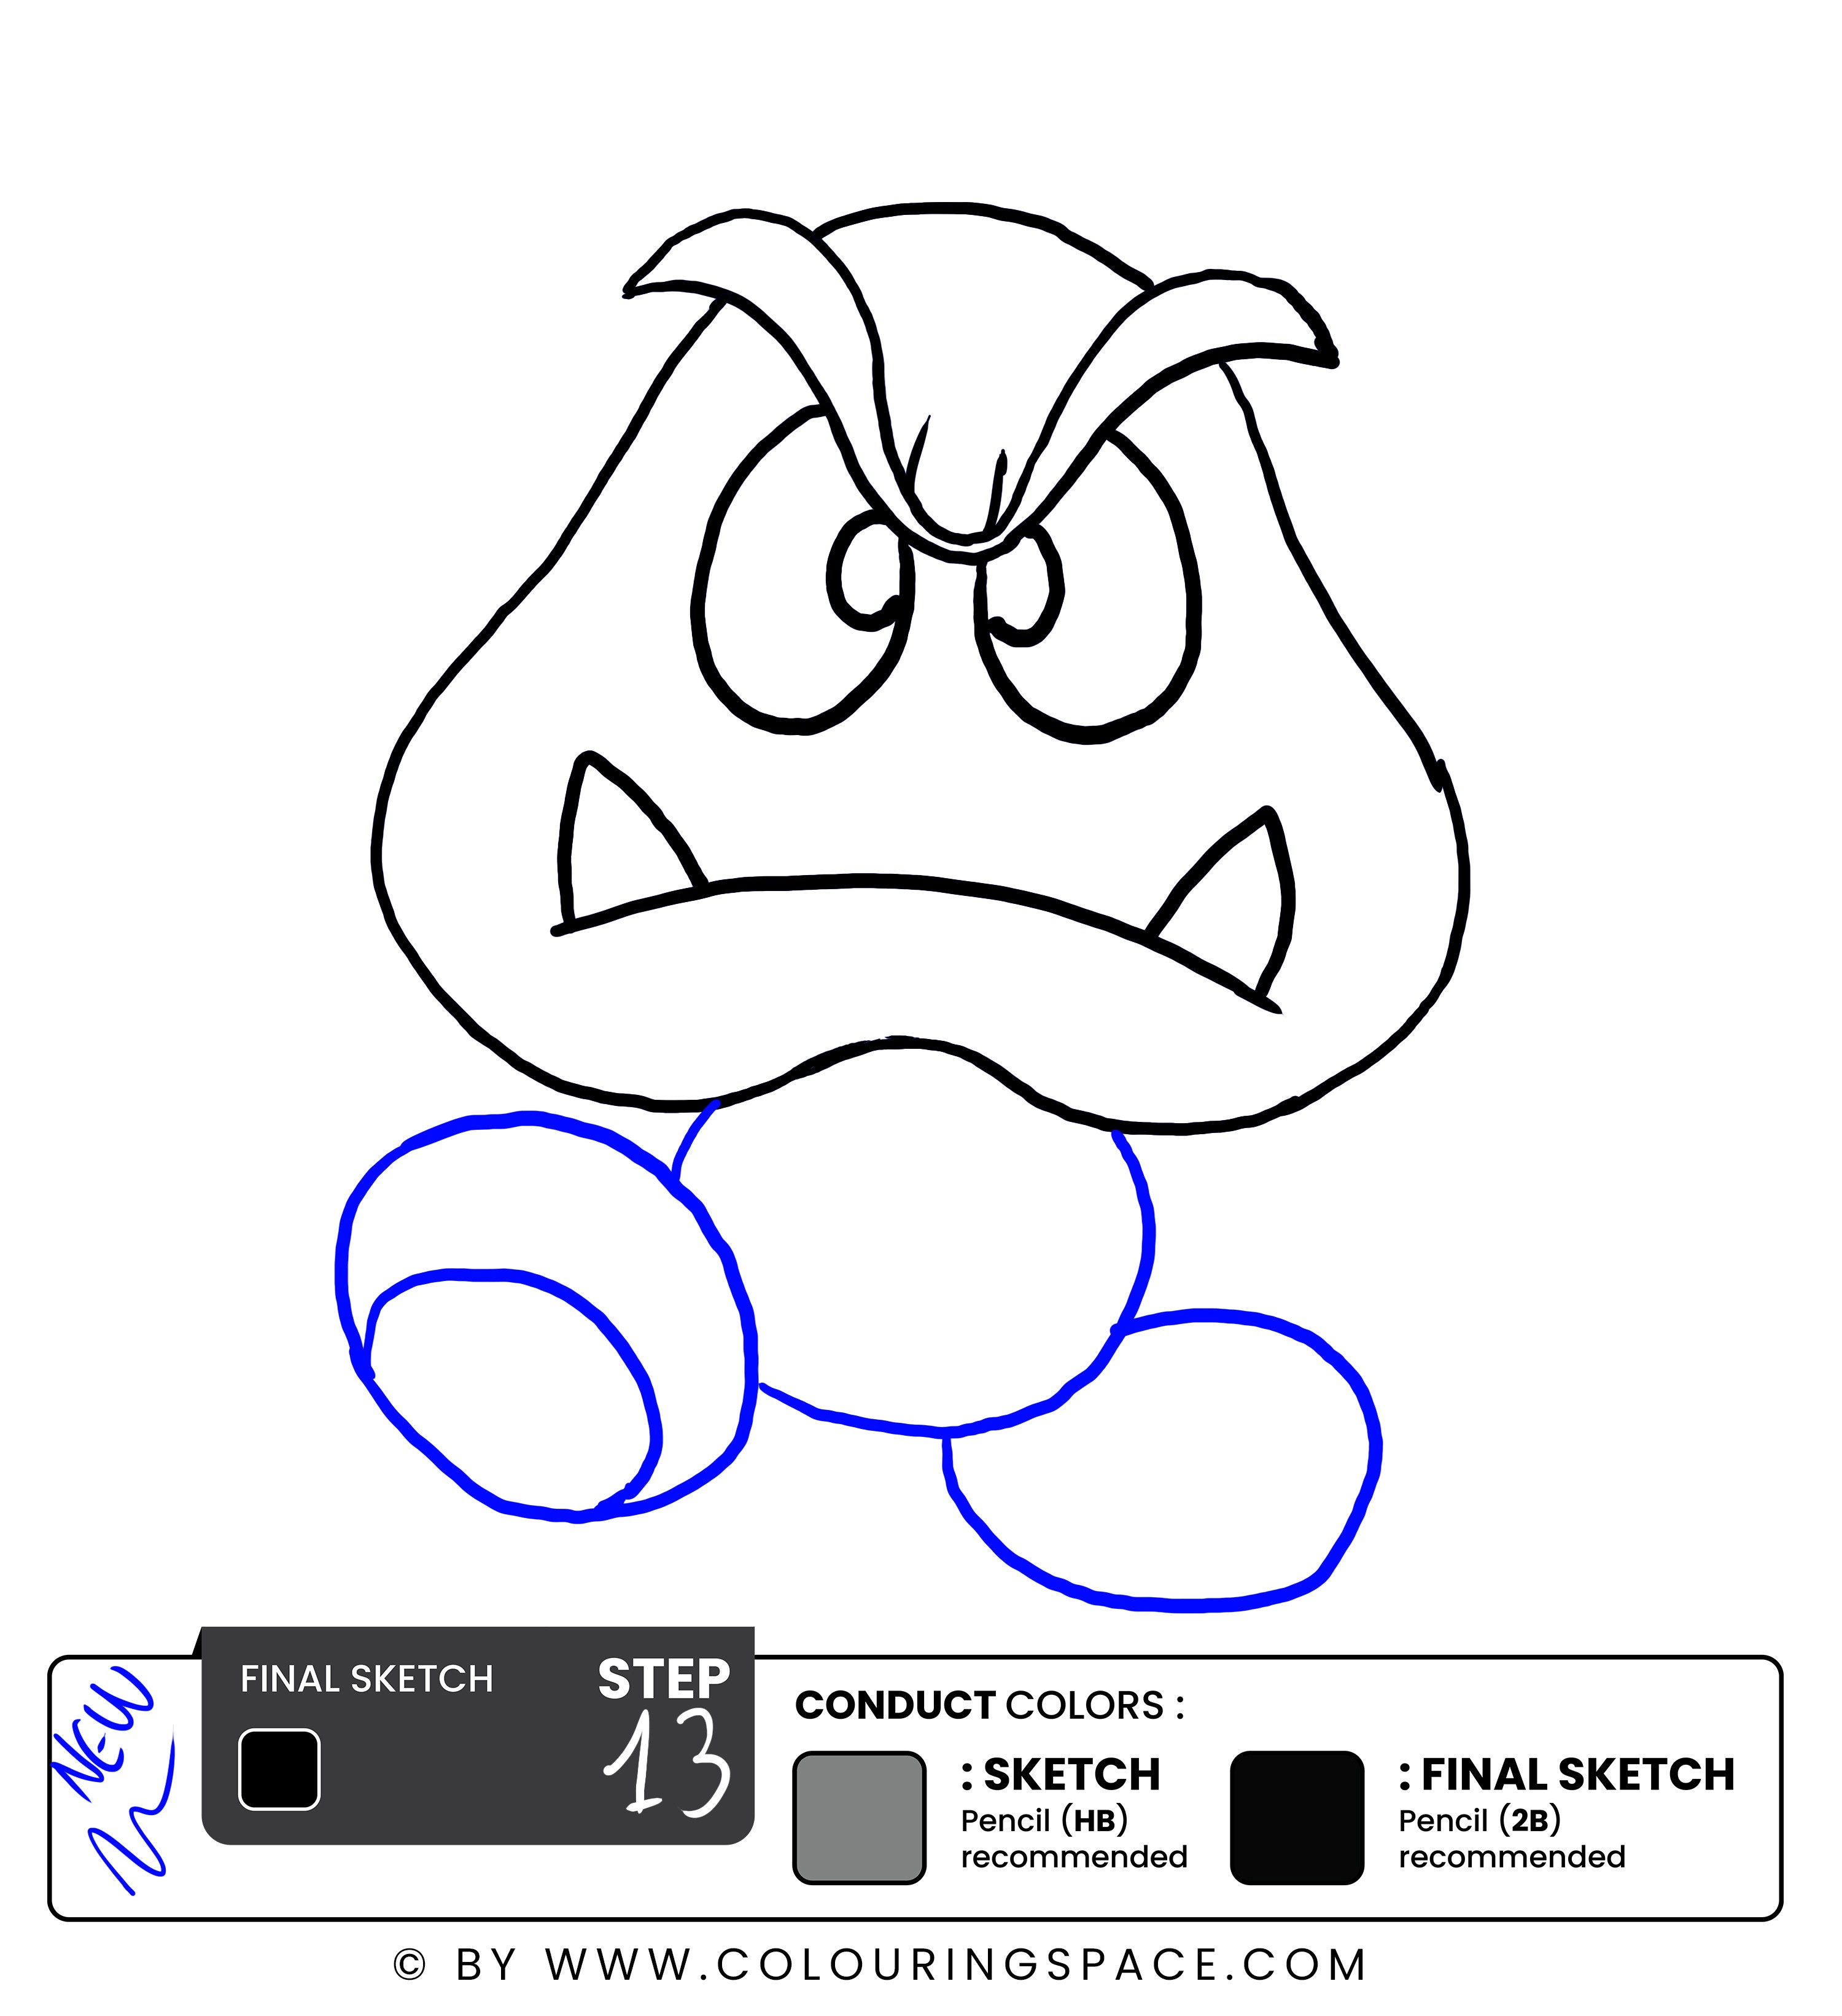
This is the step before the last one. Now that we have outlined the upper body, you are going to go through the same process to the lower part.
Step 14 - Darken the Eyes and Eyebrows.
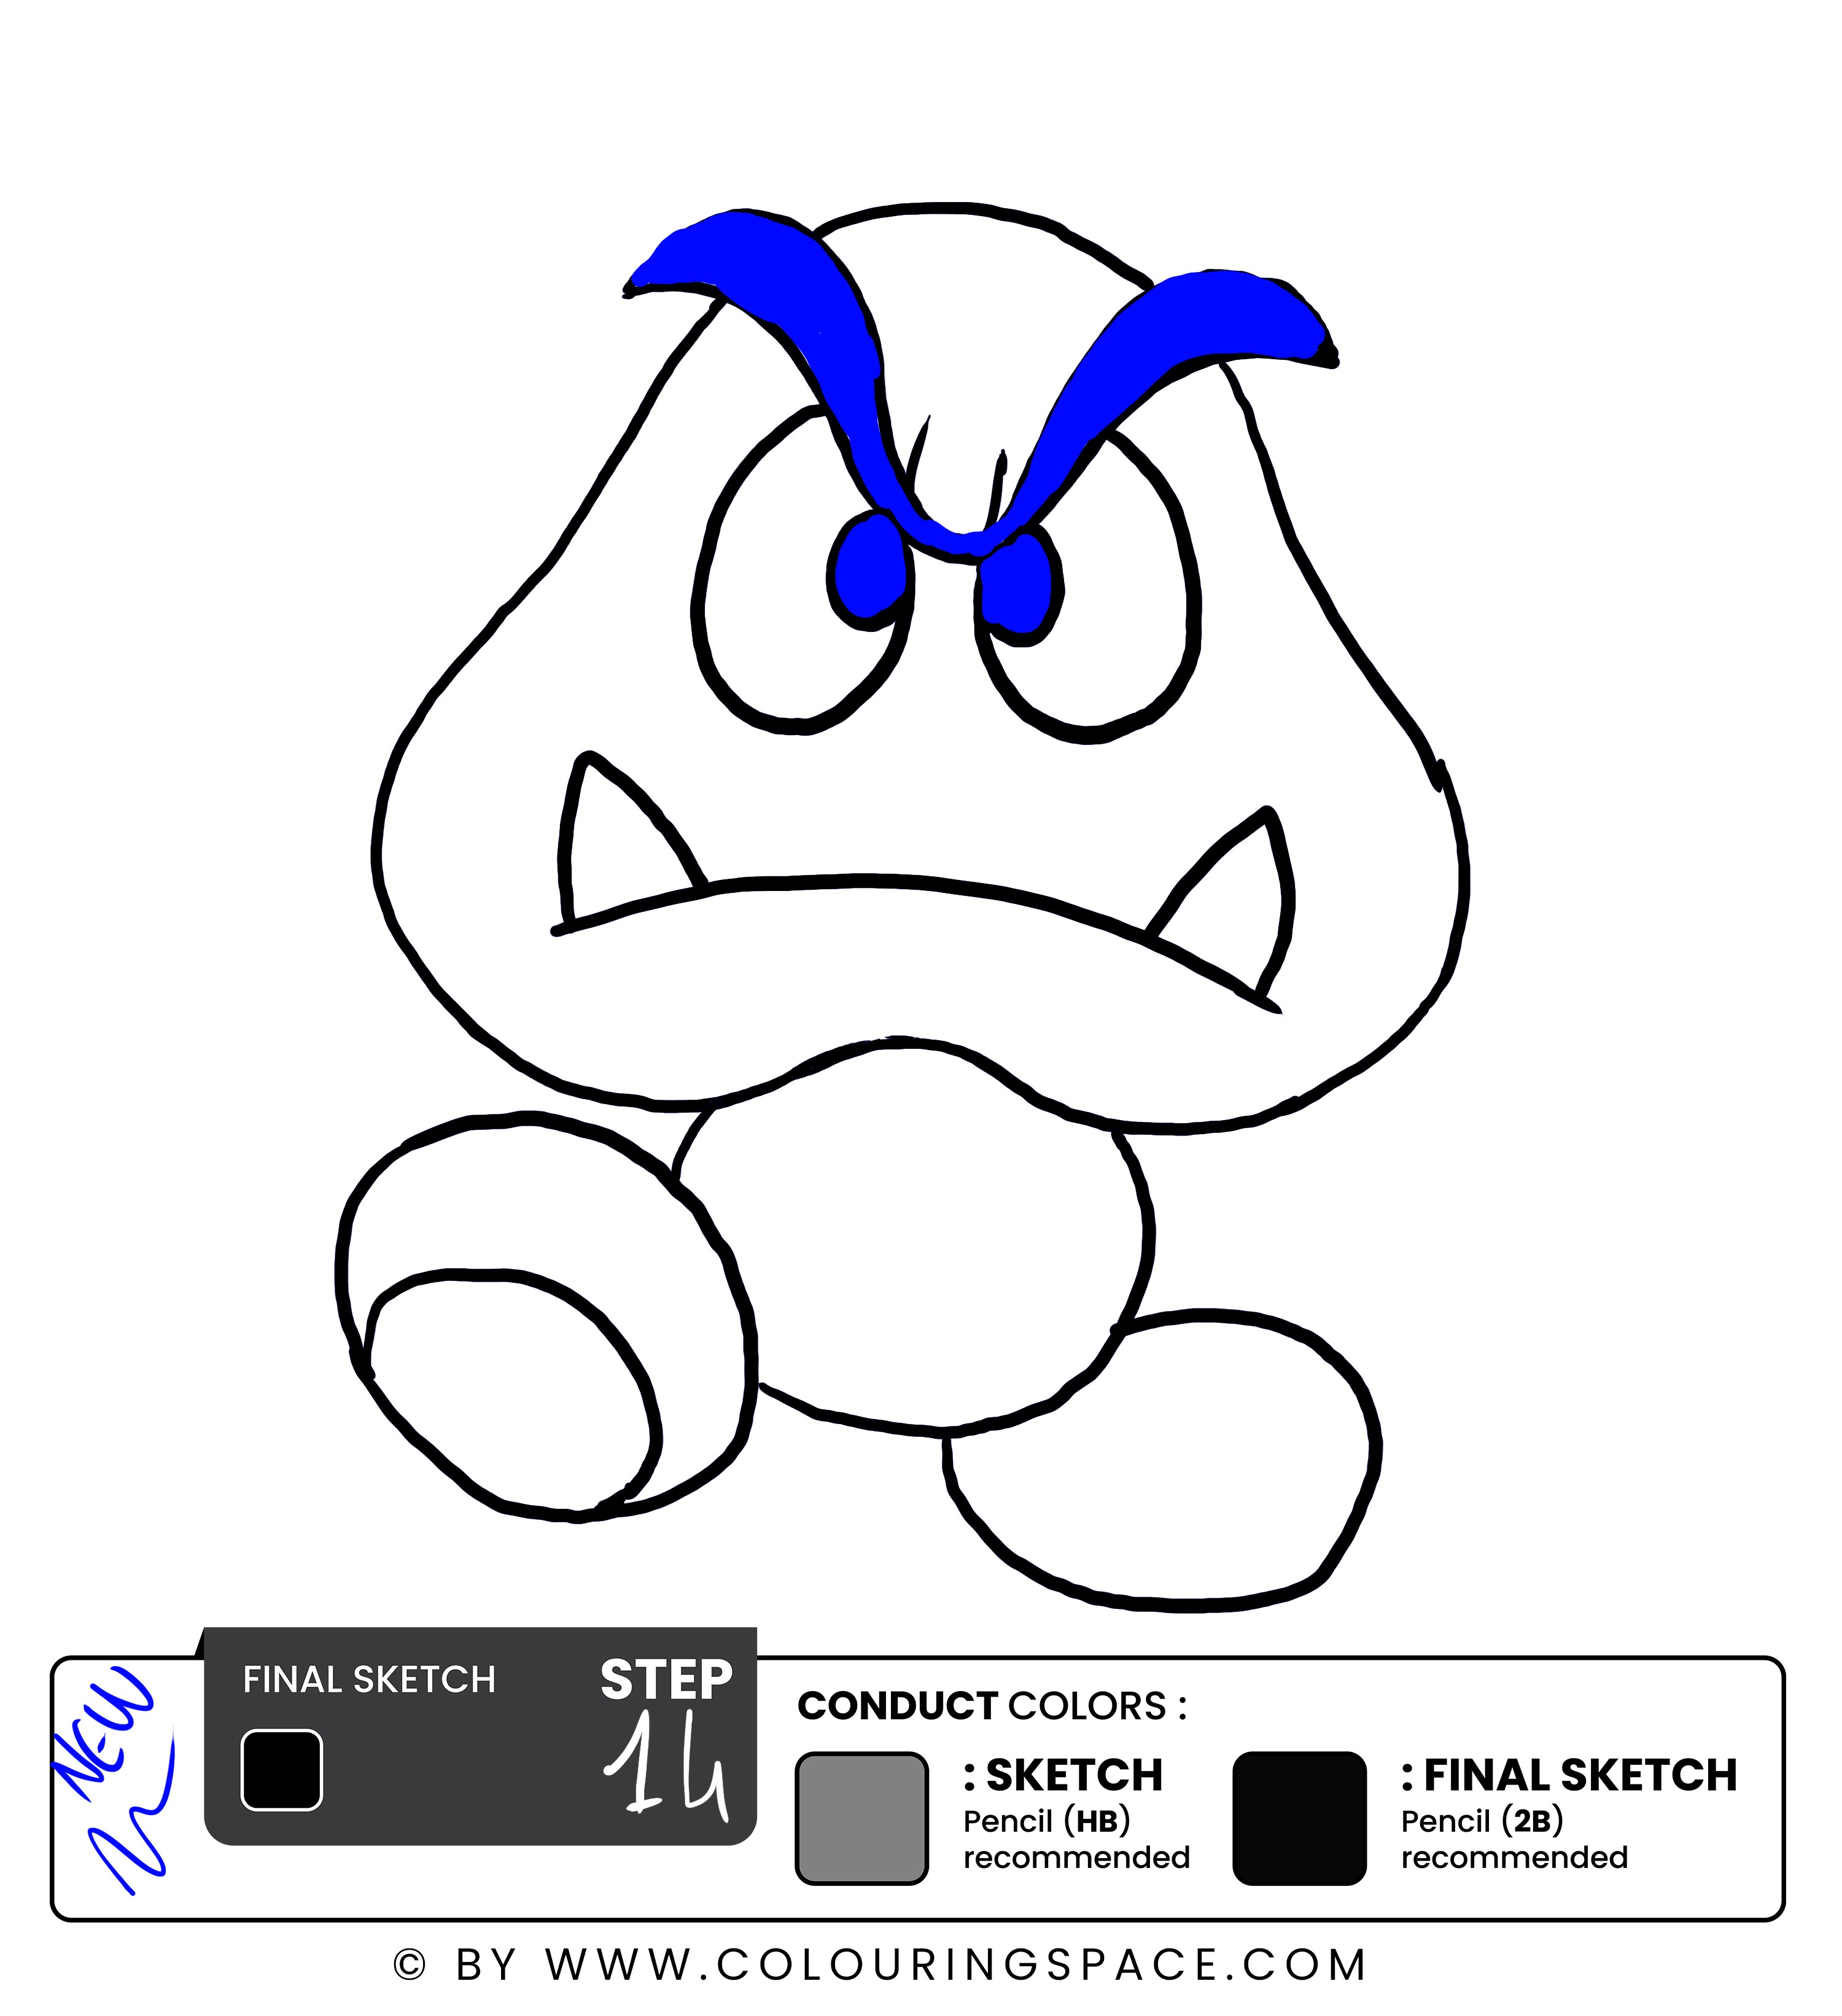
Now, Goomba is known for its dark piercing dark eyes and black eyebrows. Grab a black marker, and start adding some color to Mario Goomba’s eyebrows. Make it refined and bulky. Color his eyeballs as well. But make sure you don’t fill out the whole circle while filling the black color in his eyeball. Let a small part remain empty. It will give an impression of light in his eyes. There you go! You are ready to flex your sketch to your fellows.
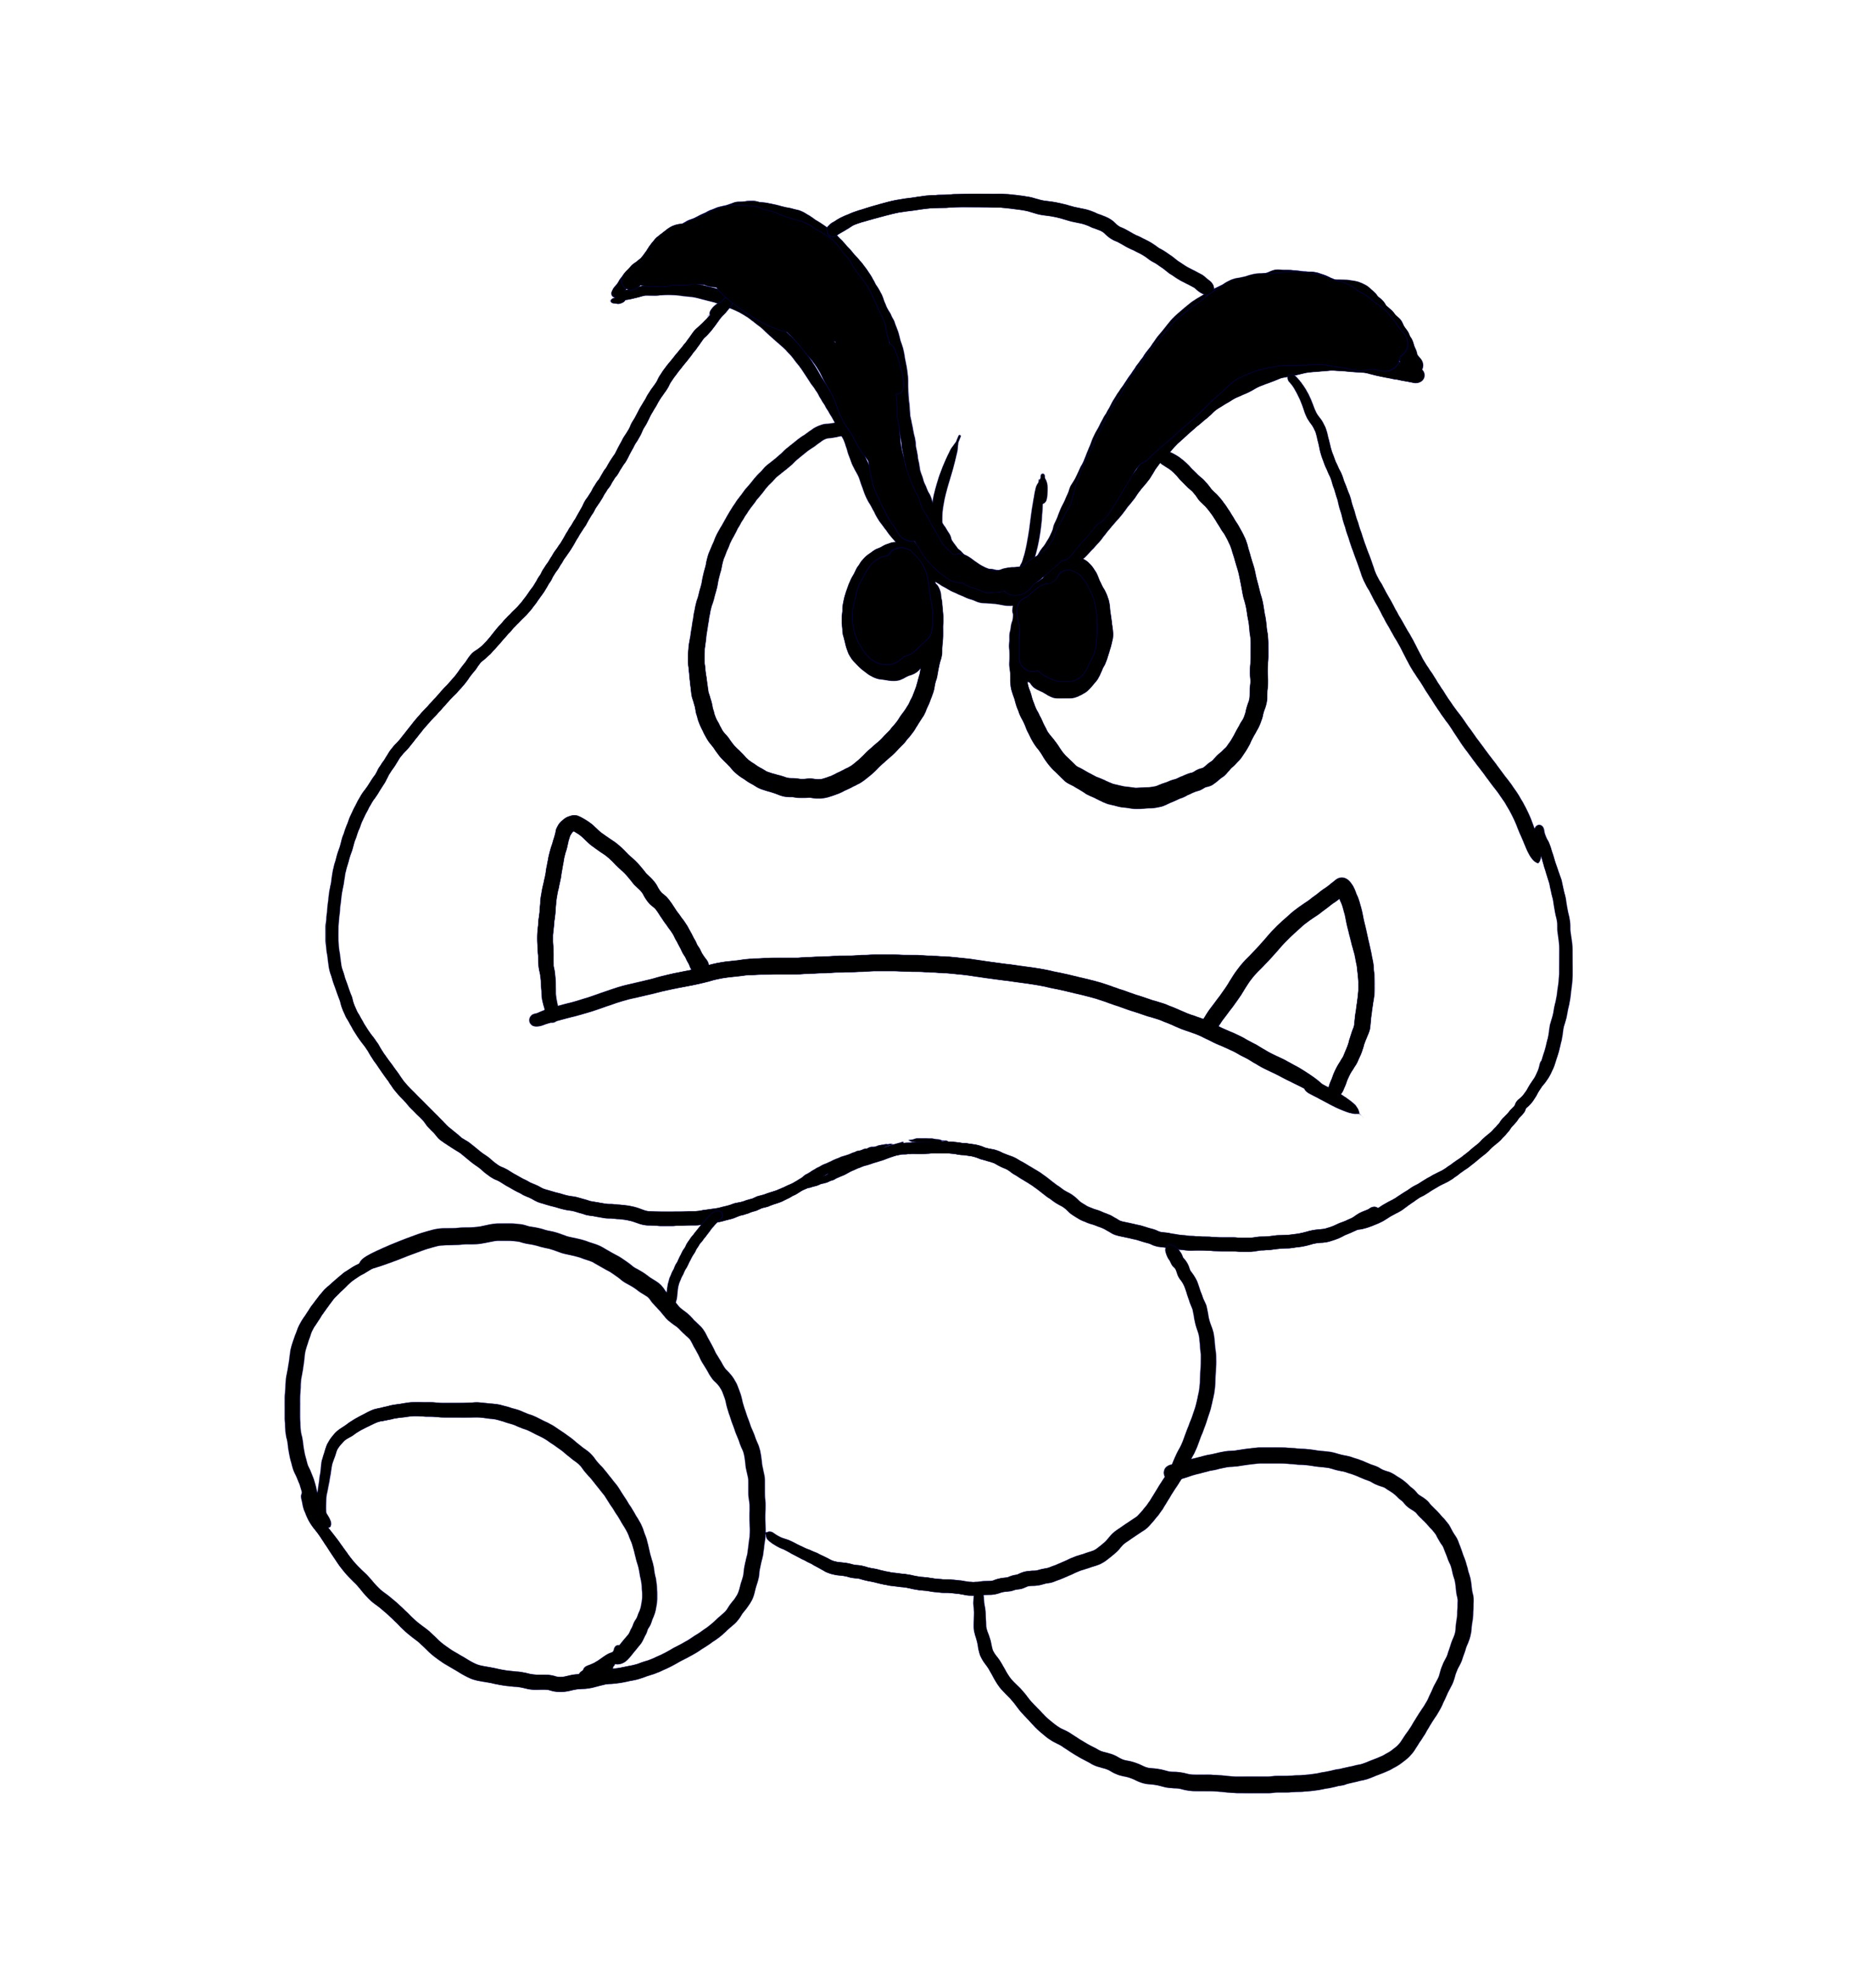
And This is Your Final Result!
Tips To Make Your Sketch Eye-Catchy!
You can always use different colored markers to add a rendering element to your sketch. Other than that, crayons are best when it comes to soft rendering. You can explore options like oil pastels, soft pastels, and watercolors. Choose the medium of your choice and work it out!
Draw it Now!
What are you waiting for? We have given all the tips and an easy guide to help you draw your perfect Goomba Super Mario drawing. Now, it's time to put your thing together and start drawing.
Check out our other articles if you are interested in Super Mario character drawing or coloring pages.