Santa Surfing with Gifts: Sketching Guide for Beginners

This guide teaches you how to create a unique drawing of Santa carrying gifts on a surfboard, expressing the spirit of Christmas. You'll learn how to sketch Santa, create a colorful surfboard, and add gifts, allowing you to create unique artwork to enjoy or share with others.
The holiday season brings with it feelings of joy and anticipation. For kids, the arrival of Santa Claus—a cheerful character who brings gifts—makes the occasion even more memorable. Since the 1800s, Santa has been a crucial component of the holiday season and is considered a symbol of Christmas.
From traditional toys and games to the latest electronics, there are plenty of options for gifts that kids will love. Fun activities like drawing and coloring can be an amazing activity to spend great quality time. Christmas is a time when families get together, exchange gifts, and enjoy one another's company. Whatever the present is, it's always the idea that matters, and gifting to the people you care about is a wonderful way to express your love and gratitude.
There are many alternatives for presents that kids will like, ranging from classic toys and games to the newest technologies. Fun pastimes like coloring and drawing may be fantastic ways to spend quality time. Families gather together throughout the holidays to enjoy one another's company and exchange stories, food, and quality time. Giving gifts to the people you care about is a beautiful way to show them how much you care and how much you appreciate them, regardless of the actual object. Therefore, we put together a drawing tutorial for you to draw Santa on a surfboard bearing gifts, to gift to your lovely family members, or use as decoration for your Christmas tree.
So, grab your sketchbook, and let’s start drawing!
You will need:
-2B pencil
-HB pencil
-Eraser
You will find the guides in each sketch in the following tutorial.
Step 1: Draw a Circle for the Face
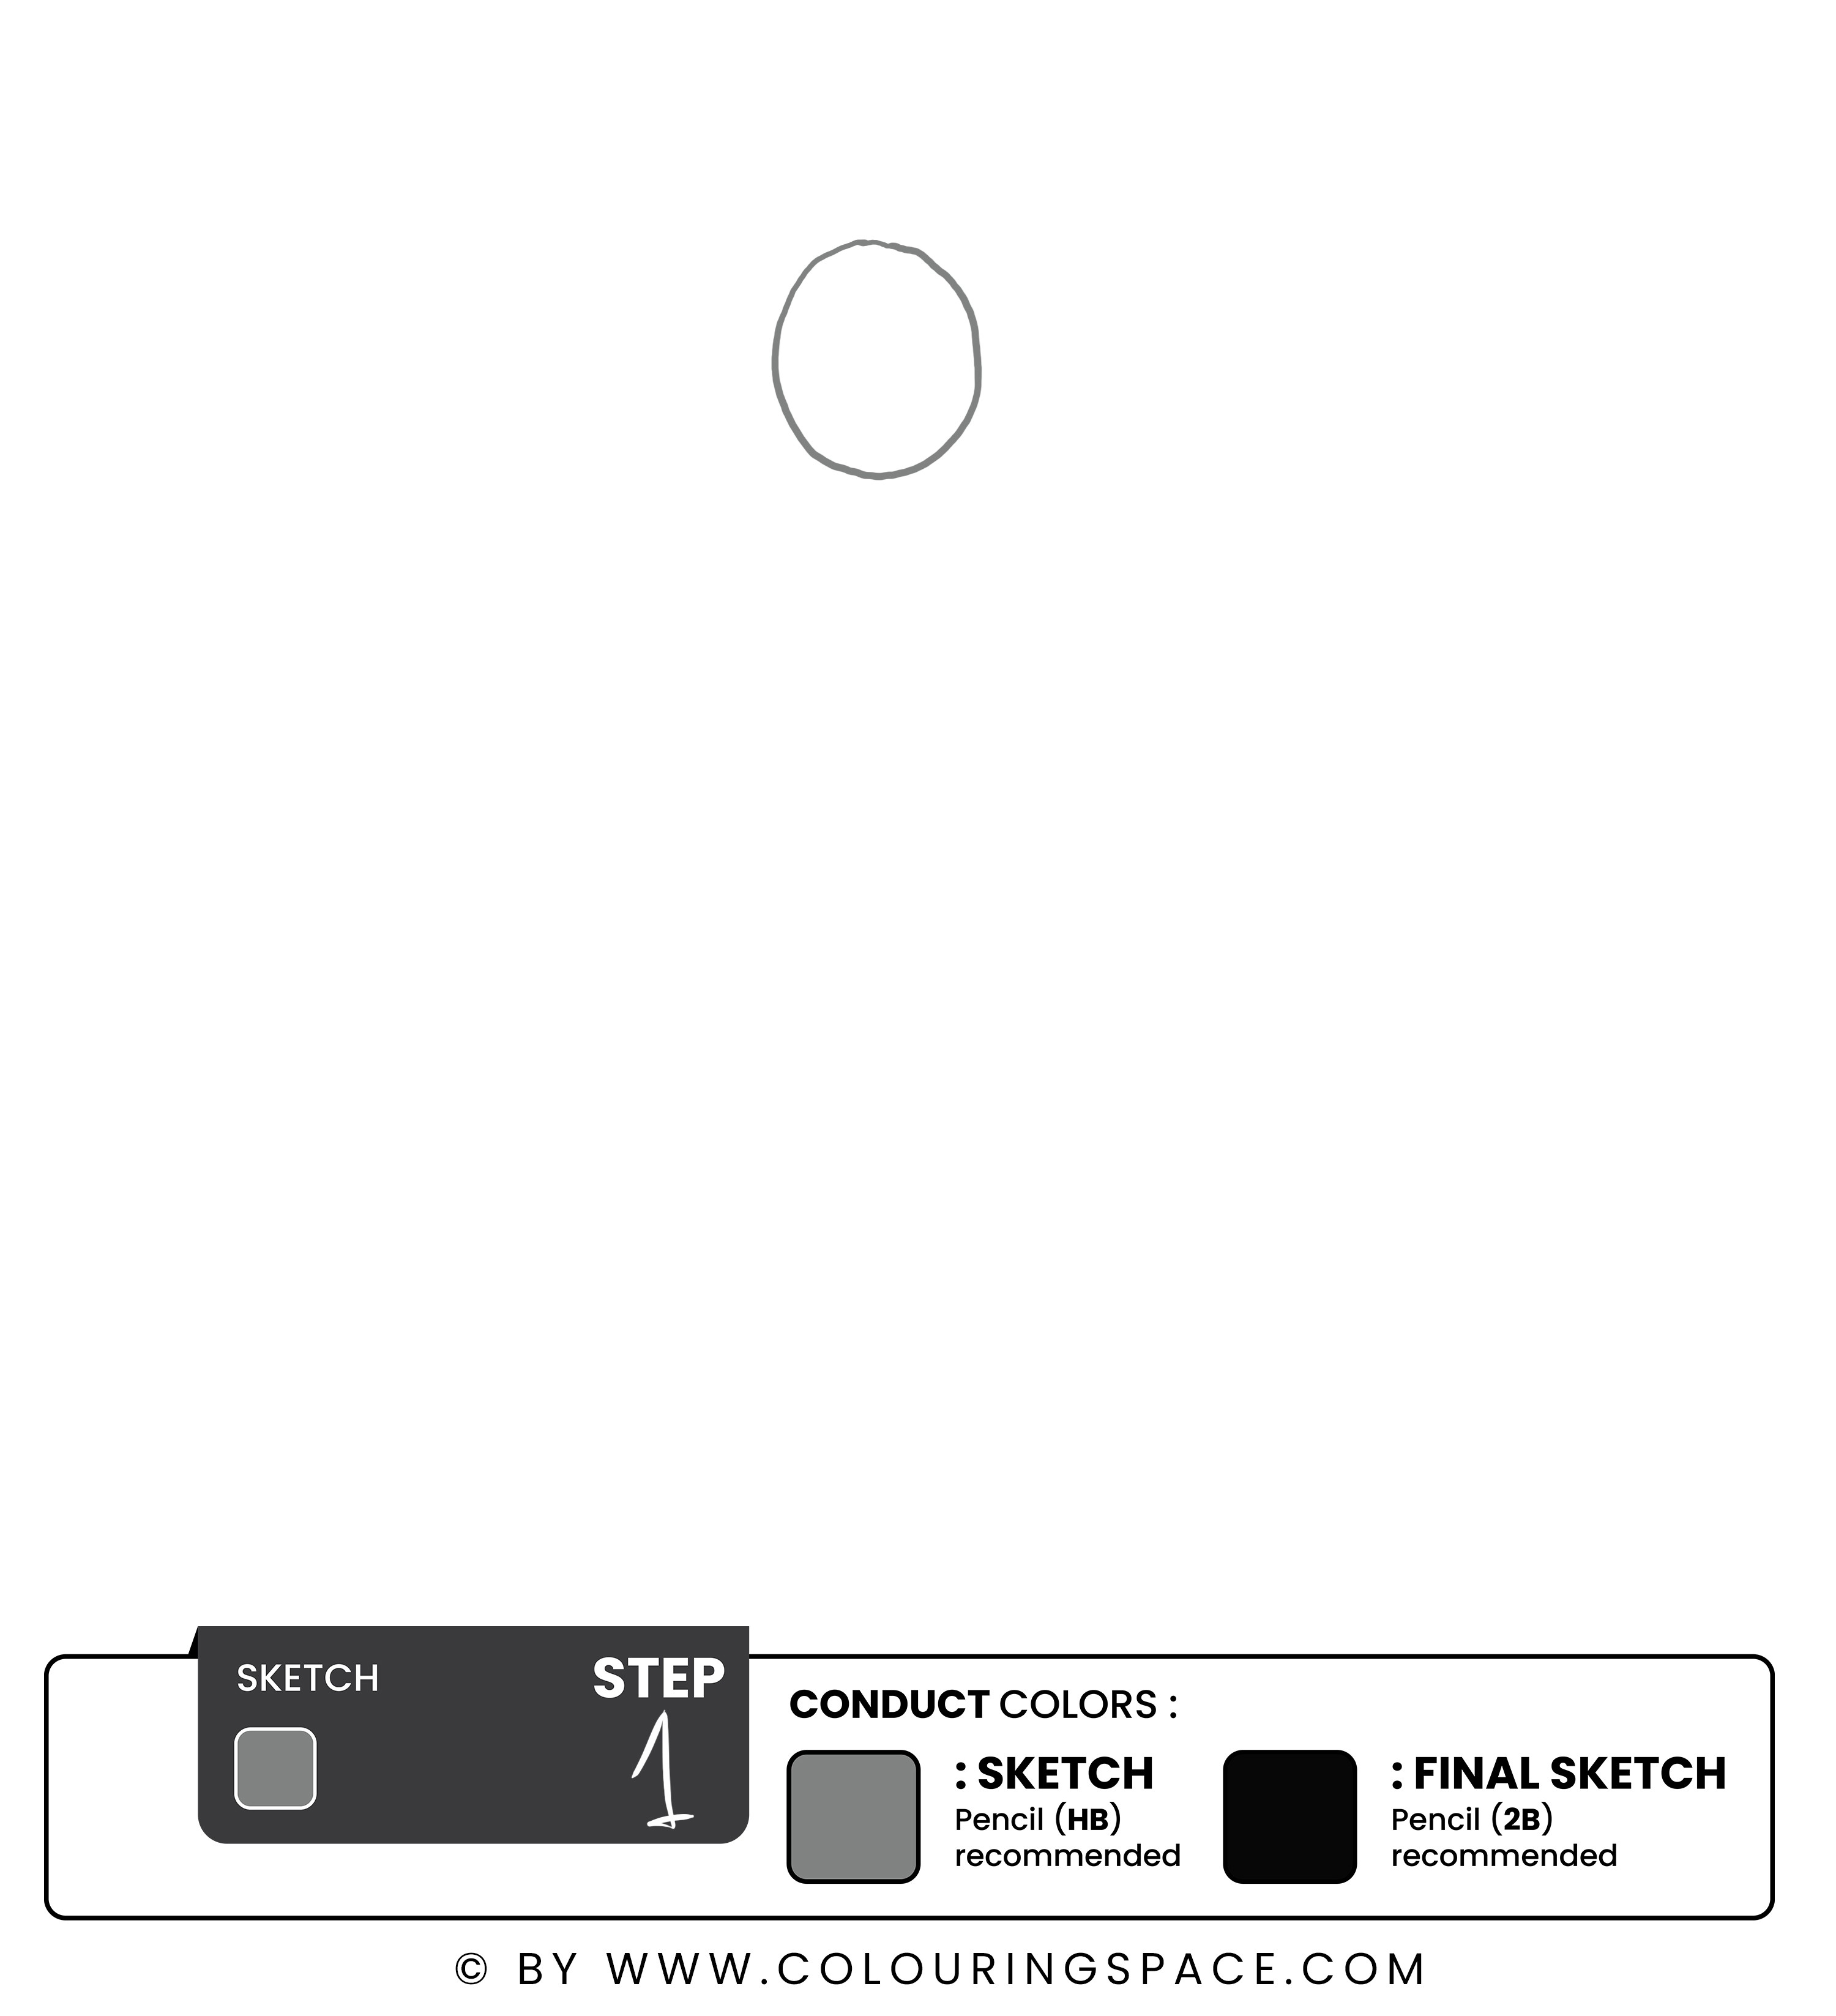
In the upper middle of your page, draw a small circle. This will be the head of Santa.
Step 2: Draw Another Circle for the Body
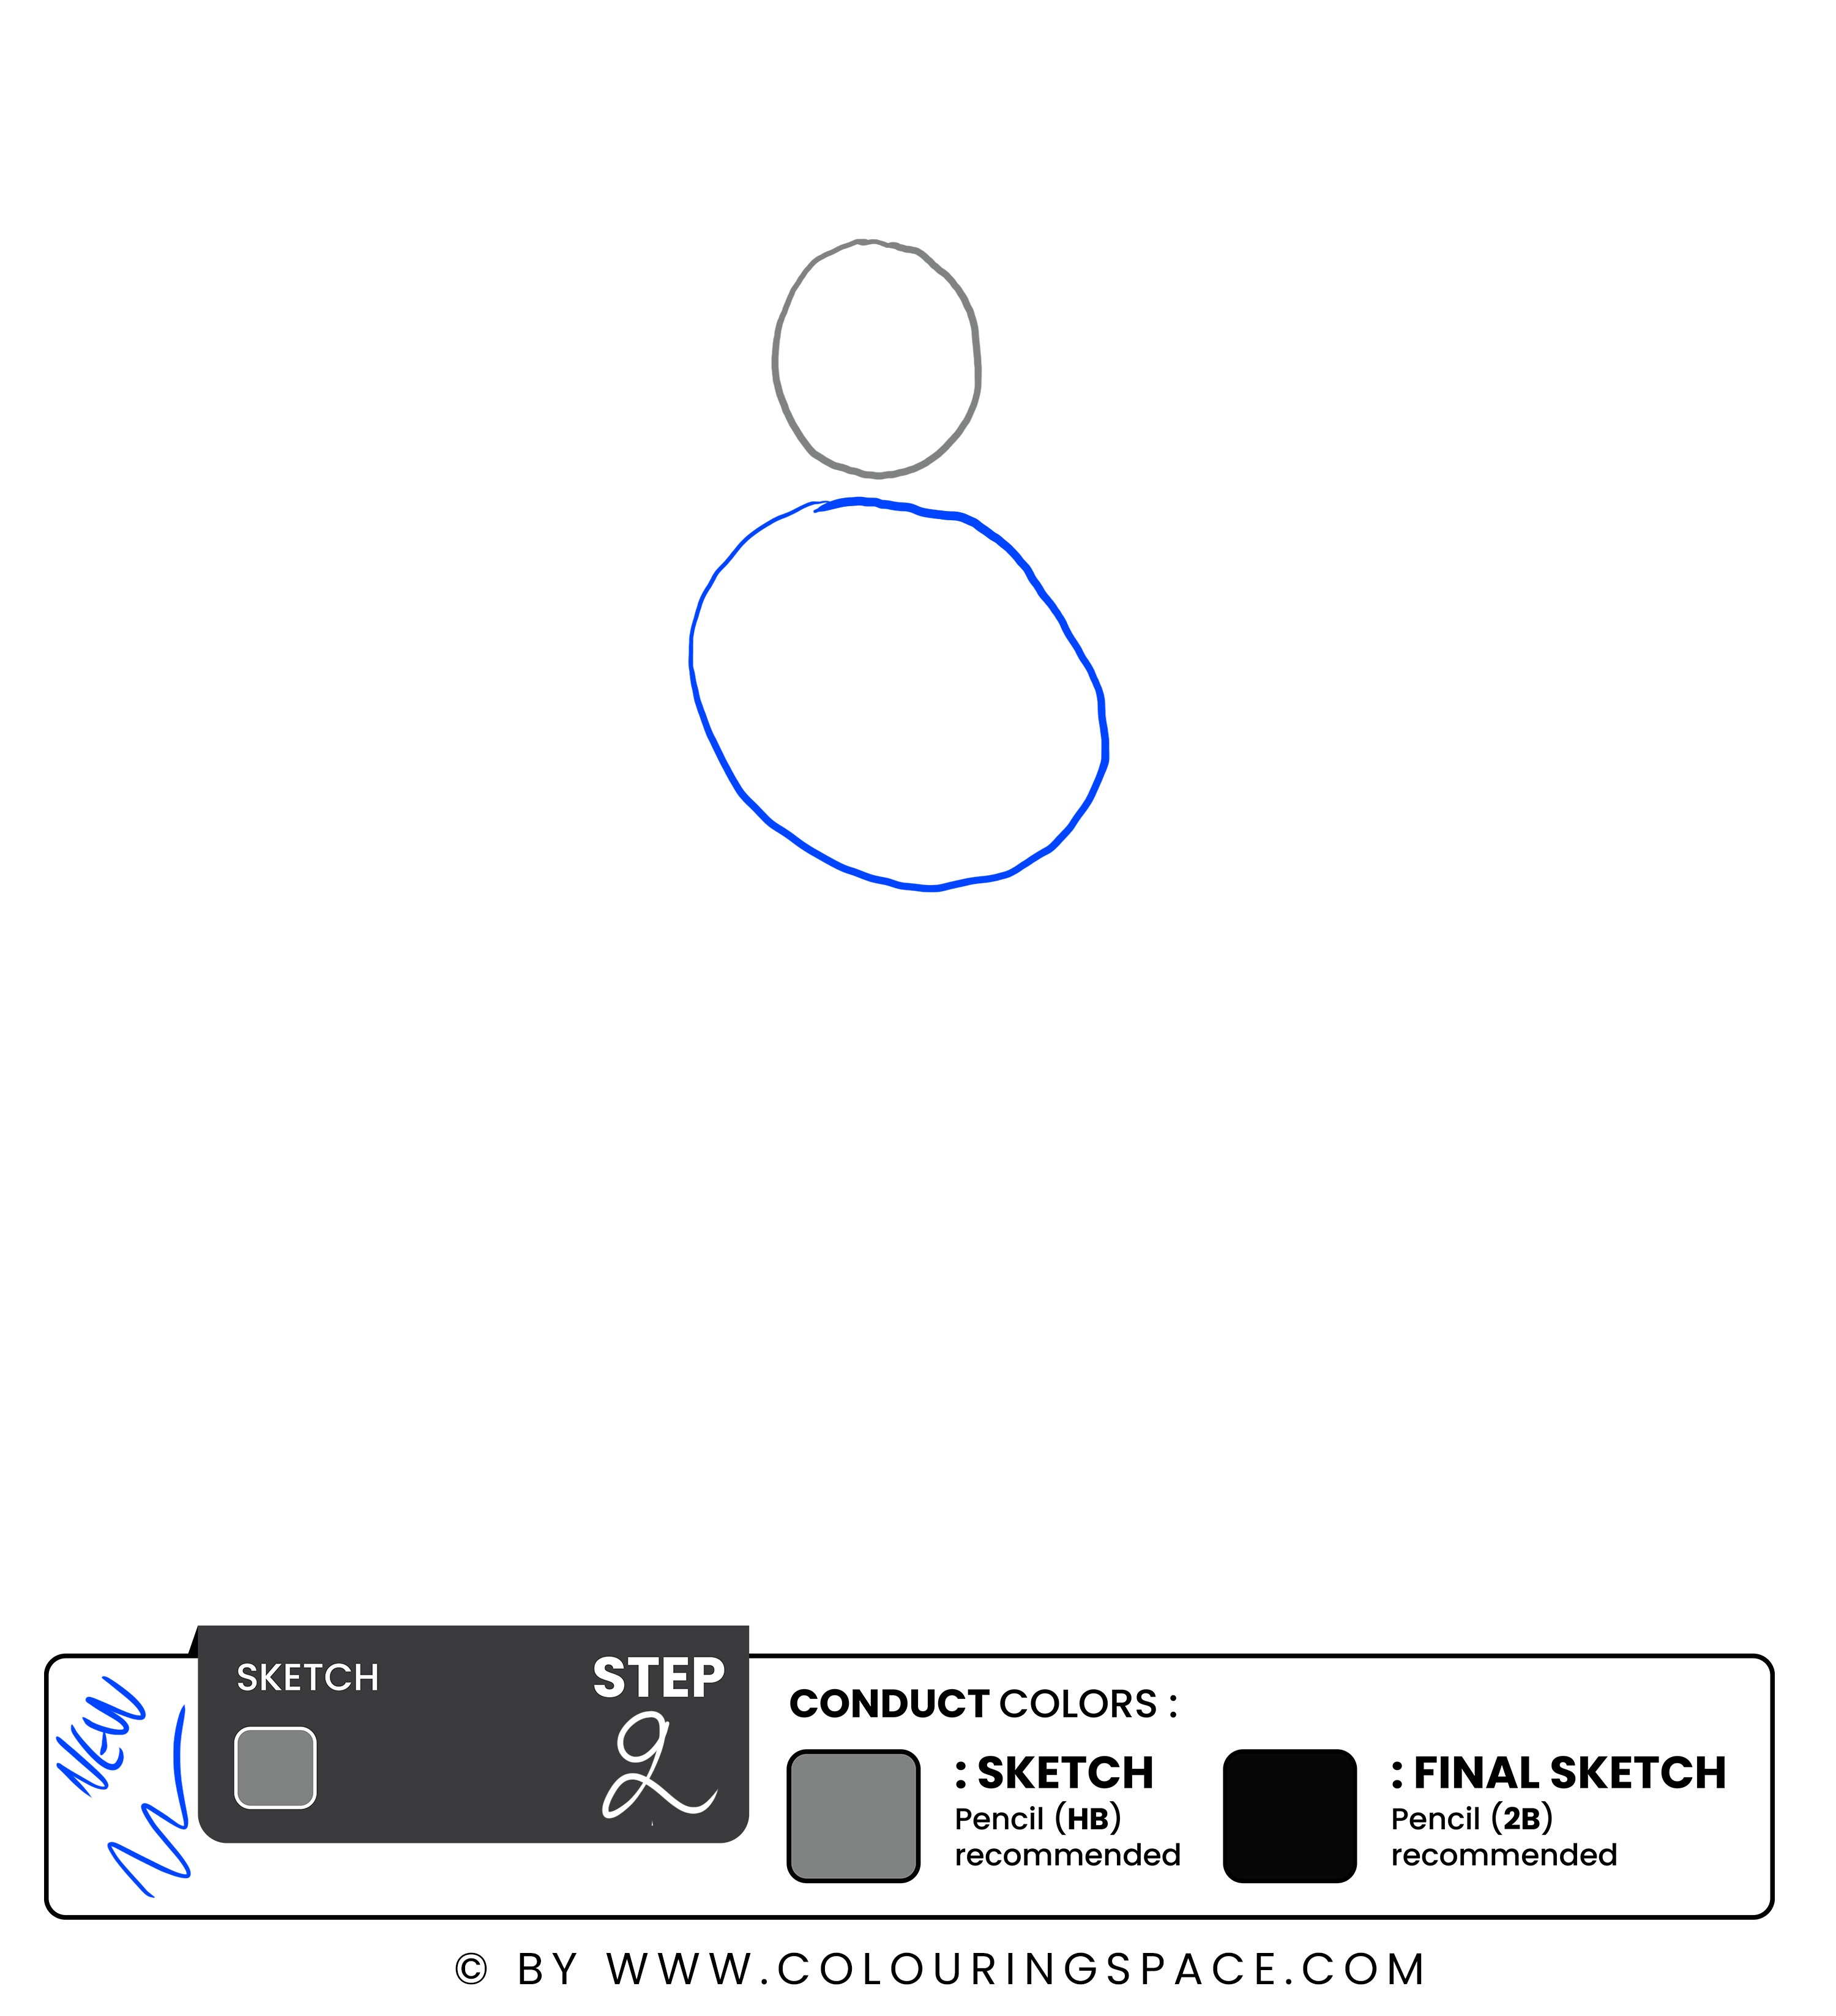
Below the initial circle drawn earlier, draw another circle right below. Make sure to leave a little gap where another detail will be placed.
Step 3: Draw the Initial Sketch of the Arms and Legs
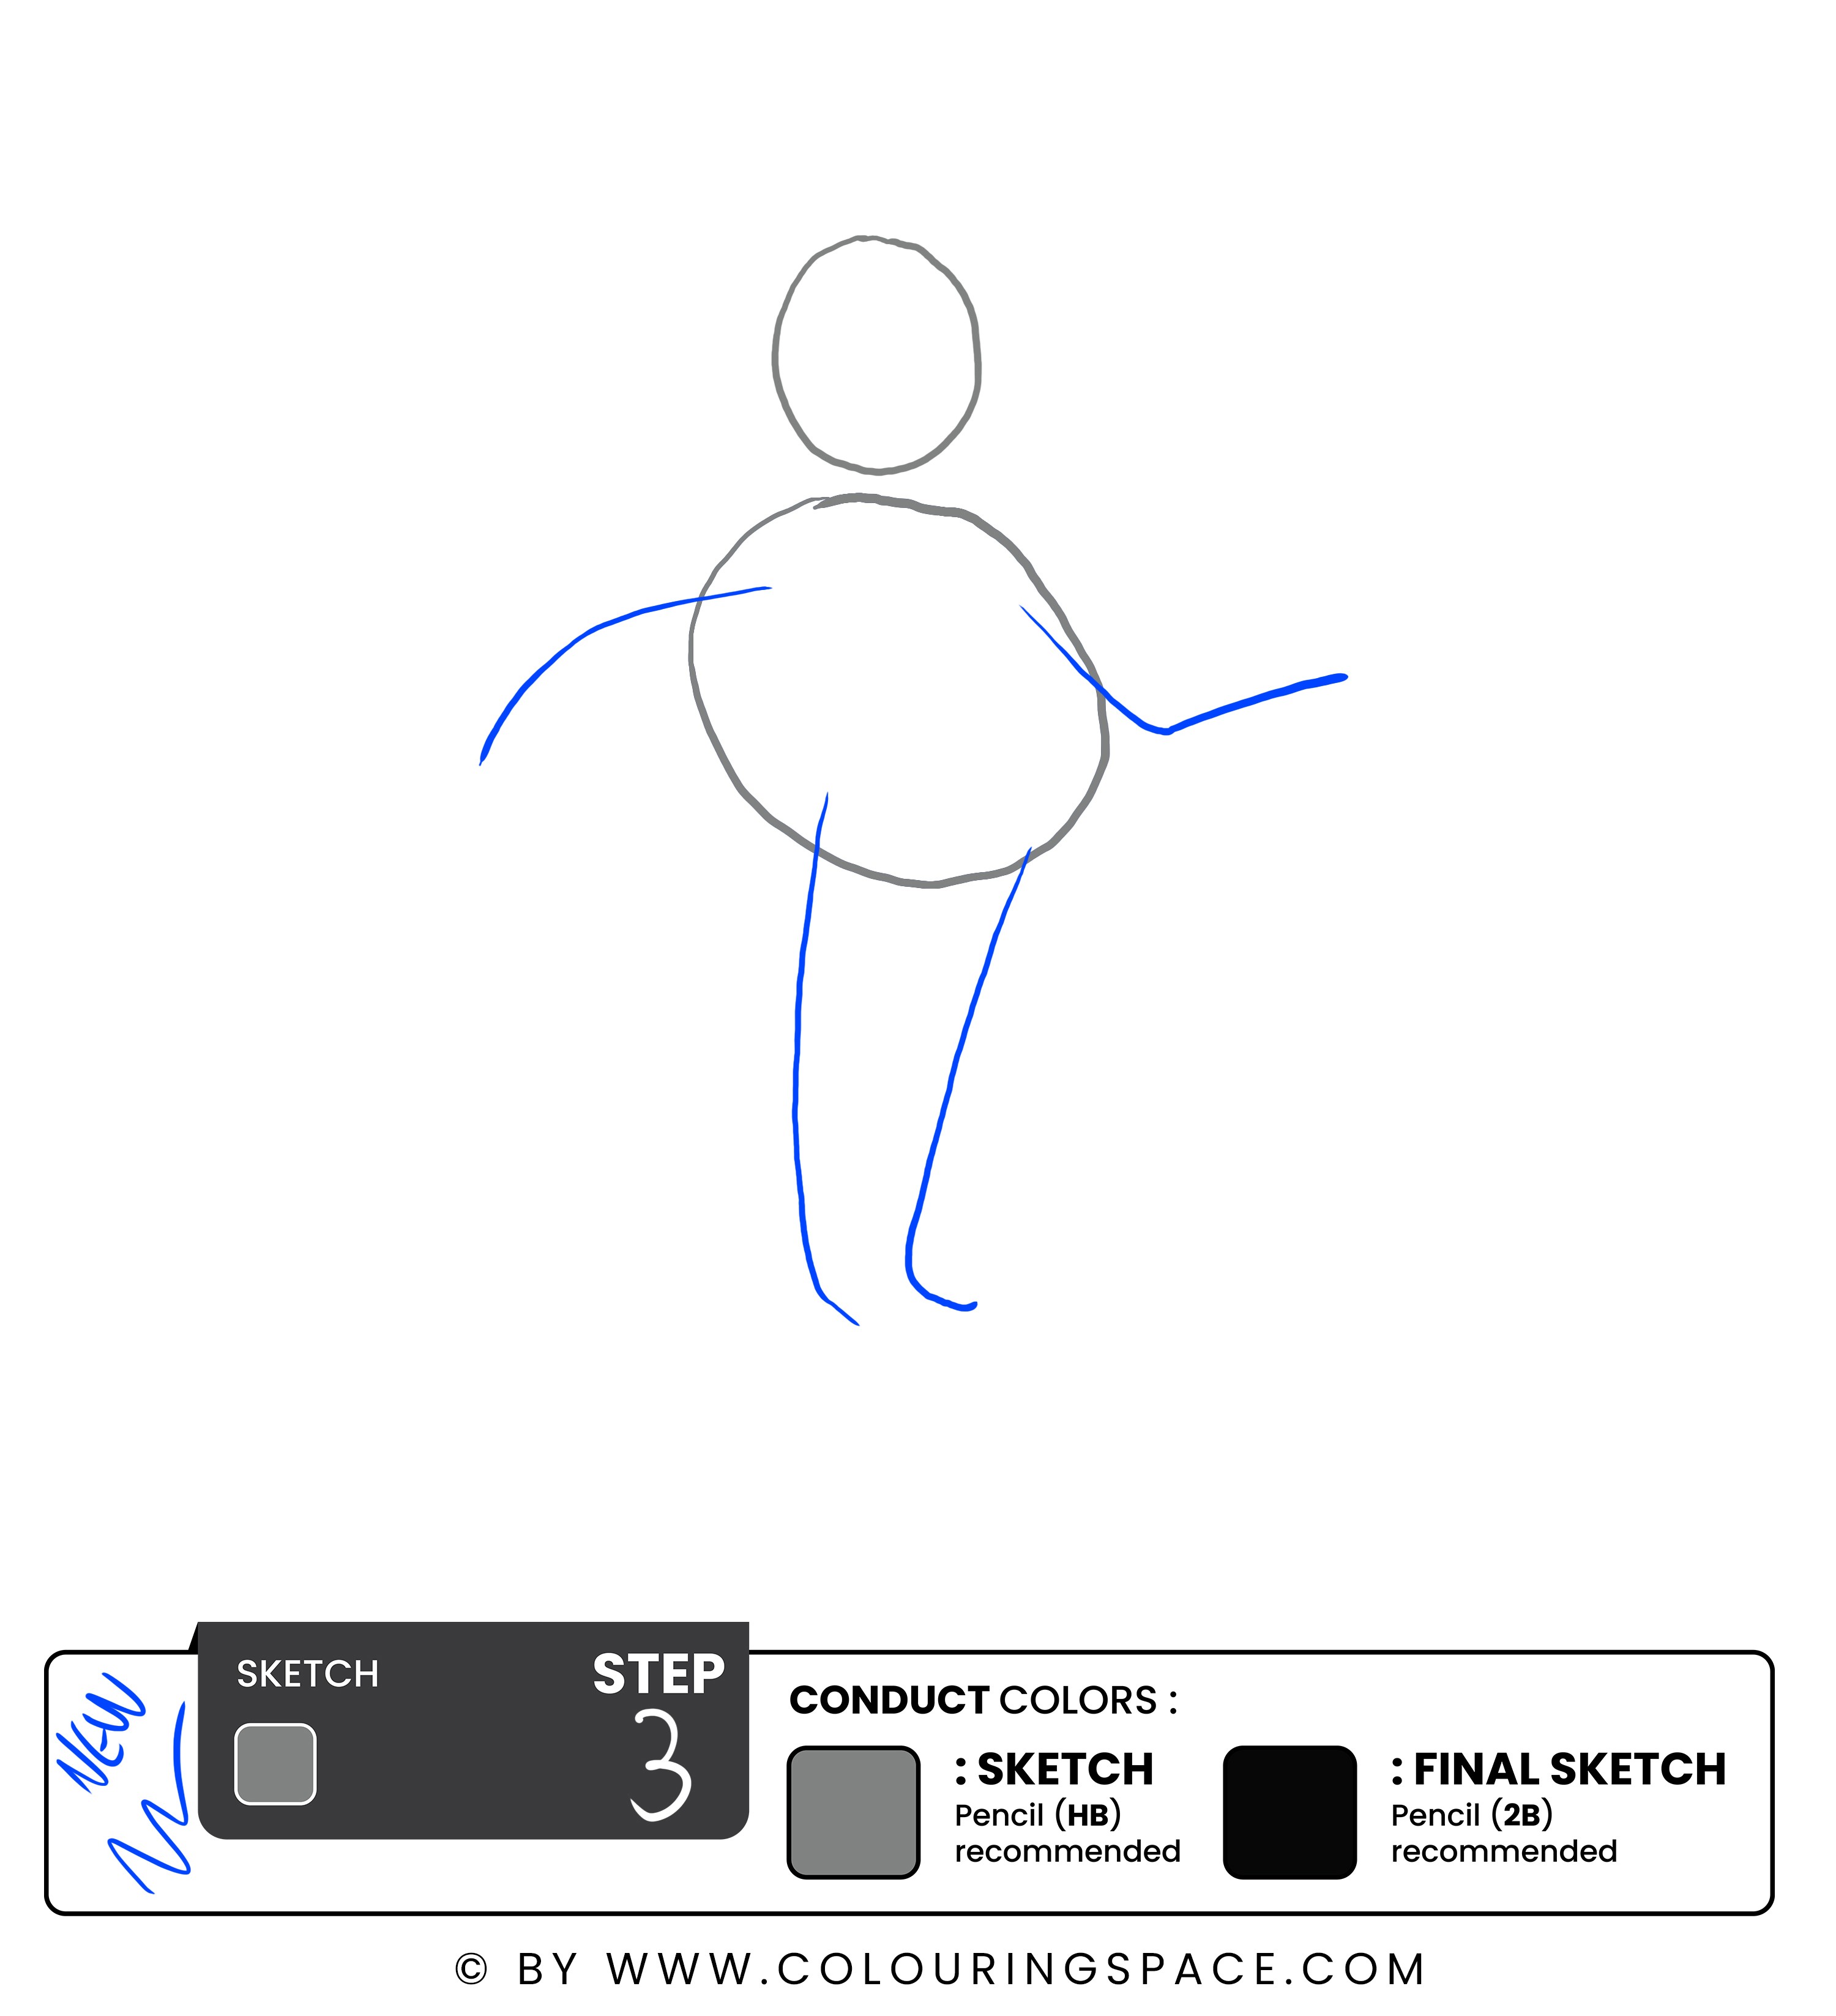
On each side of Santa’s body, draw one line slightly curved, just like in the sketch above.
Once that’s done, move on to drawing two lines with a curved end for the legs.
More details will be added later on.
Step 4: Draw the Initial Sketch of the Hands
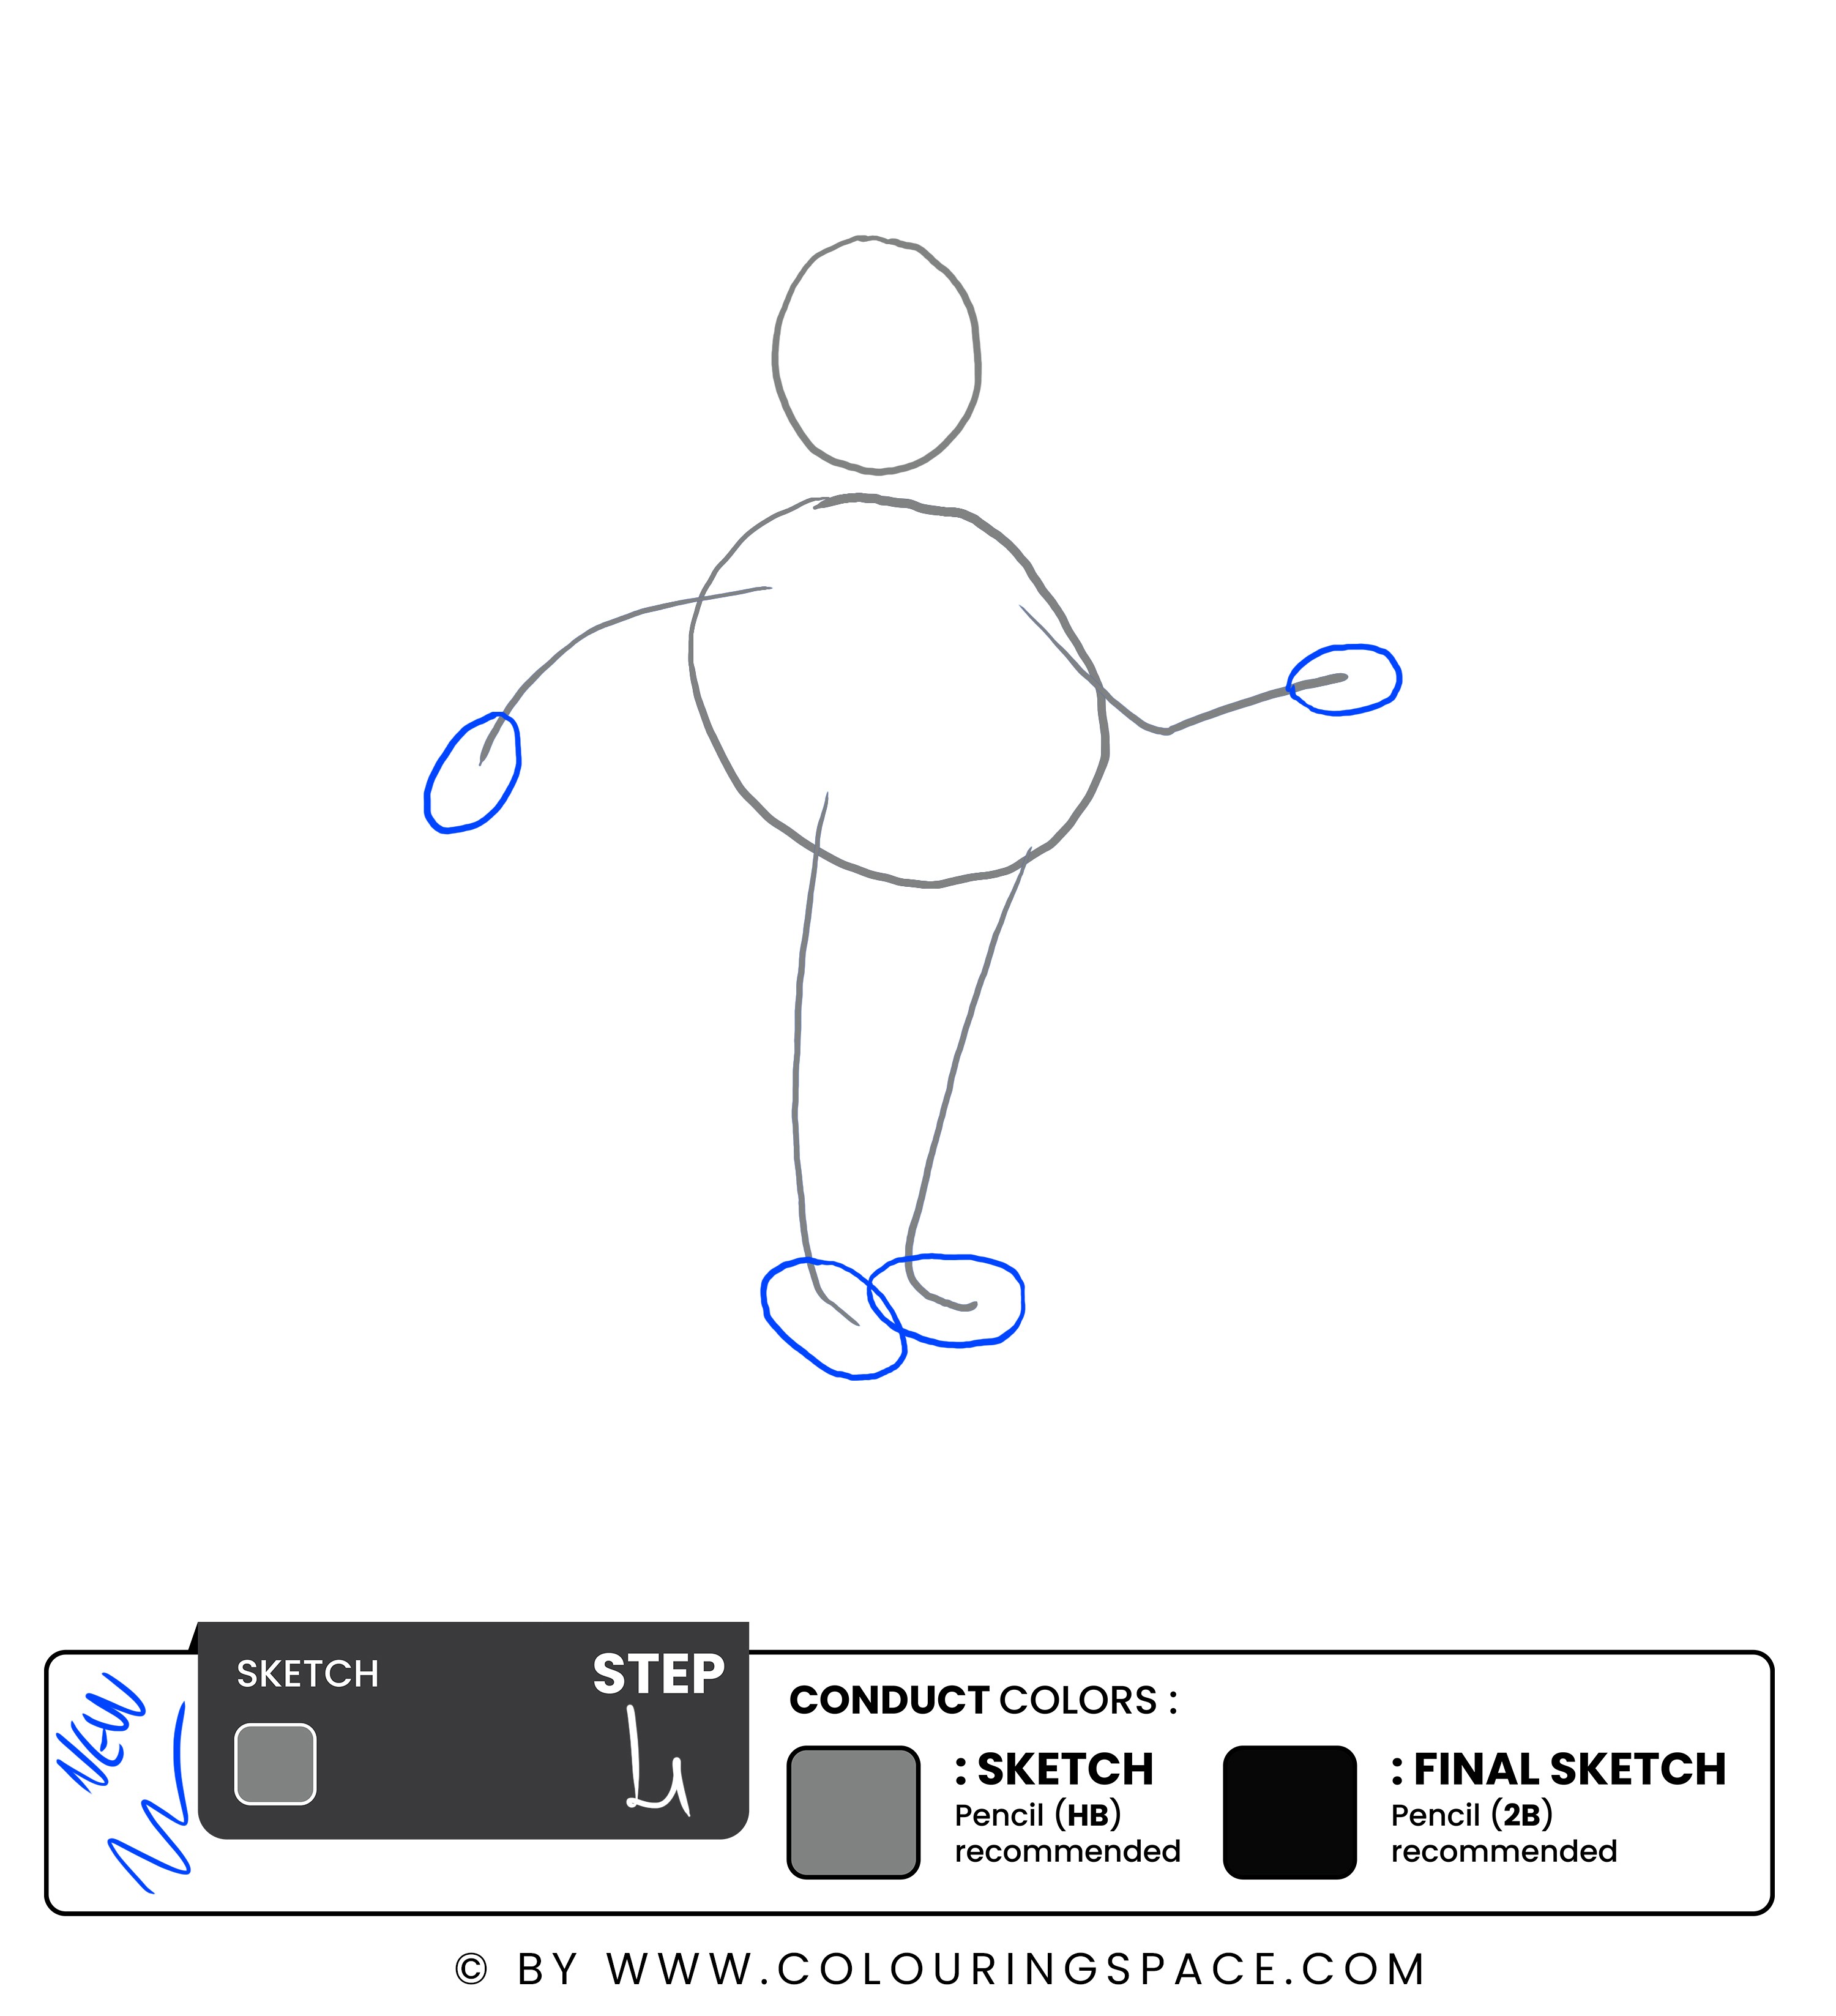
At the end of the arm sketch, draw a small oval shape that will outline the shape of the hand.
Once that’s done, do the same for the feet. Only with the feet, make the bottom slightly flat to help you with the finished look.
Step 5: Draw the Initial Sketch of the Surfboard
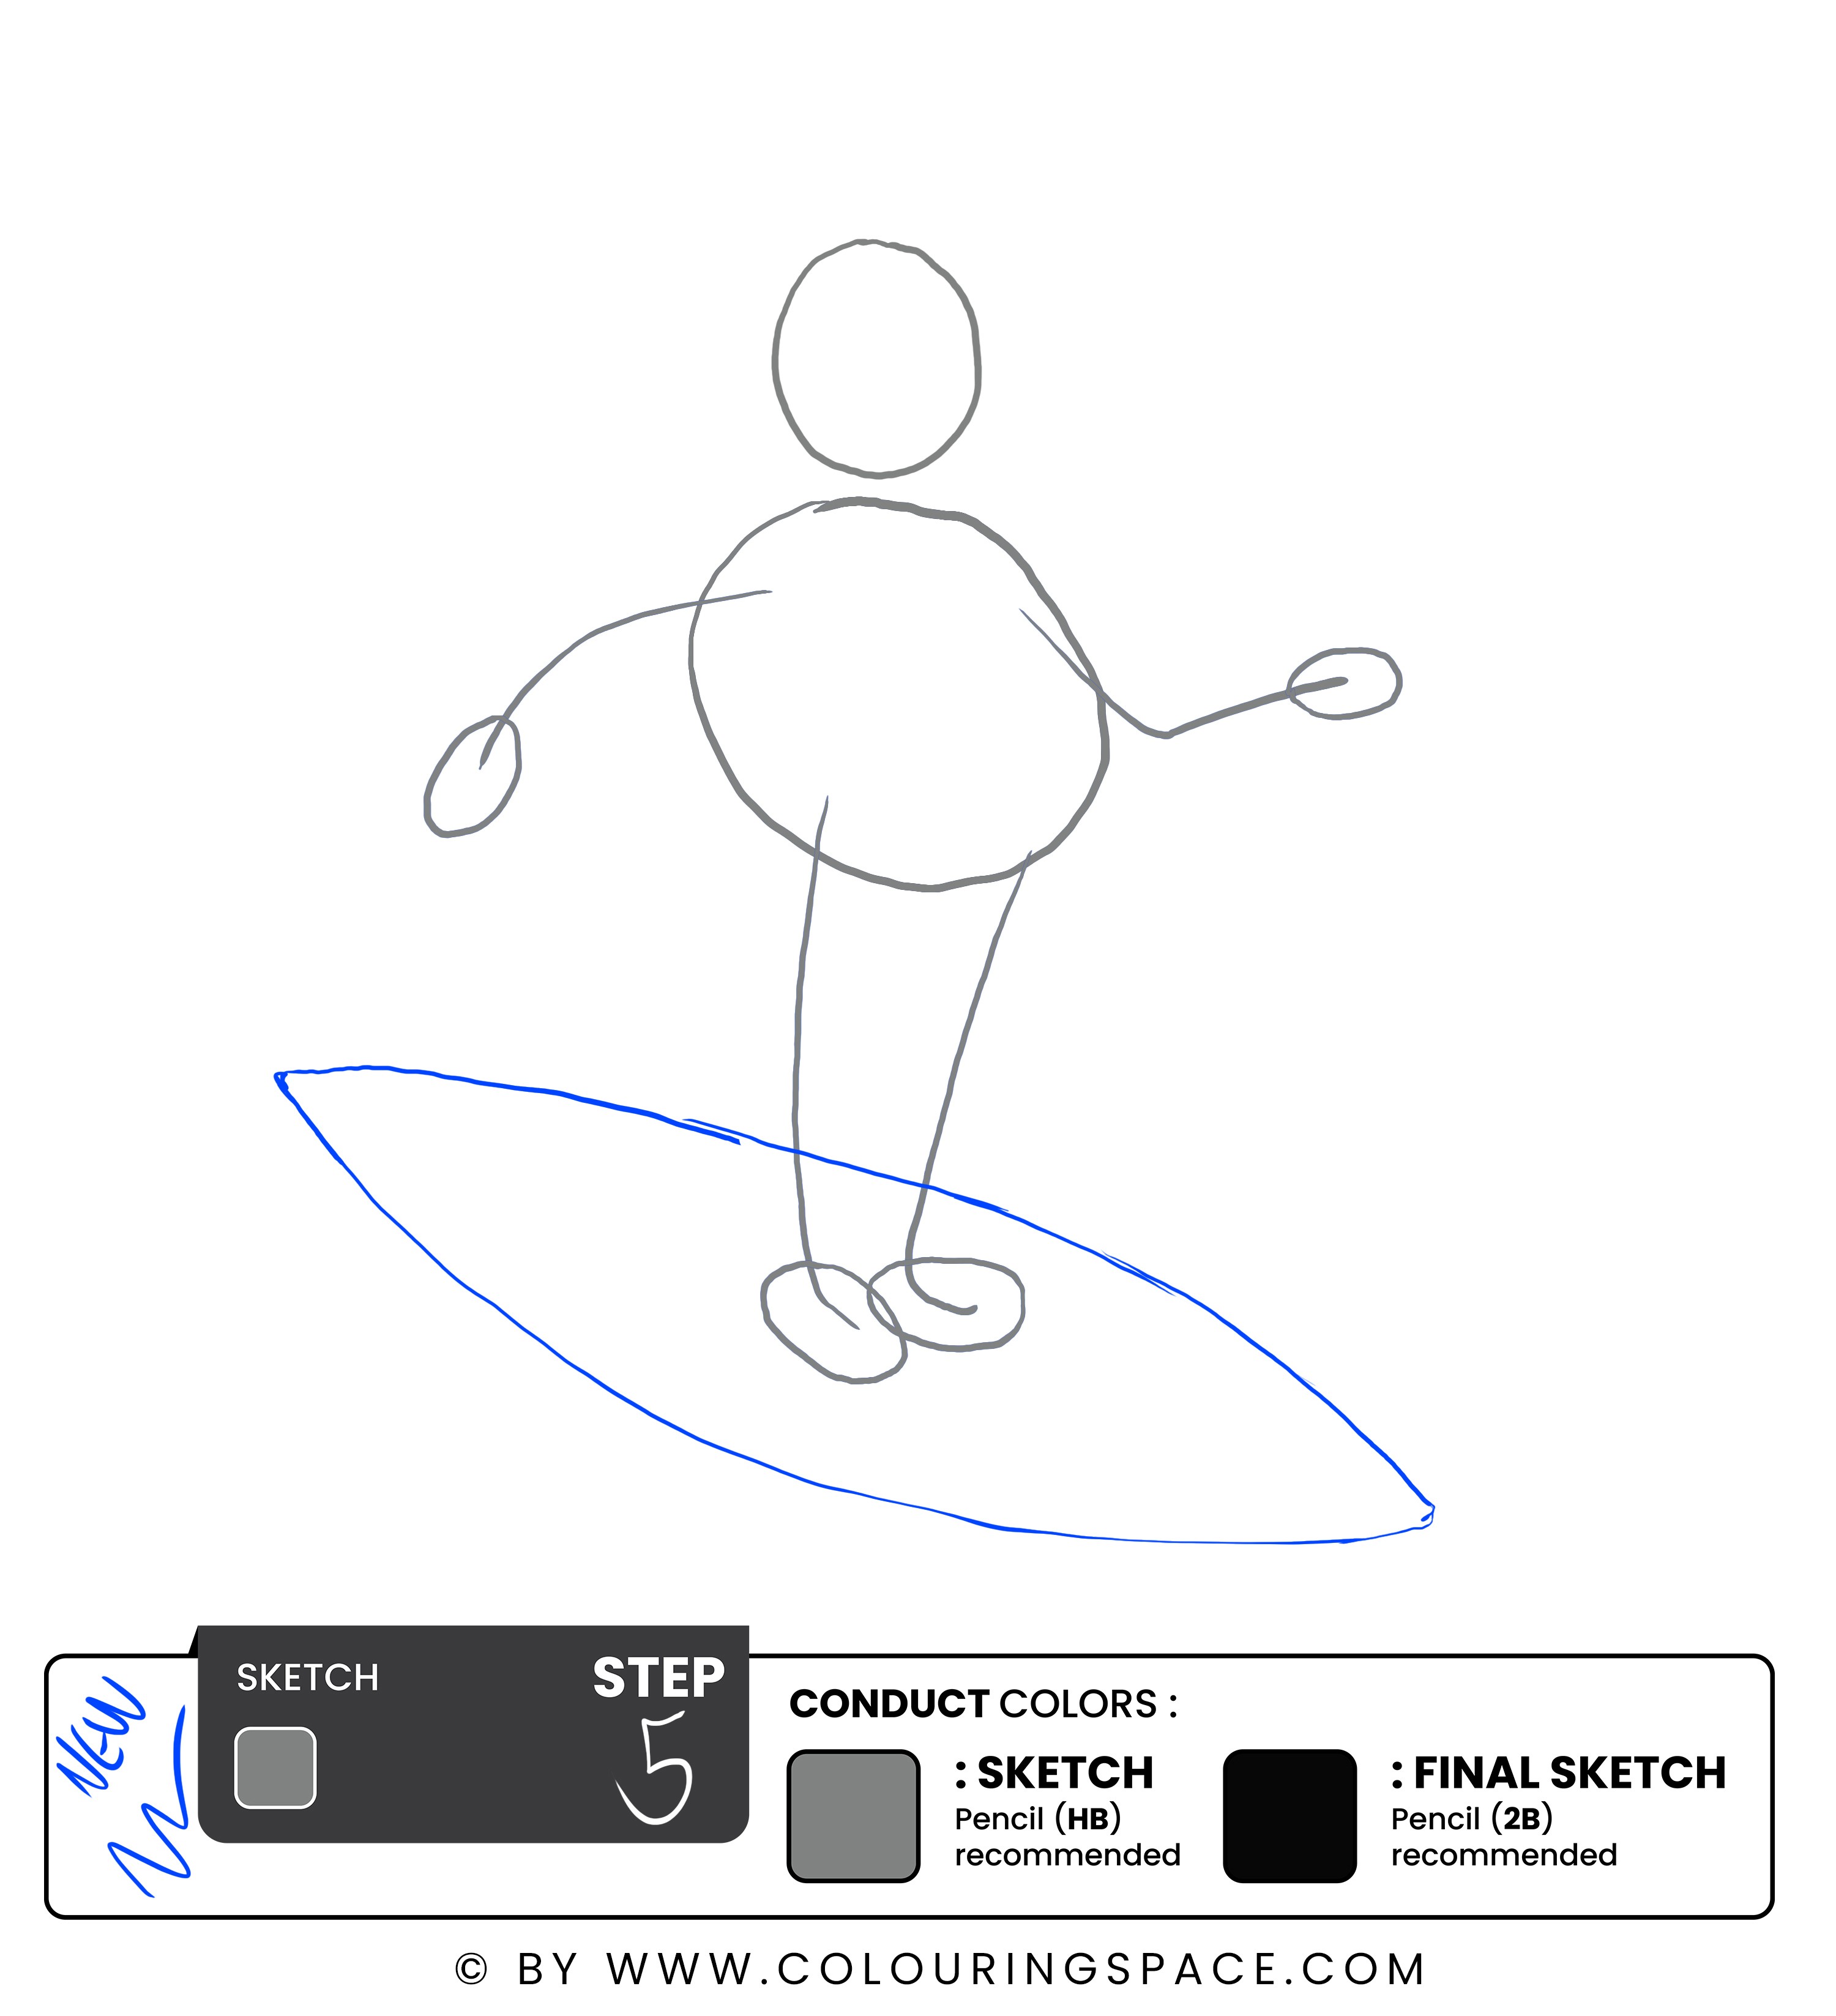
Position Santa in the middle, and draw two curved lines meeting on the edge, similar to the opposite edge.
This will be the initial sketch of the surfboard.
Step 6: Draw the Initial Sketch of the Gift Boxes
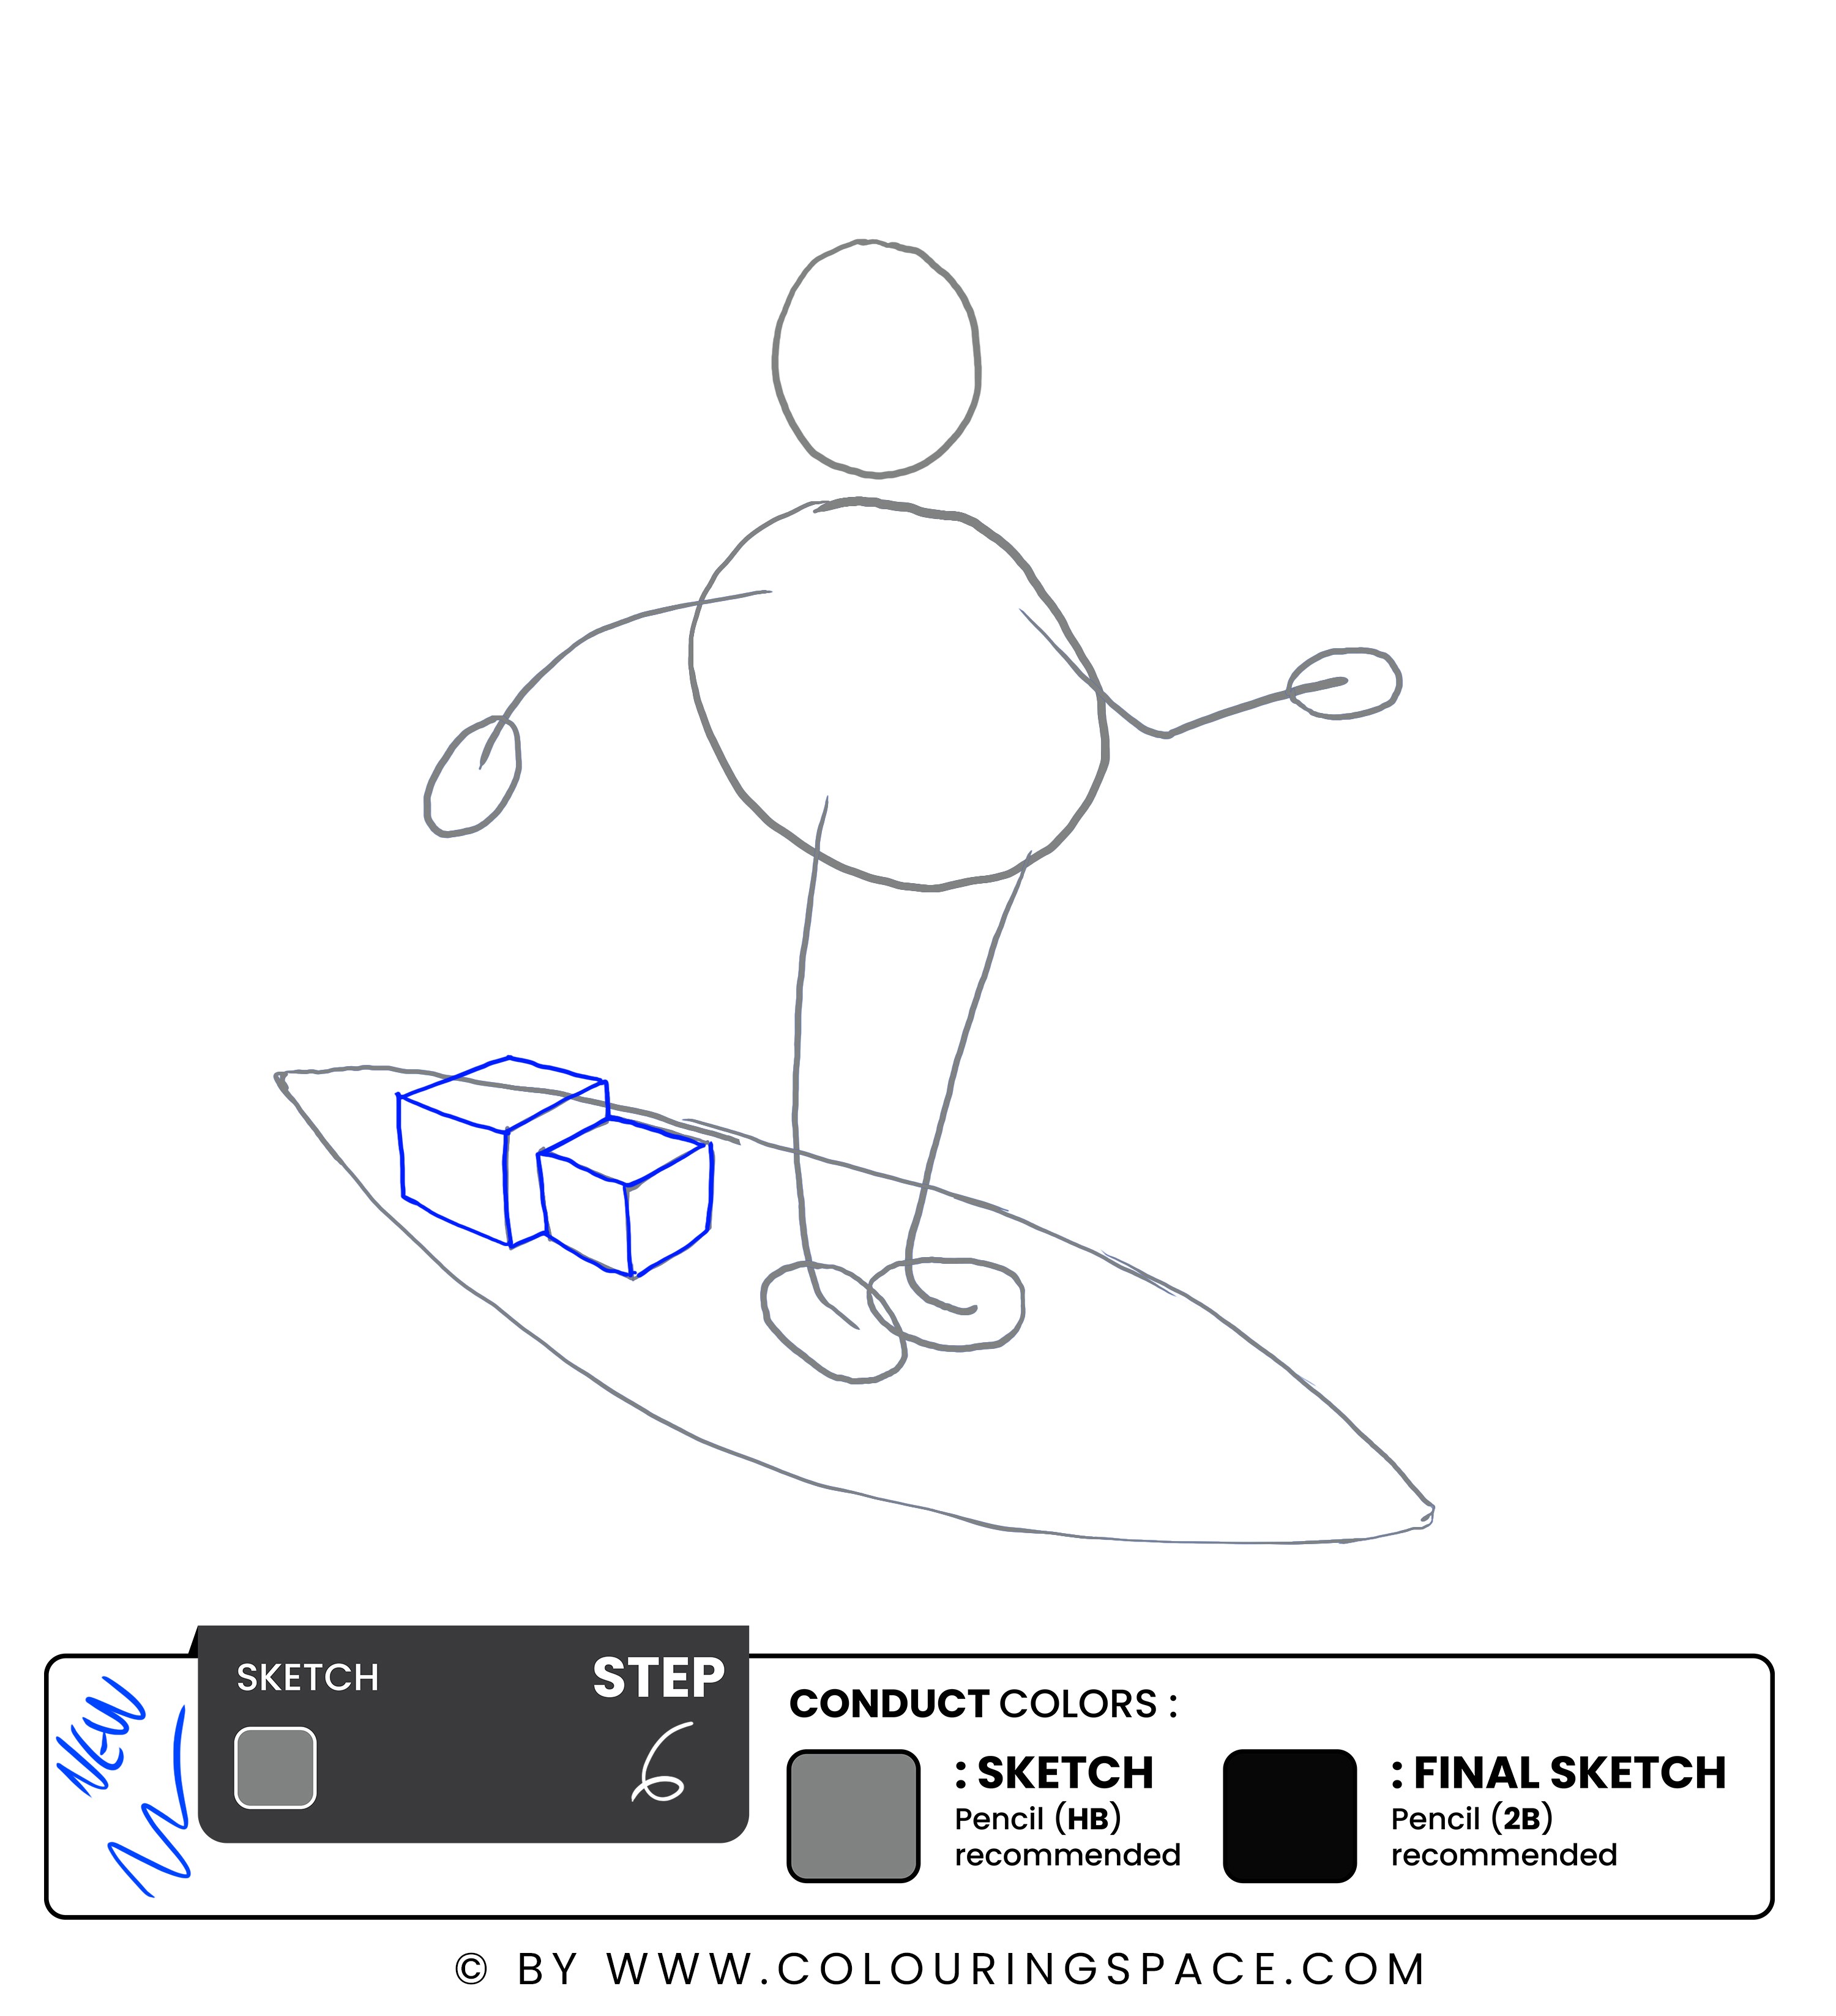
On the side of Santa, draw two boxes.
First, start by sketching a rectangle with two diagonal lines. These diagonal lines should be parallel to each other and should be the same length. Then, draw two perpendicular lines that intersect in the middle of the rectangle, which will create four smaller rectangles. Next, draw two straight lines in the middle of the two diagonal lines, which will create four little squares. Finally, draw two more lines that go from the middle of the rectangle to the sides, giving you a perfect box shape.
Ensure that the first box you draw is slightly bigger than the other one. These will turn into gift boxes later on.
Step 7: Divide the Face into Four Sections
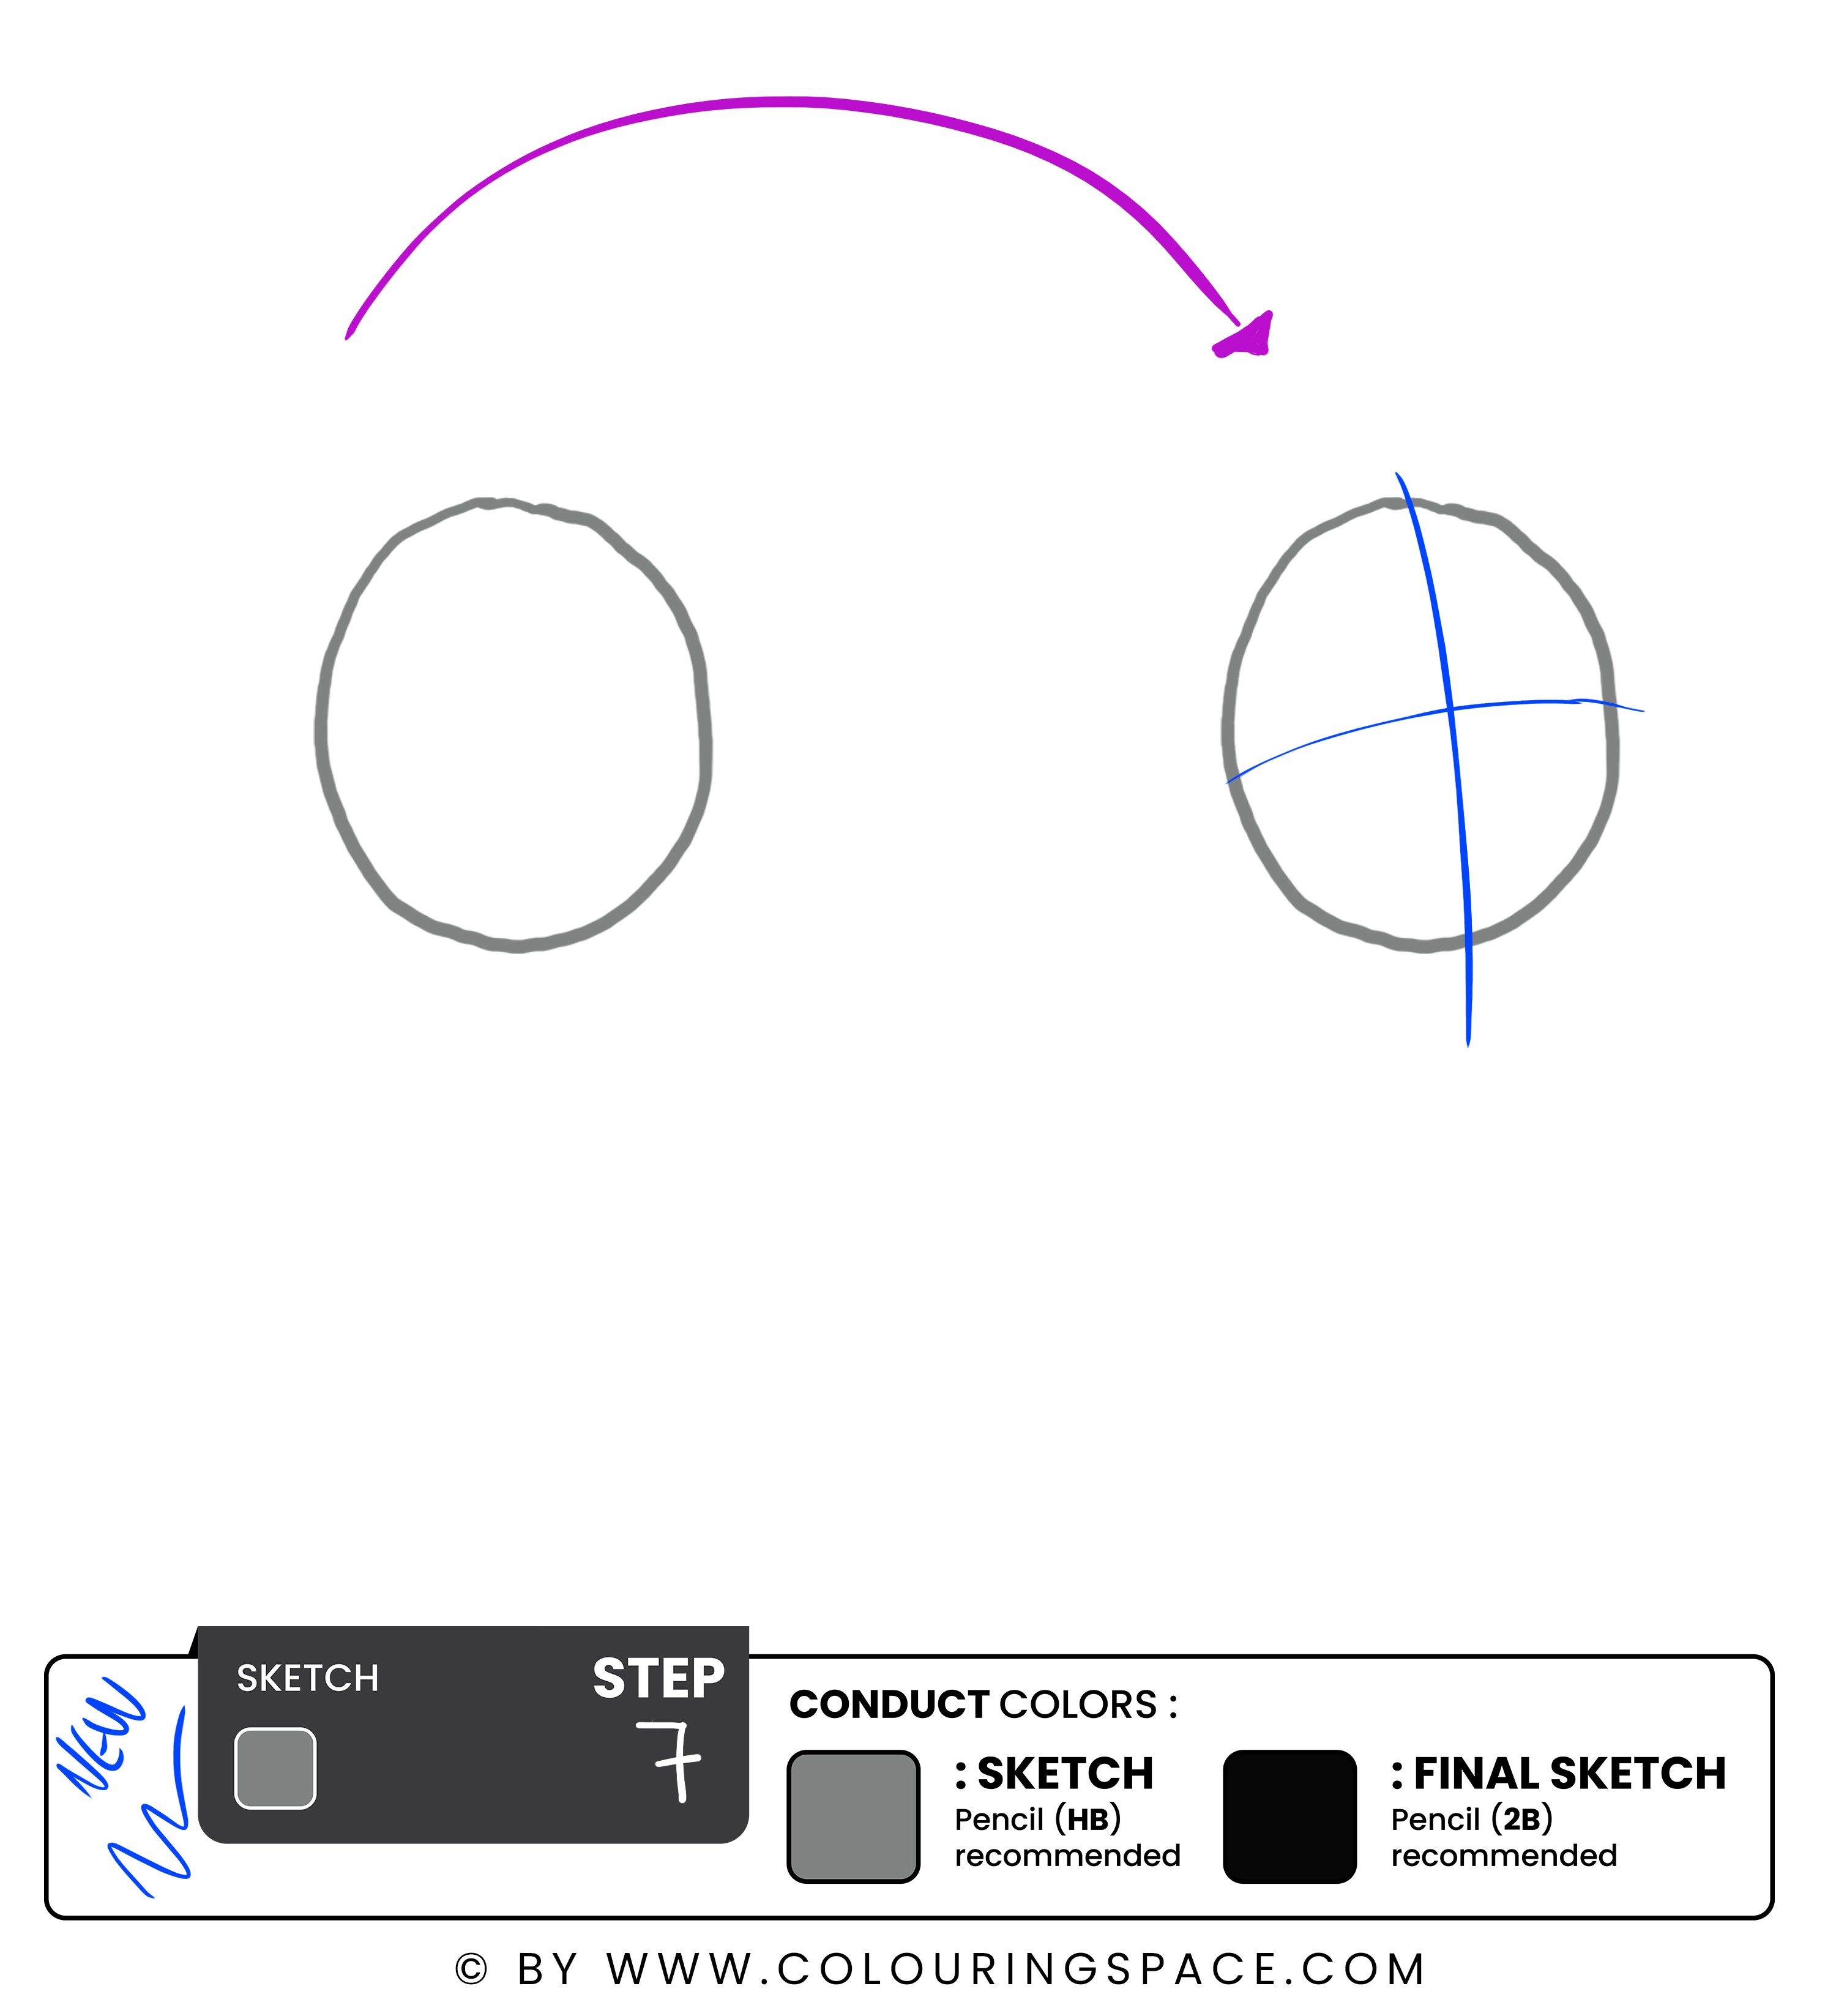
Free-handed, draw two lines, dividing the face sketch into four sections by dragging two lines, one horizontal and one vertical, just like the sketch above.
Step 8: Draw the Eyes

On the horizontal line, draw a small circle to depict the eyes, one on each side. Bellow the eyes, and add a small curved line for the eye bag.
Step 9: Draw the Nose and Eyebrows

To draw the eyebrows, imagine drawing a curved line on the eye, then a small wave on the top to finish the look. This might seem challenging, but we always advise you to get back to the sketch guide for reference.
As for the nose, on each side of the vertical line, draw two small circles exactly right below the horizontal line. Then, right in between, draw a curved line. Once that's done, connect the line to the circles, and here you go! You have finished drawing Santa's nose.
Step 10: Draw the Mustache

In order to draw the mustache, begin by sketching a horizontal line for the top of the mustache. After that, draw two curved lines on either side of the line to make the shape of the mustache. Make sure the curved lines are symmetrical, and the thickness is significant.
Step 11: Draw the Chin

For the chin, all you have to do is draw a deeply curved line right below the mustache.
Step 12: Add Santa’s Hat

This step seems a bit challenging, but we will guide you through it. Start by drawing a simple triangle outline for the hat. It should be a bit wider at the bottom and narrower at the top. You can add a curved line along the bottom edge of the triangle to give your hat a more traditional look. Next, draw two curved lines along the sides of the triangle to give the hat a little more shape. After that, draw a wide brim around the bottom of the hat and a small pom-pom on the top.
You can remove the triangle's initial sketch to give it a more clean look.
Step 13: Draw the Beard

In order to draw the beard, start a semi-circle starting from one side of the face to the other. Make sure to make it a bit thick and somewhat bushy.
Step 14: Outline the Hat

Grab your 2B pencil and outline the hat sketch you drew earlier.
Make sure to take your time with this step so you don’t overline it.
Steps 15 & 16: Outline the Facial Features, then Remove the Sketchlines


Using the same 2B pencil, outline the facial features of Santa, as well as the mustache . Once that’s done, move on to outlining the beard. Make sure to make it fuzzy and slightly pointy at the end.
Step 17: Draw the Upper Part of Santa’s Outfit
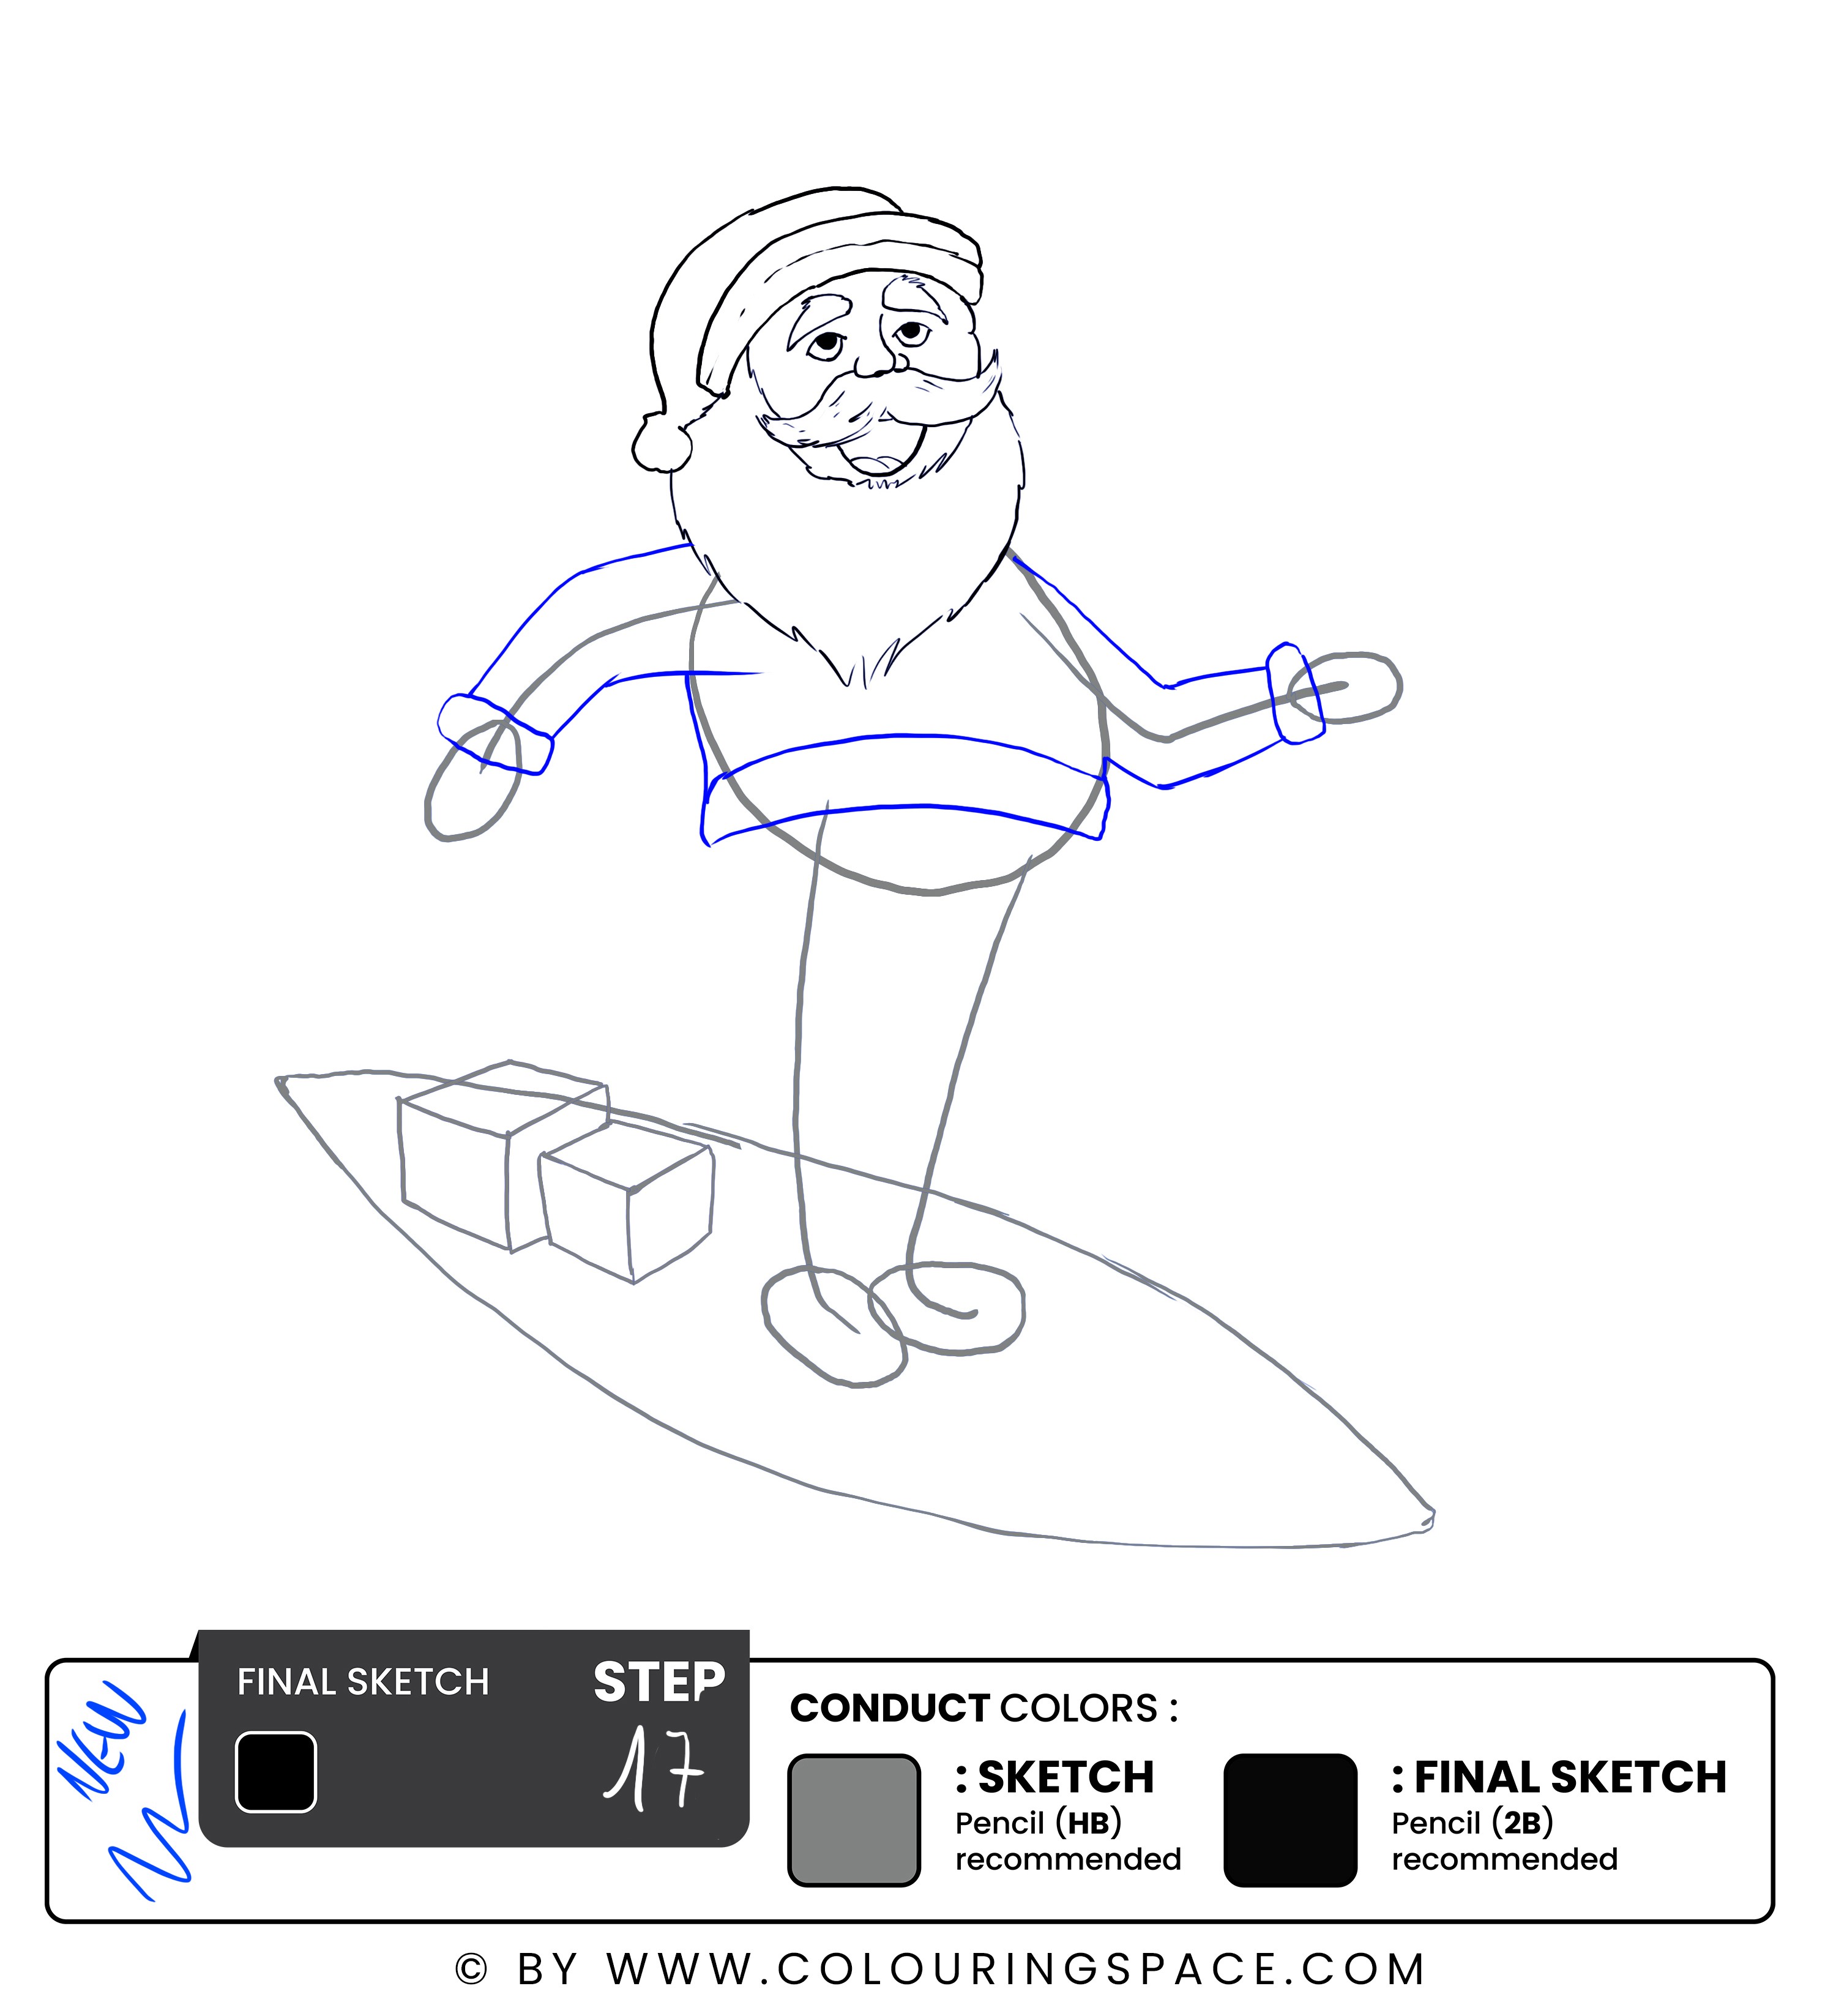
To make sure you complete this step, start by drawing two parallel lines curved to the arm’s bend to depict the sleeves. Repeat this process for the other hand. Once that’s done, draw a line coming on both sides of the upper part of Santa’s outfit, then draw a belt shape on the bottom to depict the belt.
More details will be added later on; the drawing is coming together.
You're growing as an artist, too! How fun is that?
Steps 18 & 19: Draw the Hands, then Remove the Sketch


Within the circle drawn to depict the hands, follow the sketch guide shown on the side. Add one finger at a time to finish the hand look.
Make sure to repeat the process for the other hand as well.
Step 20: Finish the Look of Santa’s Coat

On the upper part of the outfit, add a line to show the coat design, then add three buttons by drawing small circles on the upper part, then two below the belt.
For the belt, draw a small rectangle in the middle to finish its look, then move on to completing the coat’s look on the bottom.
Below the belt, draw two curved lines on the side going inwards, then move on to adding a thick part to depict the lower hem.
Step 21: Draw the Pants

Make sure that the pants fit Santa's body by using curved lines for the waistband and curved lines for the bottom of the pants. Then, draw a horizontal line for the top of the pants and two vertical lines for the side seams.
You can use the lines drawn earlier to help you position the pants perfectly.
Steps 22 & 23: Draw the Shoes, then Remove the Sketch Lines
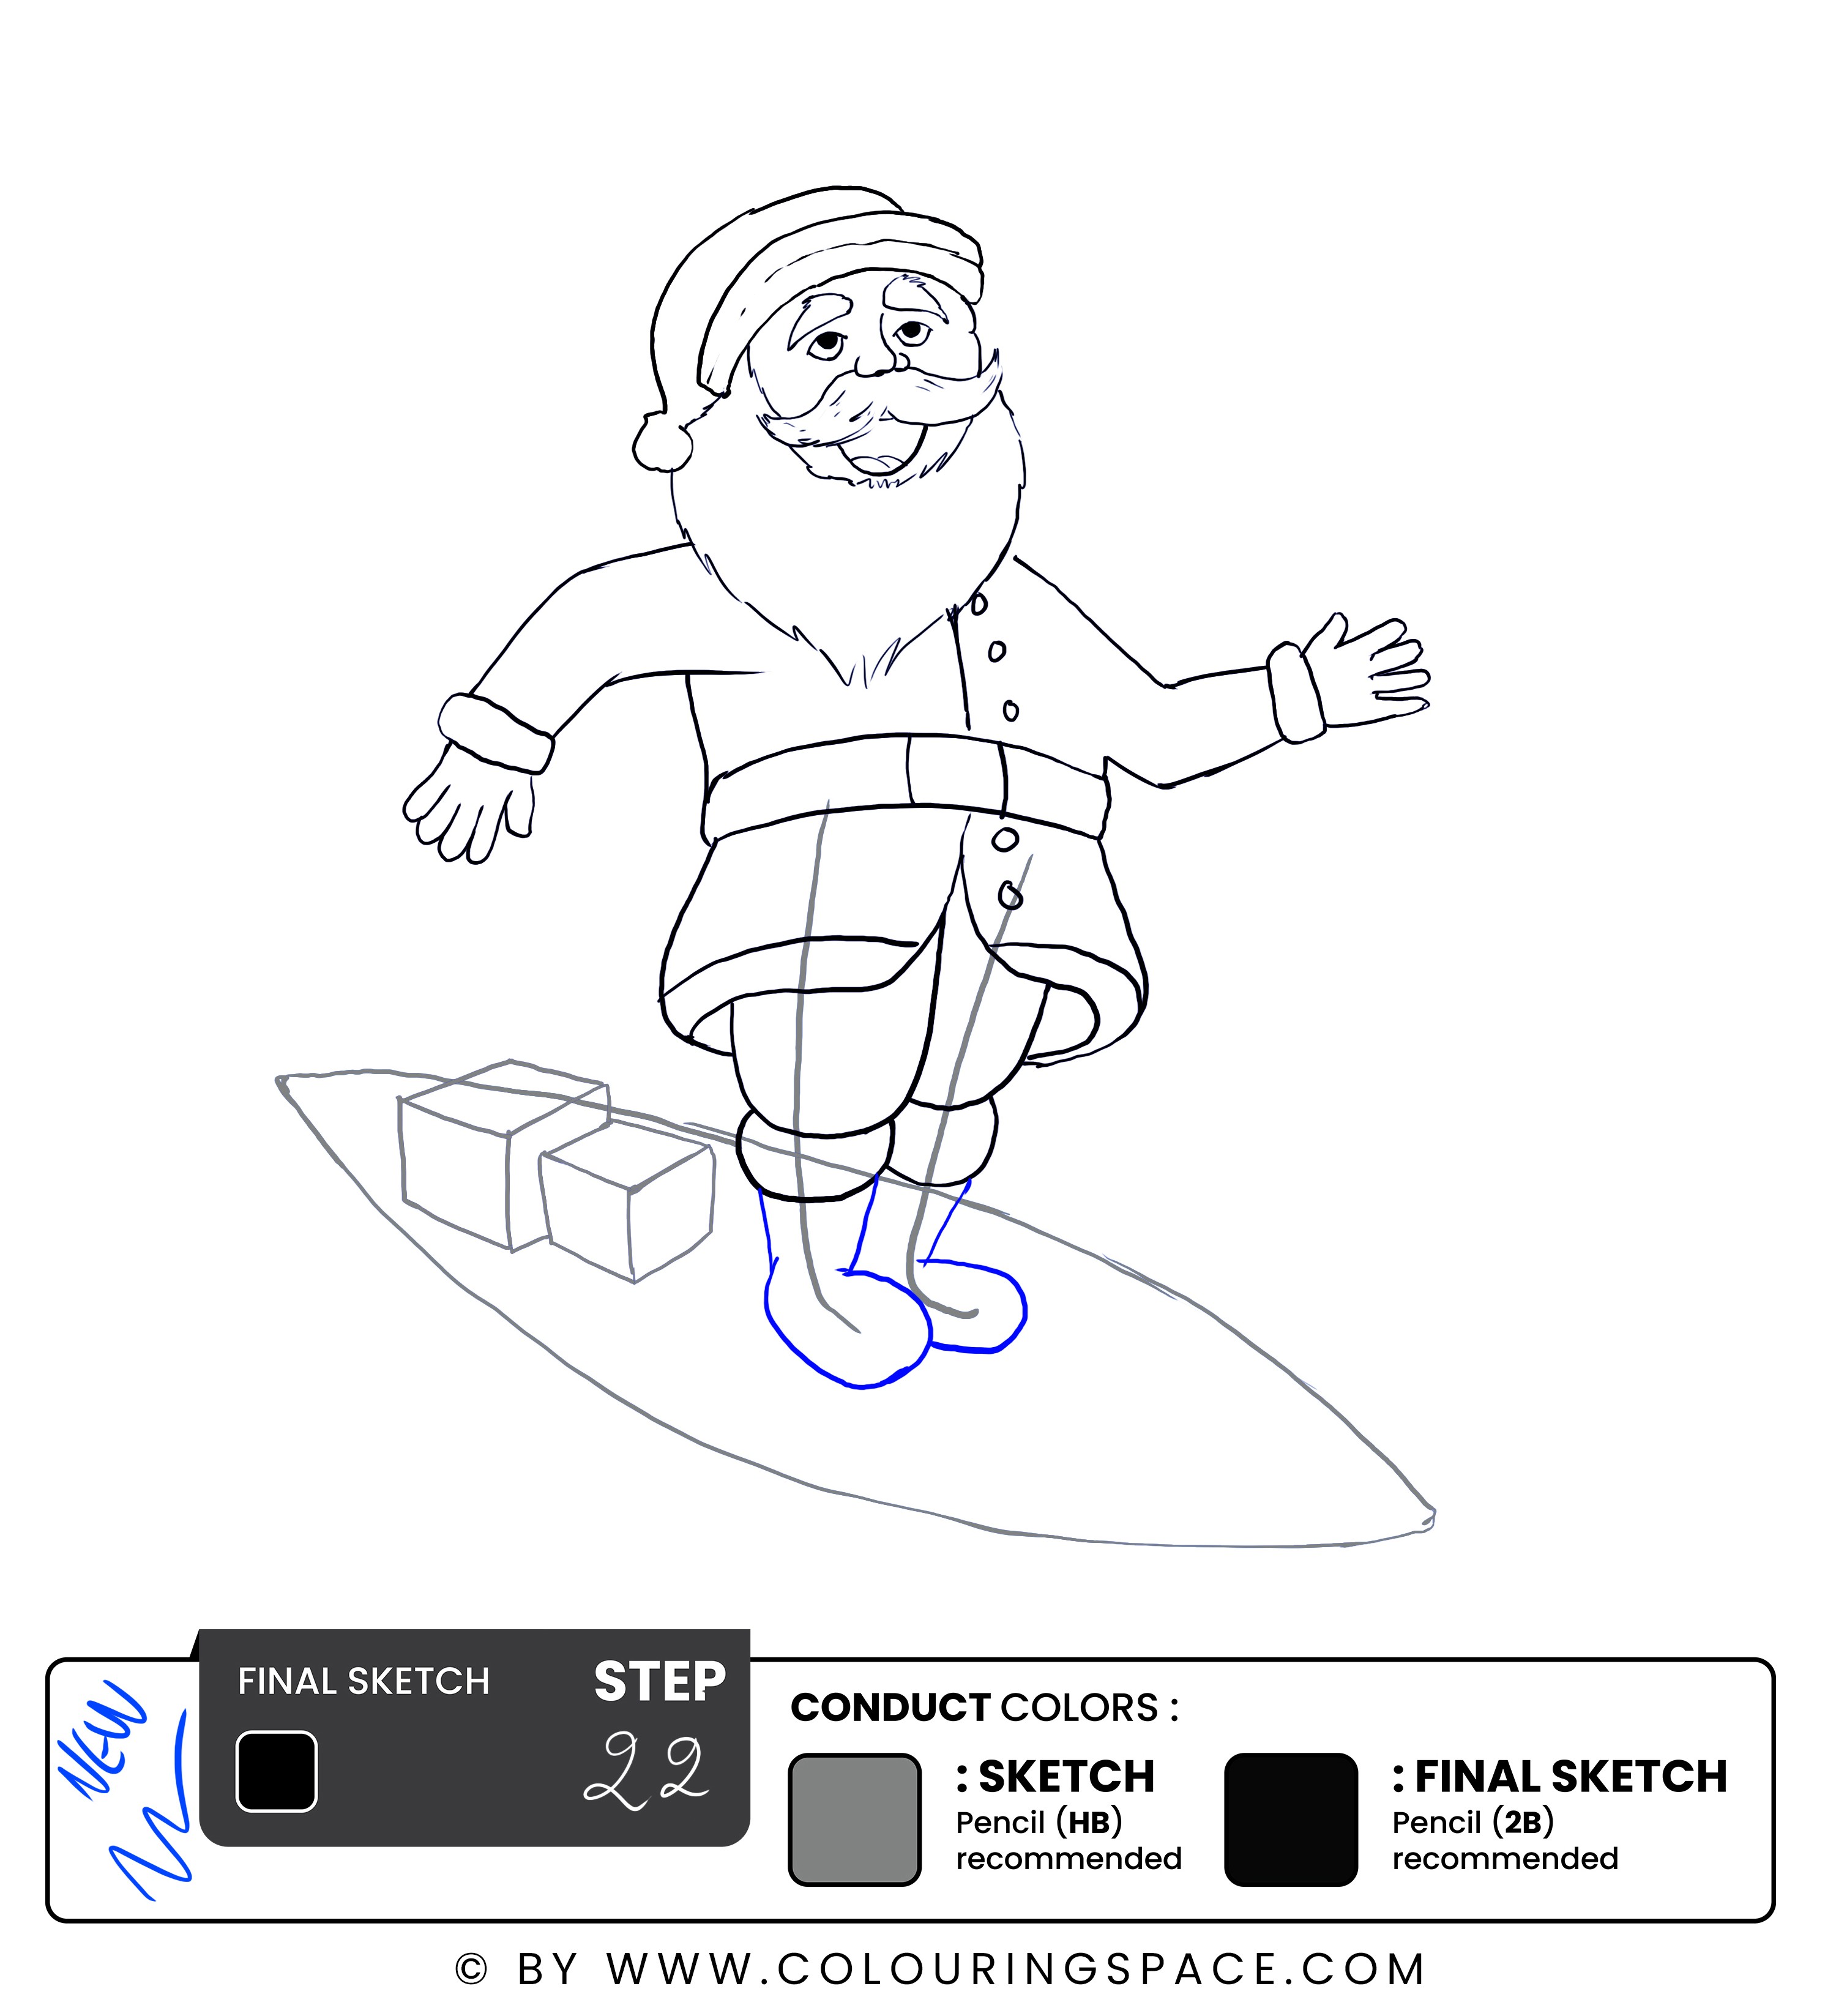

In order to draw Santa's boot, all you have to do is to draw an oval shape. Start by following the foot's shape and work your way up to the top of the boot. Make sure it's connected to the pants. Once that’s done, remove the sketch lines using a clean eraser so as not to ruin the sketch. Use short and consistent strokes.
Step 24: Outline the Small Santa Gifts Box

Draw a line across the square's center. This is where the box's fold will be. Then, draw two lines—one at the top and one at the bottom—across the square. These are where the box will be folded once more. Next, mark two diagonal lines at each of the square's four corners. These are the flaps that are going to be folded up into the box. Lastly, draw two tiny triangles to form the box's lid at the top, with no pointy heads but rather round to form the bow.
Steps 25 & 26: Outline the Bigger Box, then Remove the Sketch Lines


Using the same technique used to outline the smaller box, finish the bigger box drawing. Once that’s done, grab your eraser, then remove the sketch lines used to achieve the final drawing.
Steps 27 & 28: Outline the Surfboard, then Remove the Sketch Lines
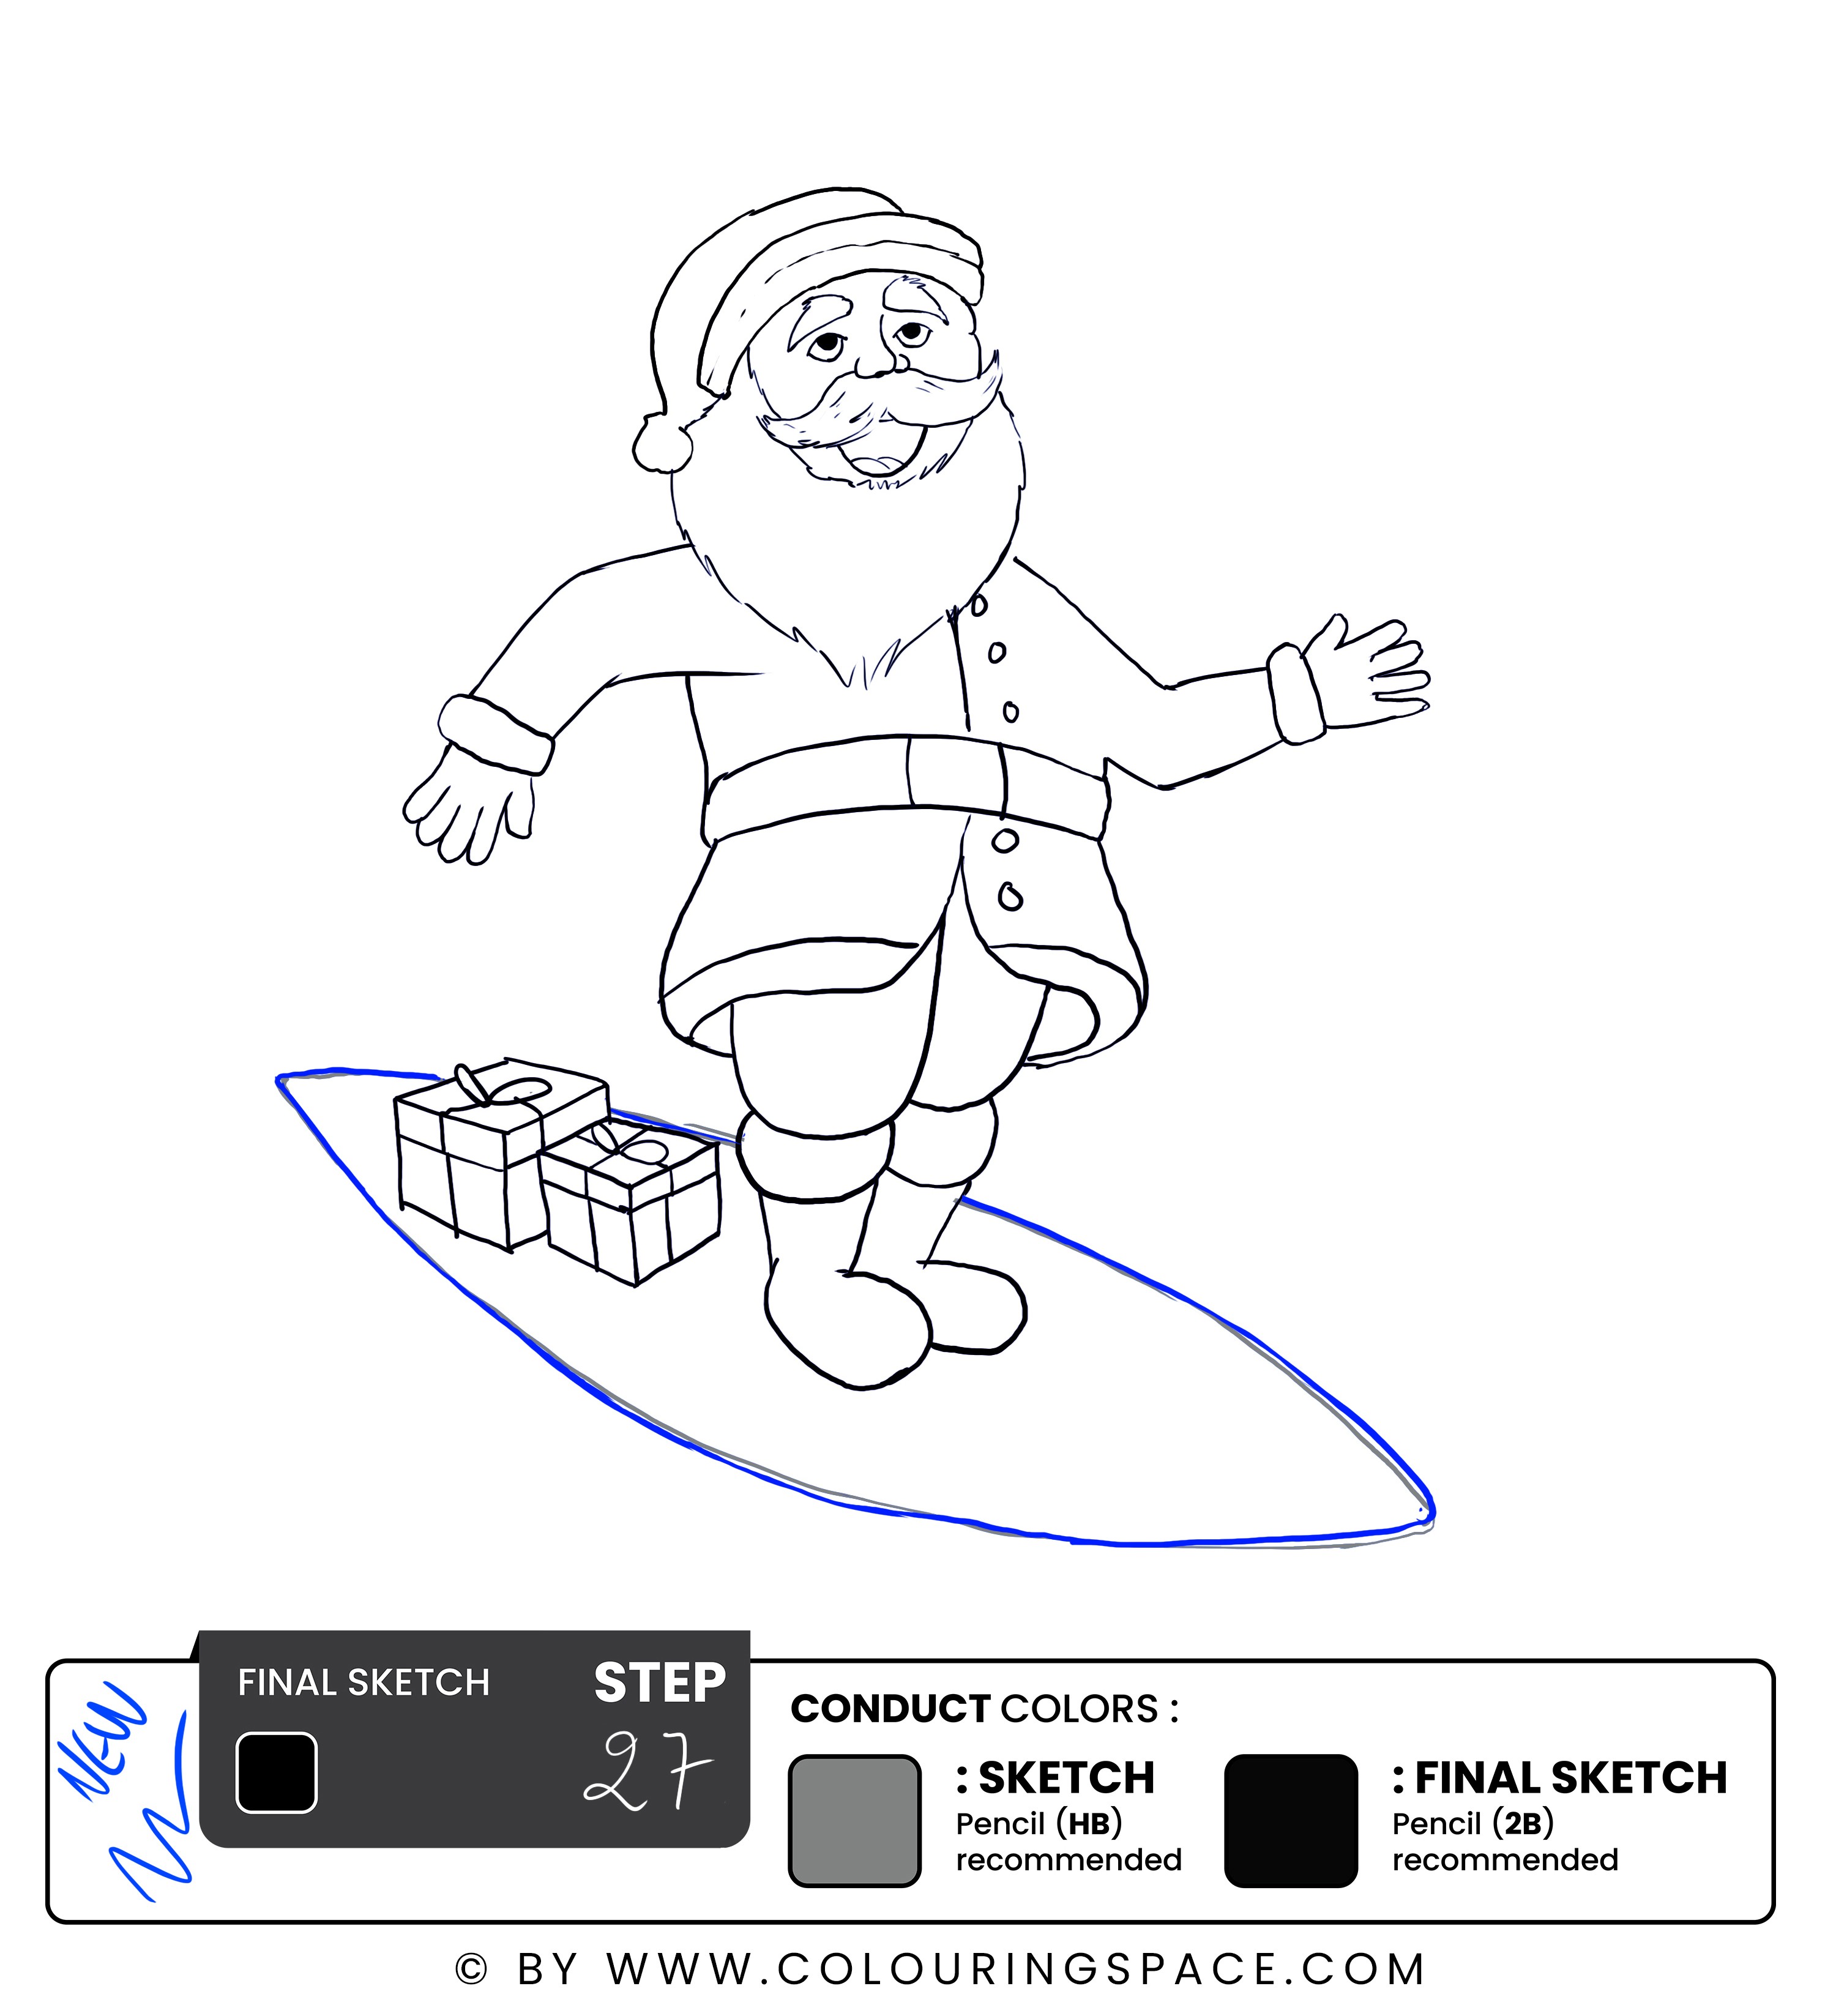

Using your 2B pencil, outline the surfboard. Make sure not to overline the surfboard as you go, then move to removing the sketch lines using the same strategy.
Step 29: Add a Last Detail to the Surfboard

In the middle of the surfboard, draw two thinly spaced lines, going in the middle of the surfboard to give it a more fun, realistic look. If you're unsure of how to draw it, you can always use a ruler to help you with the process.
Final Sketch
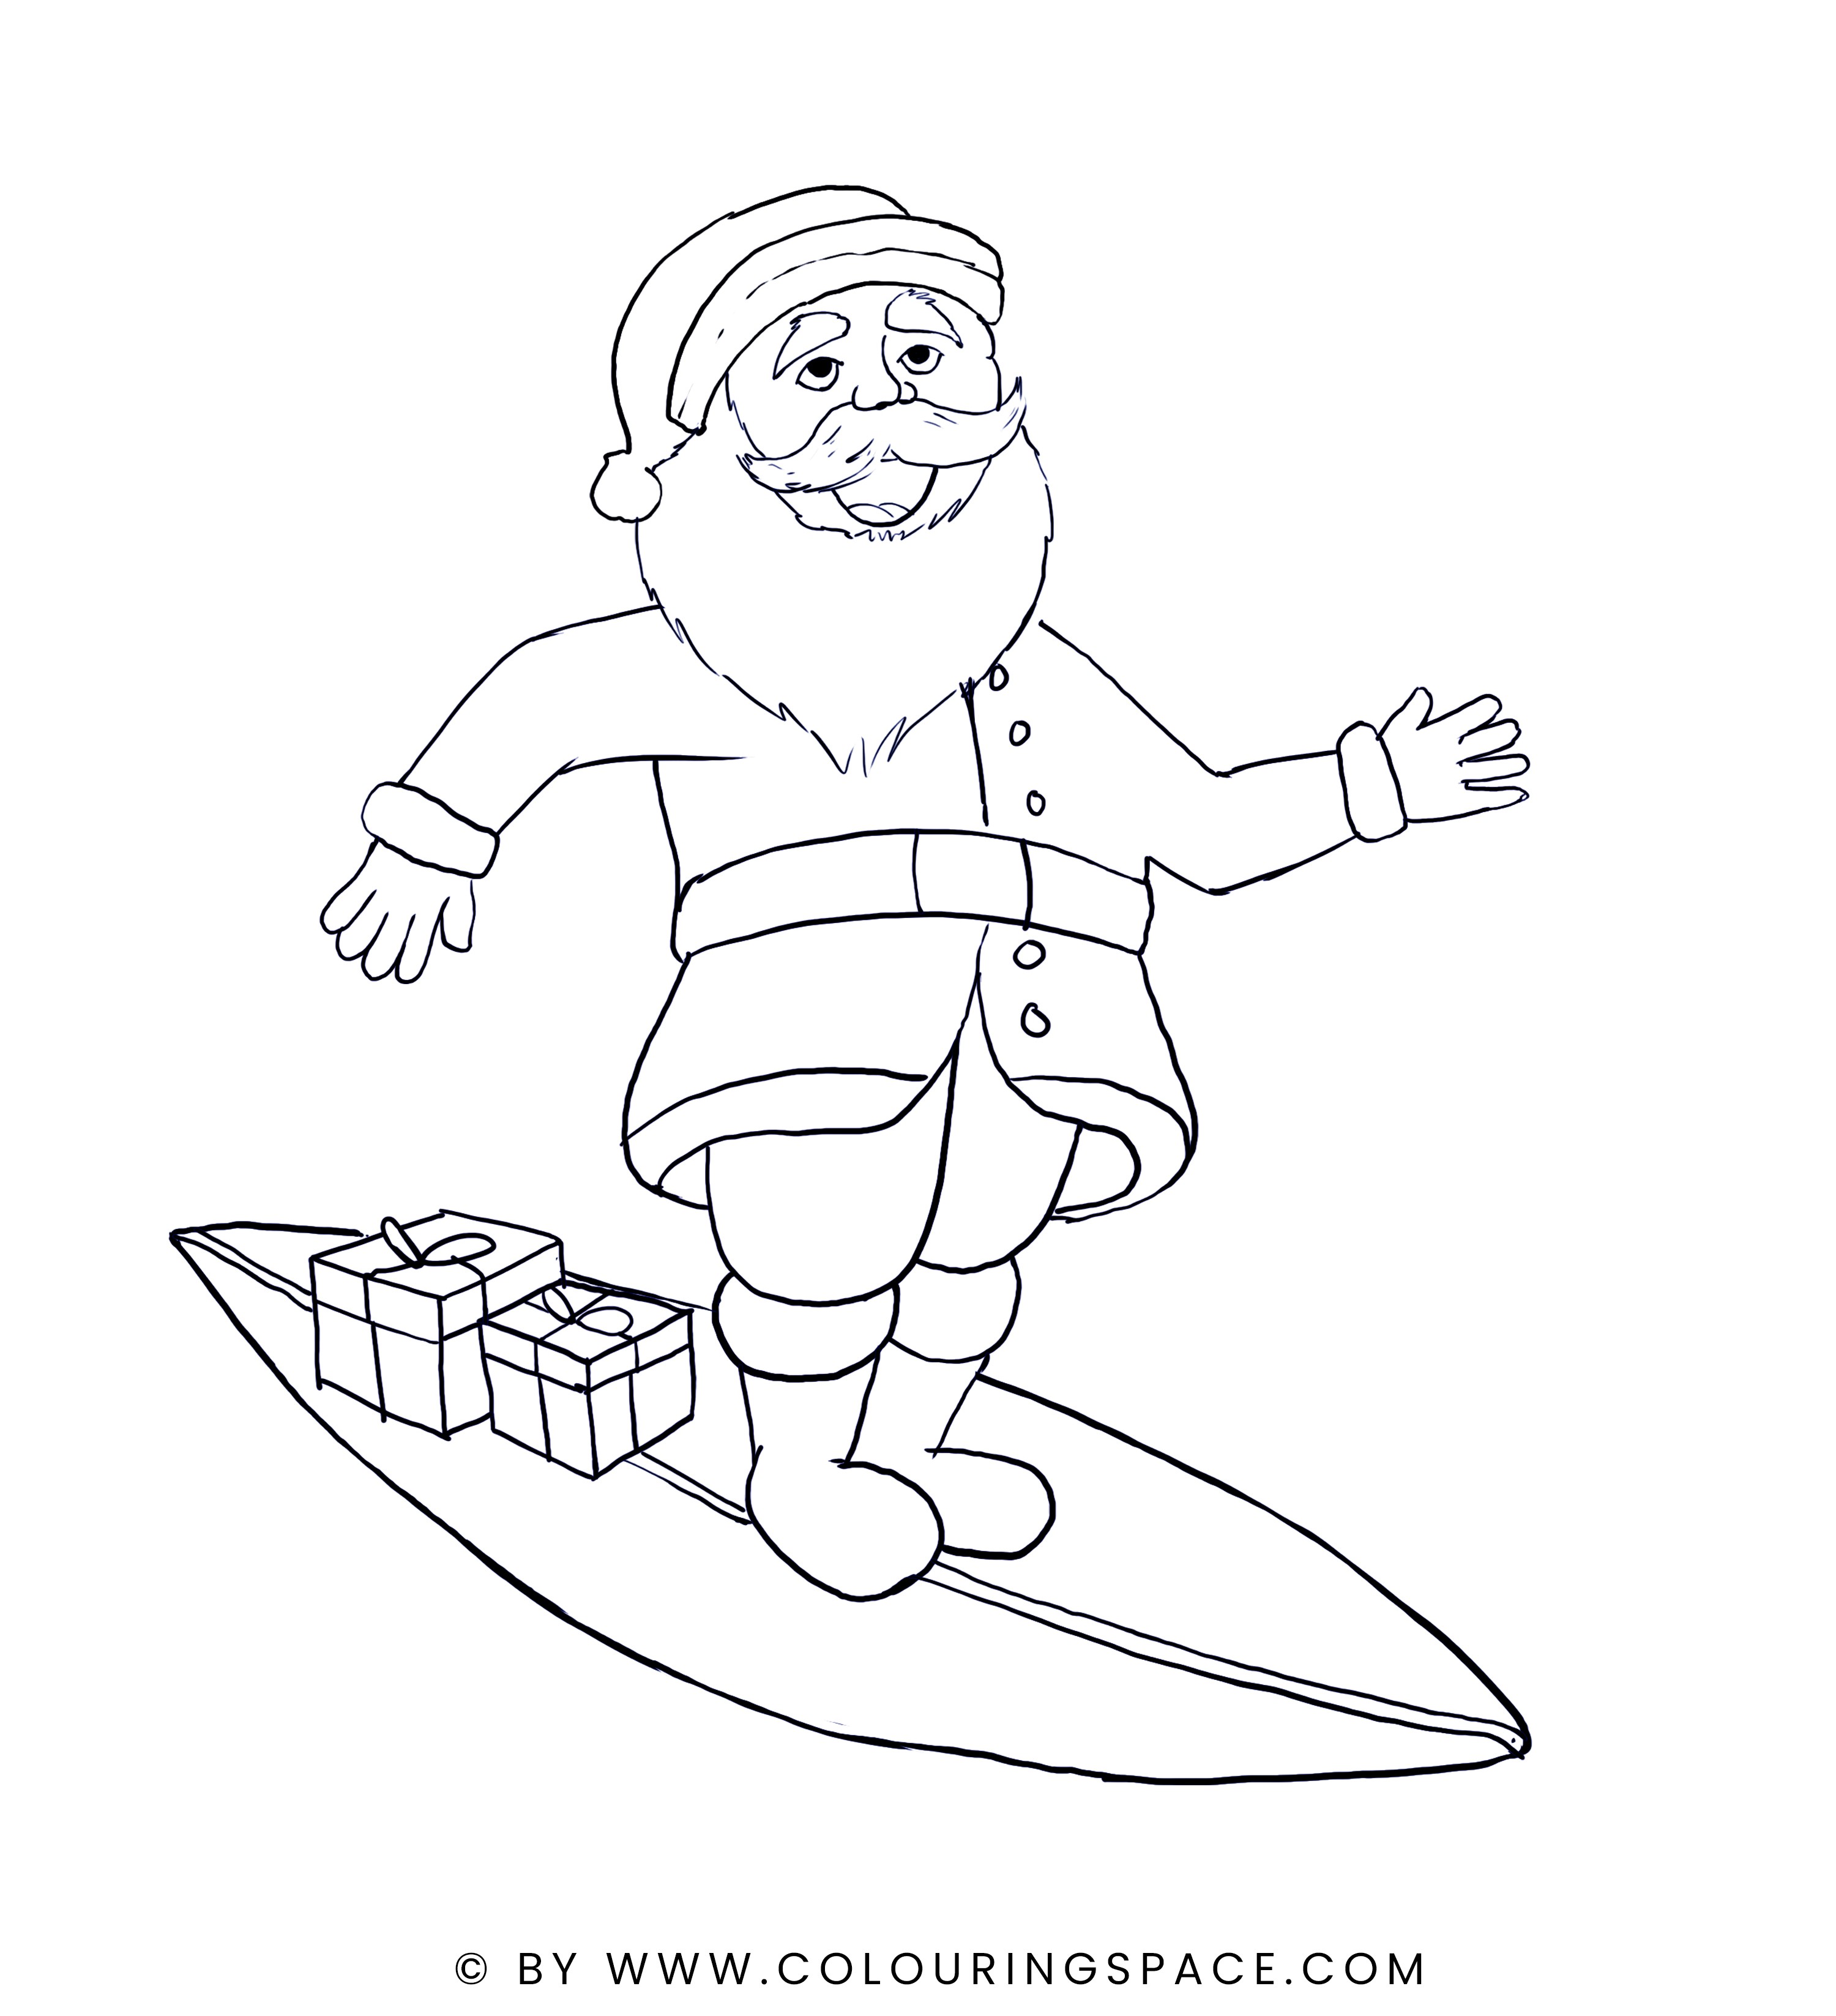
Congratulations, you have finally finished drawing your own Santa on a surfboard, bearing gifts to all the children of the world.
To conclude, we have just completed a drawing tutorial of Santa on a surfboard bearing gifts. We learned how to draw Santa and his board, as well as how to draw the presents he was carrying. You can also draw the waves on the background in order to make the illustration more realistic. This tutorial was a great way to practice your drawing skills while also having some fun. Now that we know how to sketch Santa on a surfboard, perhaps we can utilize this skill to make original artwork of our own; add some color to your drawing sheet to make it more vivid. Alternatively, you might just savor the sentimental experience of sketching Santa and his presents. Whatever you decide to do, we hope you had a great time creating your own version of Santa.
