Pokemon Fans How to Draw Ash Holding Pokeball

Are you into anime? Well, this drawing lesson is for you! Here is a step-by-step guide to Pikatchu’s best friend, Ash. A tutorial that will surely please both adults and kids.
Pokemon is a beloved franchise that has captured the hearts of fans worldwide. With its colorful cast of creatures, exciting battles, and engaging story lines, it is no wonder that so many people have become fans of this iconic series.
One of the most noticeable characters in the Pokemon universe is Ash Ketchum. The fearless trainer who journeys throughout various regions to capture and train Pokemon. Ash's signature accessory is the Pokeball, the device used to catch and store Pokemon.
Drawing Ash with Pokeball is a fun way to show off your artistic skills and pay homage to this iconic character.
This article will provide a step-by-step guide to drawing Sacha full body holding a Pokeball that will help you bring your drawing to life.
So whether you're an old fan of the series or just starting out, grab your pencils, and let's begin this exciting artistic journey!
Step 1: Begin by drawing a circle for Ash's face
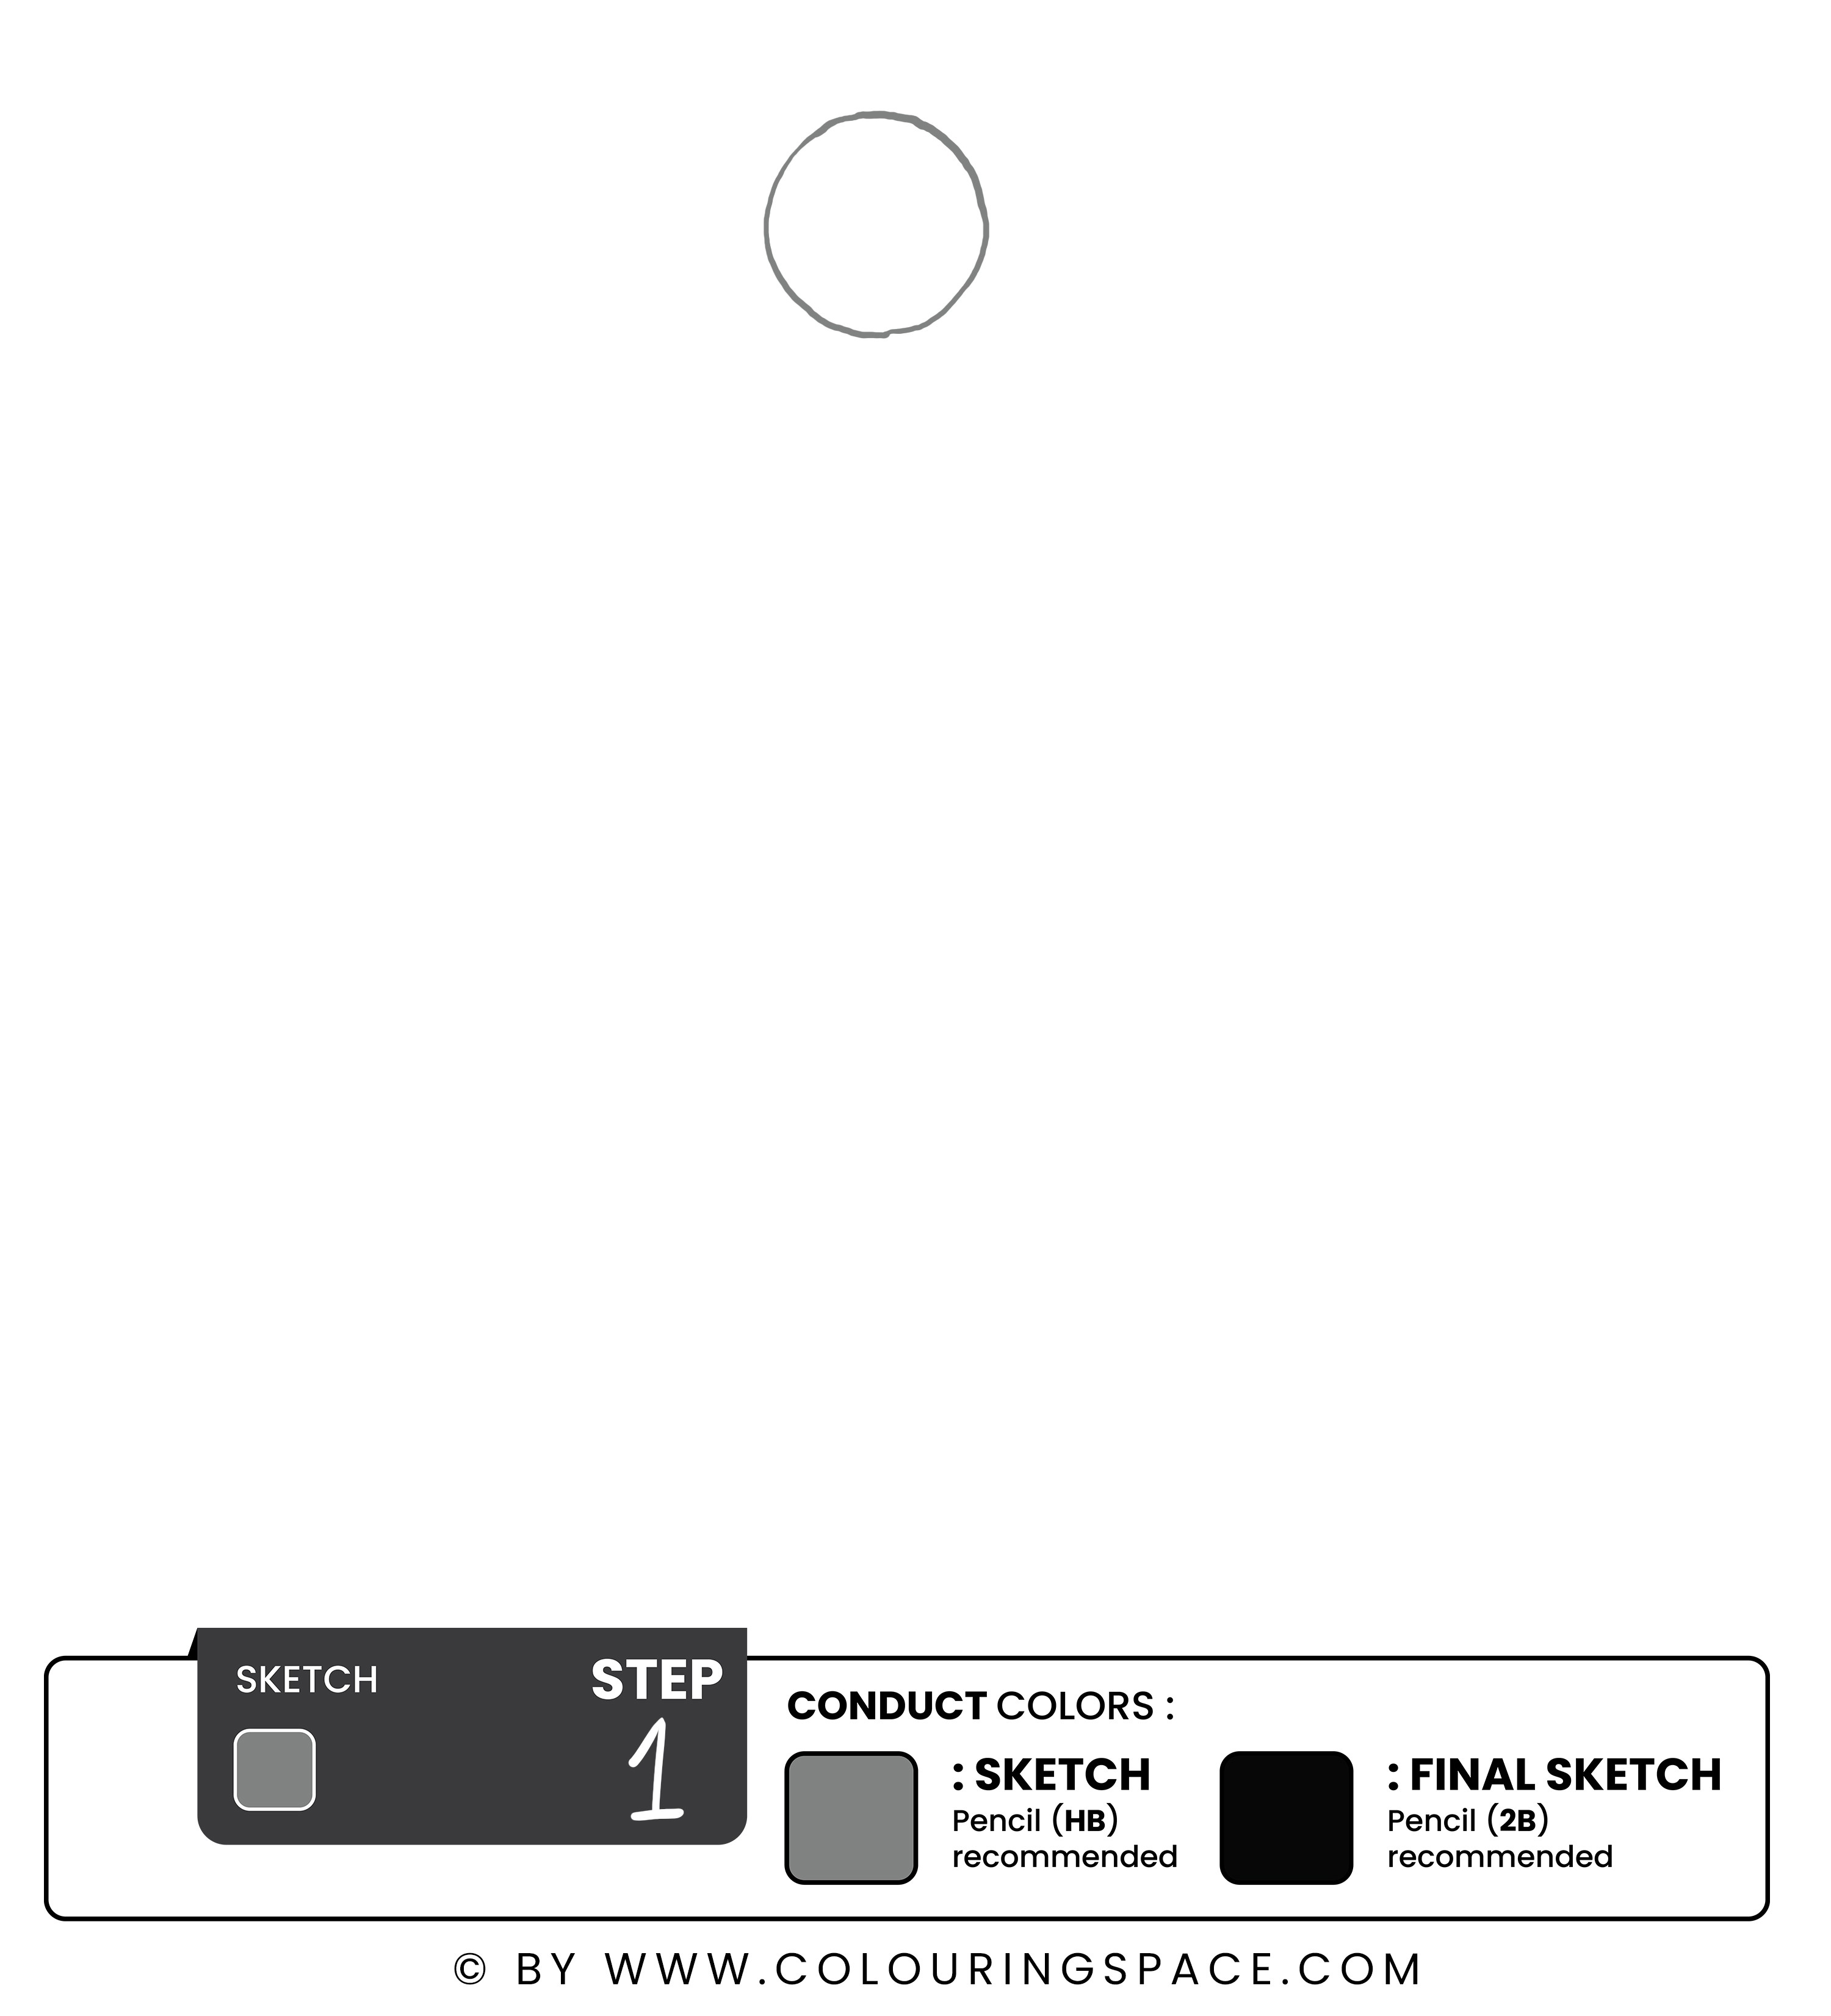
This circle will serve as the foundation for his head and facial features.
Don't worry about making it perfect. Aim for a general circle shape proportional to the size you want Ash's head to be. Drawing circles may seem simple, but it's an essential skill for any artist.
Be brave and practice drawing circles of different sizes until you feel comfortable with this basic shape. The more you practice, the simpler it will become!
Now that you've got the circle down move on to the next step.
Step 2: Draw the Structure of Ash's Face
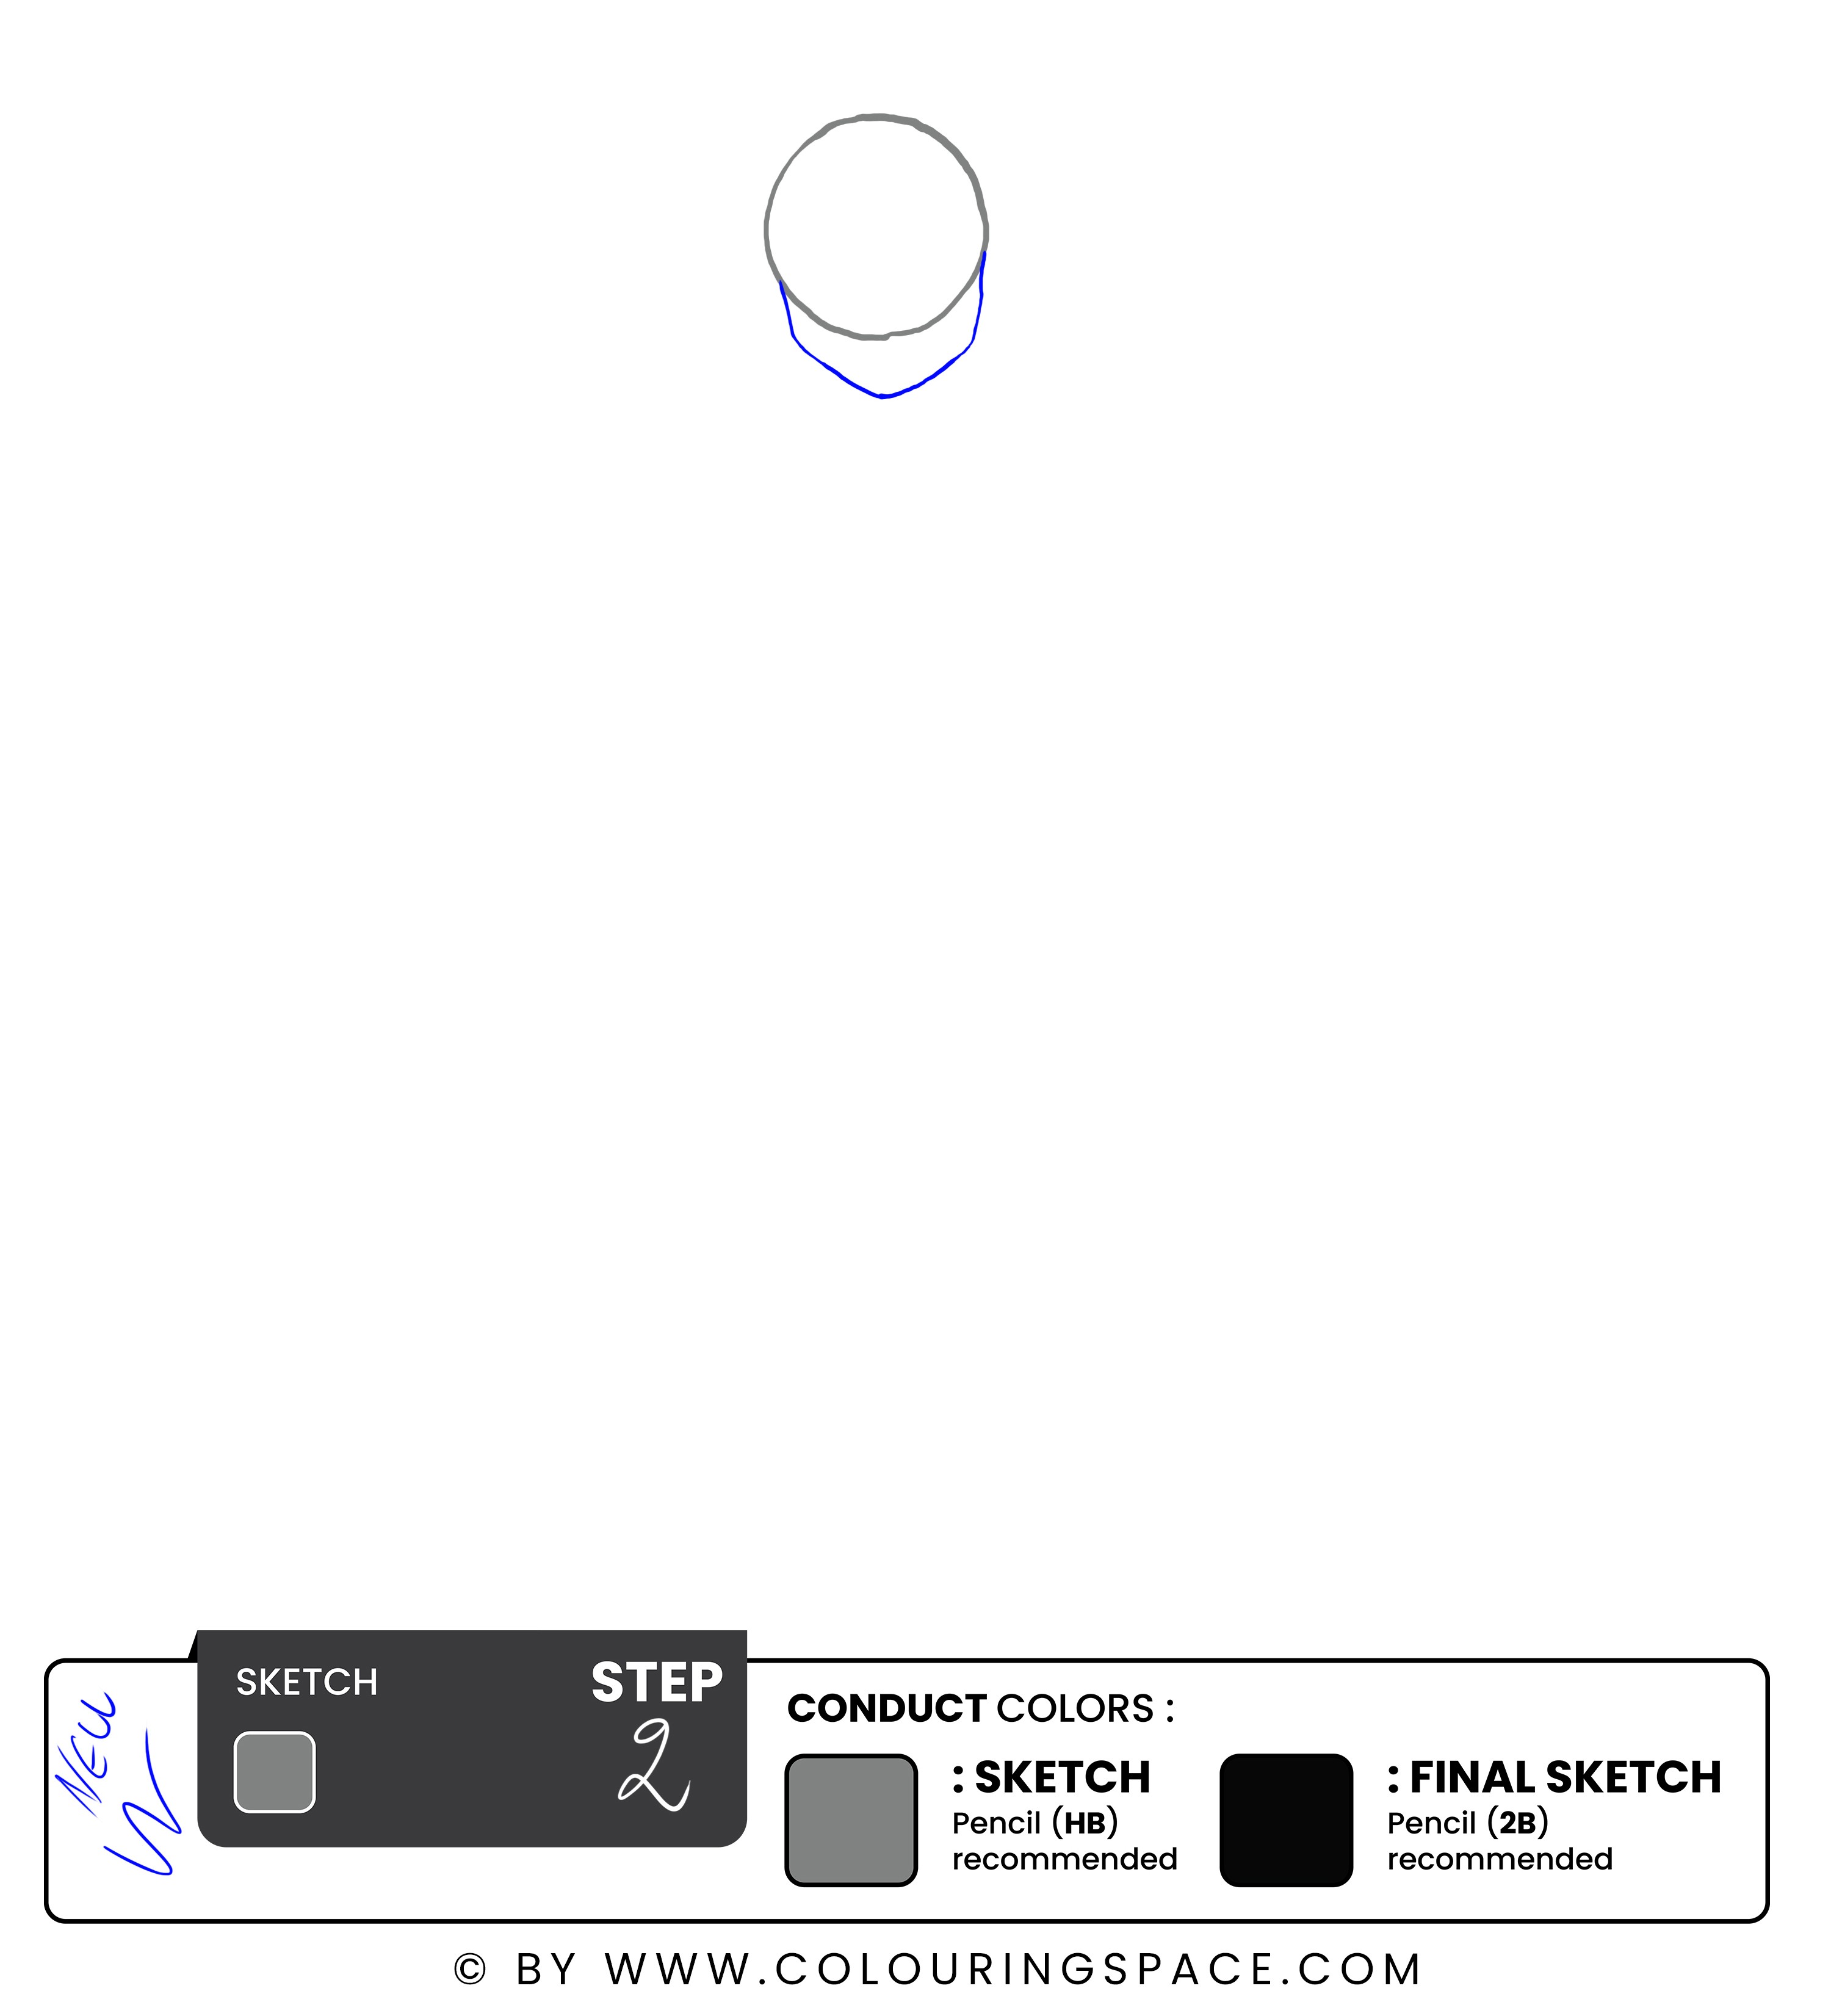
Now that you have the circle for Ash's head, it's time to add structure to his face. Let's start by drawing a line that extends from the bottom of the circle, curving slightly outward towards the middle of the page. This will be Ash's jawline.
When drawing a character's face, paying attention to the overall structure and proportions is essential.
In Ash's case, his jawline is an important feature that helps define the shape of his face. Paying close attention to this detail can create a more accurate representation of the character. As you draw the jawline, don't worry too much about making it perfect. It's okay if it's a little wobbly or uneven at first. You can always go back and make adjustments later.
Steps 3 - 4 & 5: Sketch the Neck and Body of Ash
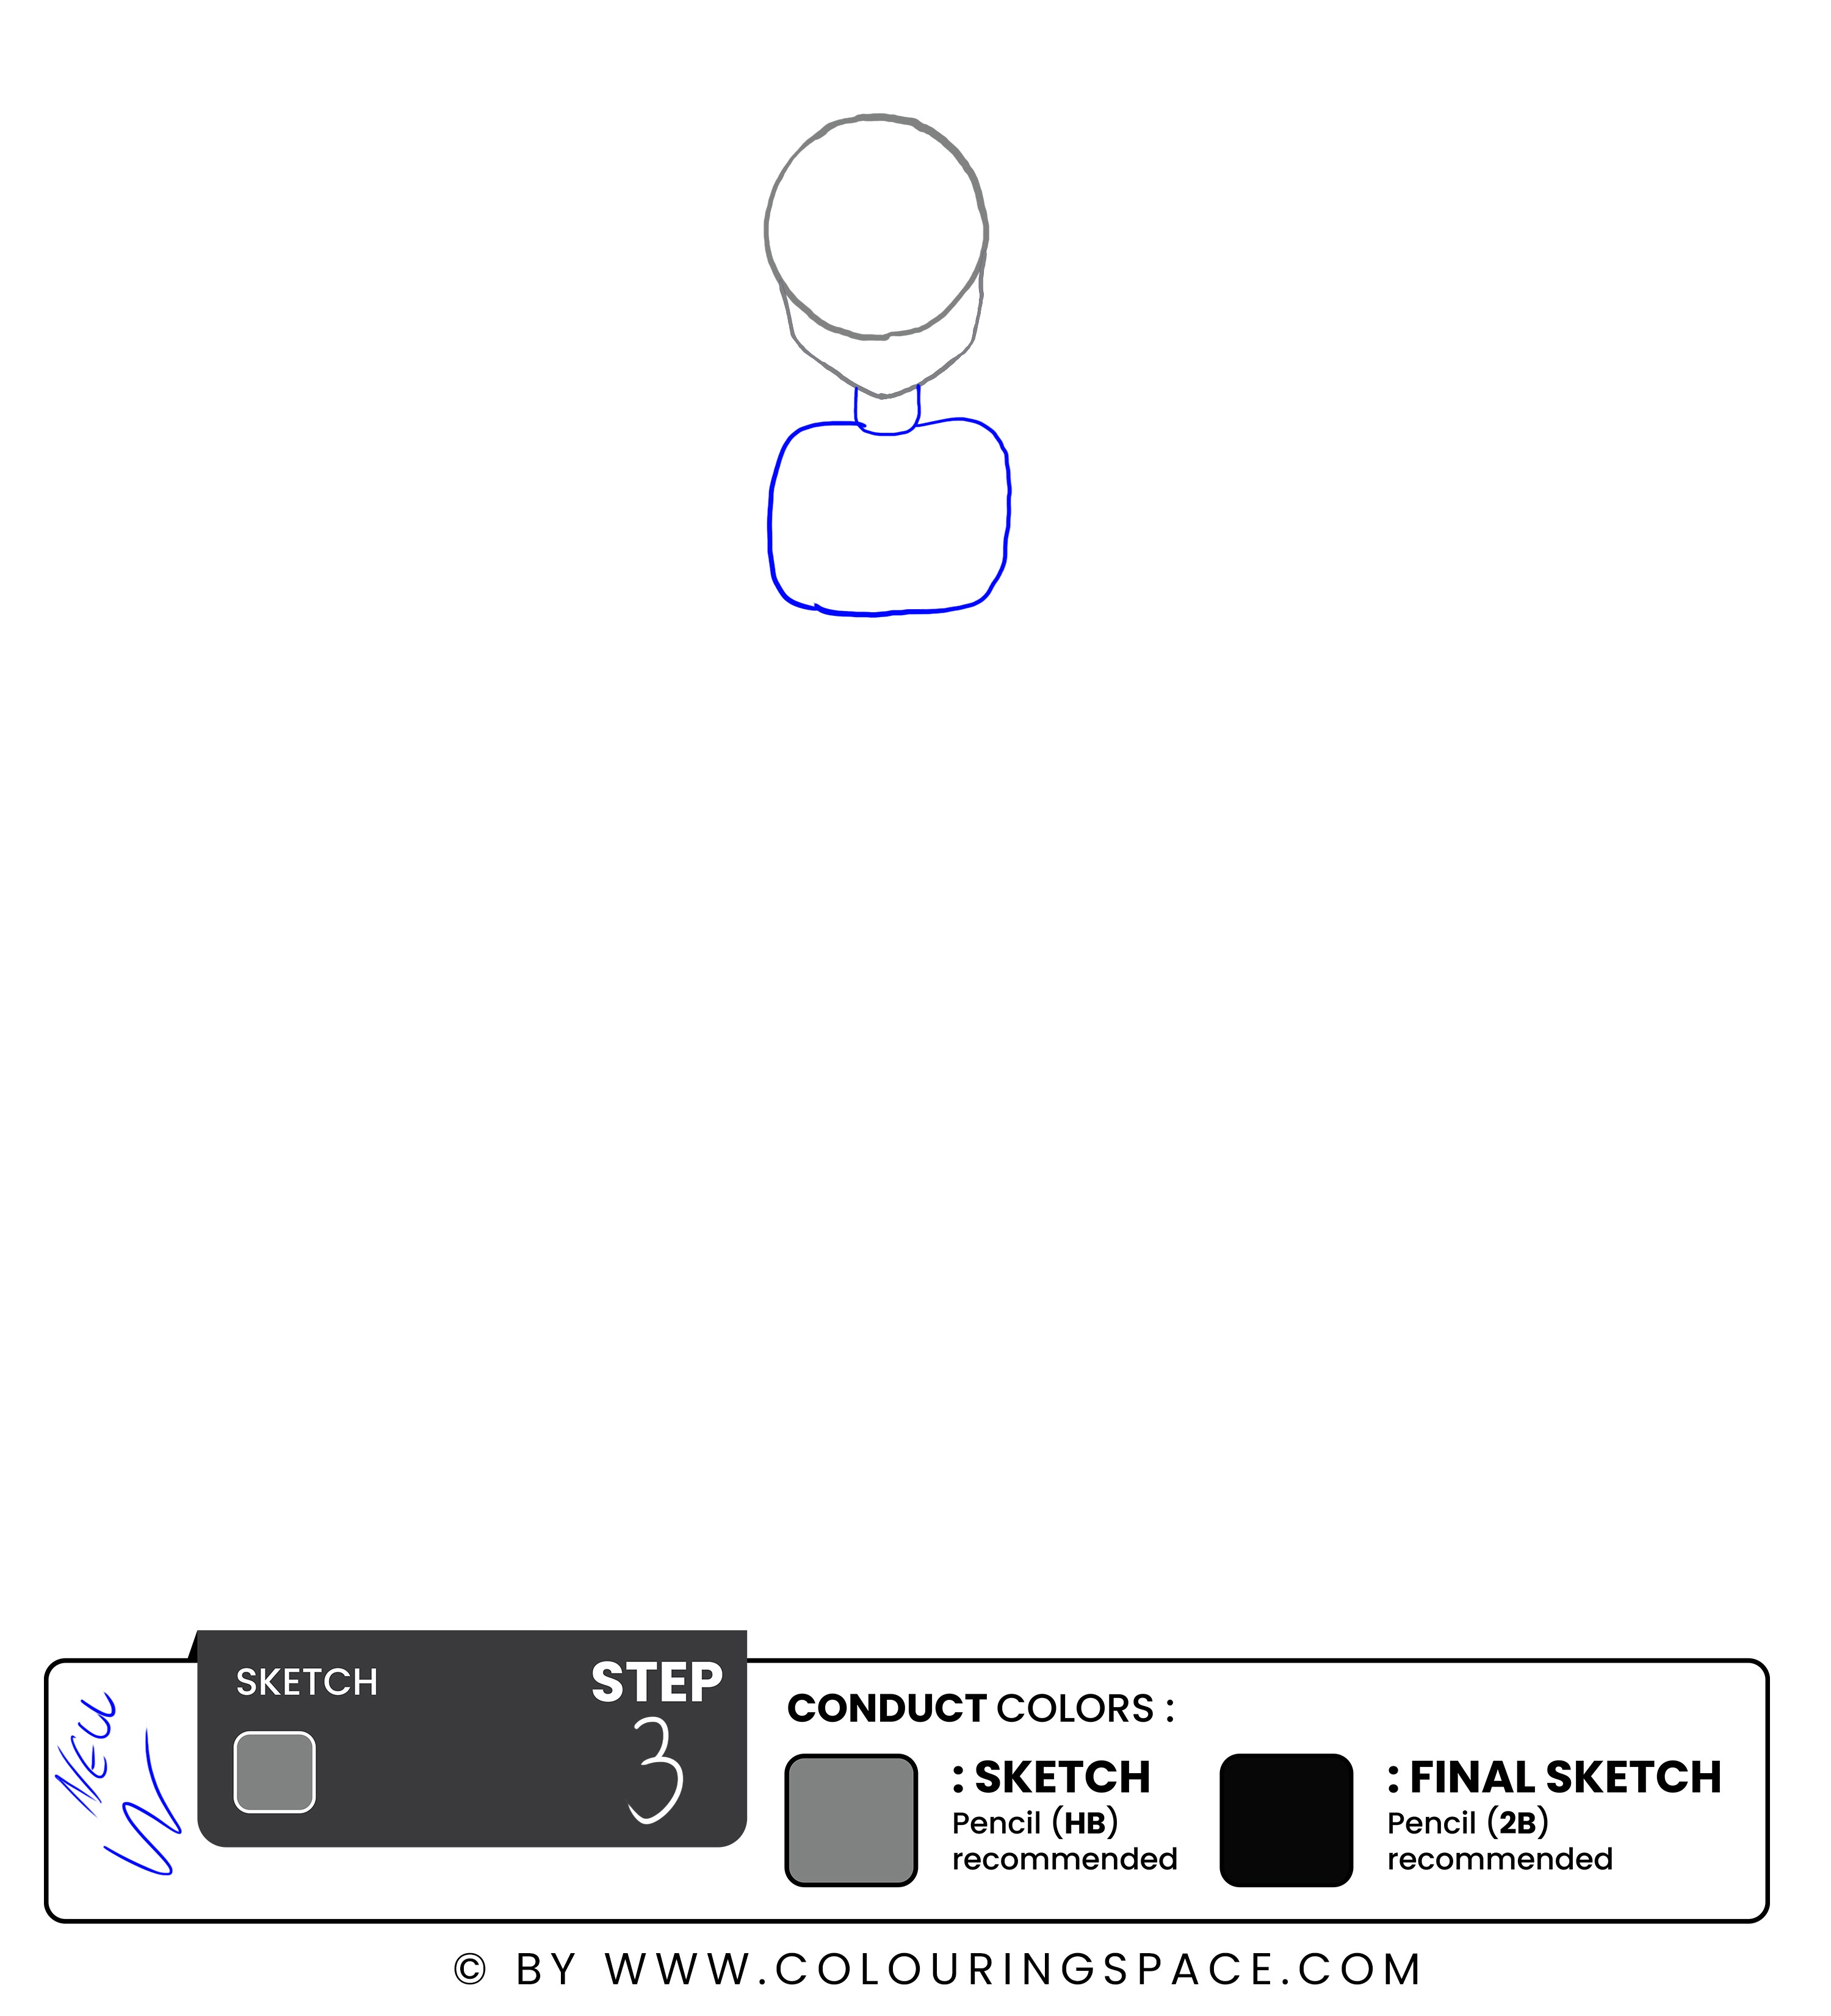
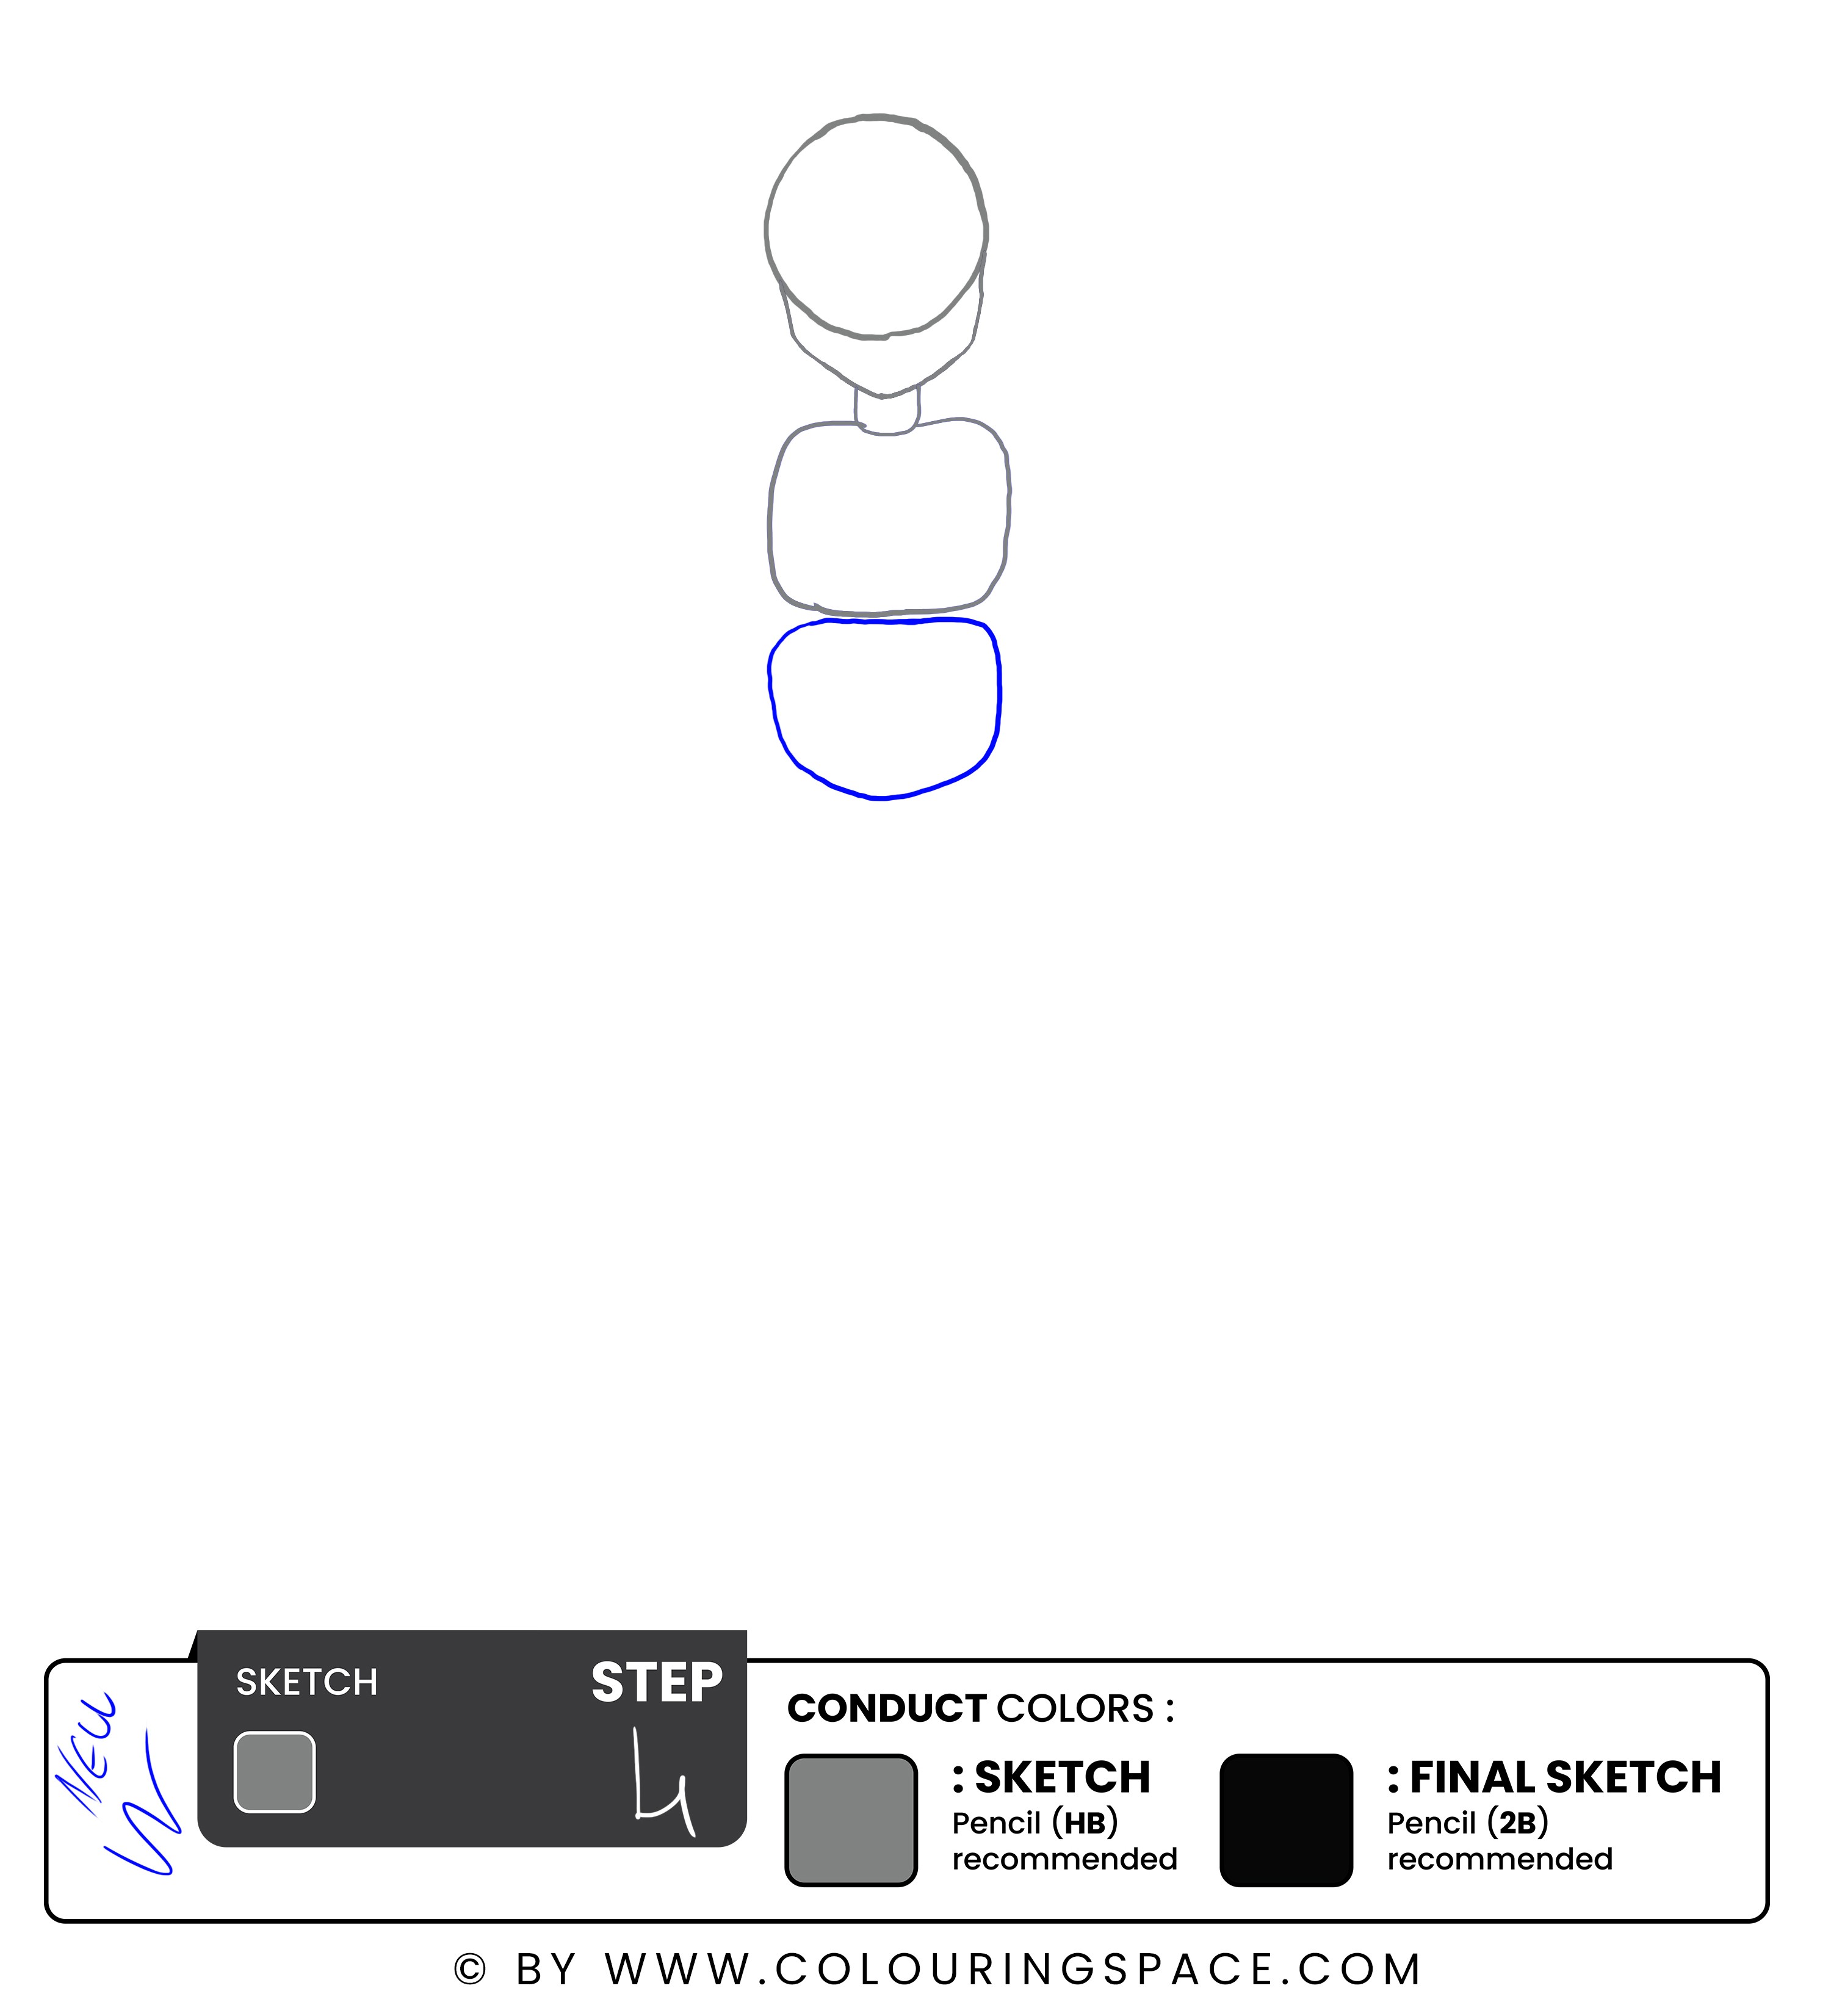
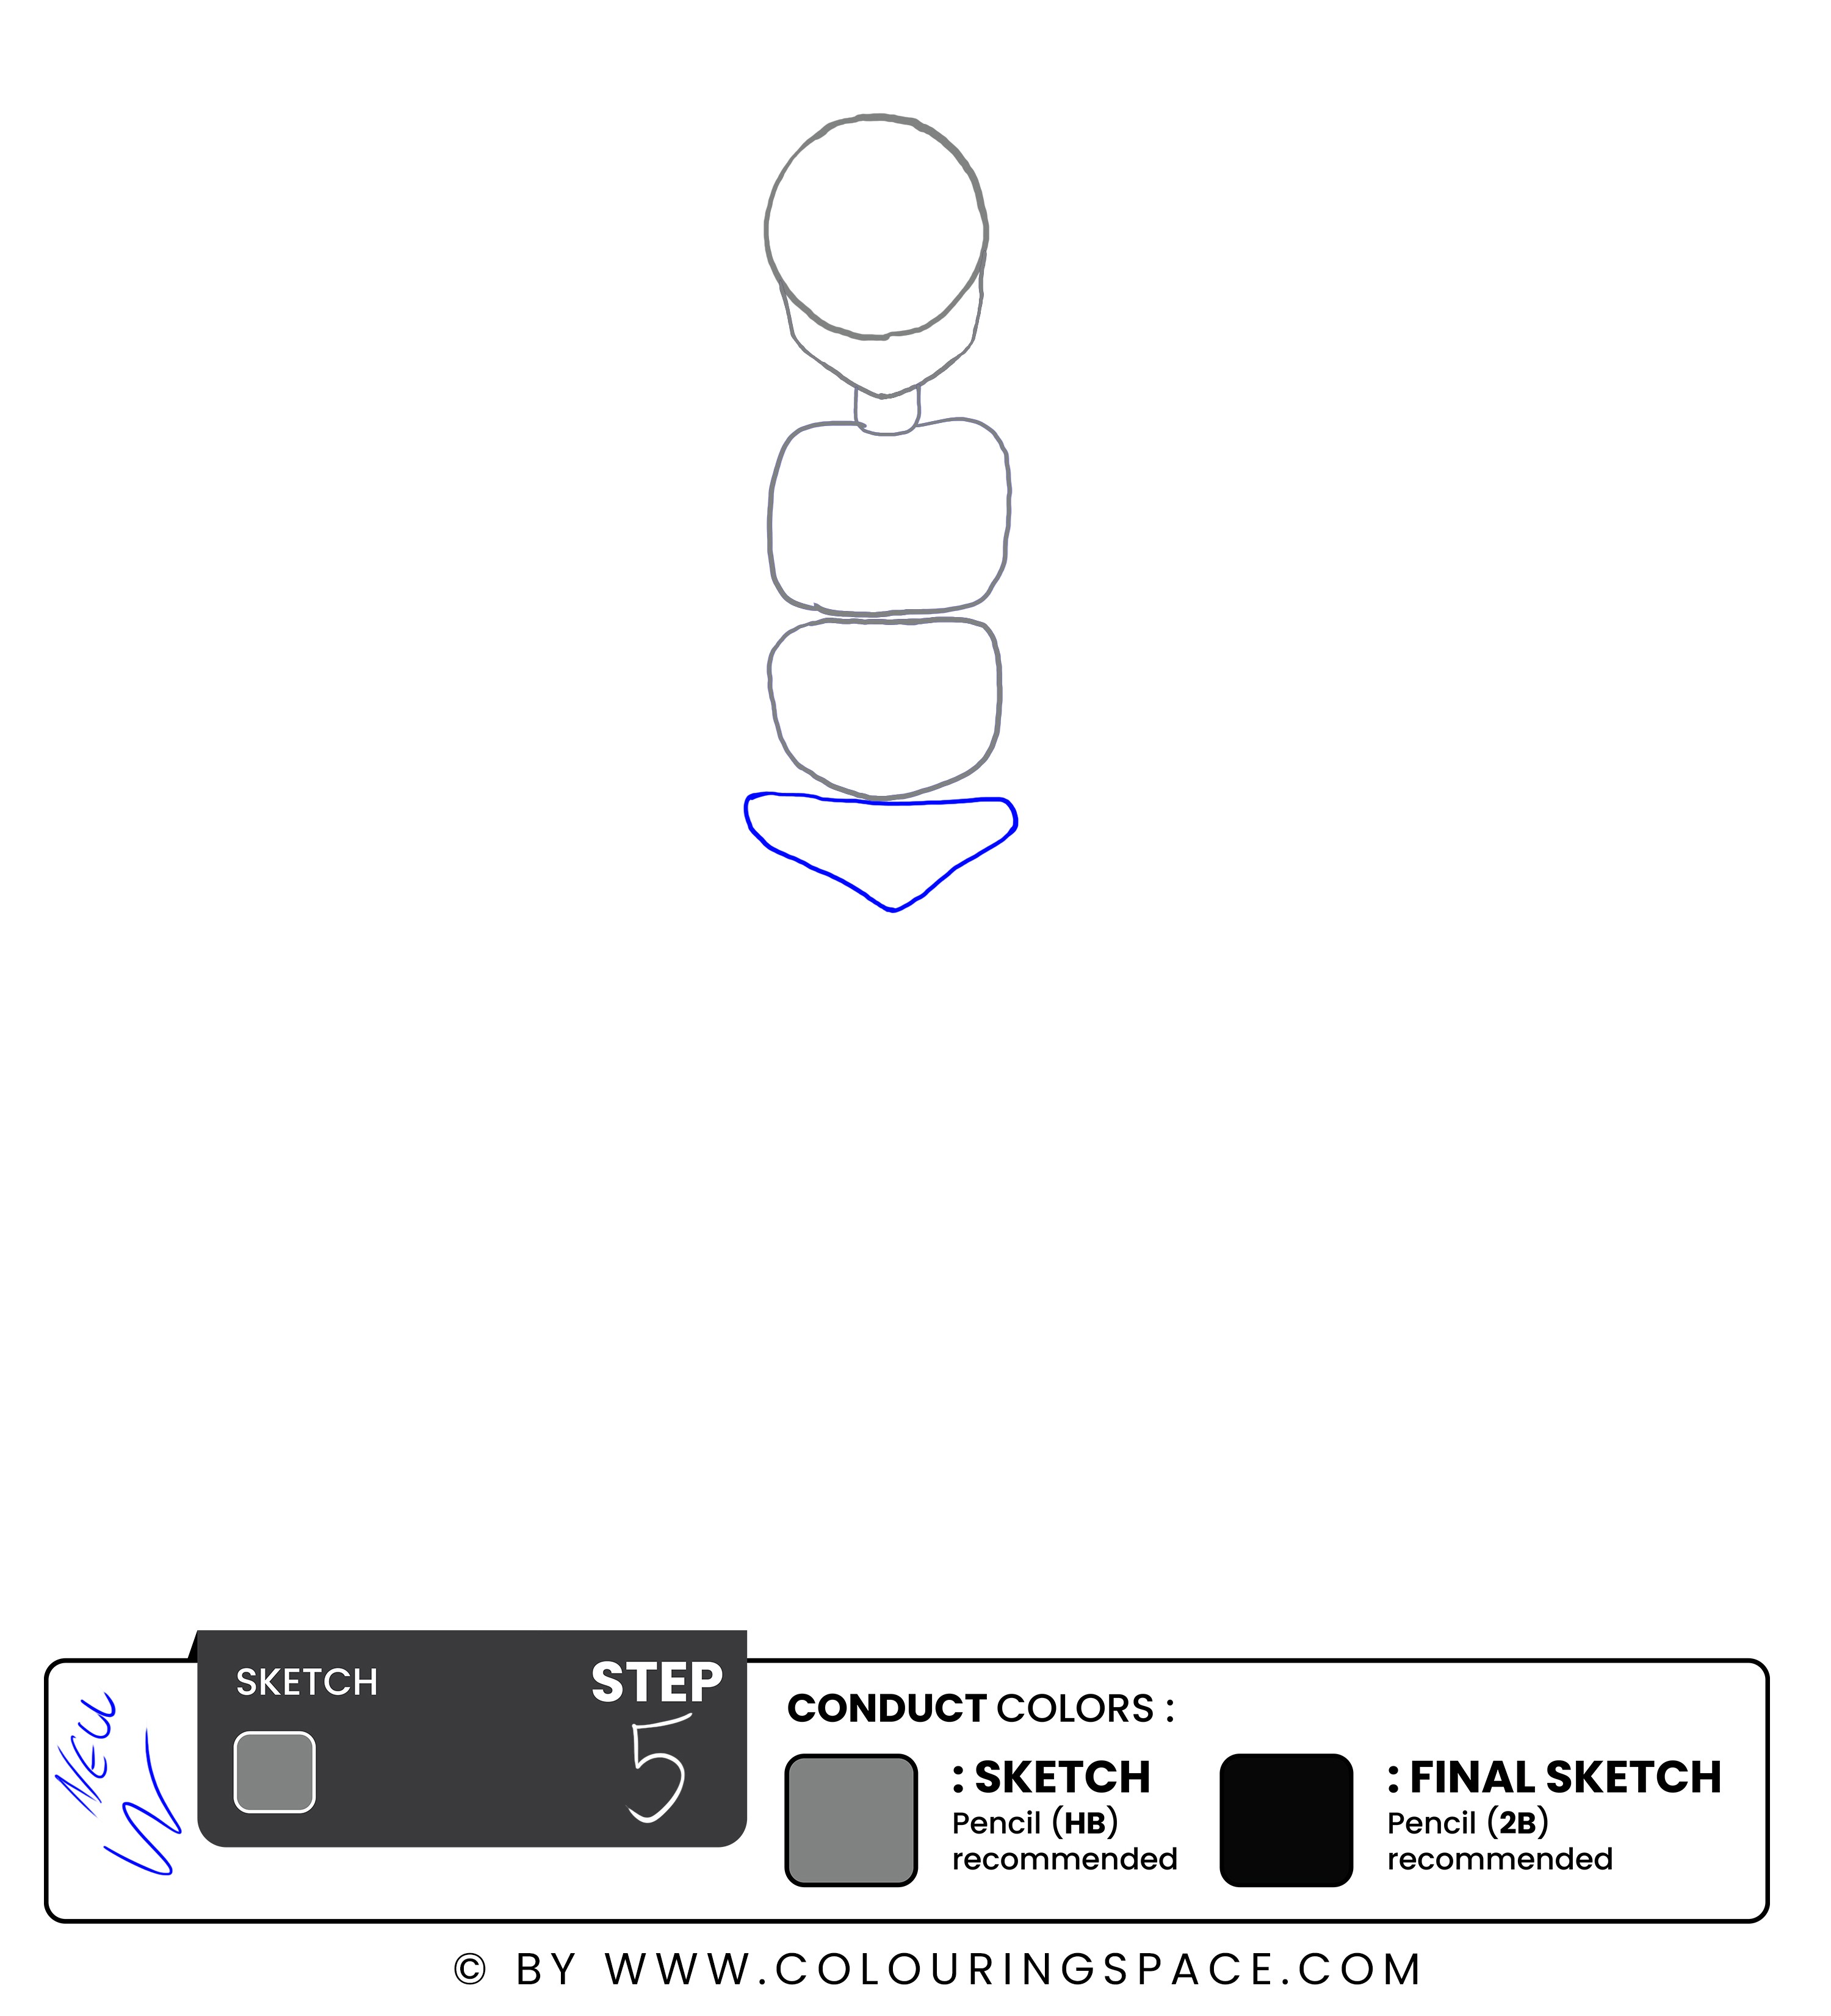
Start by drawing three shapes to create the basic structure of his body. Draw a larger organic shape at the top of his chest, a smaller shape in the middle for his waist, and a hipbone at the bottom.
While drawing Ash's torso, remember to pay attention to his body's overall shape and proportions. He should be roughly the same height as his head and have a lean and athletic build.
Step 6: Draw Ash's Legs
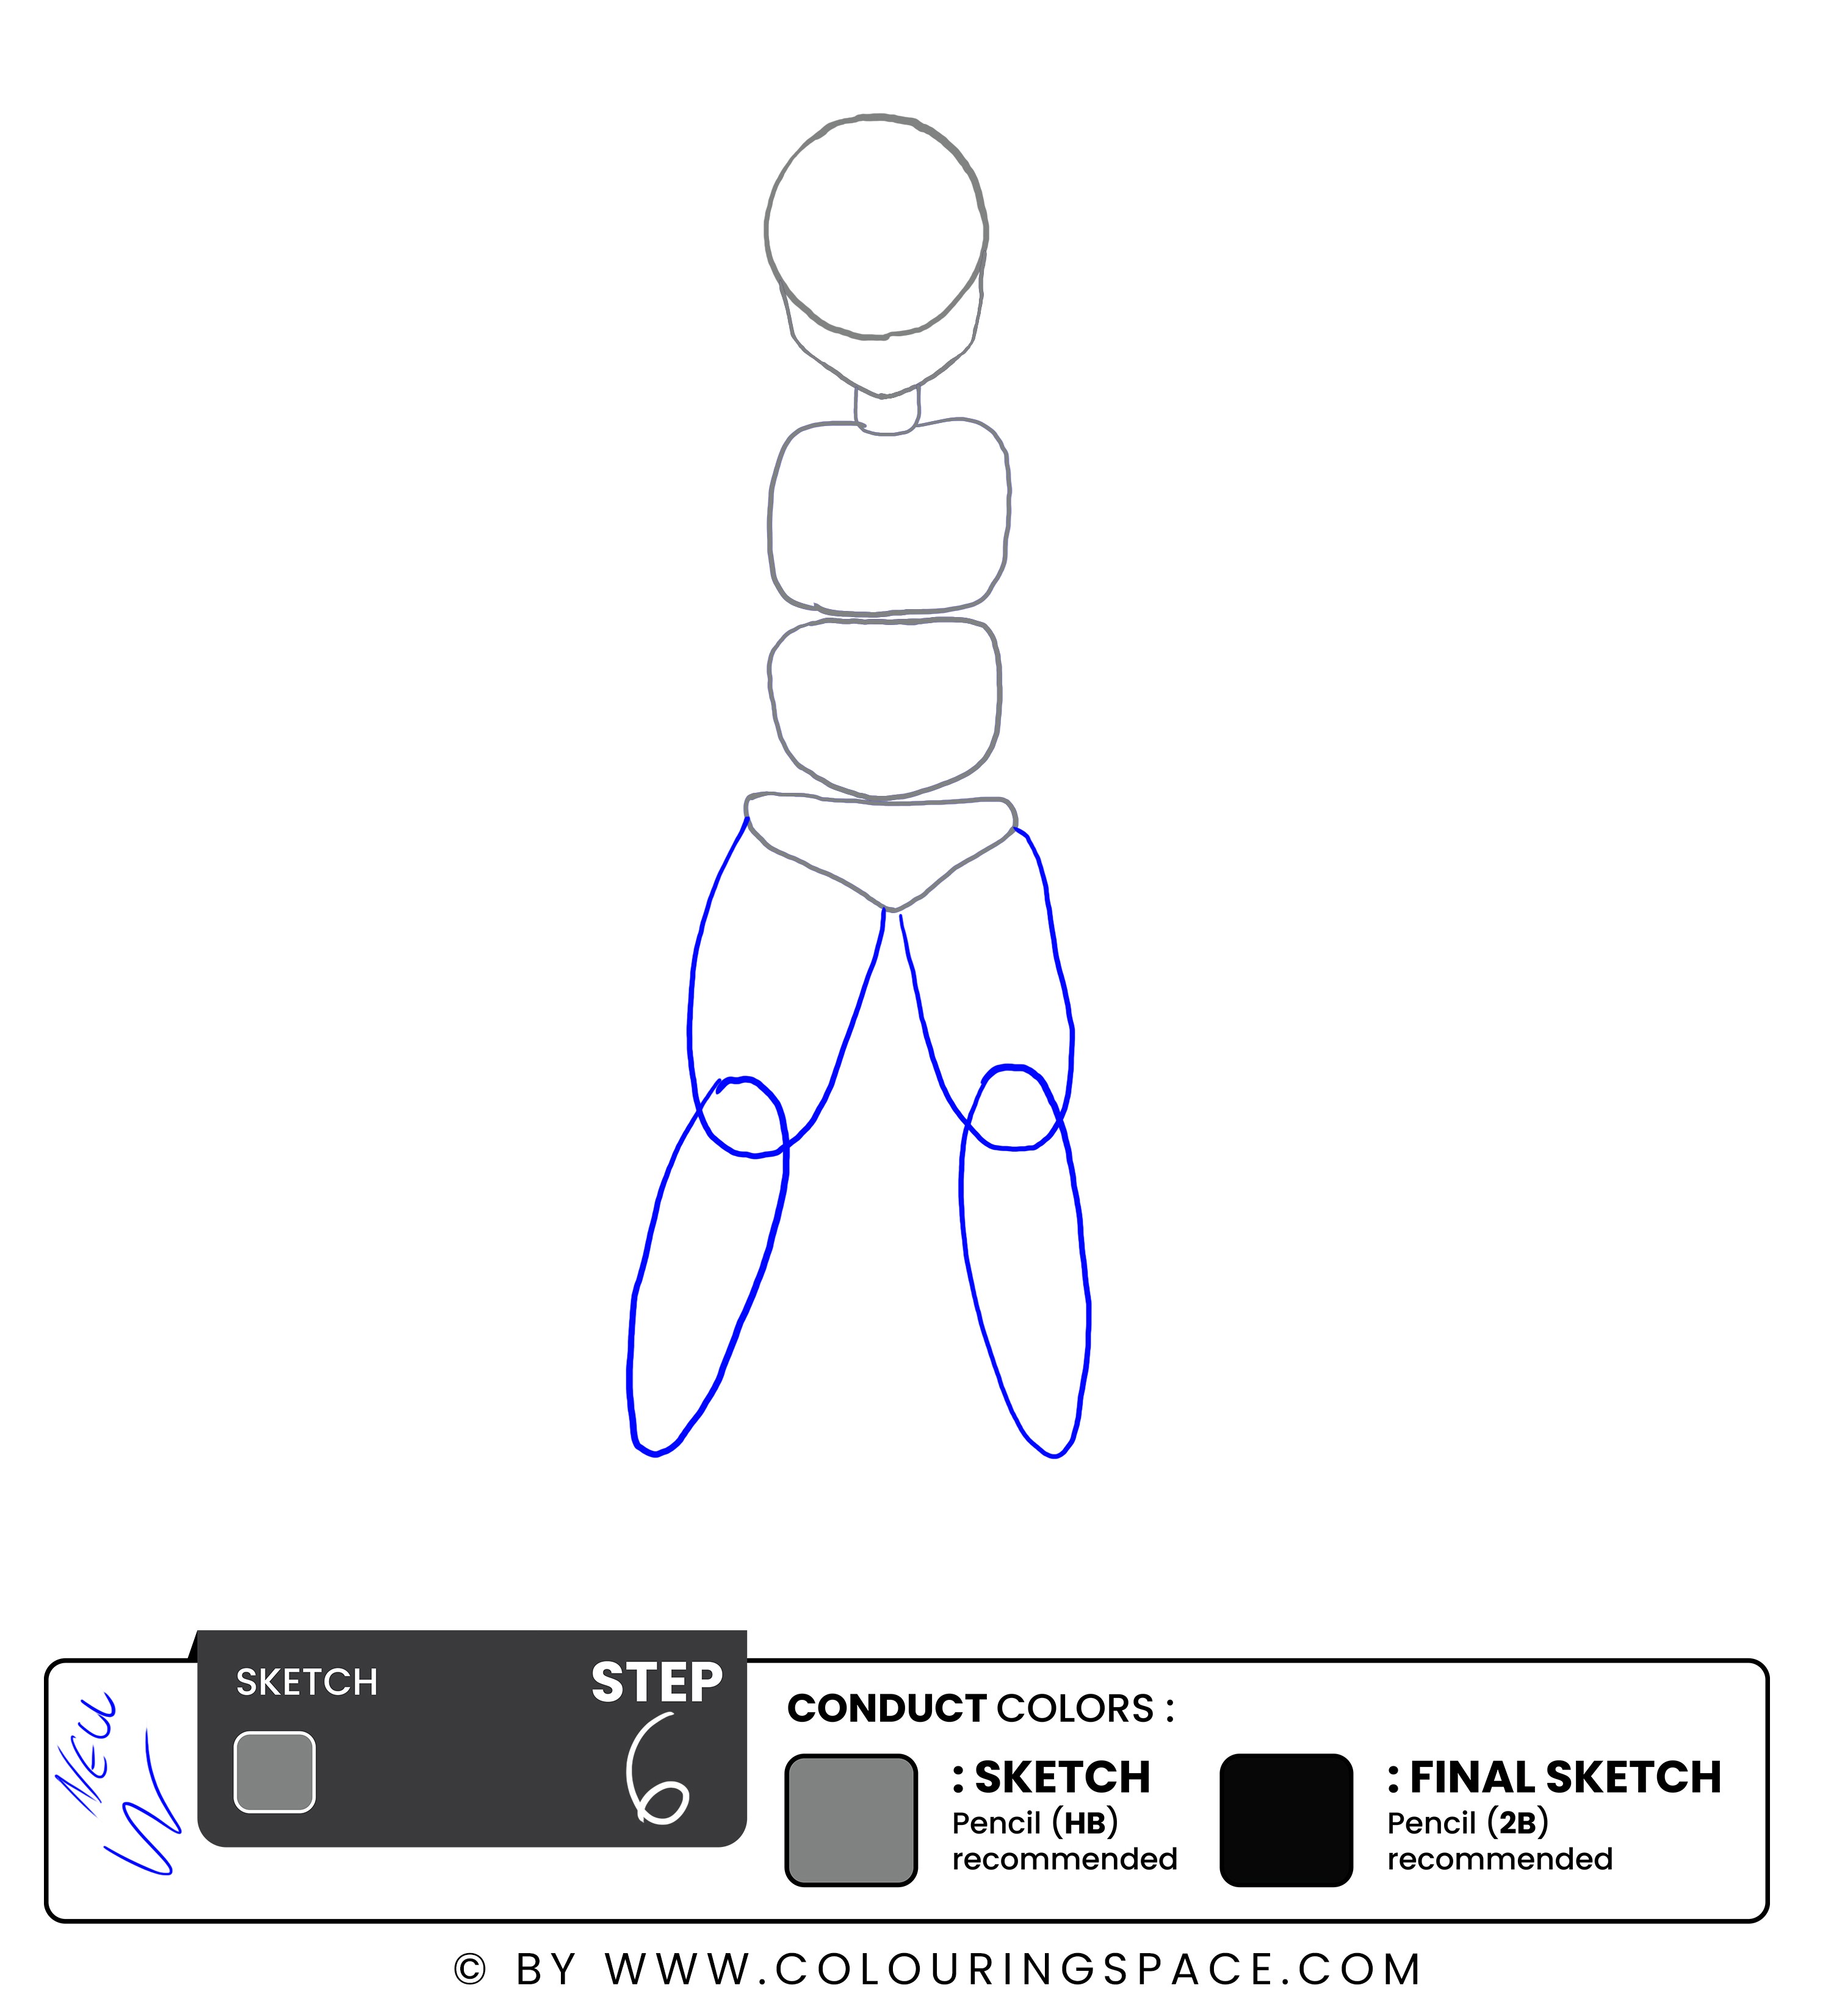
It's time to move on to his legs. Start by drawing two rough ovals just below the hip bone to indicate the placement of his legs.
Step 7: Draw Ash's Shoes
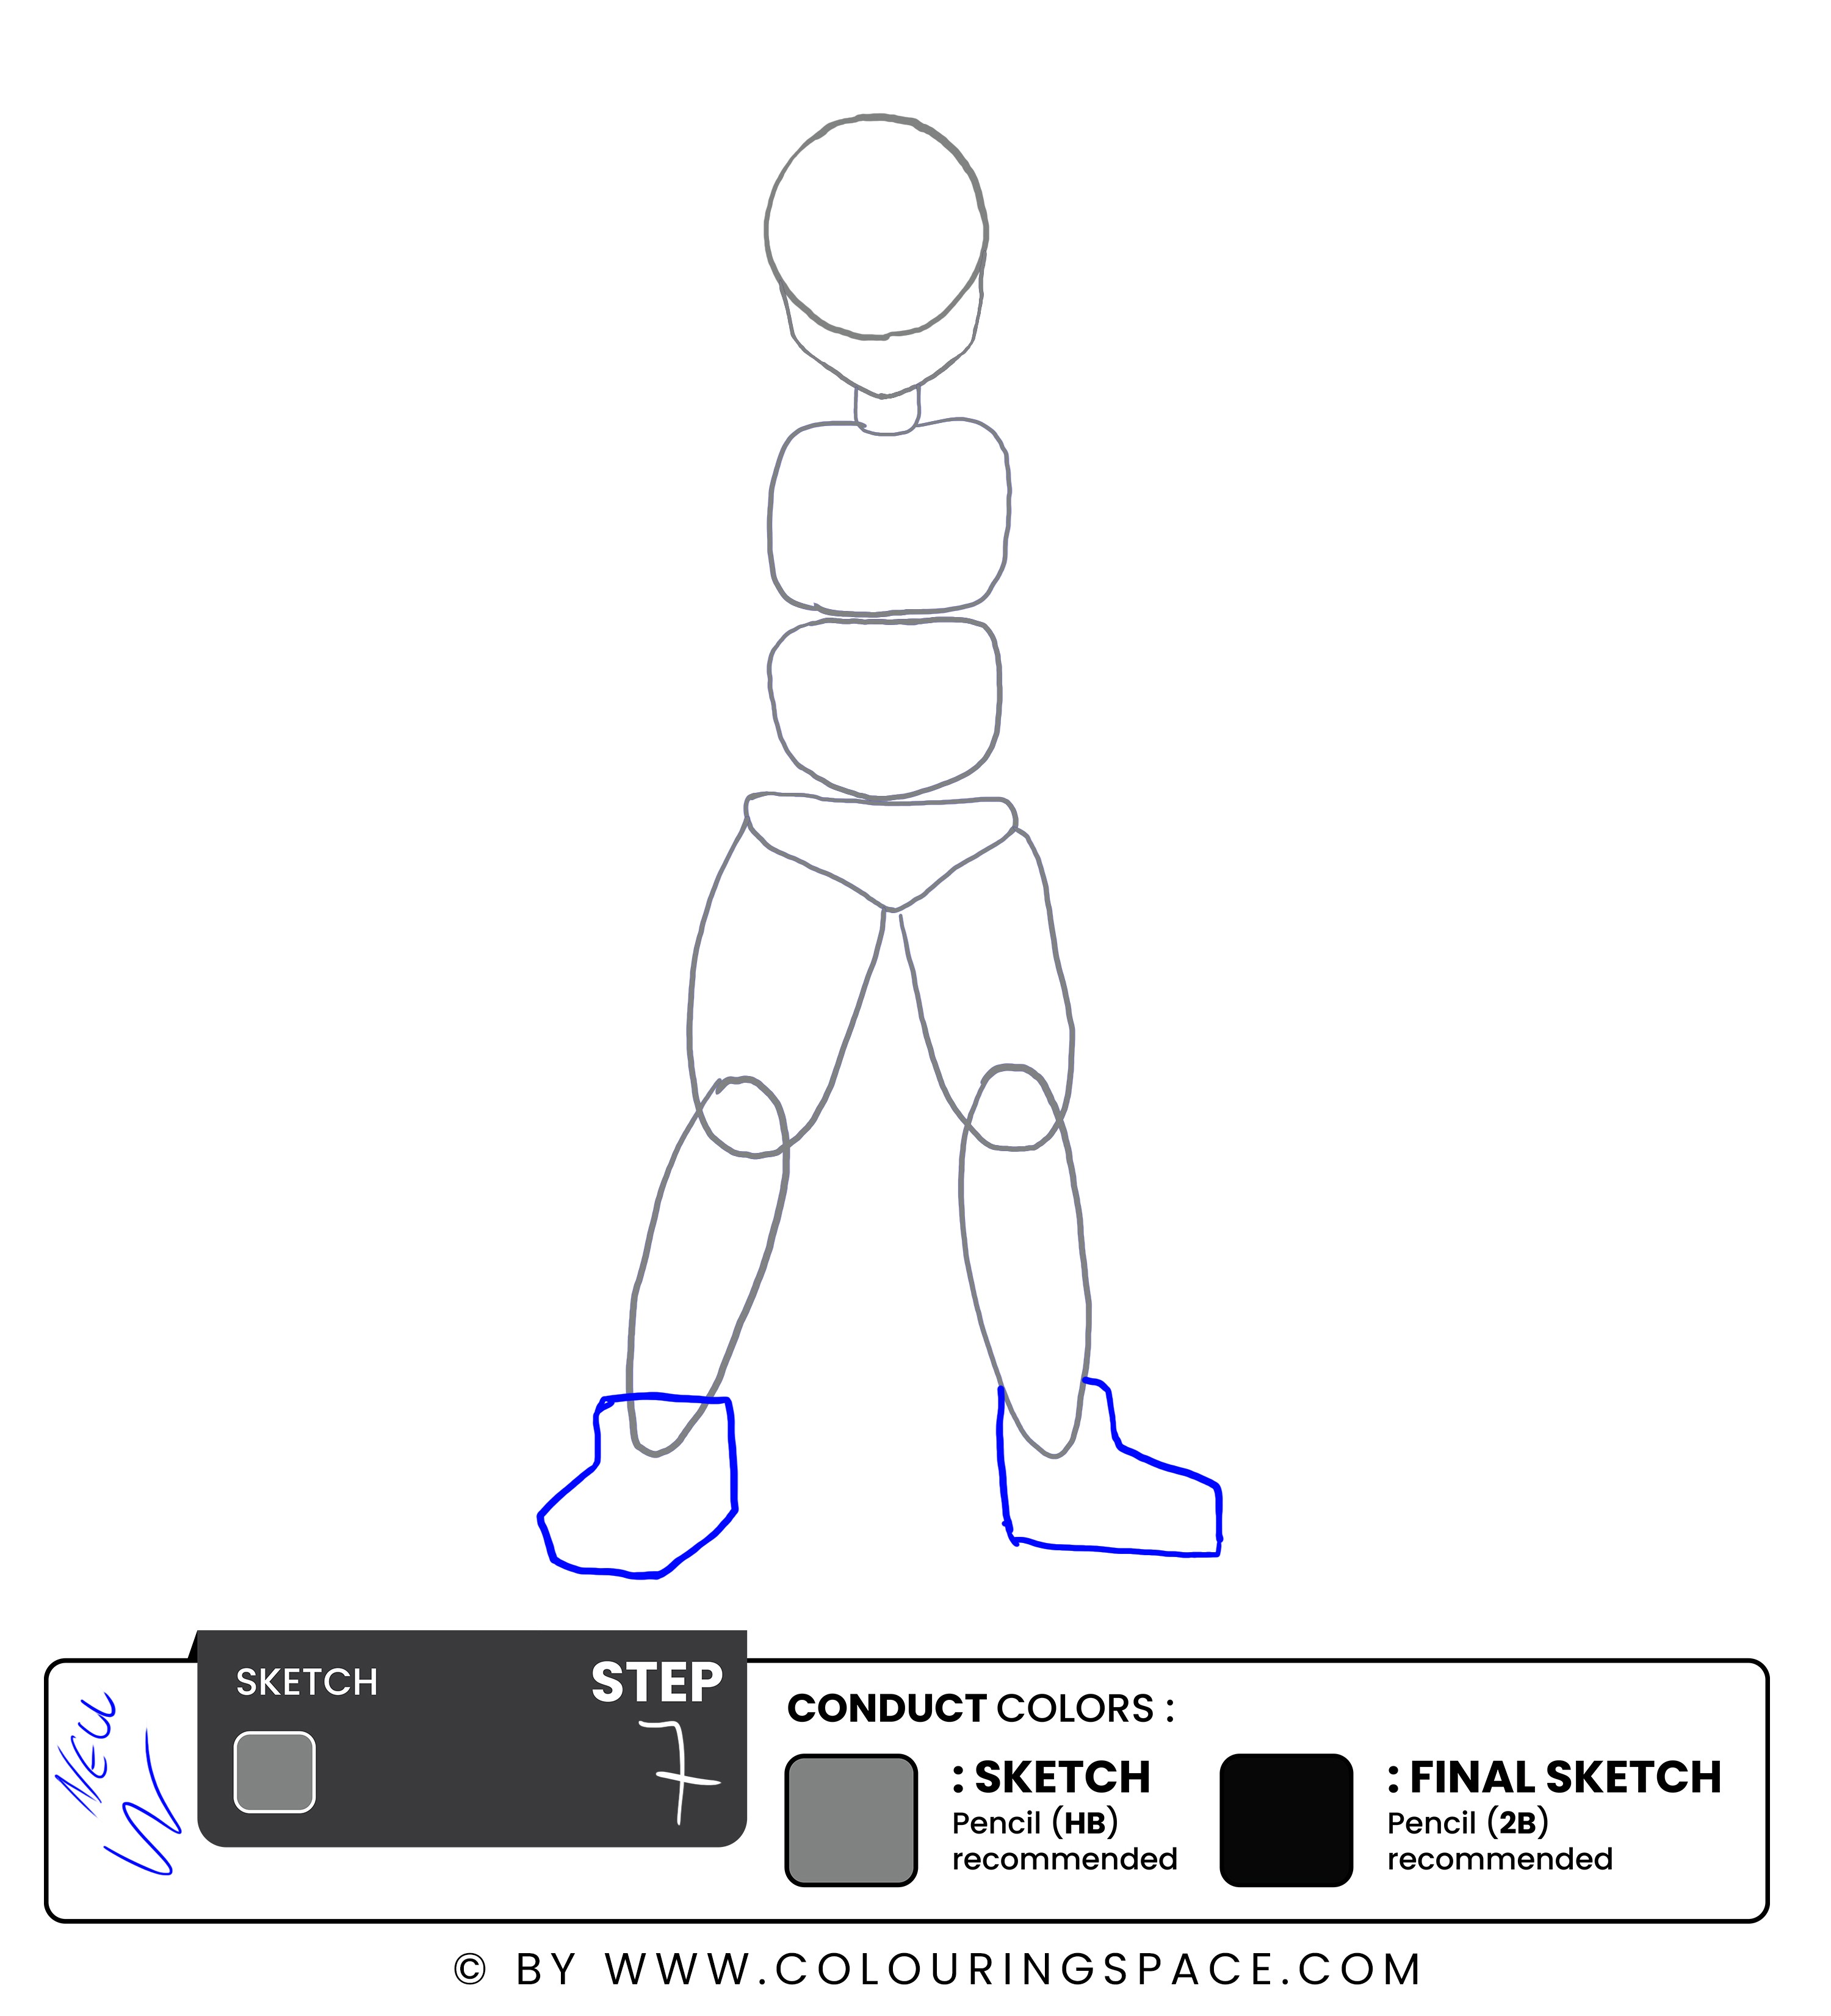
Start by drawing two rough shapes just below the bottom of his pants to indicate the position of his shoes.
Steps 8 & 9: Draw Ash's Arms, then Draw the Poke Ball
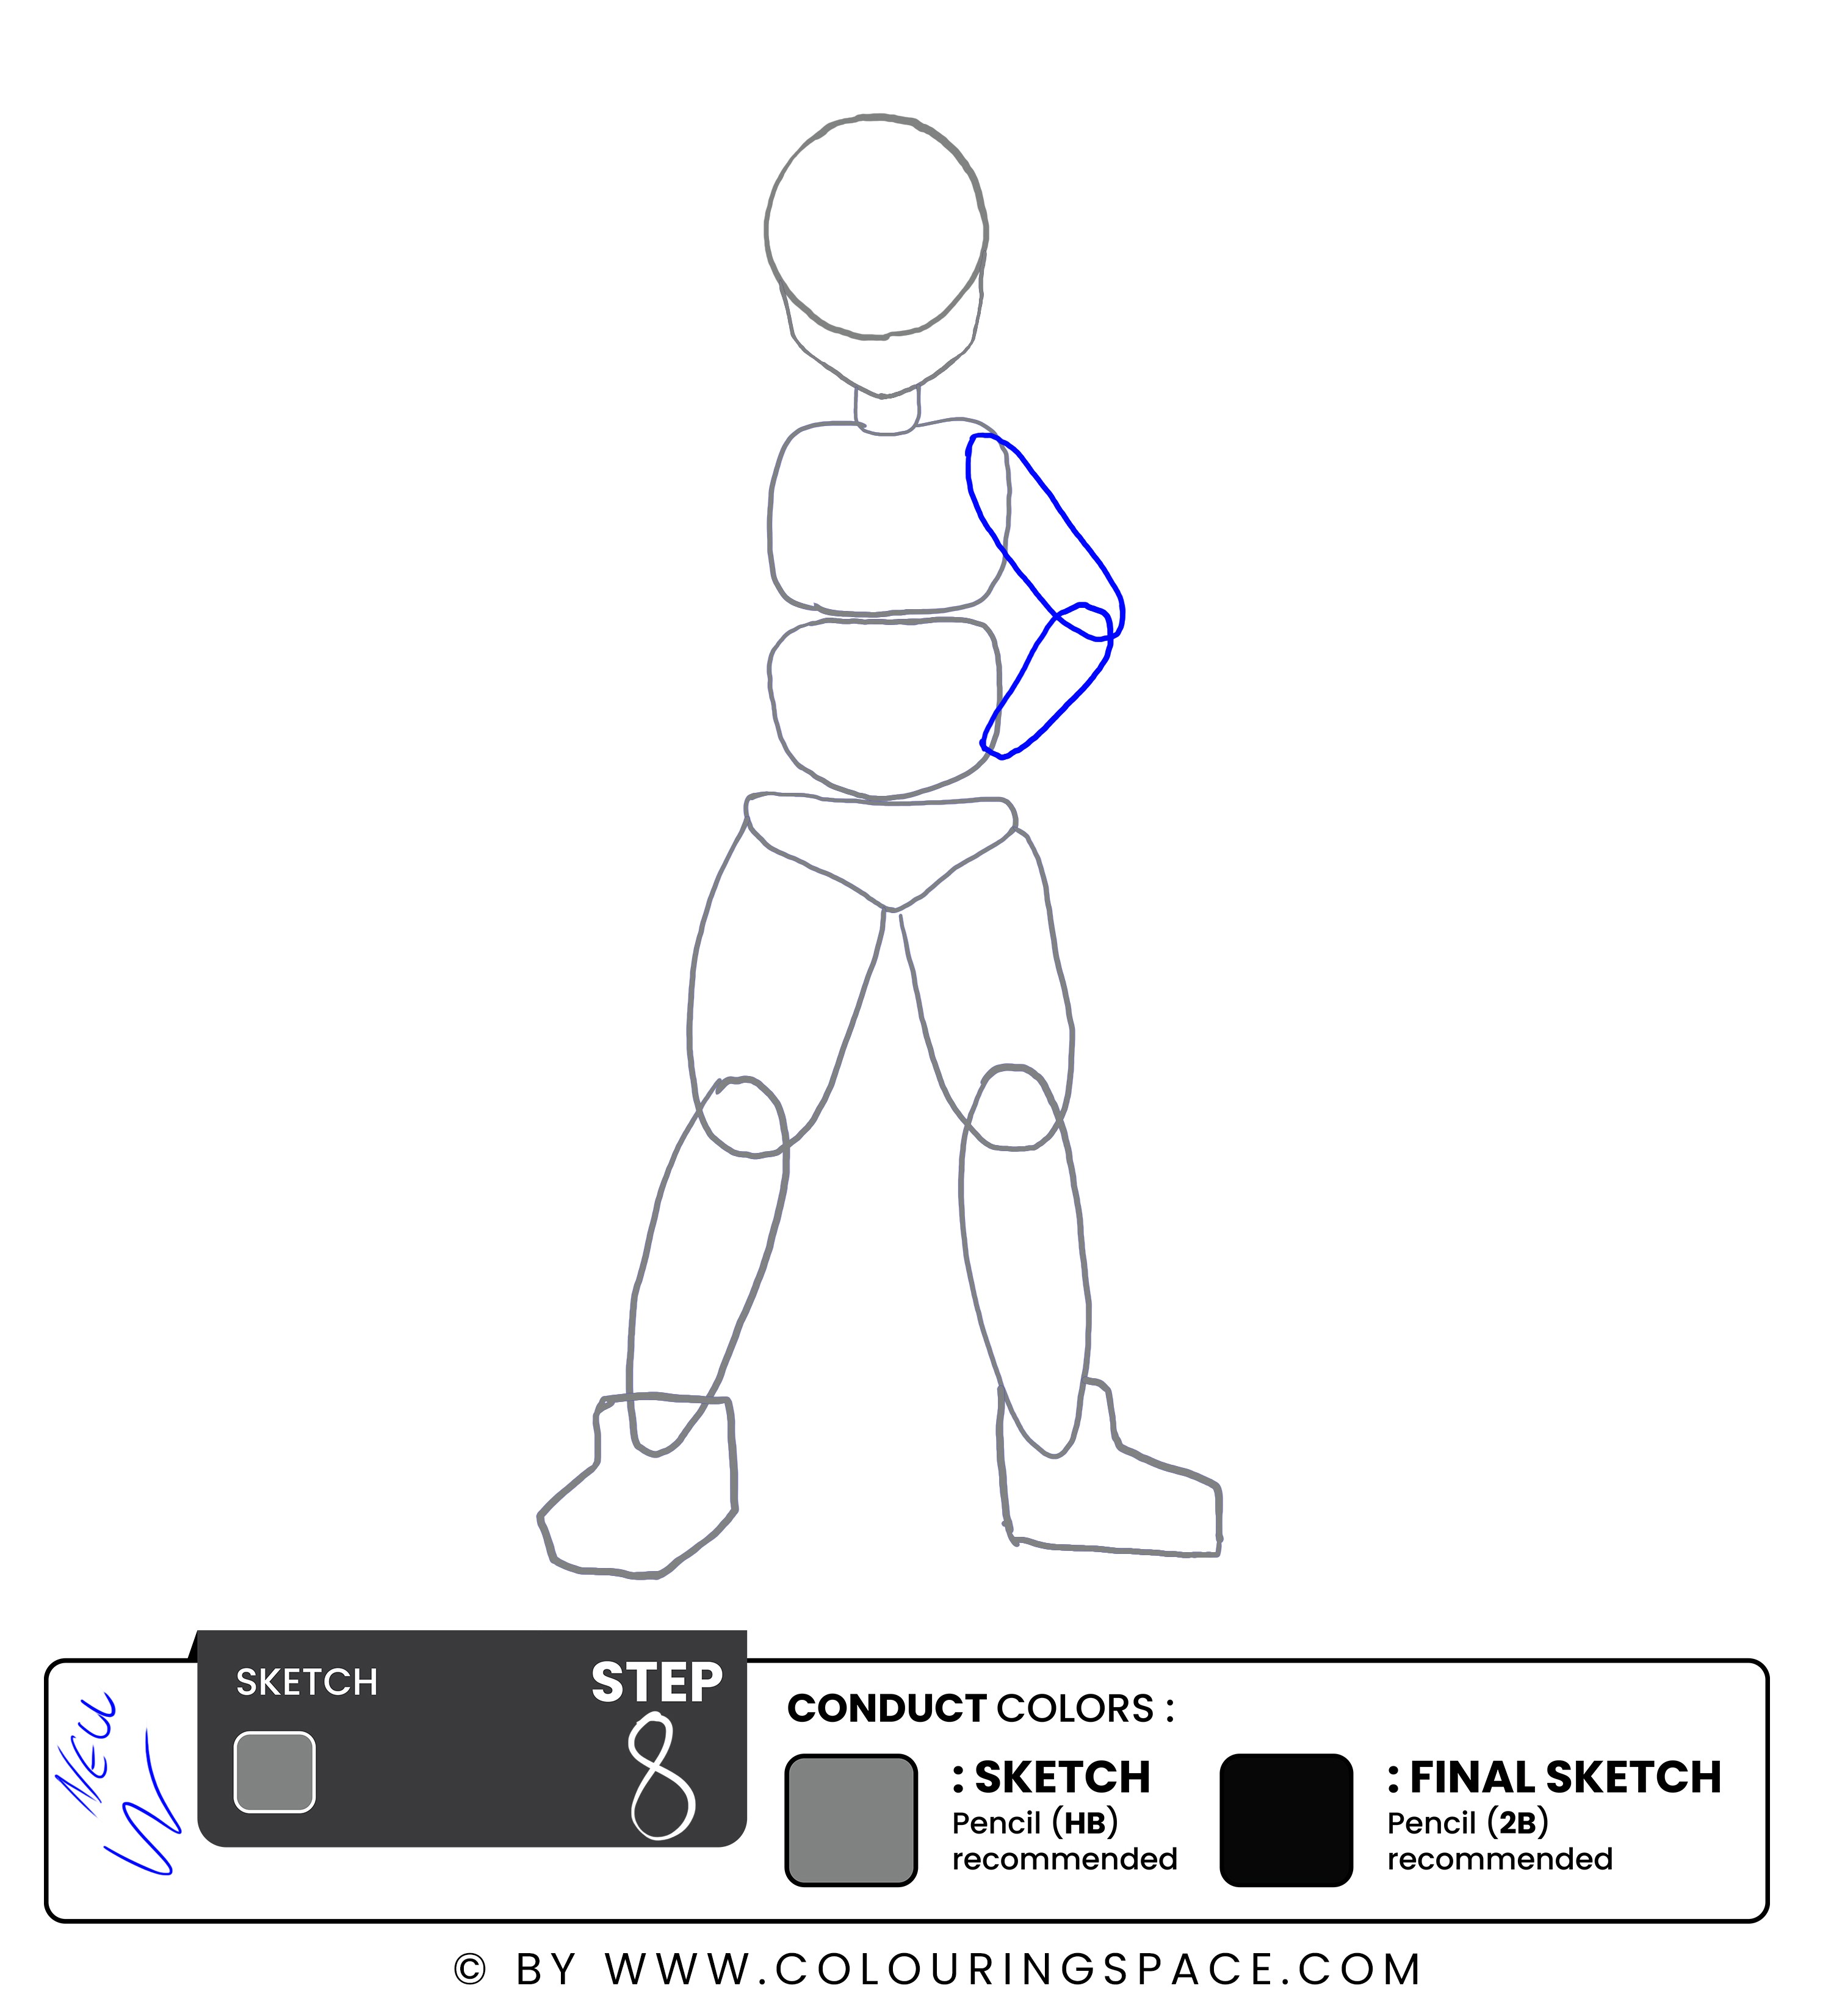
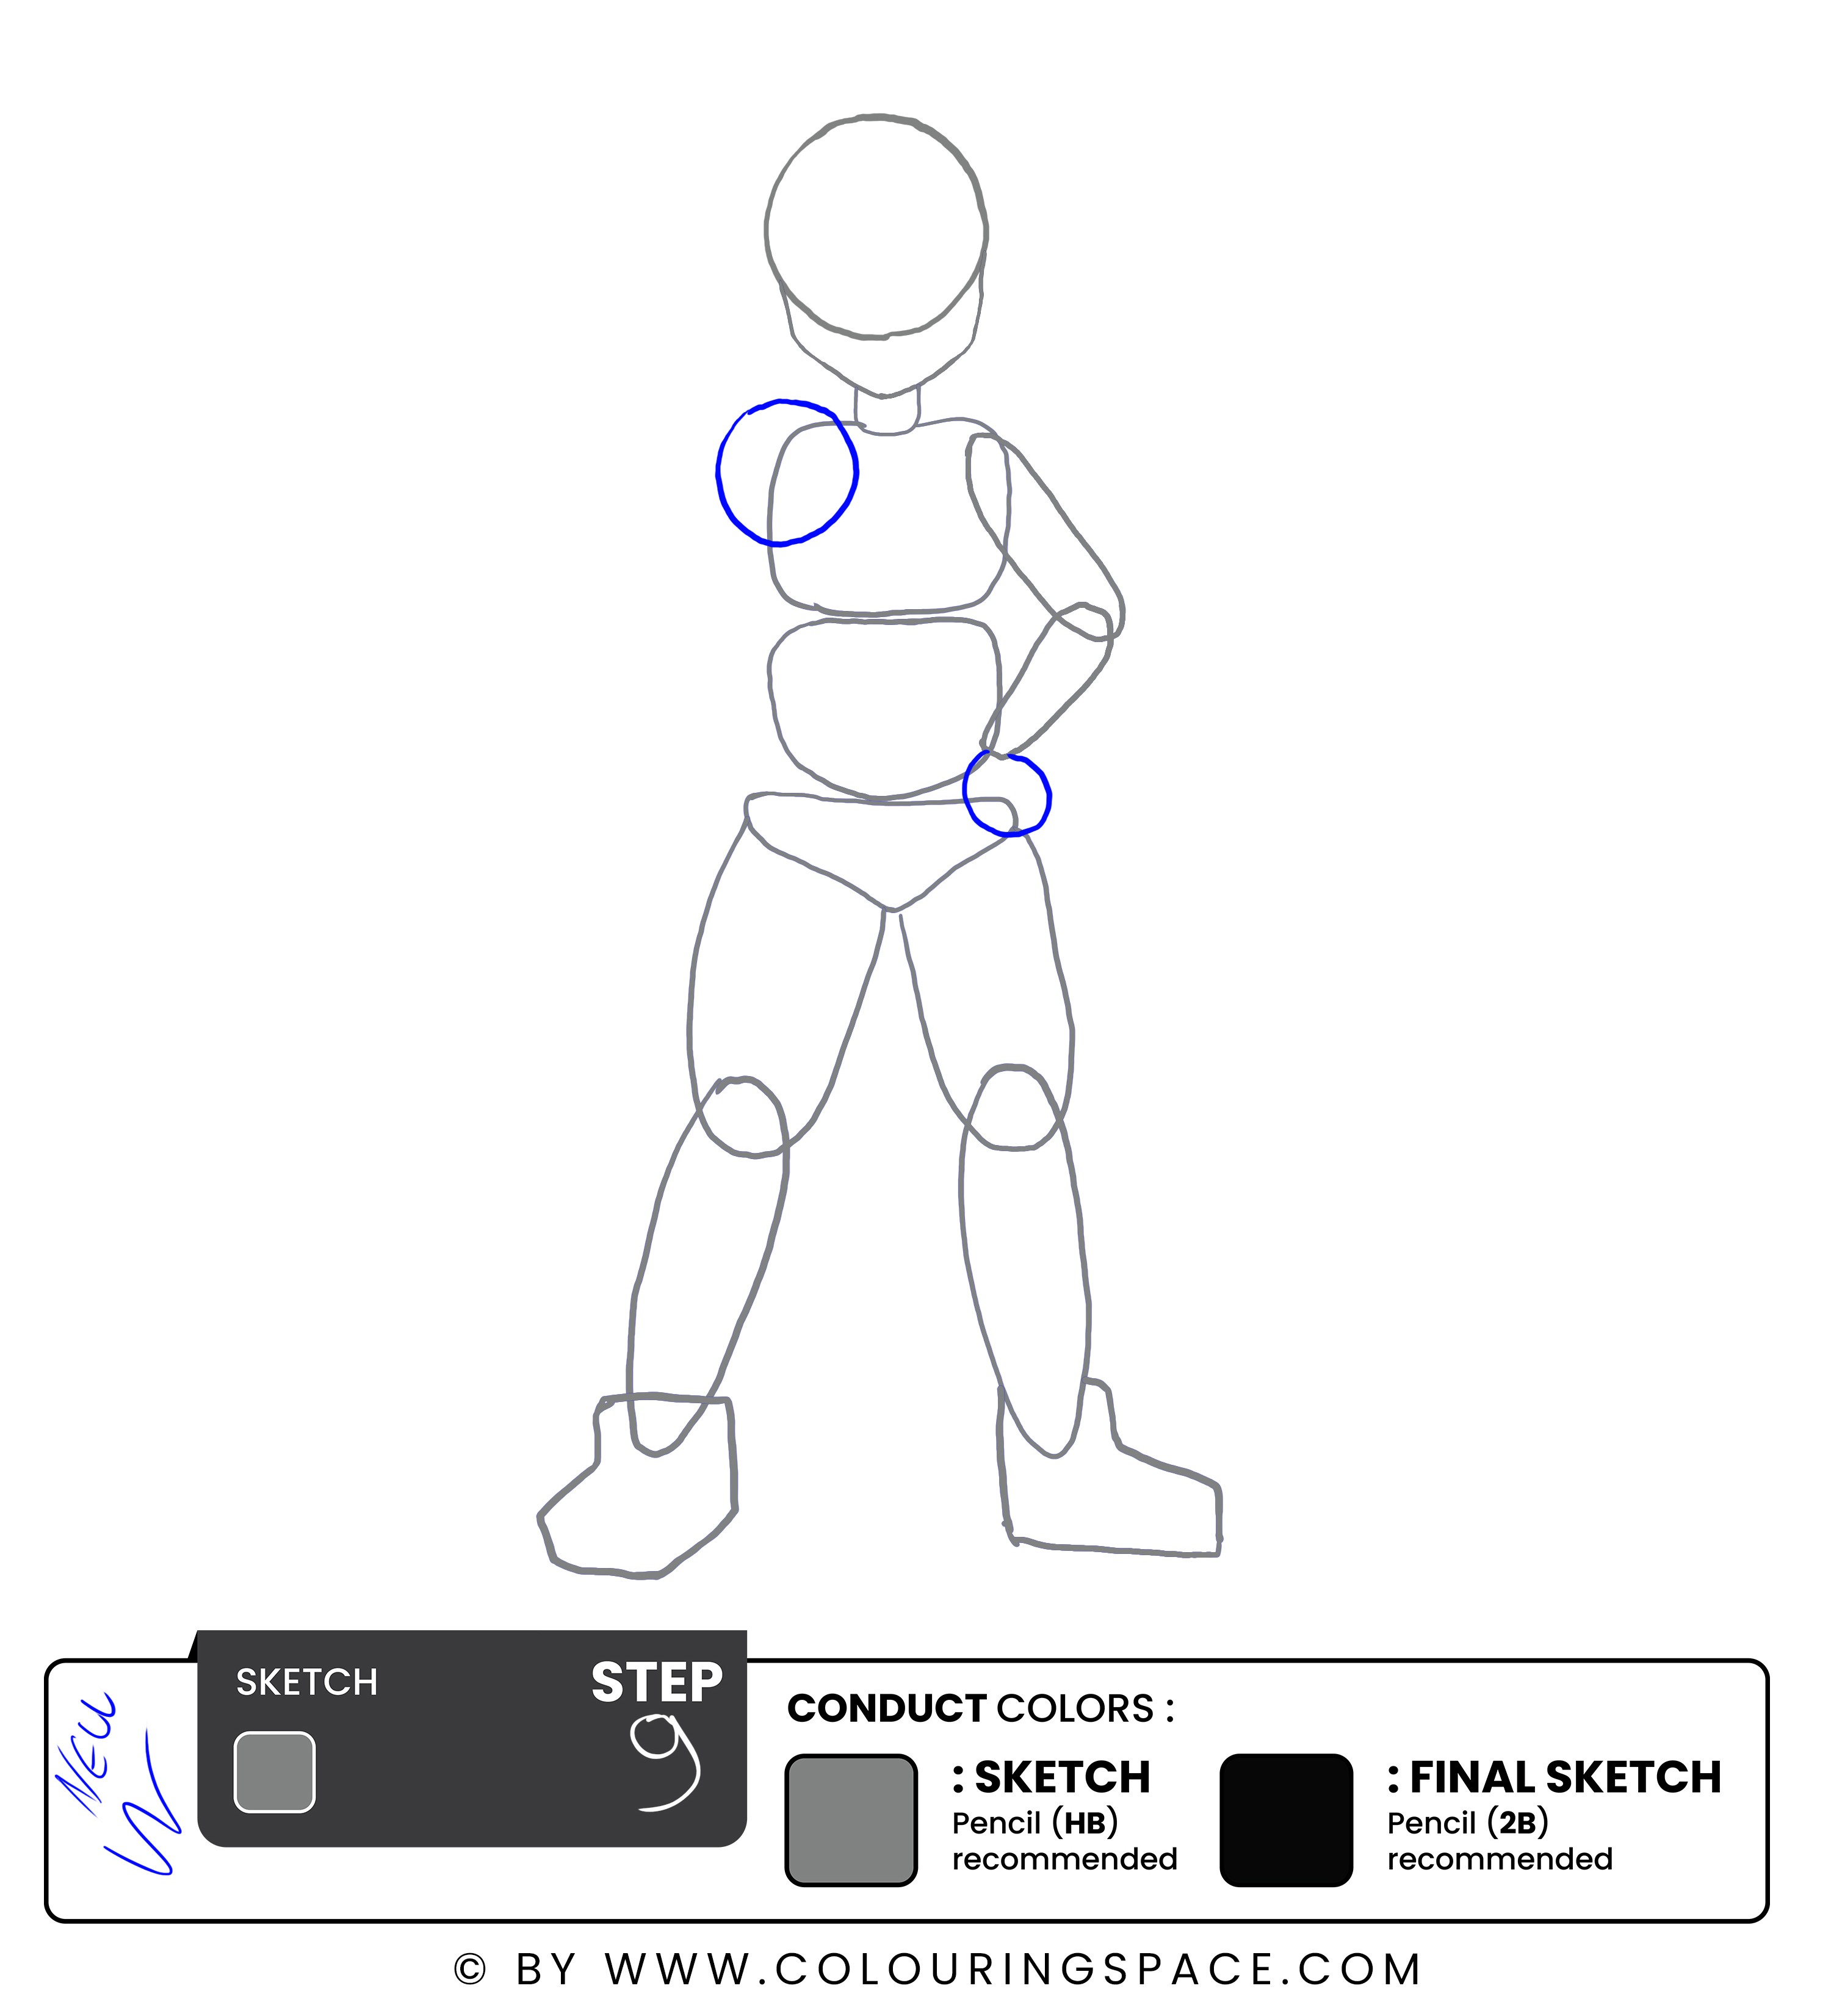
With Ash's torso and legs in place, it's time to add his arms to the drawing. Start by drawing two rough ovals just below the shoulder to indicate the position of his arms.
Draw a circle at the end of the arm to indicate the position of his hands. Pay attention to the size and proportion of his hands in relation to the rest of his body.
Now that you have the basic structure of Ash's body, it's time to draw the Pokeball he is holding. Draw a circle in the middle of his hand to indicate the position of the Pokeball.
Remember the size and proportion of the Pokeball in relation to Ash's hand and body. The Pokeball should be roughly the same size as Ash's hand and be in proportion to the rest of his body.
Step 10: Draw the Rough Placement of Ash's Eyes
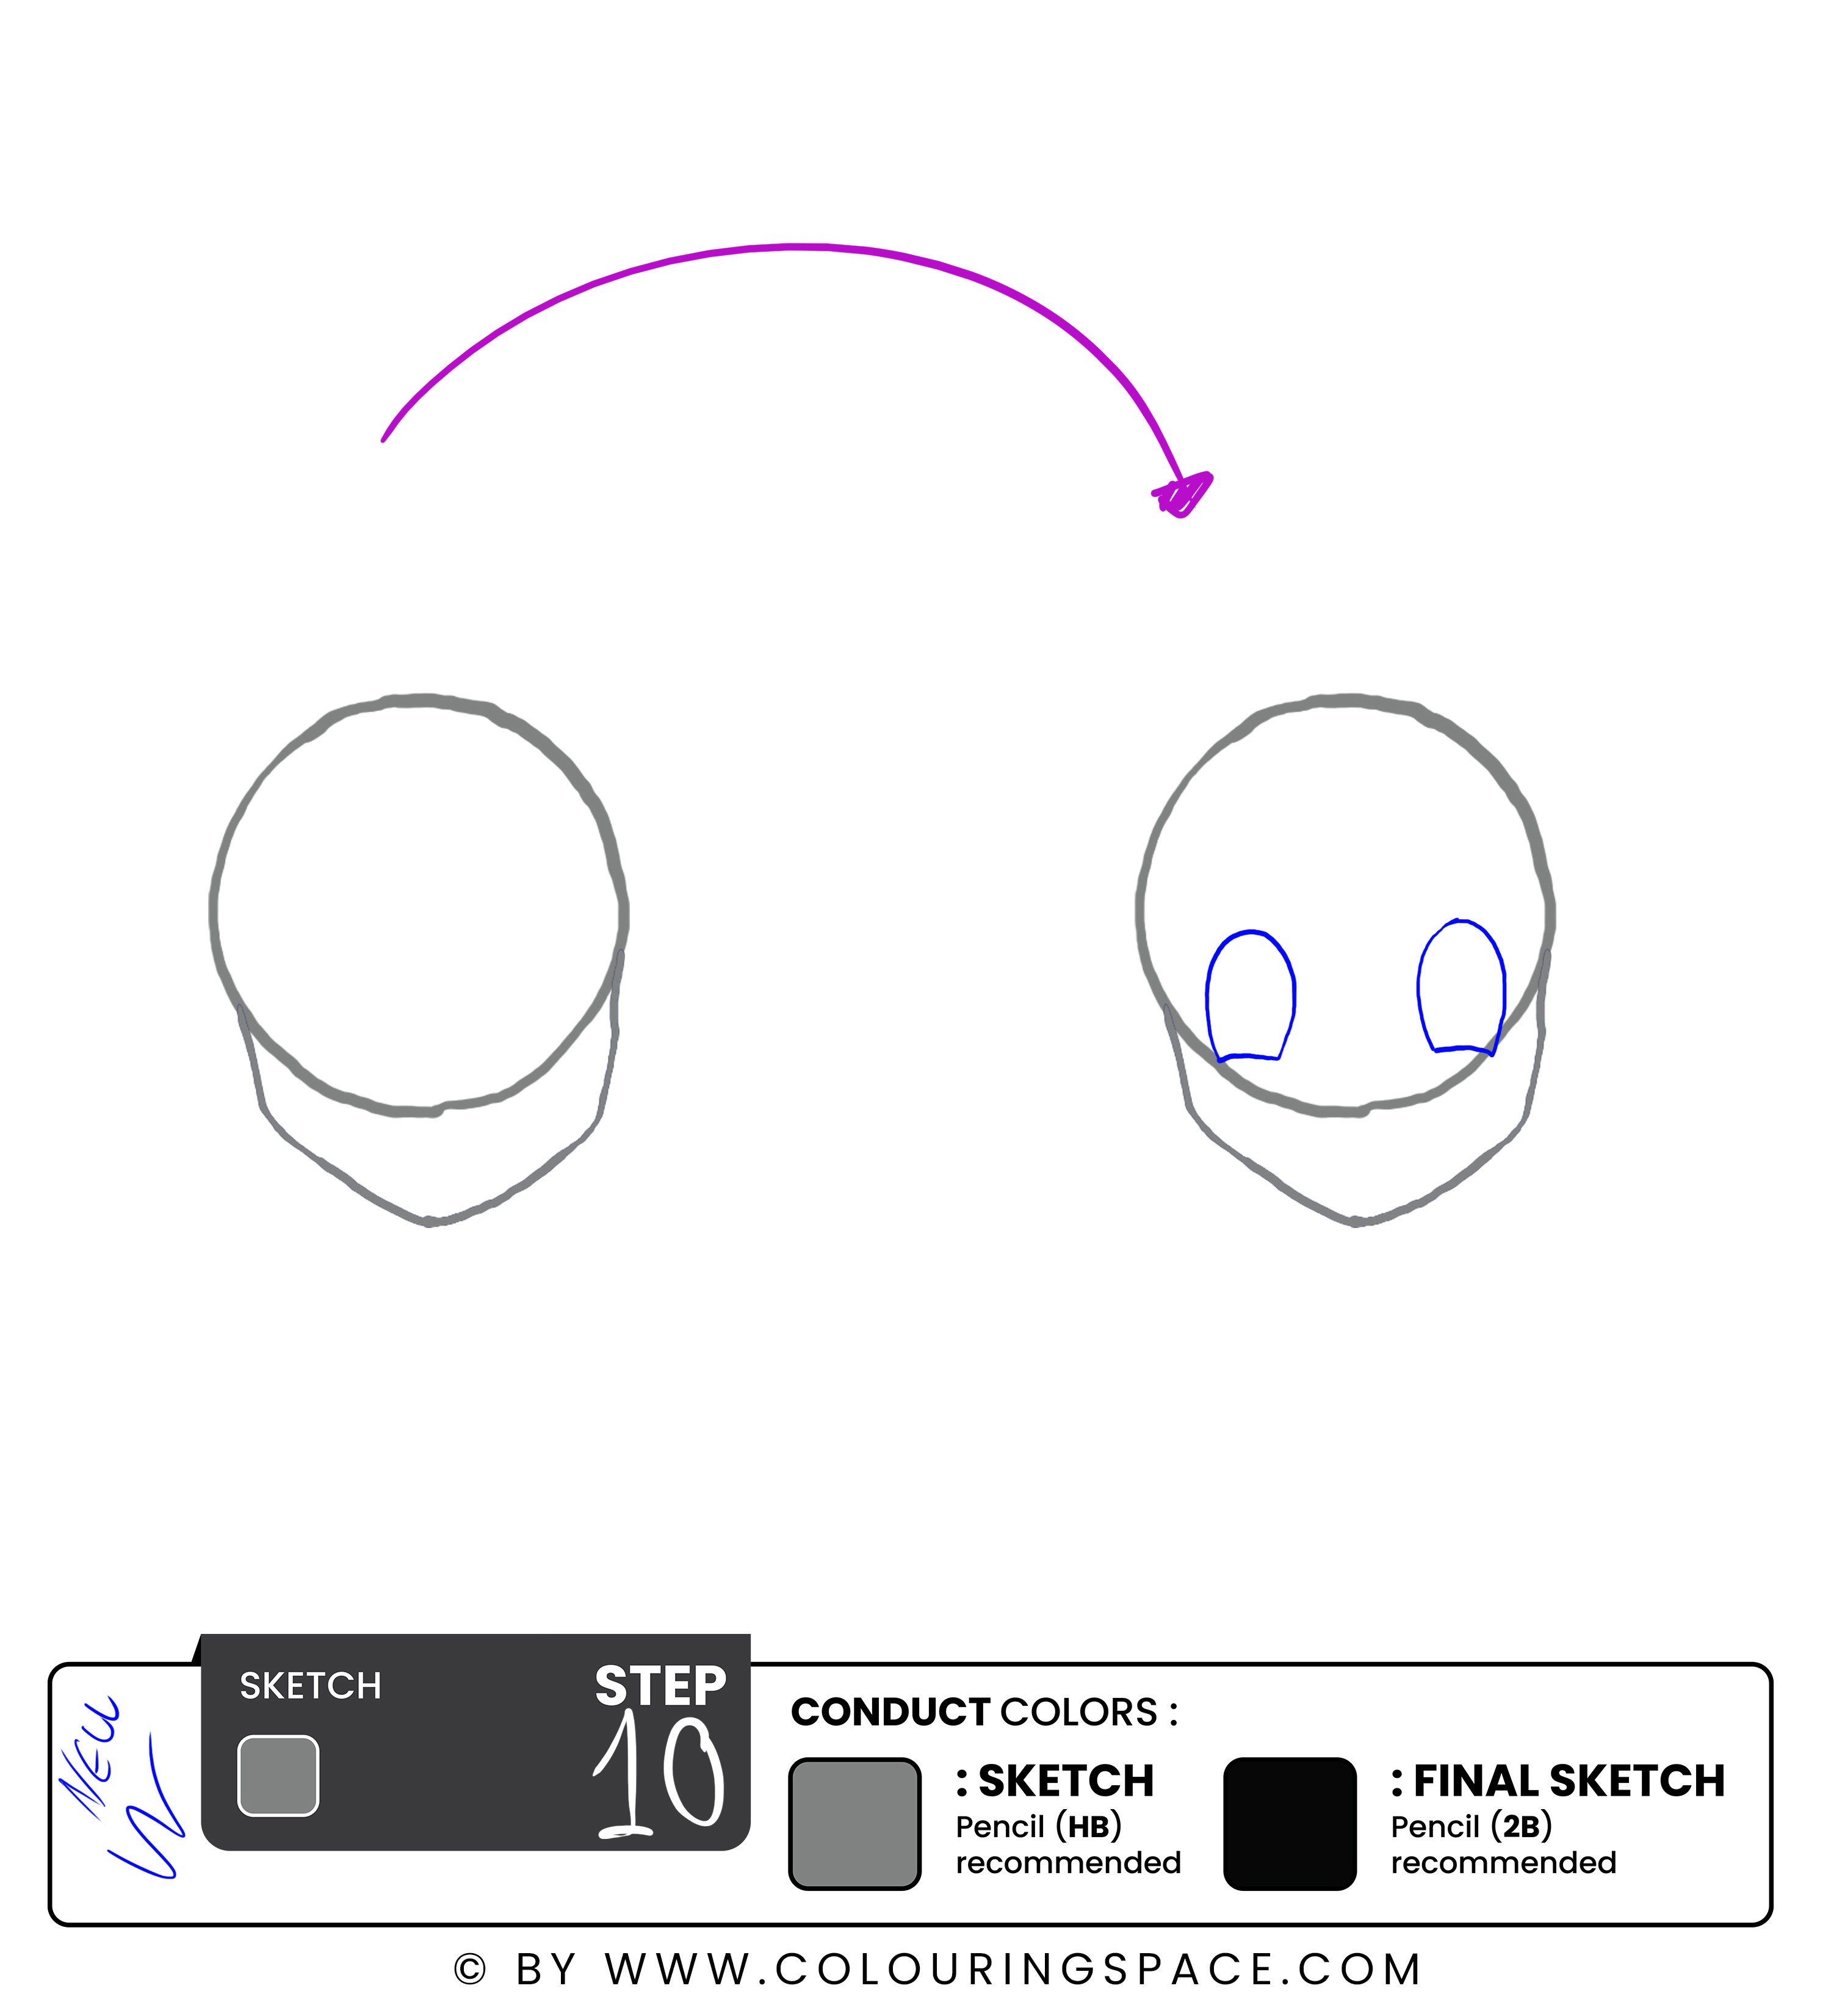
Now that you have the basic structure of Ash's face in place, it's time to add some details. Start by drawing two rough circles within the bottom of the circle you drew for Ash's head. These circles will serve as the placement for Ash's eyes.
When drawing a character's eyes, paying attention to the overall shape and size of the eyes in relation to the rest of the face is essential. Ash's eyes are a key feature that helps convey his emotions and personality.
As you draw the rough circles for Ash's eyes, don't worry too much about making them perfect. They're just a starting point that you can refine later.
Steps 11 & 12: Draw Ash's Mouth and Ears
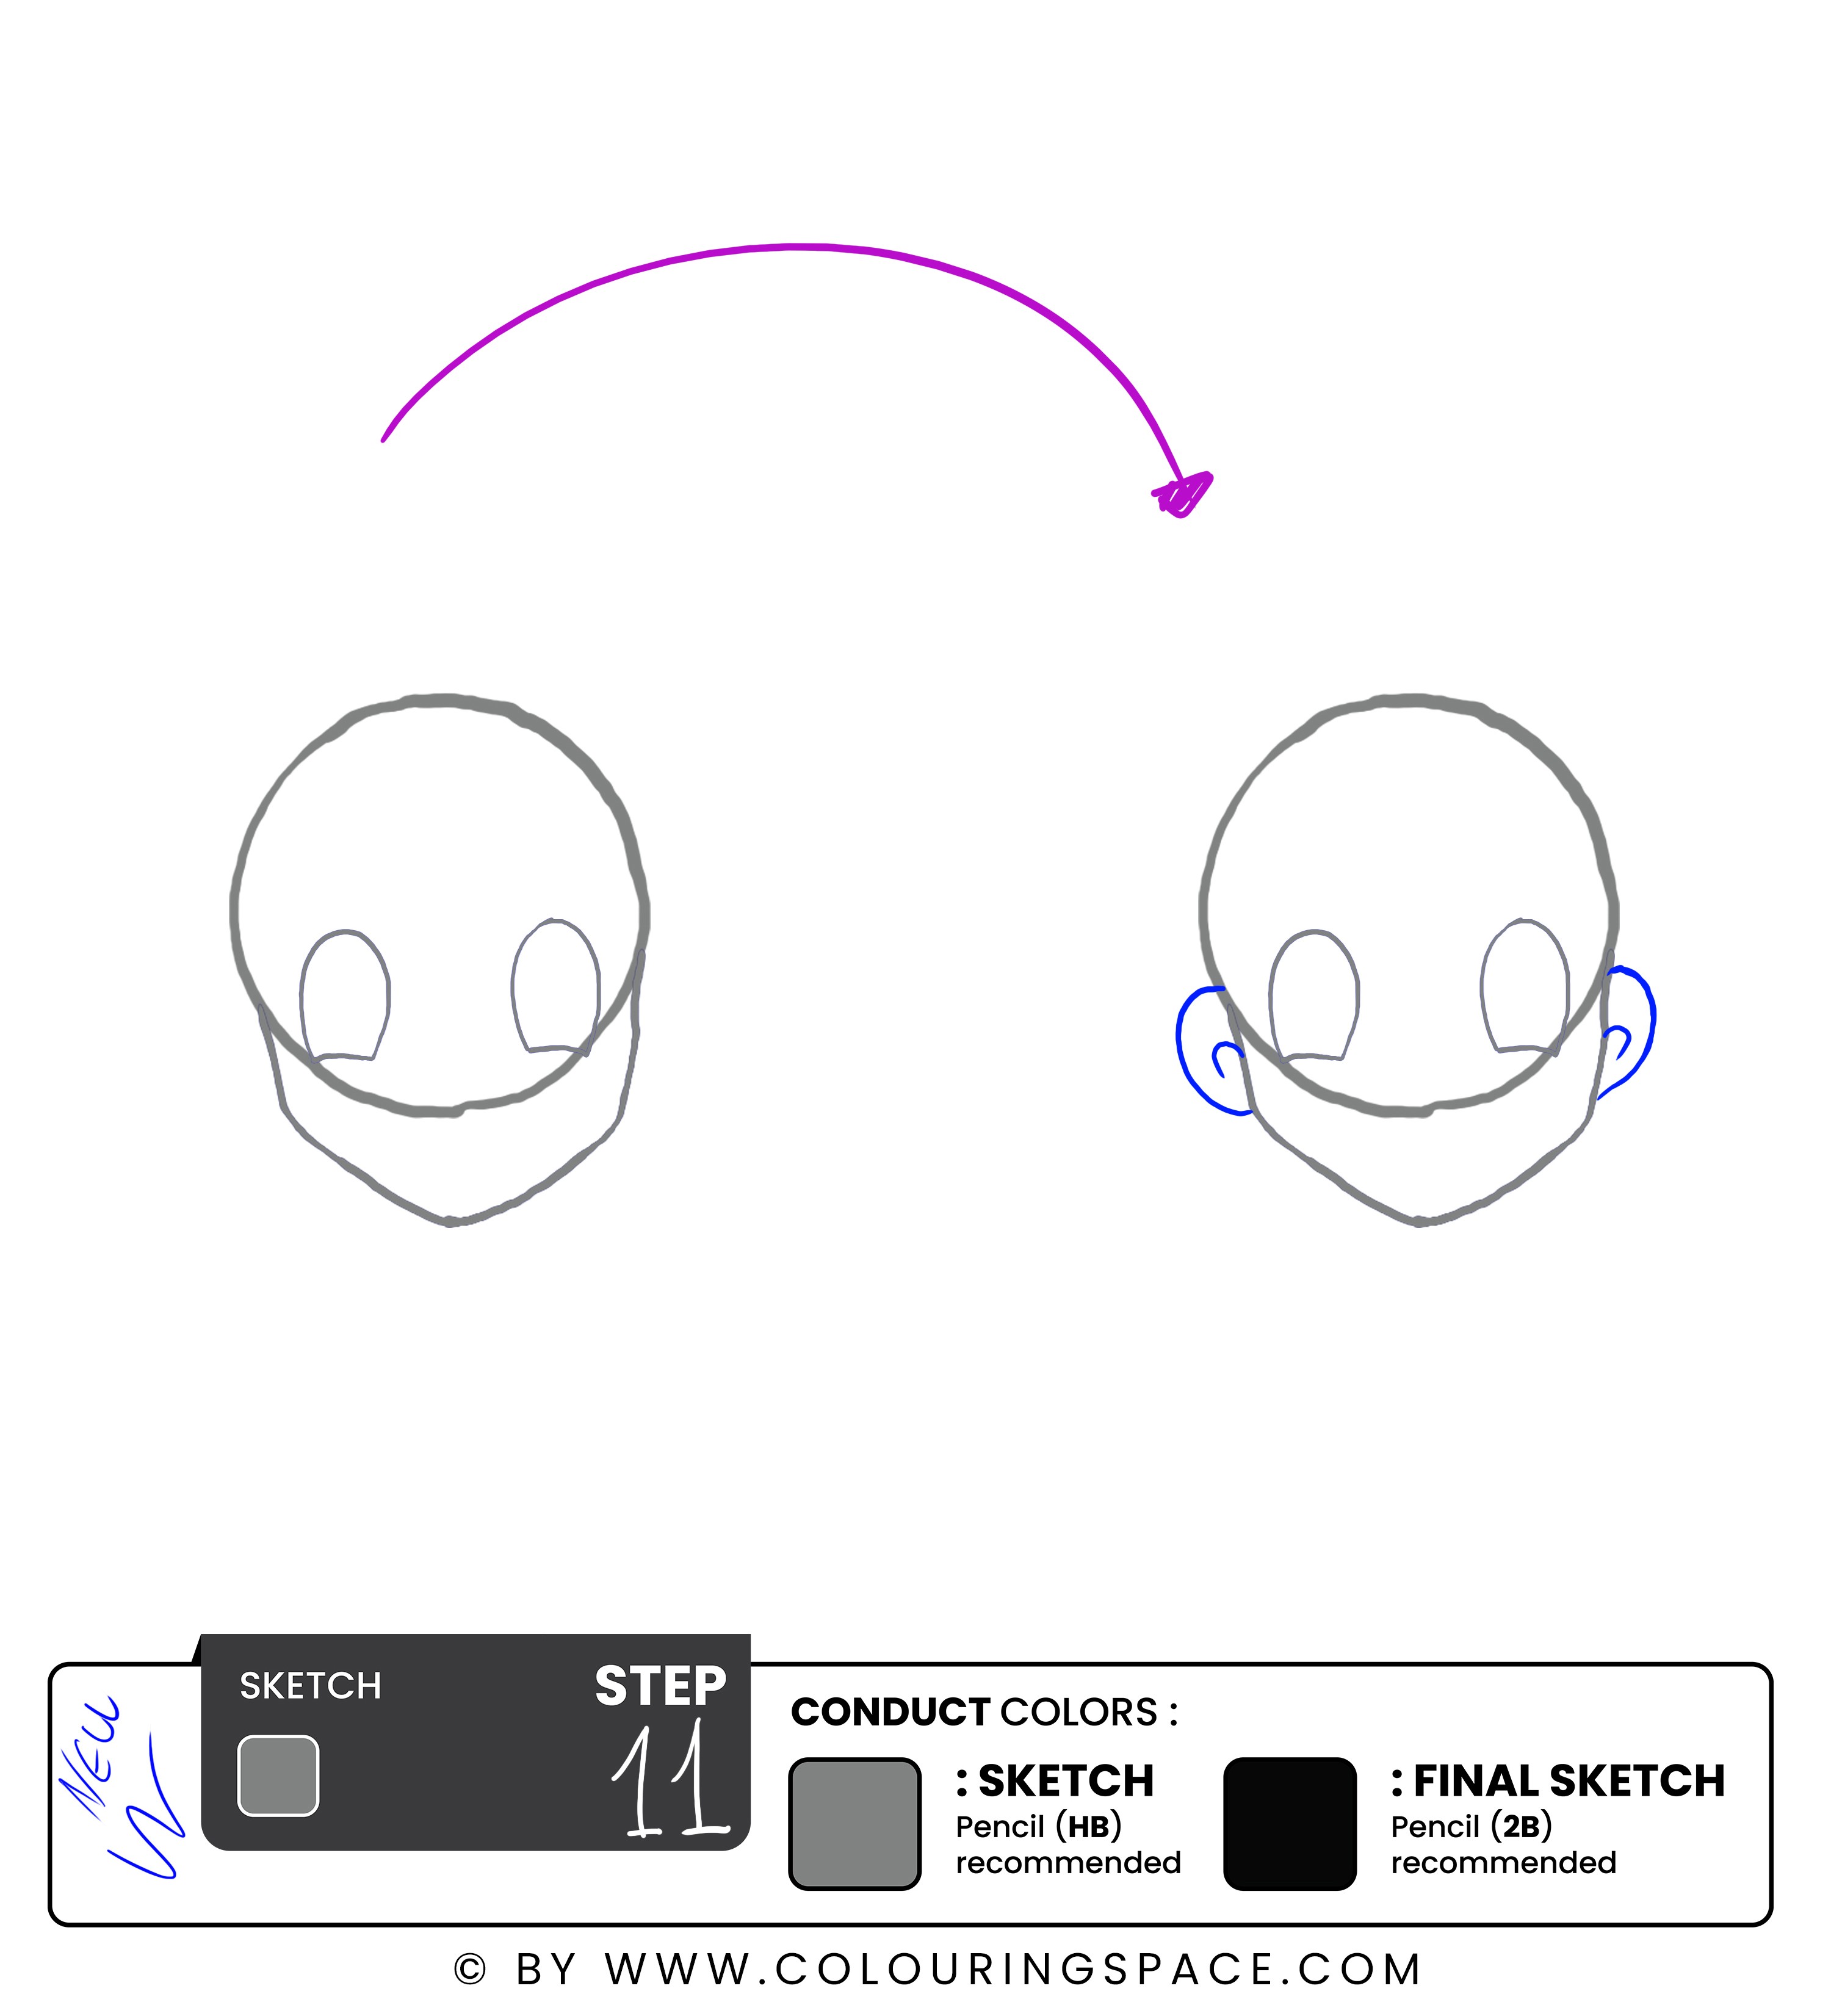
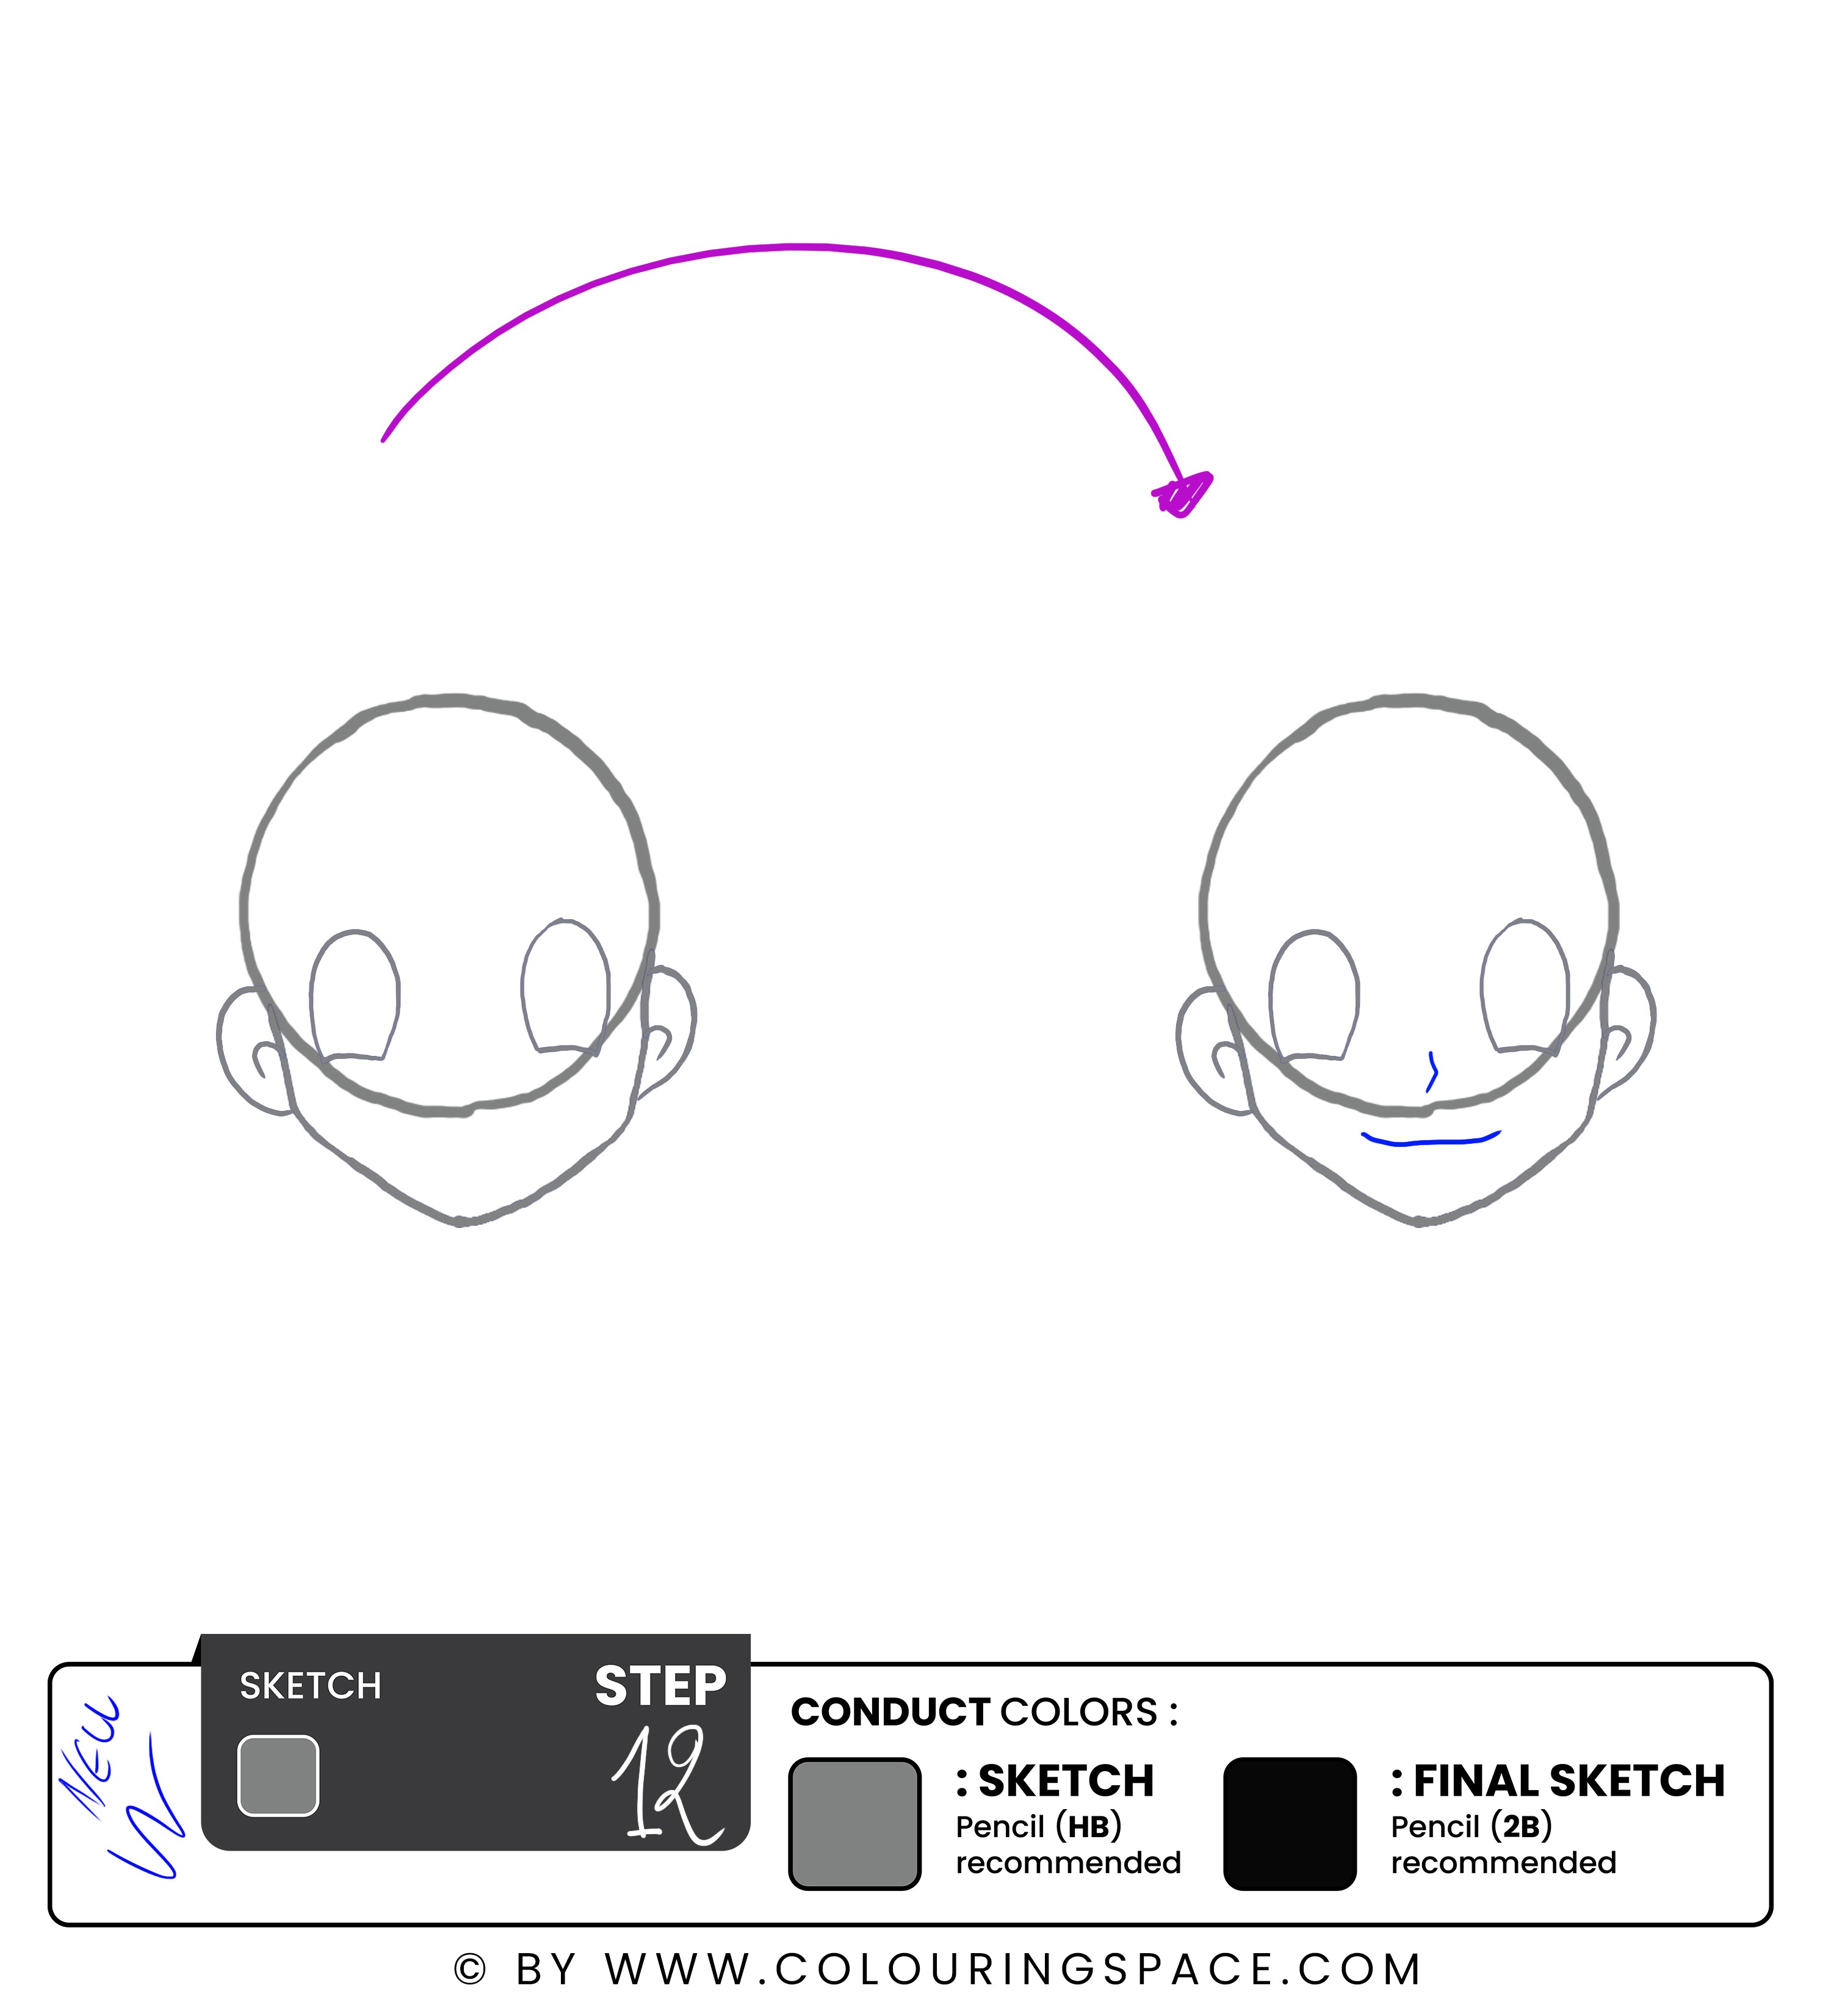
It is time to add some more features to his face. Start by drawing a curved line for Ash's mouth, with the ends slightly turned upwards. This will give Ash a friendly and approachable expression.
Next, add Ash's ears. They are located on either side of his head, just below the level of his eyes.
When drawing Ash's mouth and ears, pay attention to the overall proportions of his face. The mouth should be in line with the bottom of his eyes. The ears should be roughly the same size as his eyes.
You can adjust the shape and position of his mouth to convey different emotions or change the angle of his ears to give him a more dynamic look.
Step 13: Draw Ash's Cap (Part One)
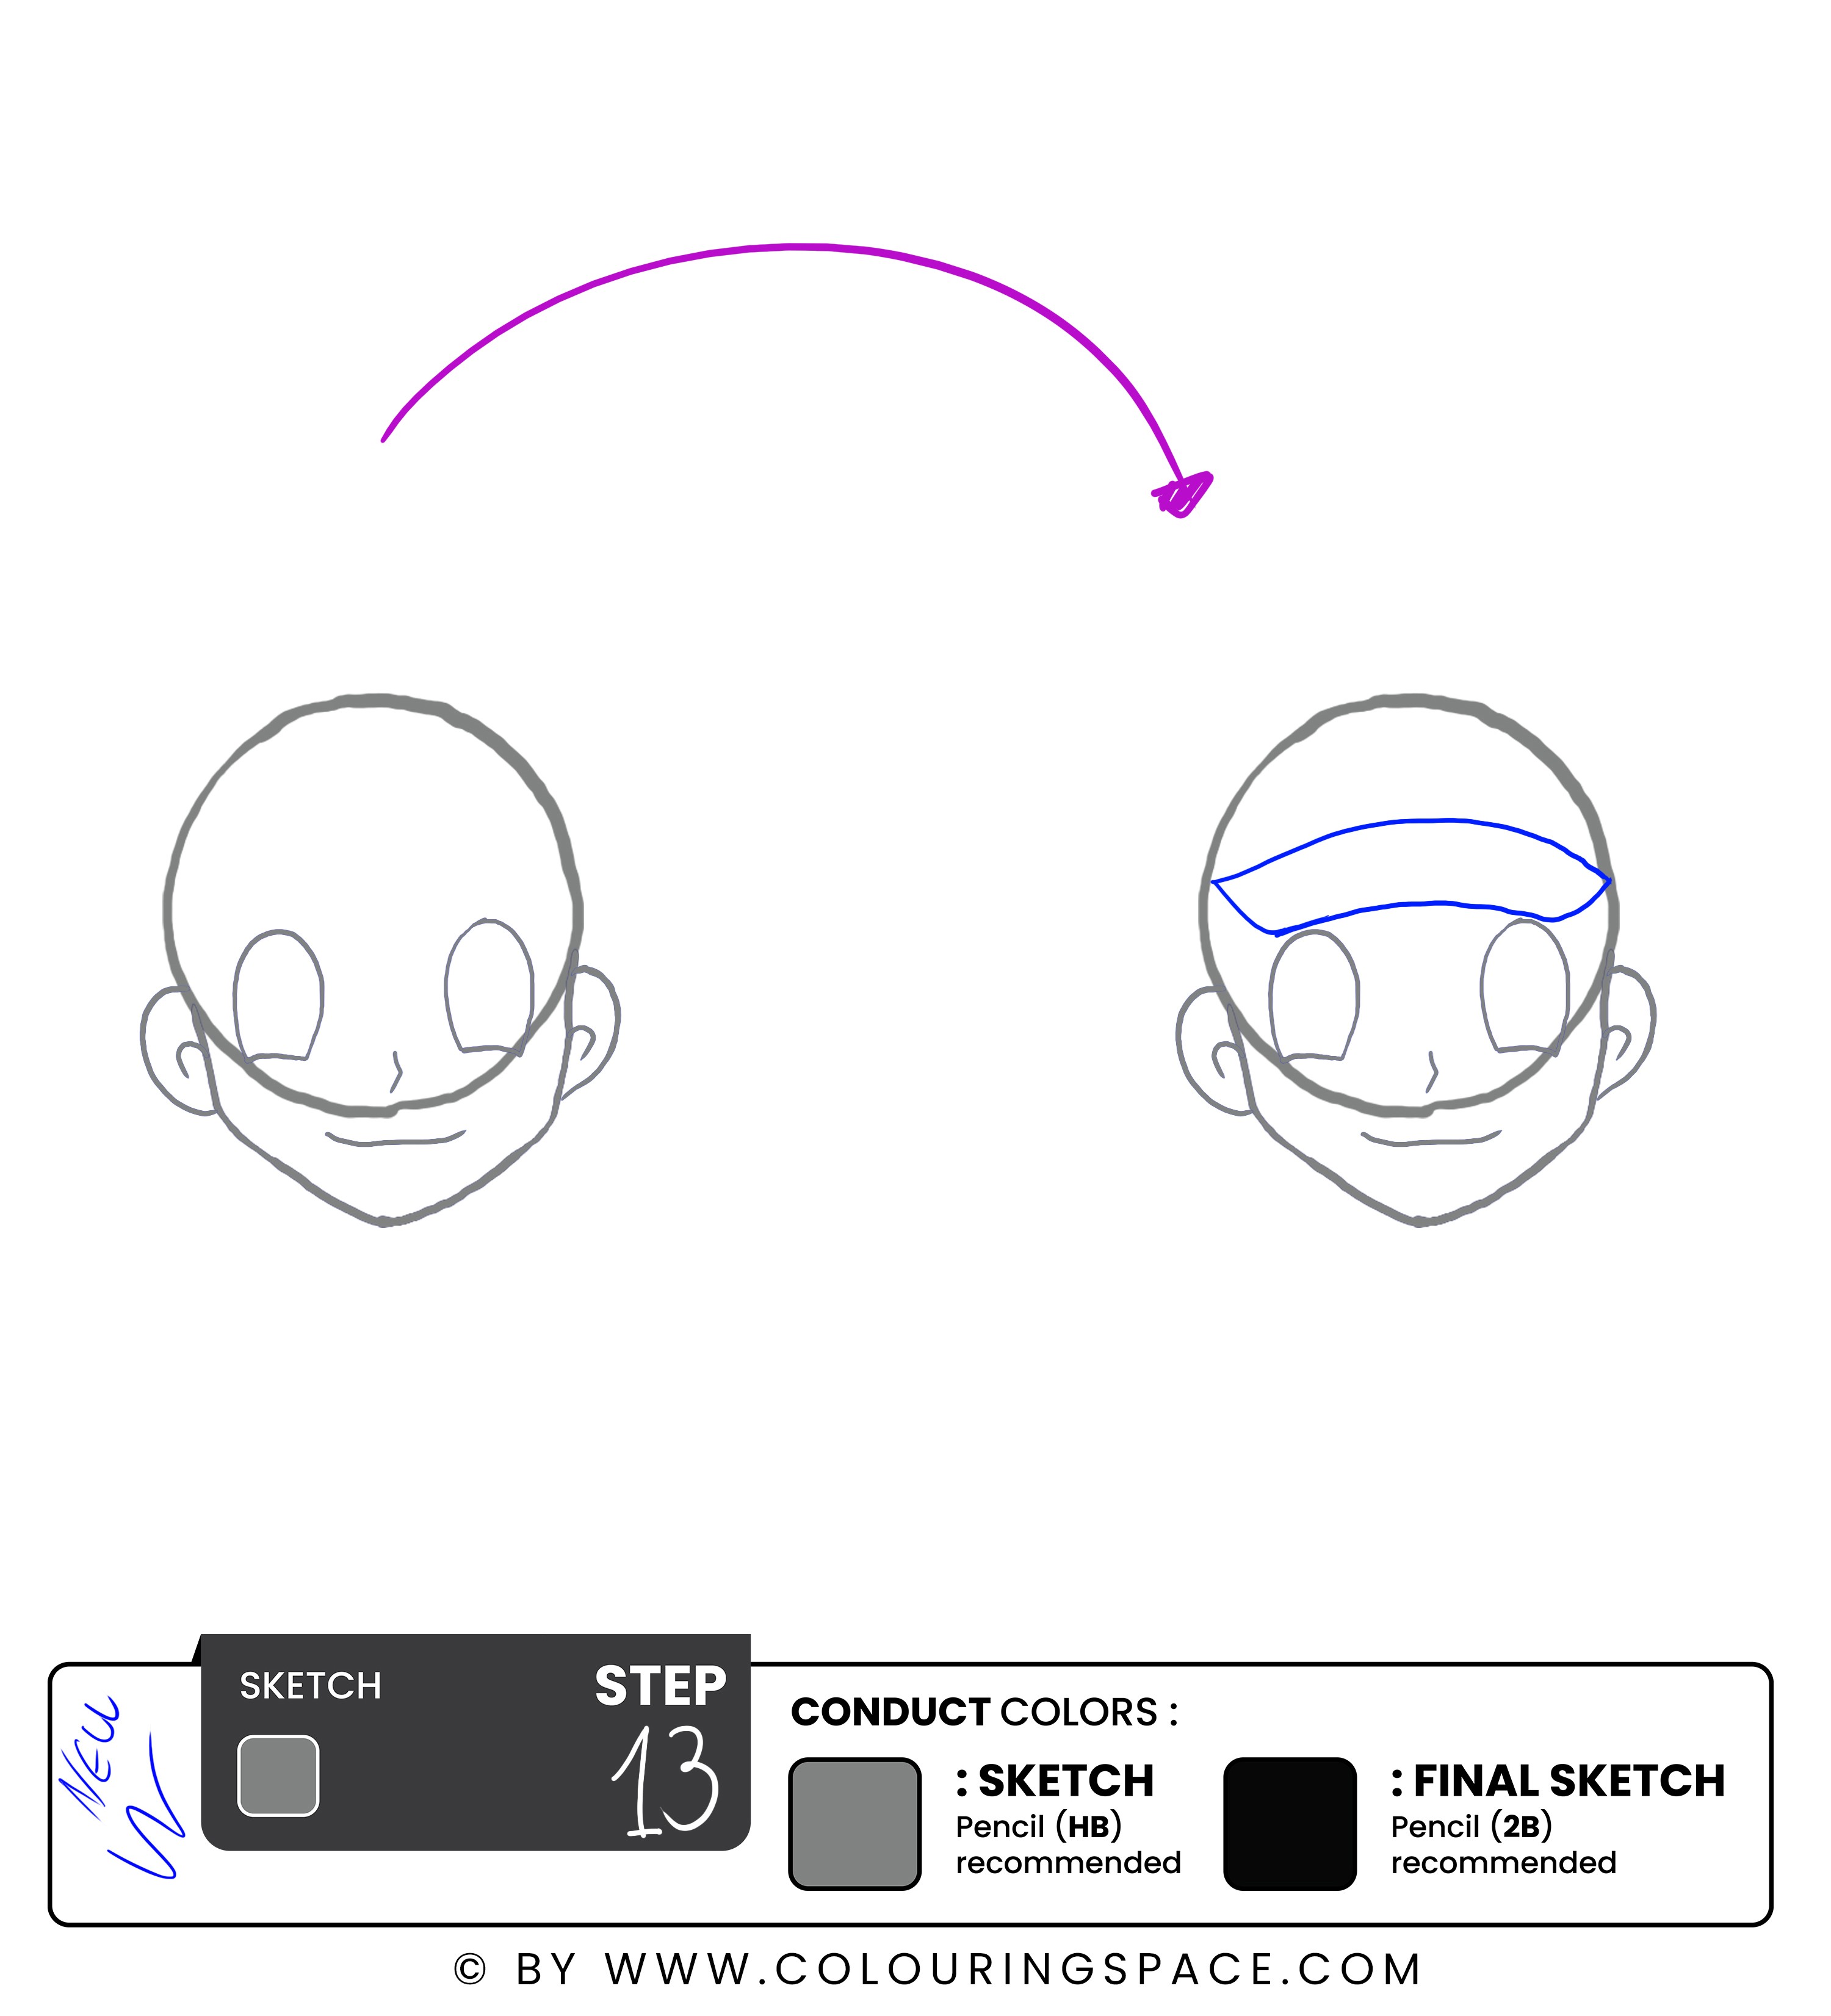
Start by drawing the cap's brim, which should be a curved line extending from the top of his forehead.
Steps 14 & 15: Draw Ash's Cap (Part Two)
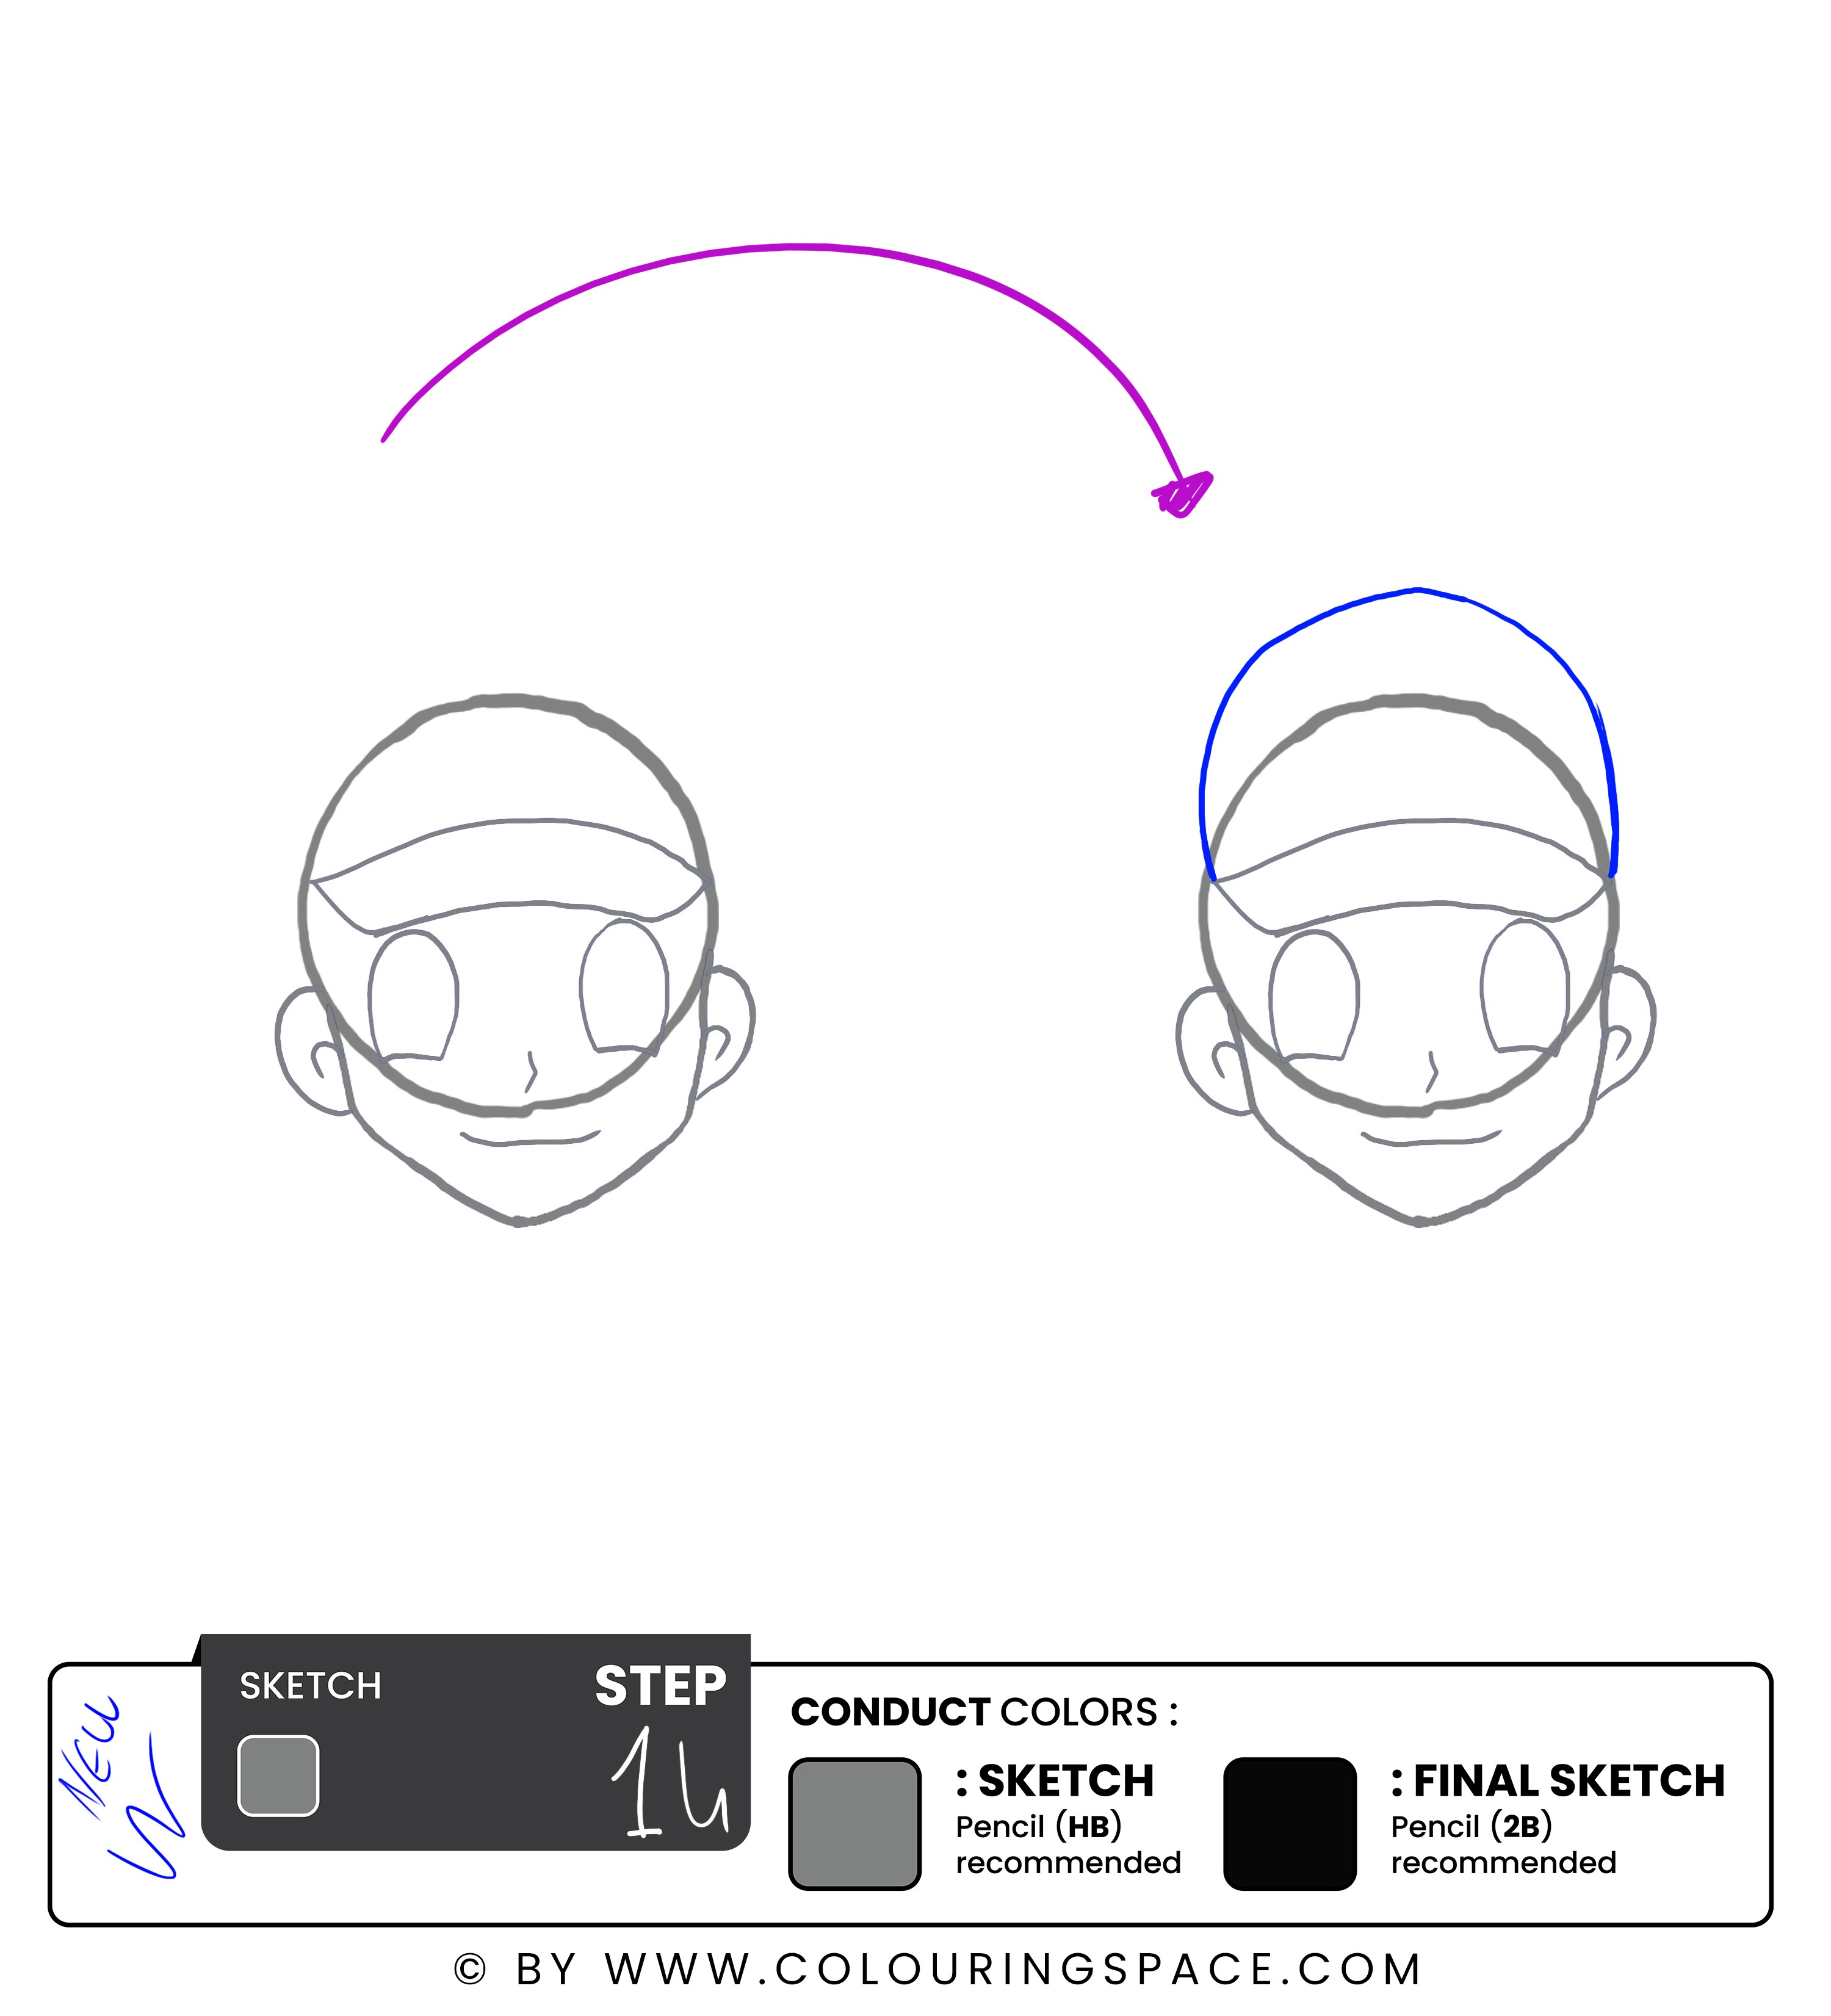
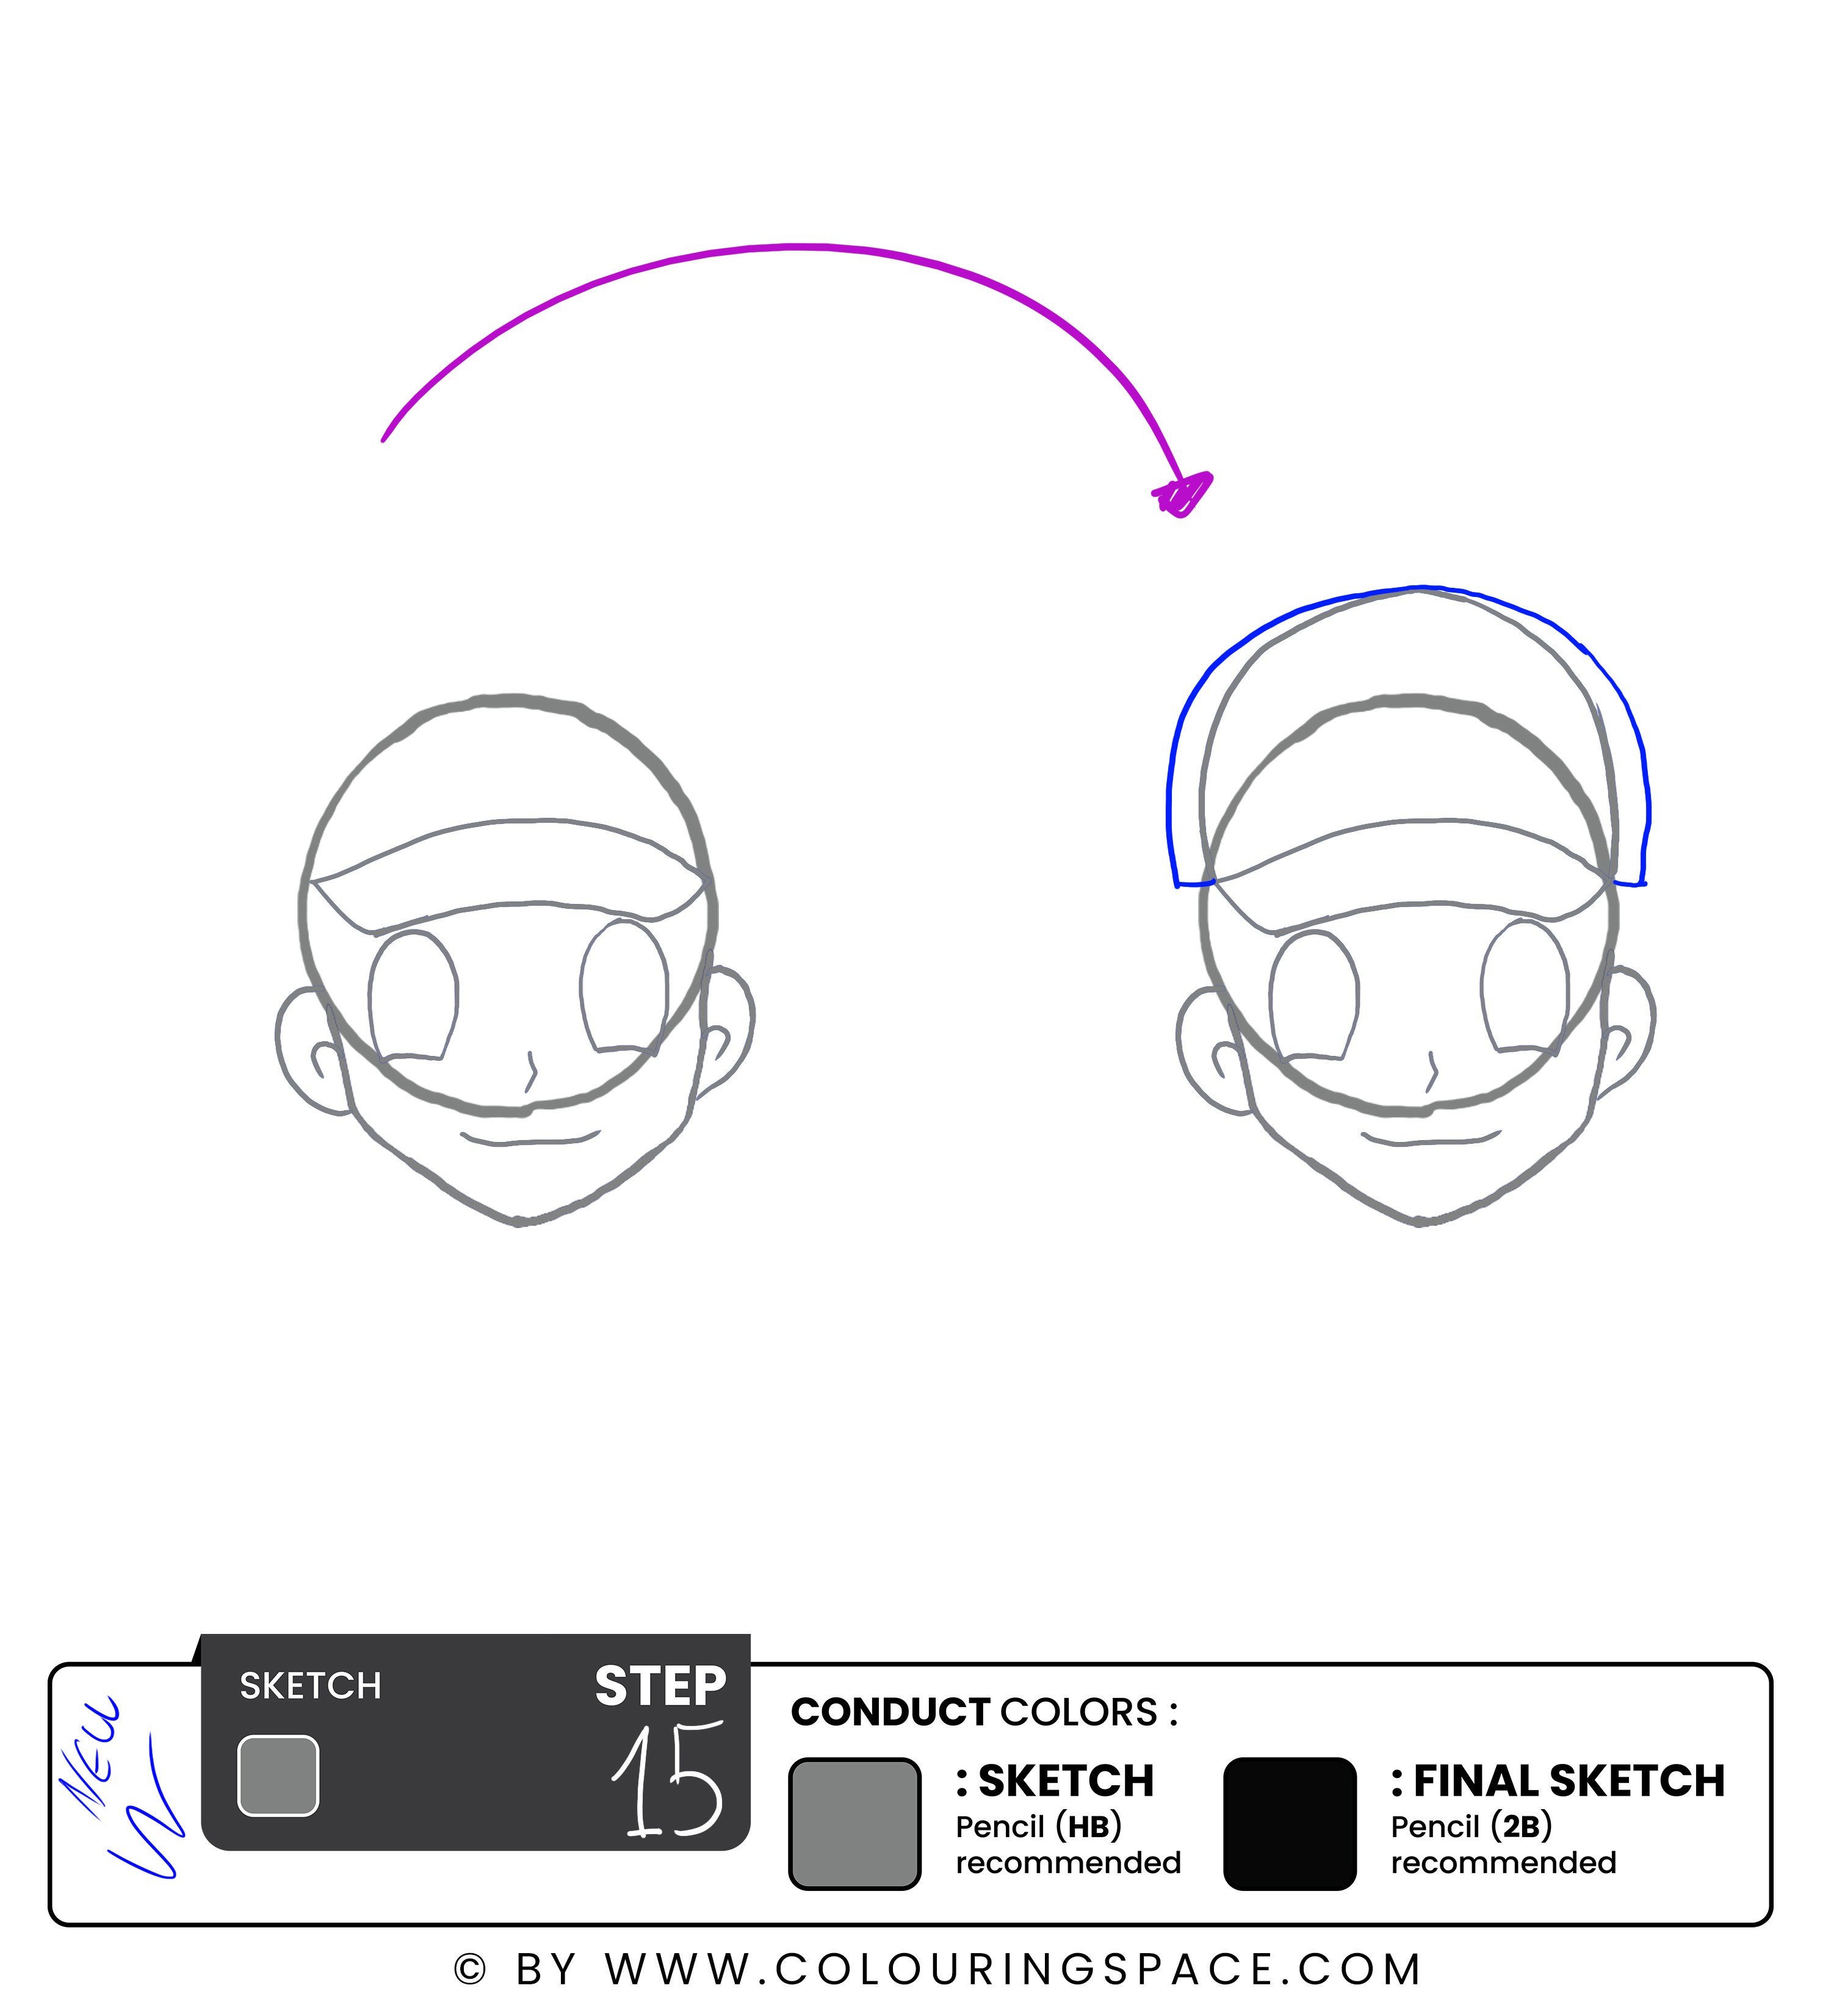
Next, draw two lines that extend upwards from the brim to create the shape of the cap.
Once you have the basic shape of the cap in place, it's time to add the details. As you draw Ash's cap, remember to pay attention to his head's overall shape and proportions. The cap should fit snugly on his head and be roughly the same width as his face.
Steps 16 & 17: Draw Ash's Spiky Hair, Add the Logo to the Hat, then Remove the Sketch Guidelines
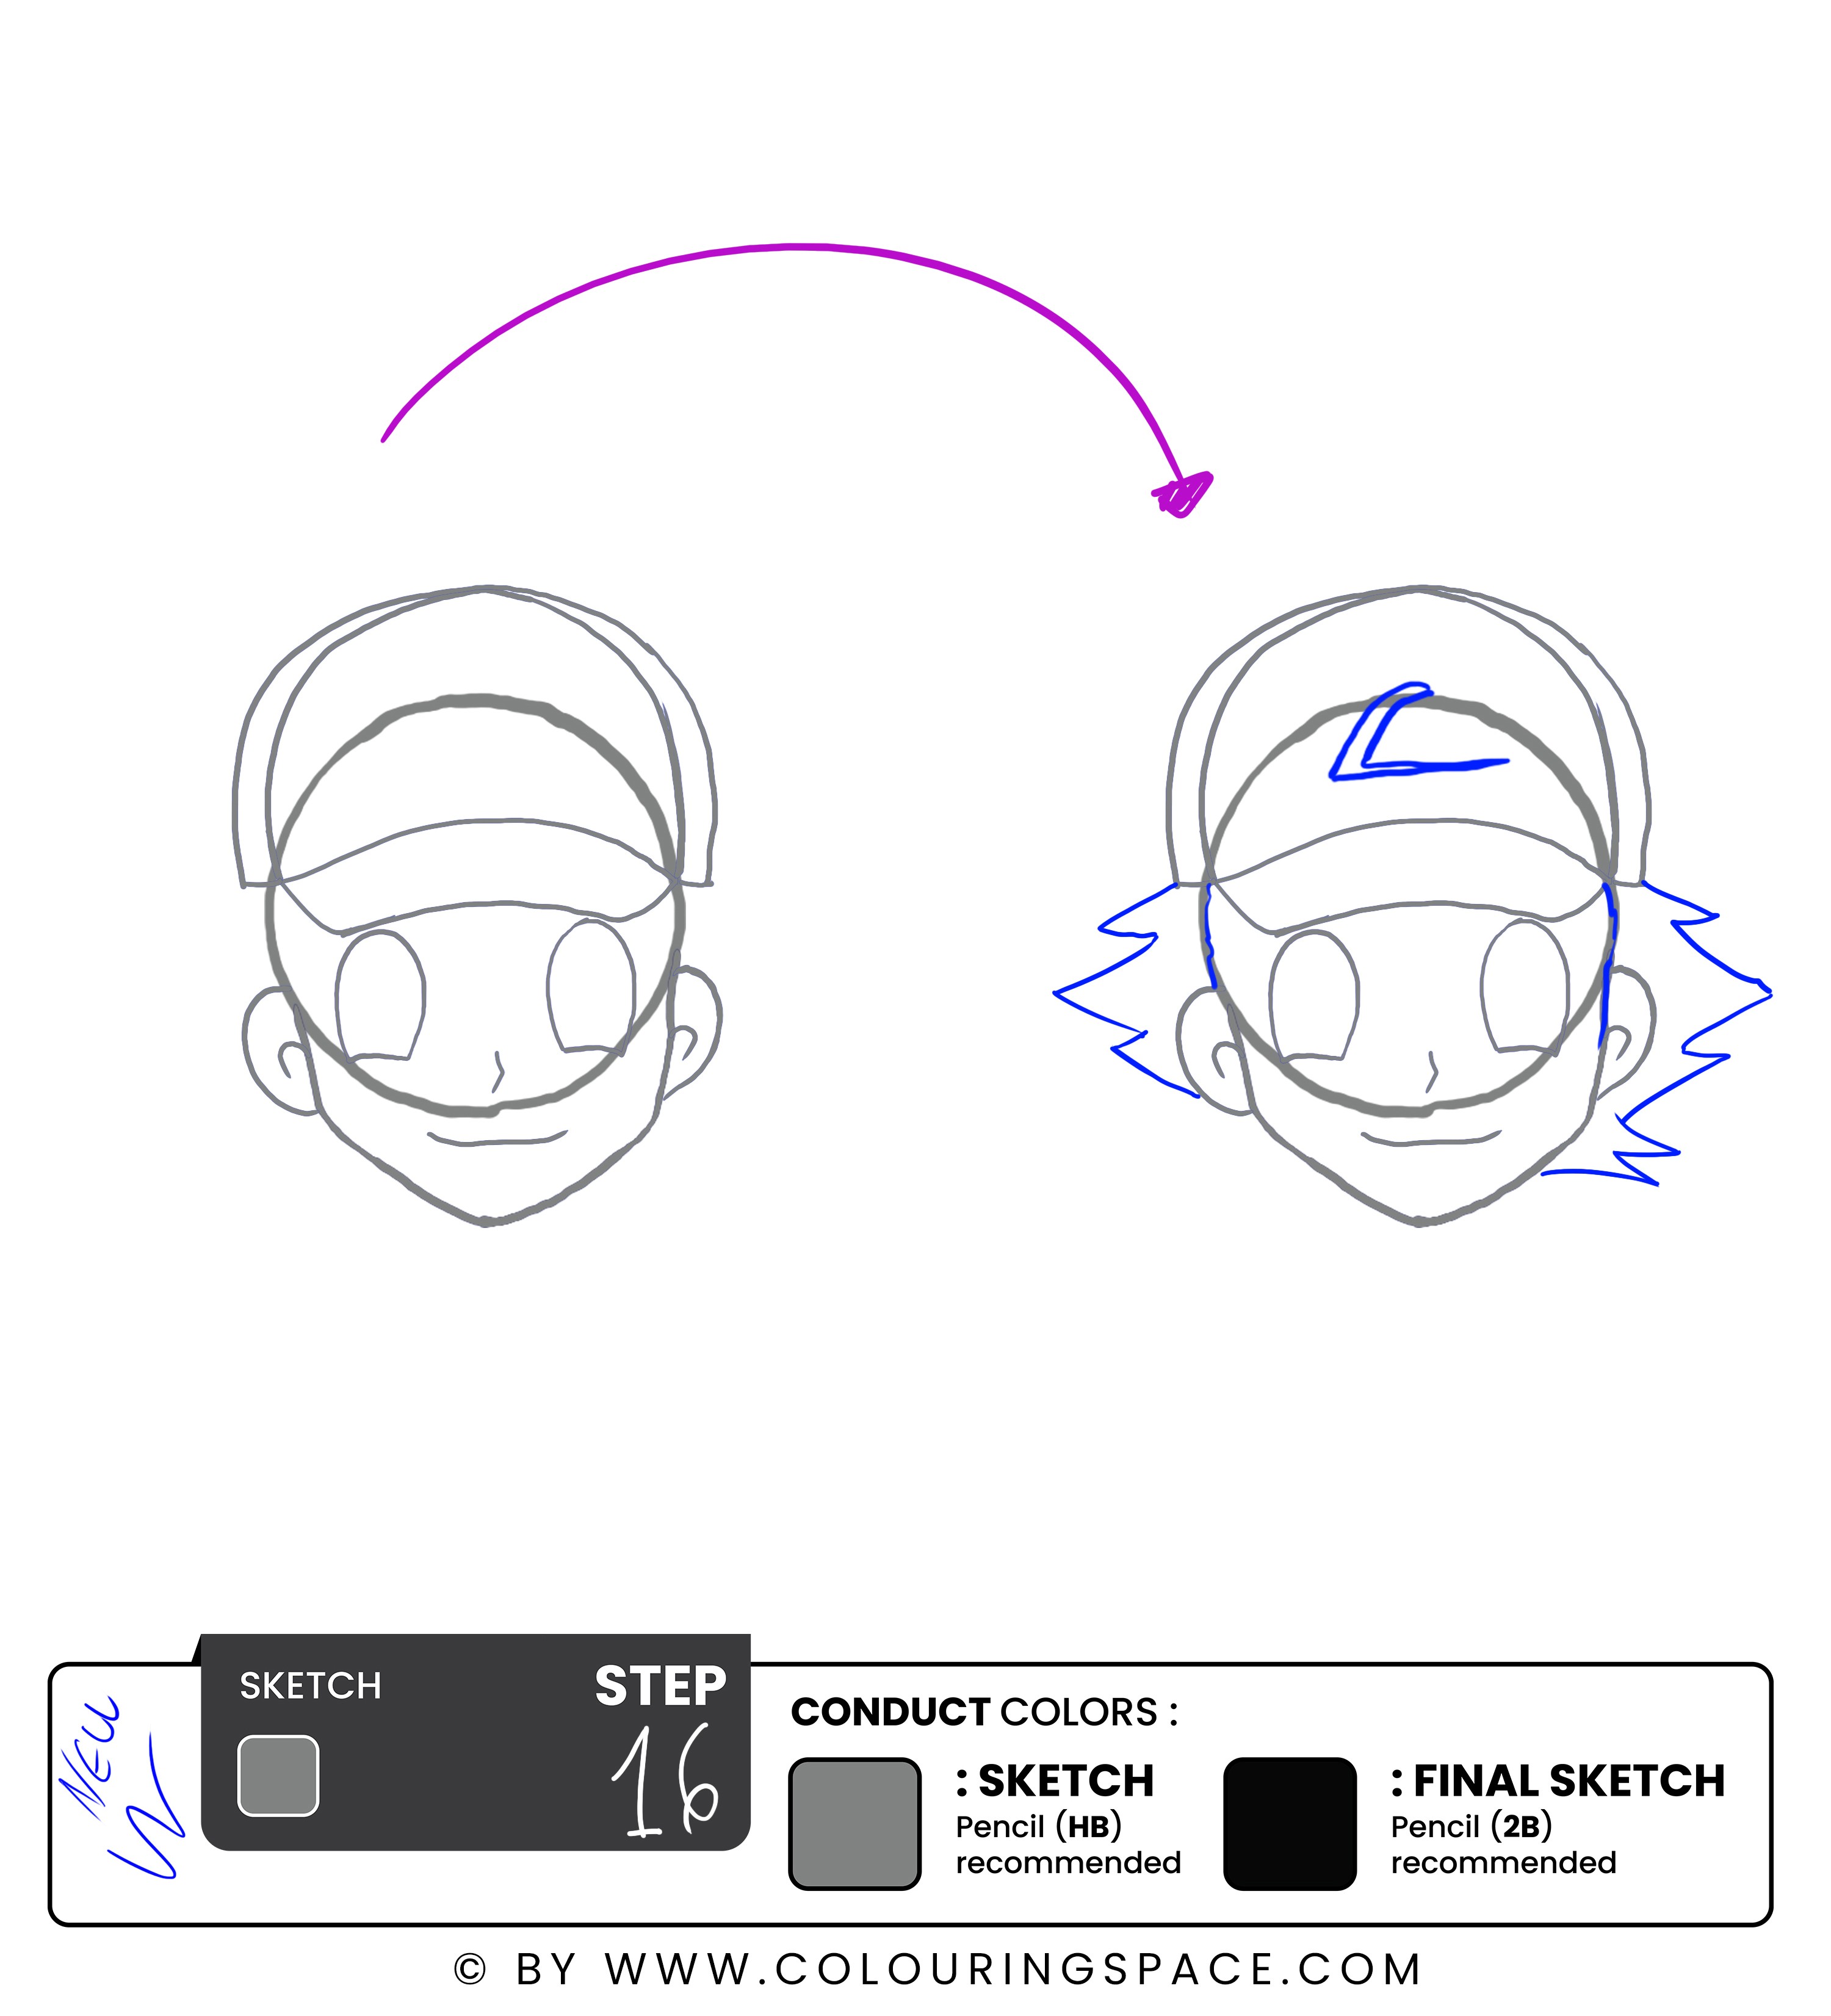
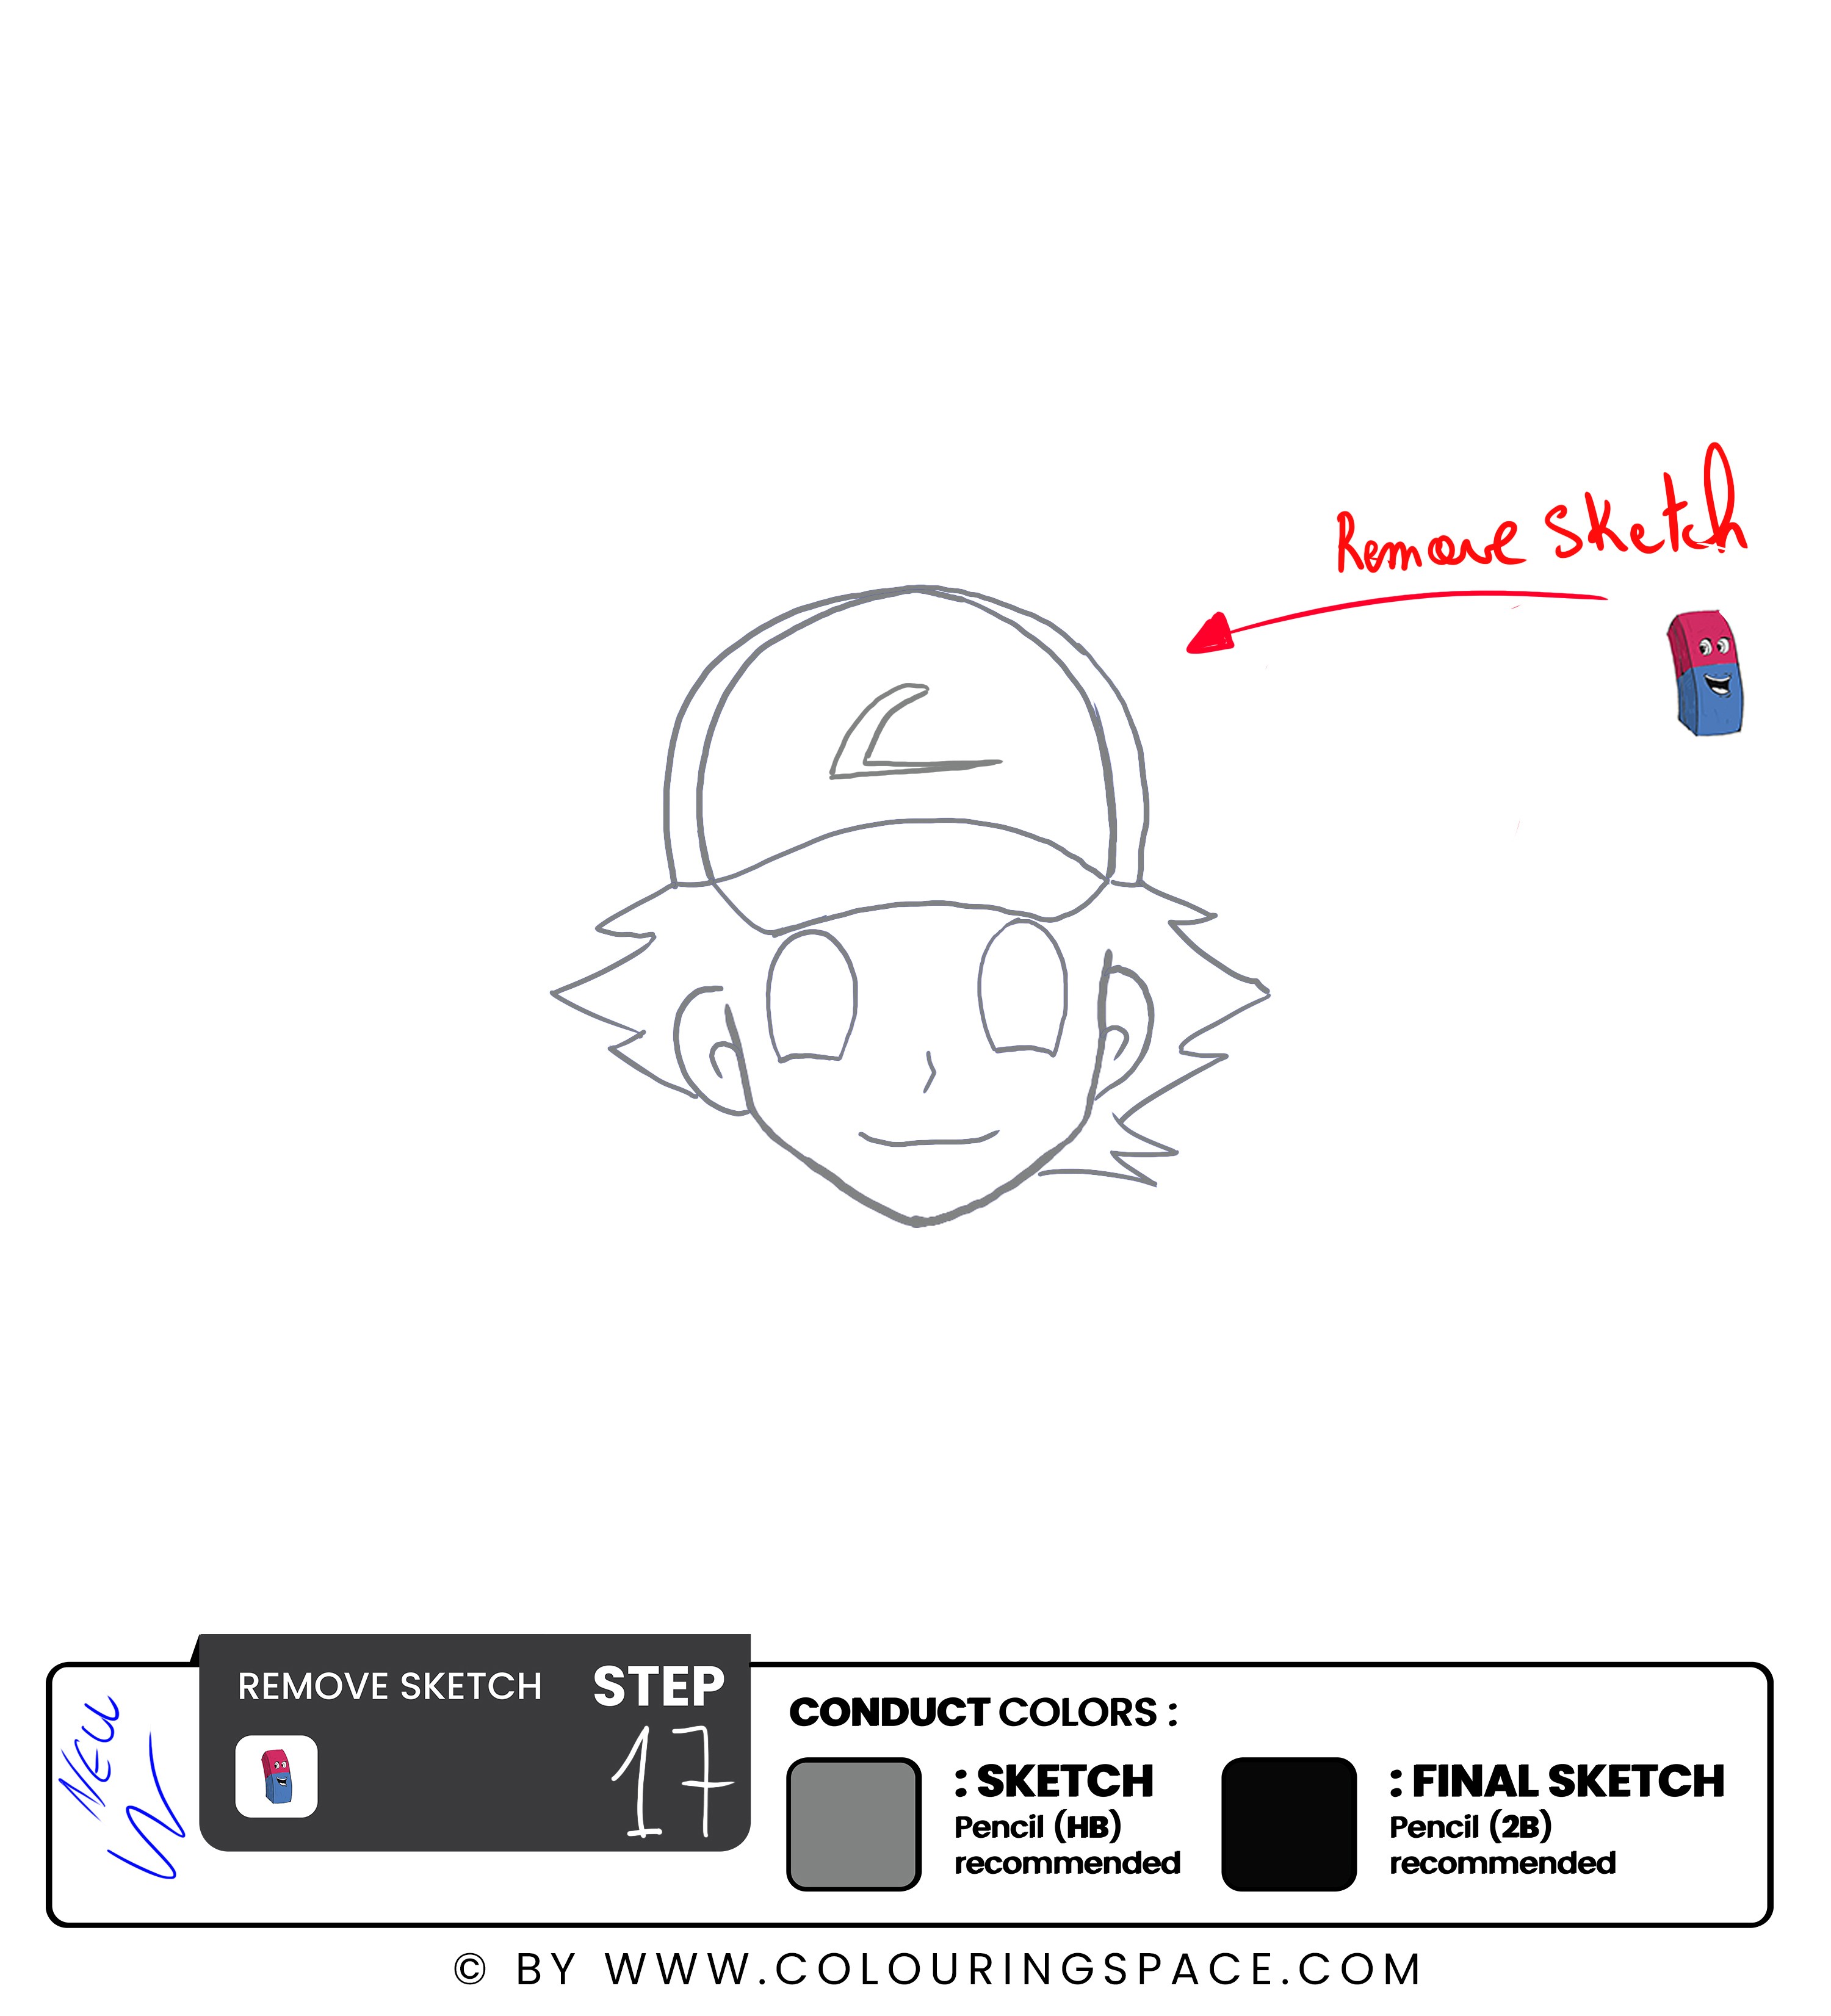
Now that you have Ash's cap in place, it's time to add his signature spiky hair.
Draw several small, spiky shapes along the line you just drew. These spikes should be slightly curved and irregular in size and shape. Ash's hair had a wild and untamed look.
Draw extra spikes or strands of hair to give it more volume and depth. Add some shading or highlights to create a sense of dimension and contrast.
Once that’s done, Draw the Pokémon symbol on the front of the hat. Make sure to follow the sketch guide above to achieve the best results. When confident with the results, grab a clean eraser and remove the sketch guidelines.
Steps 18 & 19: Outline Ash’s Hat, then Hair
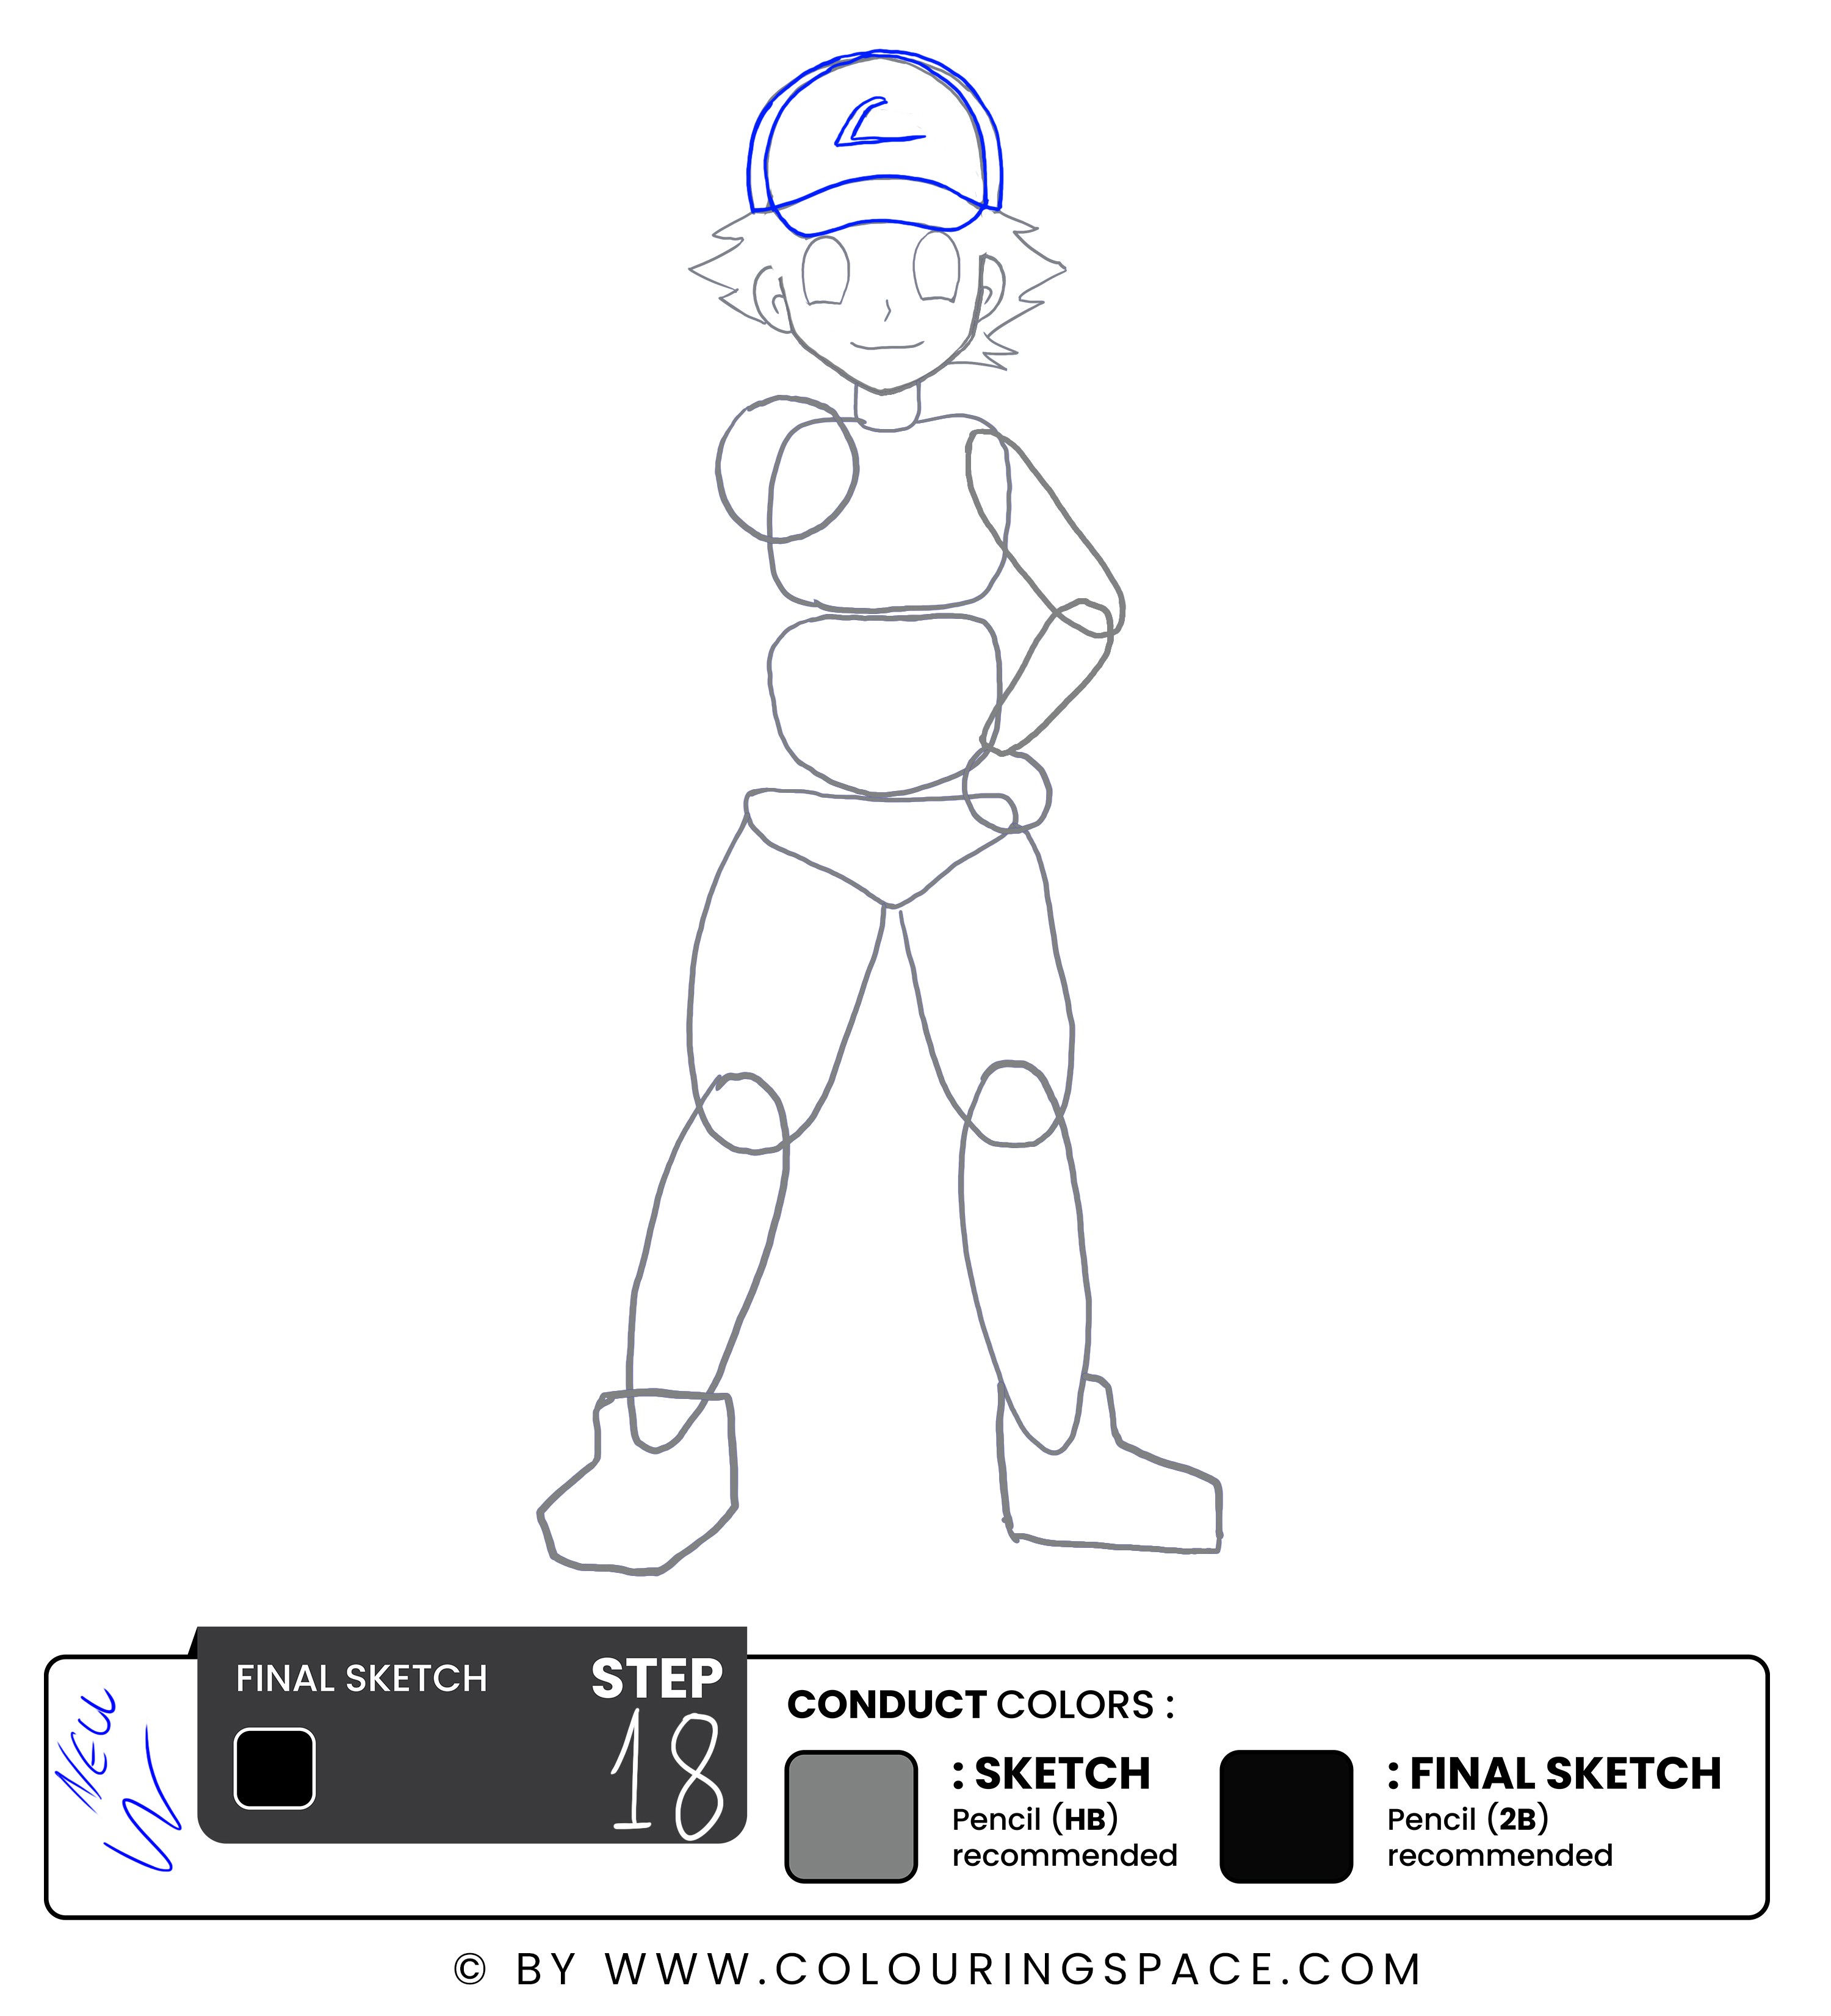
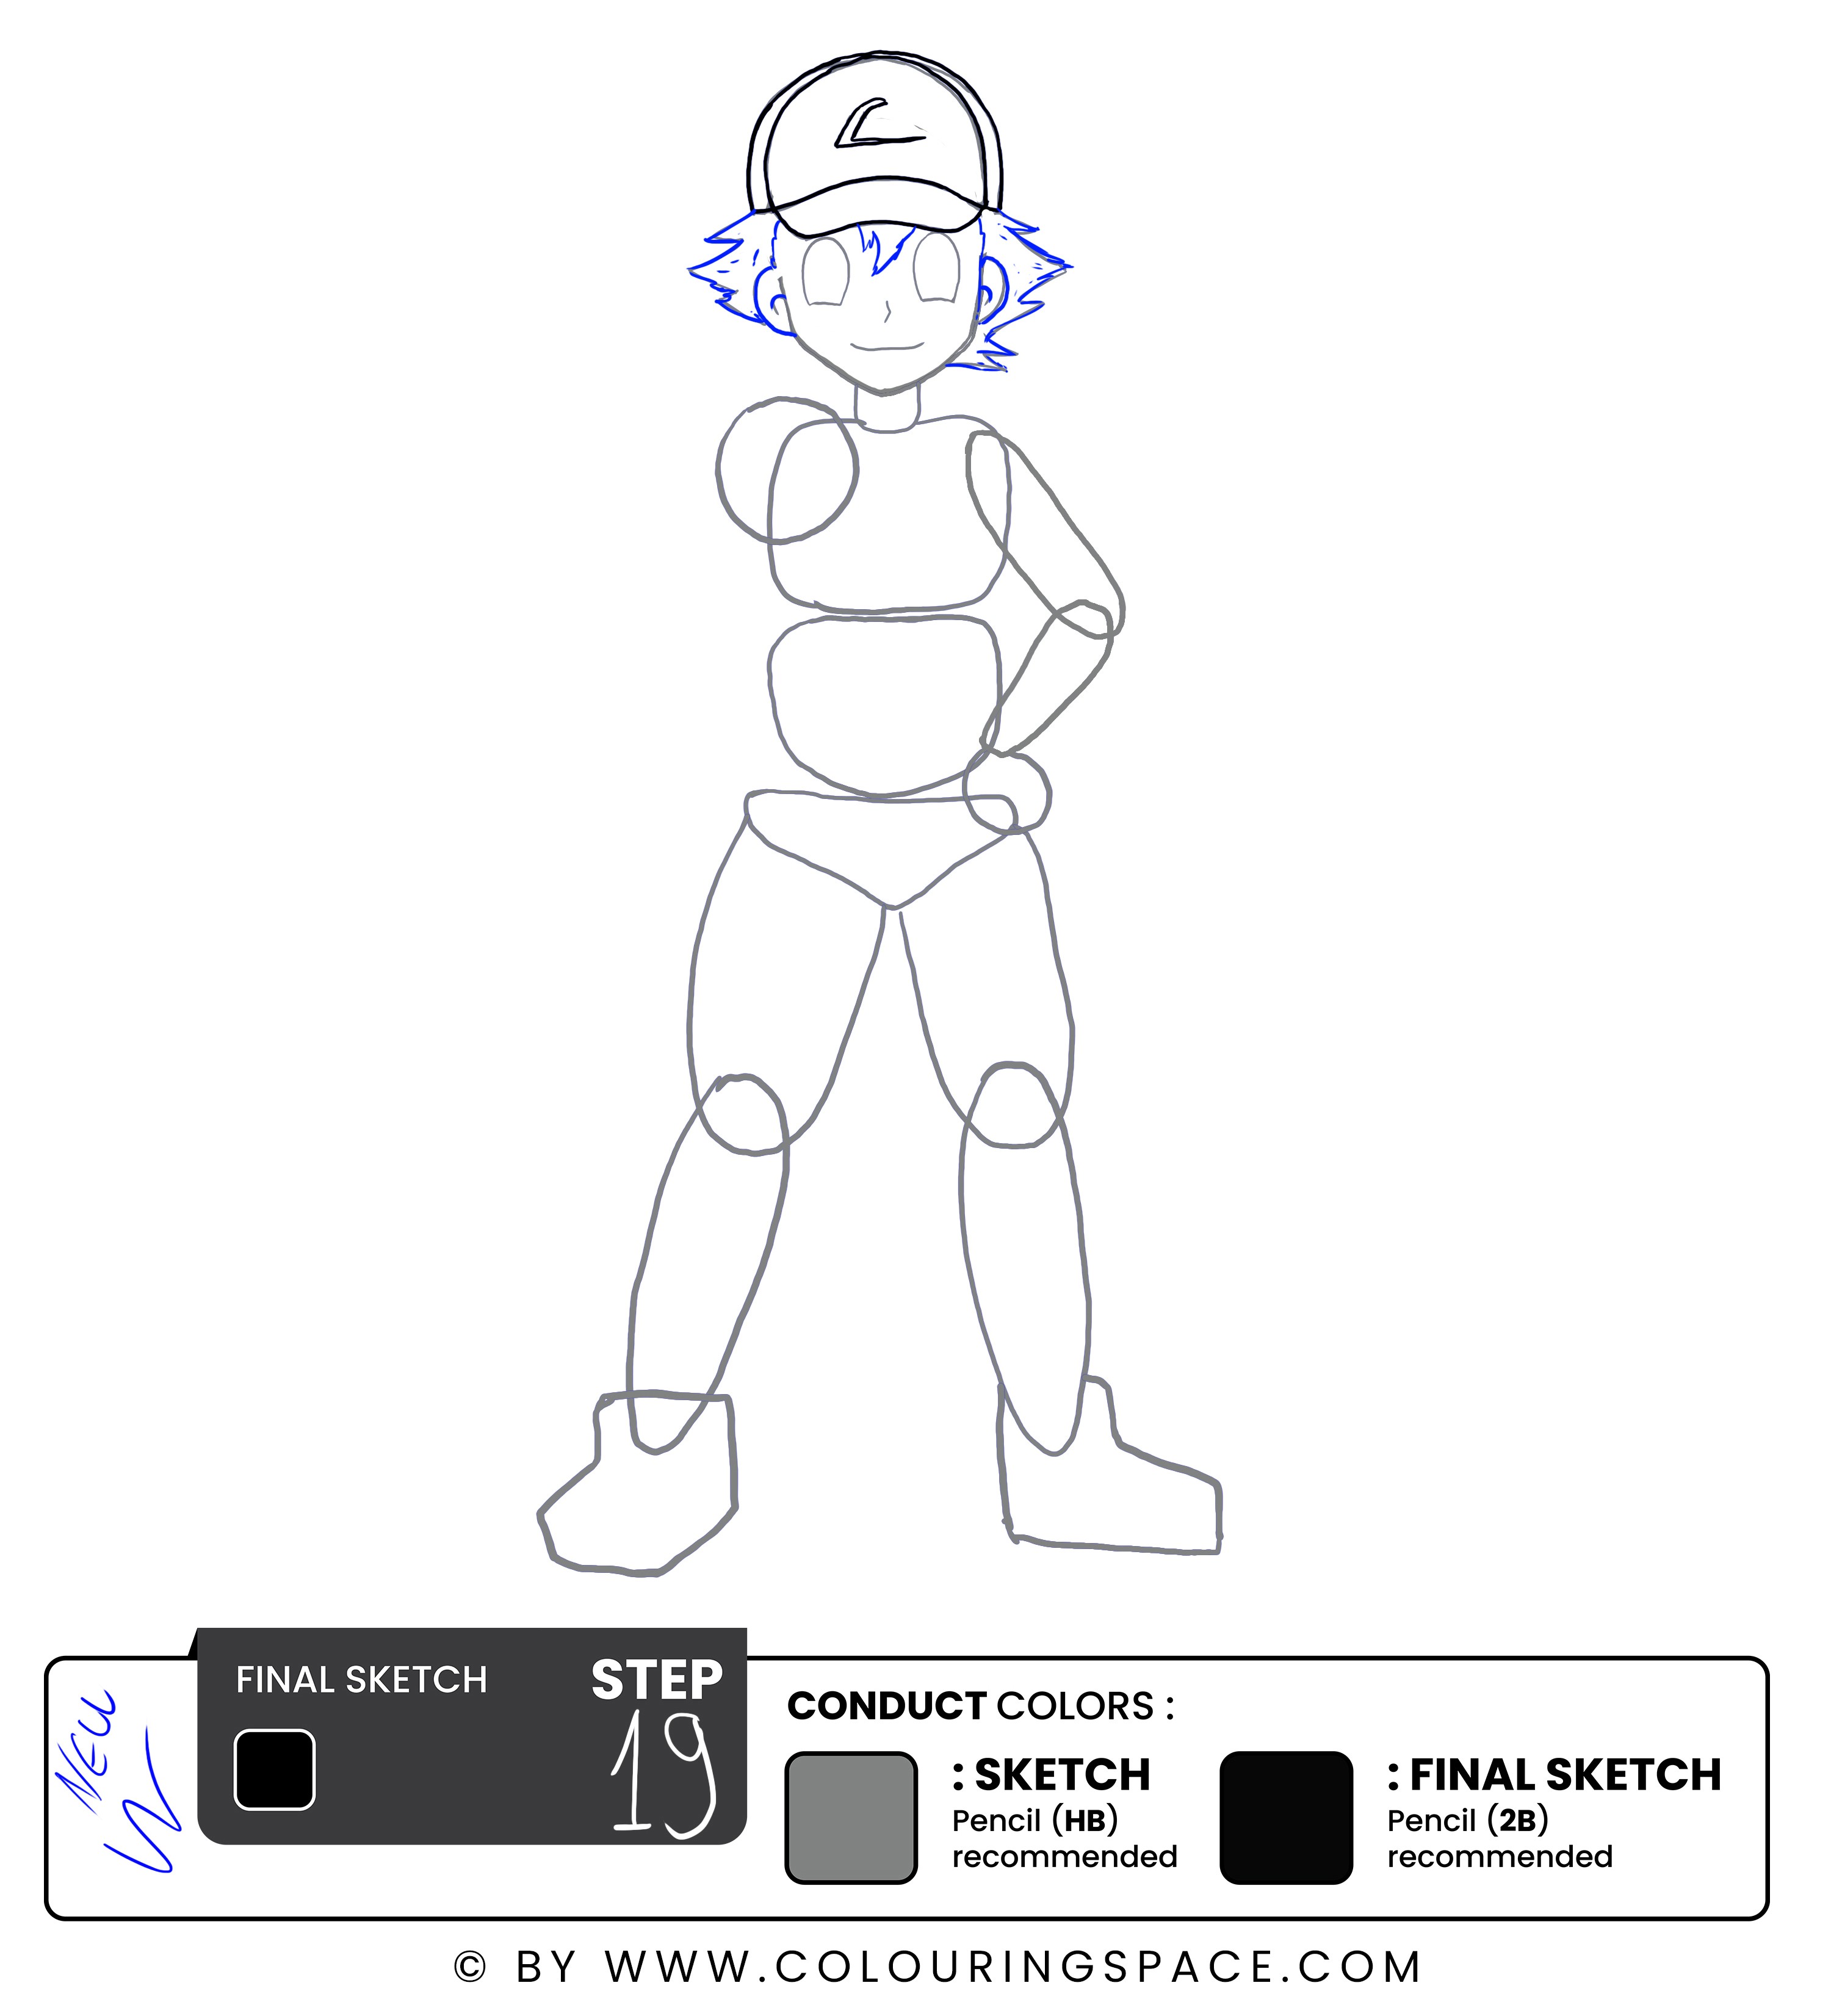
Using your 2B pencil, outline Ash’s hat. Make sure to outline the logo as well, and do not miss any details. Once that’s that’s done, outline the spiky hair. Don’t forget to add some shading to the hair to make it look thicker and more realistic.
Steps 20: Detail Ash's Eyes, then Outline the Nose and Mouth
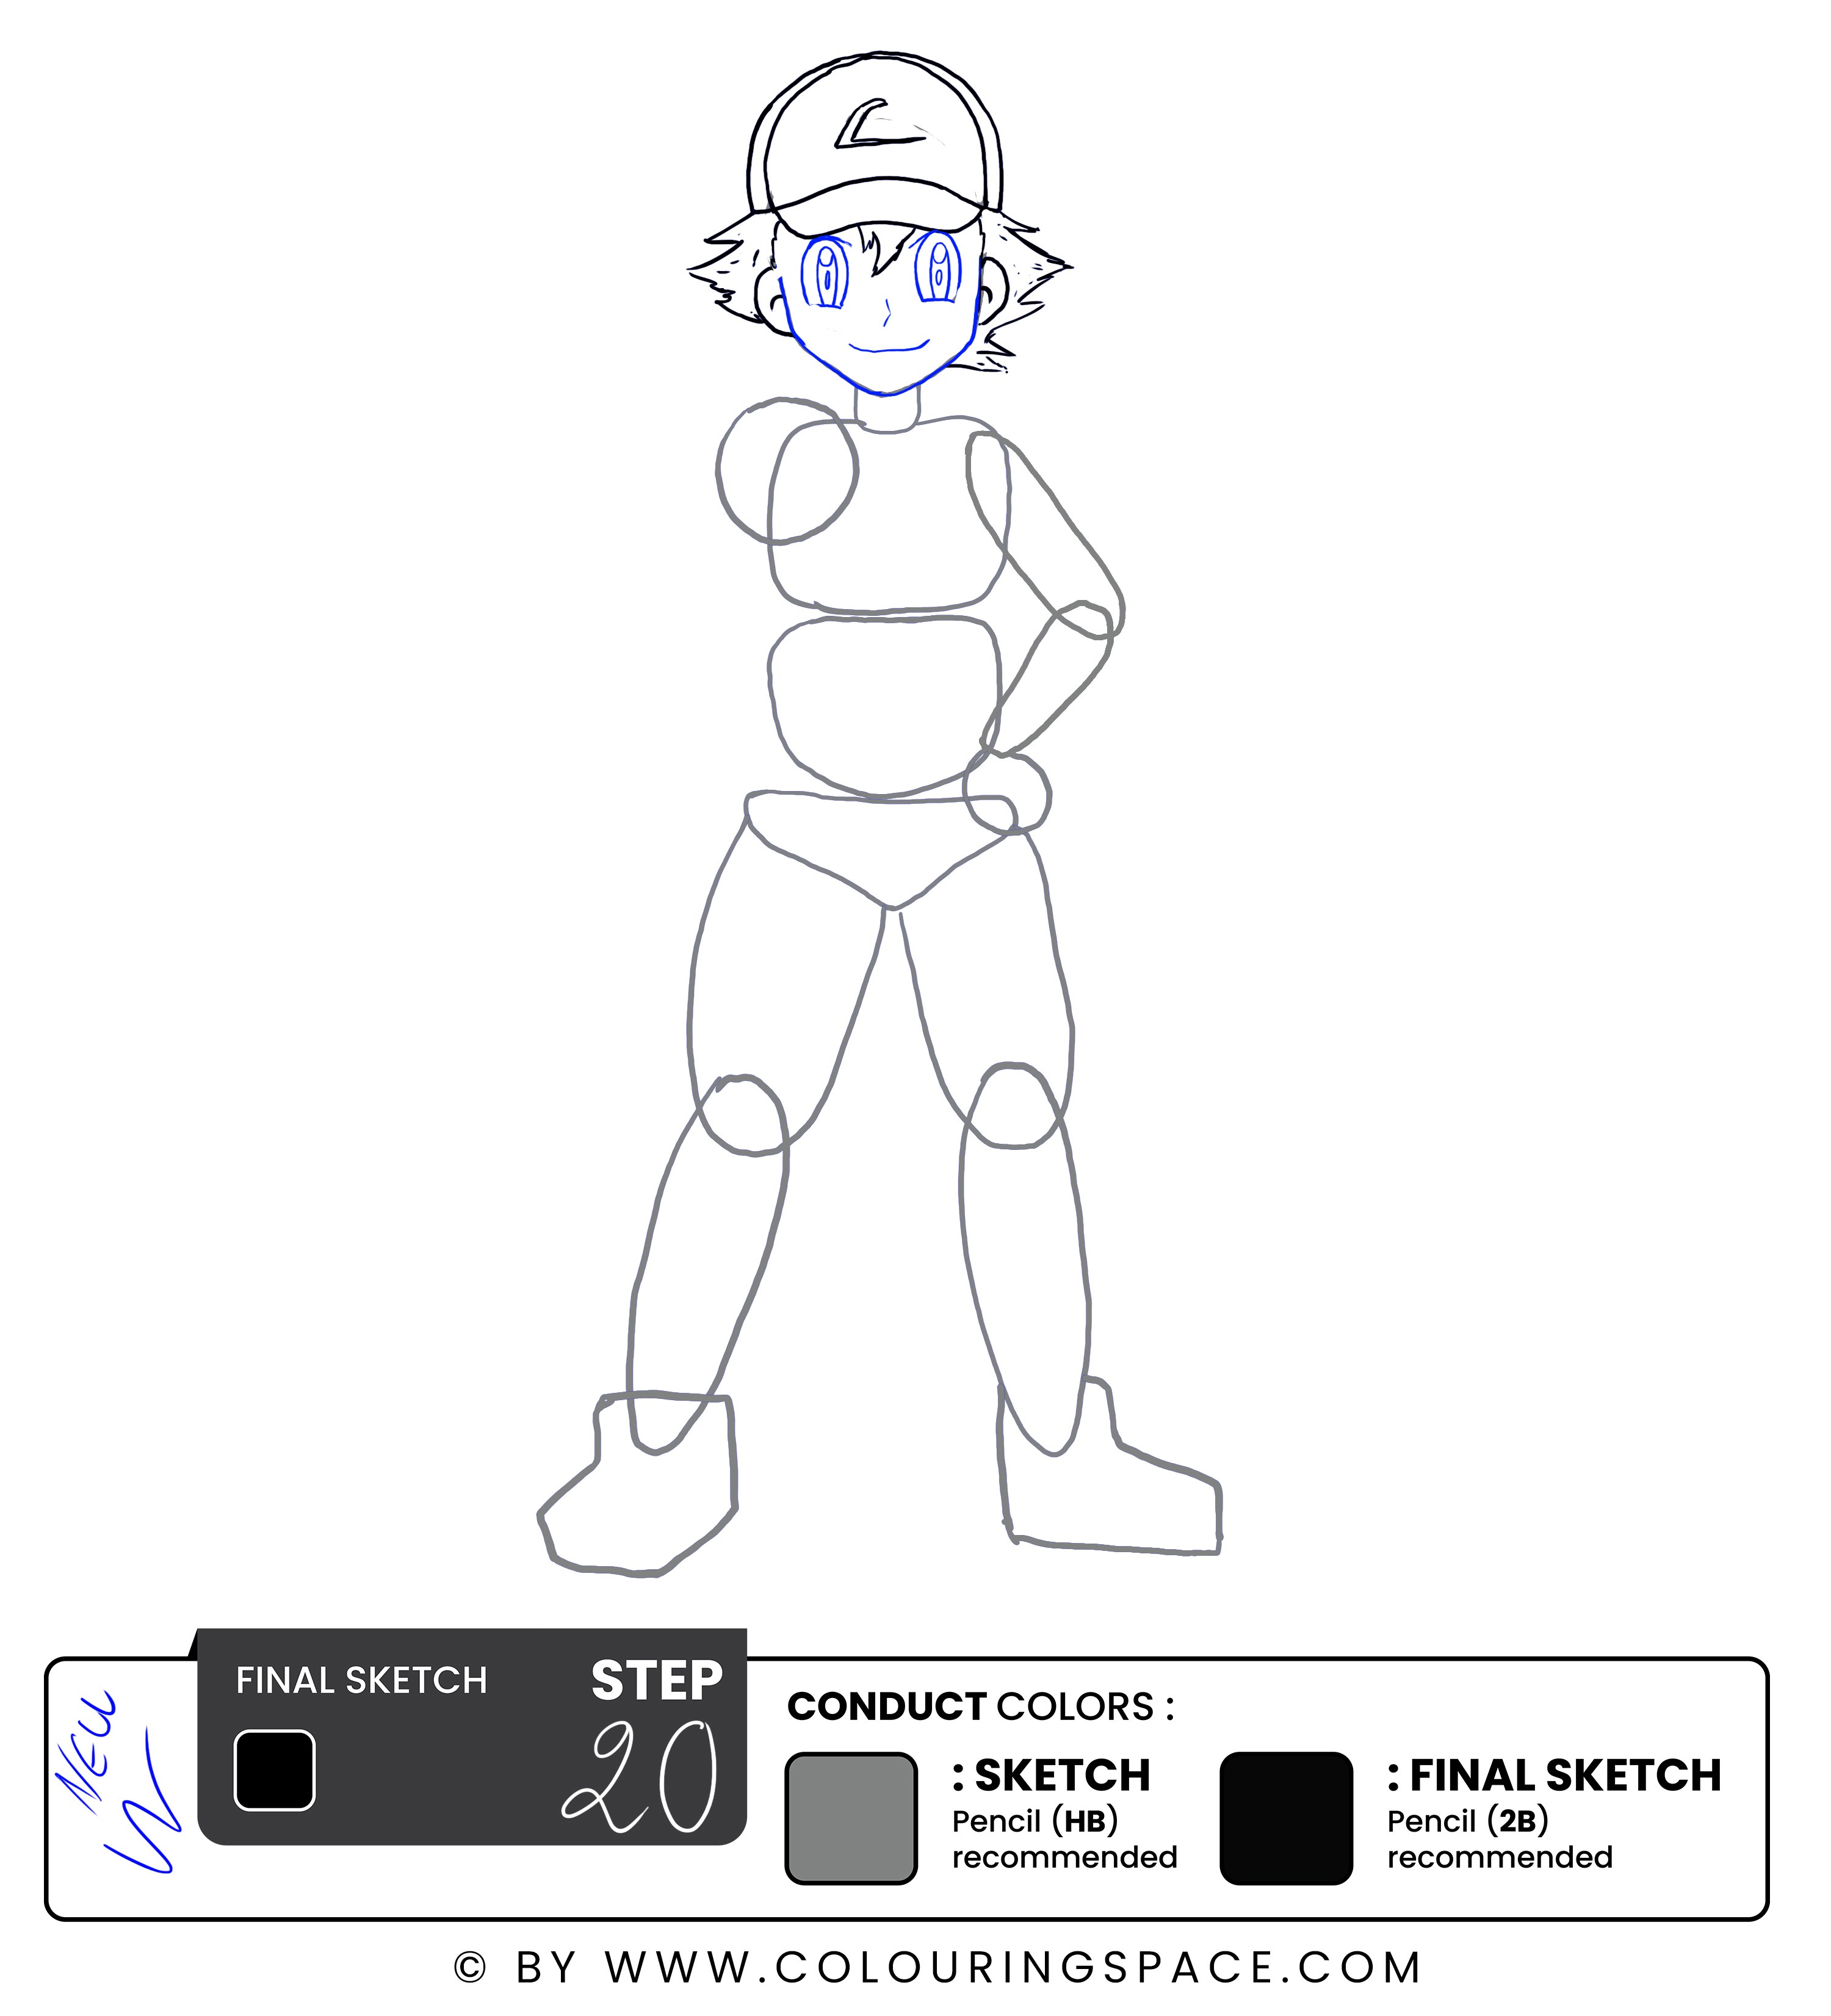
It's time to add some detail to the eyes. Start by drawing the iris and pupil within each eye.
Ash's eyes are relatively large, so make sure the iris and pupil take up a good amount of space within the eye.
Next, add some eyelids to give Ash's eyes depth and character. His eyelids should curve slightly above and below the iris, with the top eyelid slightly thicker than the bottom. This will help give Ash a more expressive look and add emotion to his face.
Step 21: Remove the Sketch Guidelines
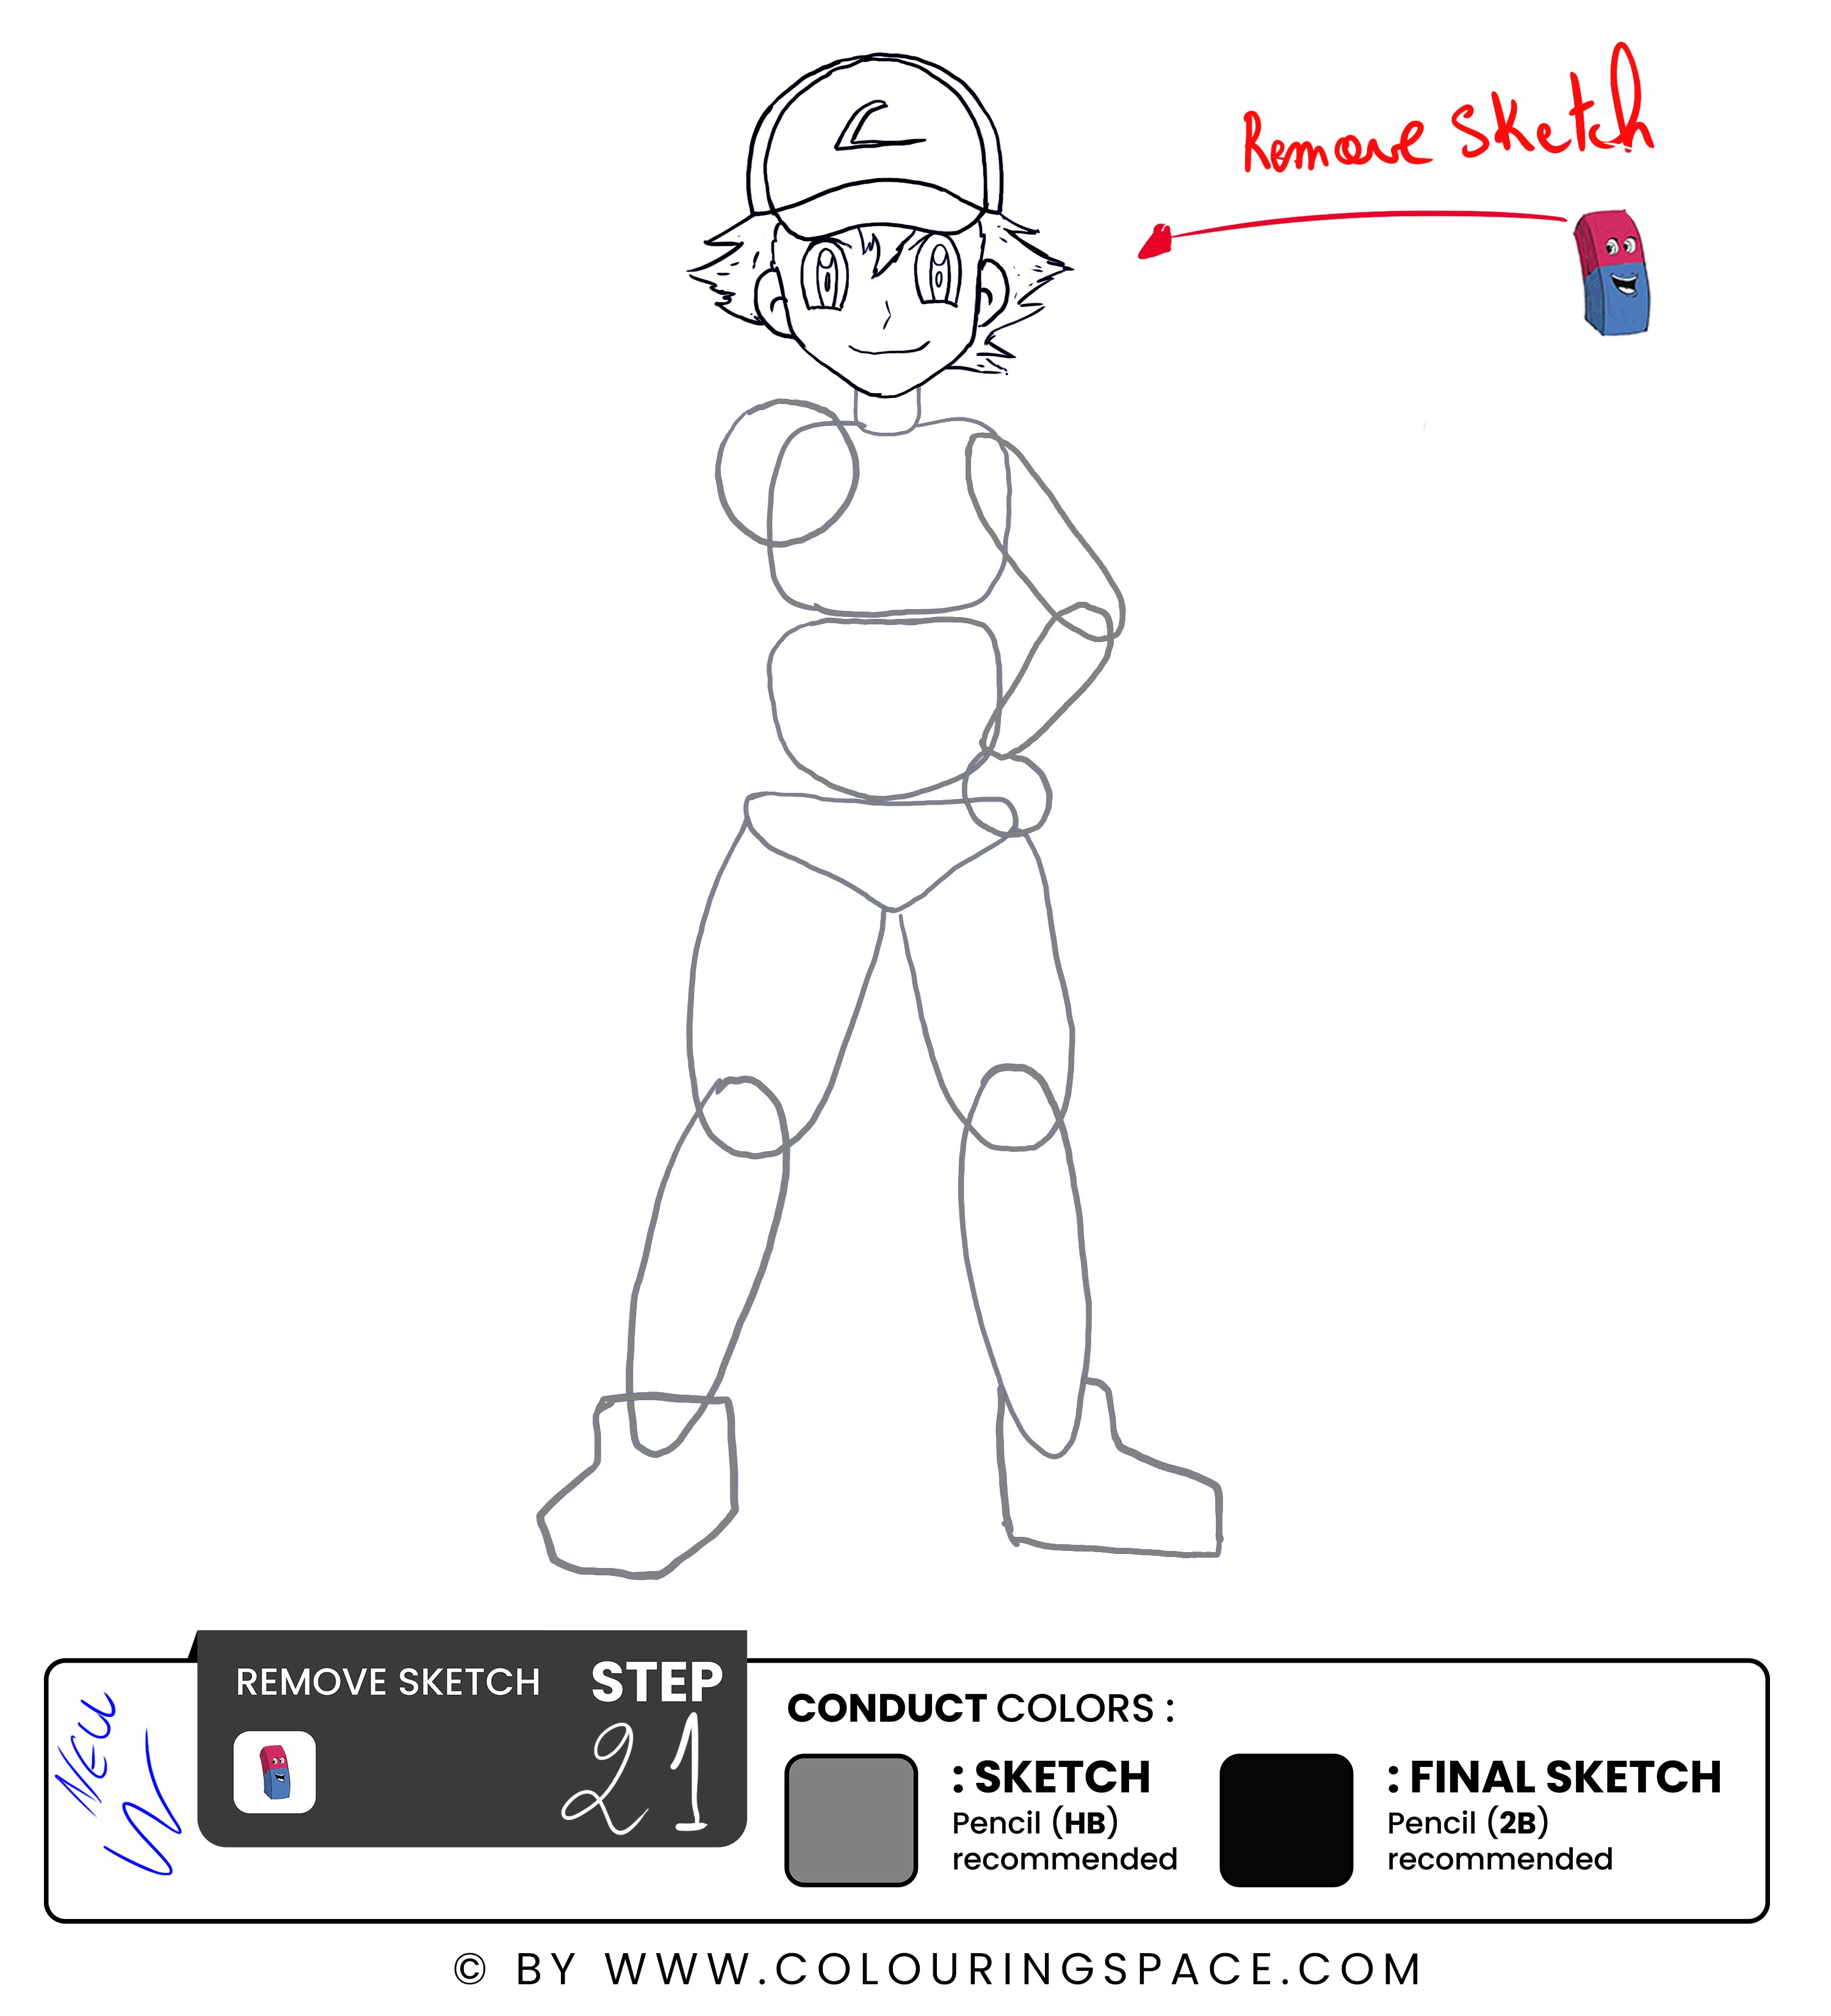
Remove the remaining sketch guidelines of the head and hair.
Step 22: Draw Ash's Collar Detail
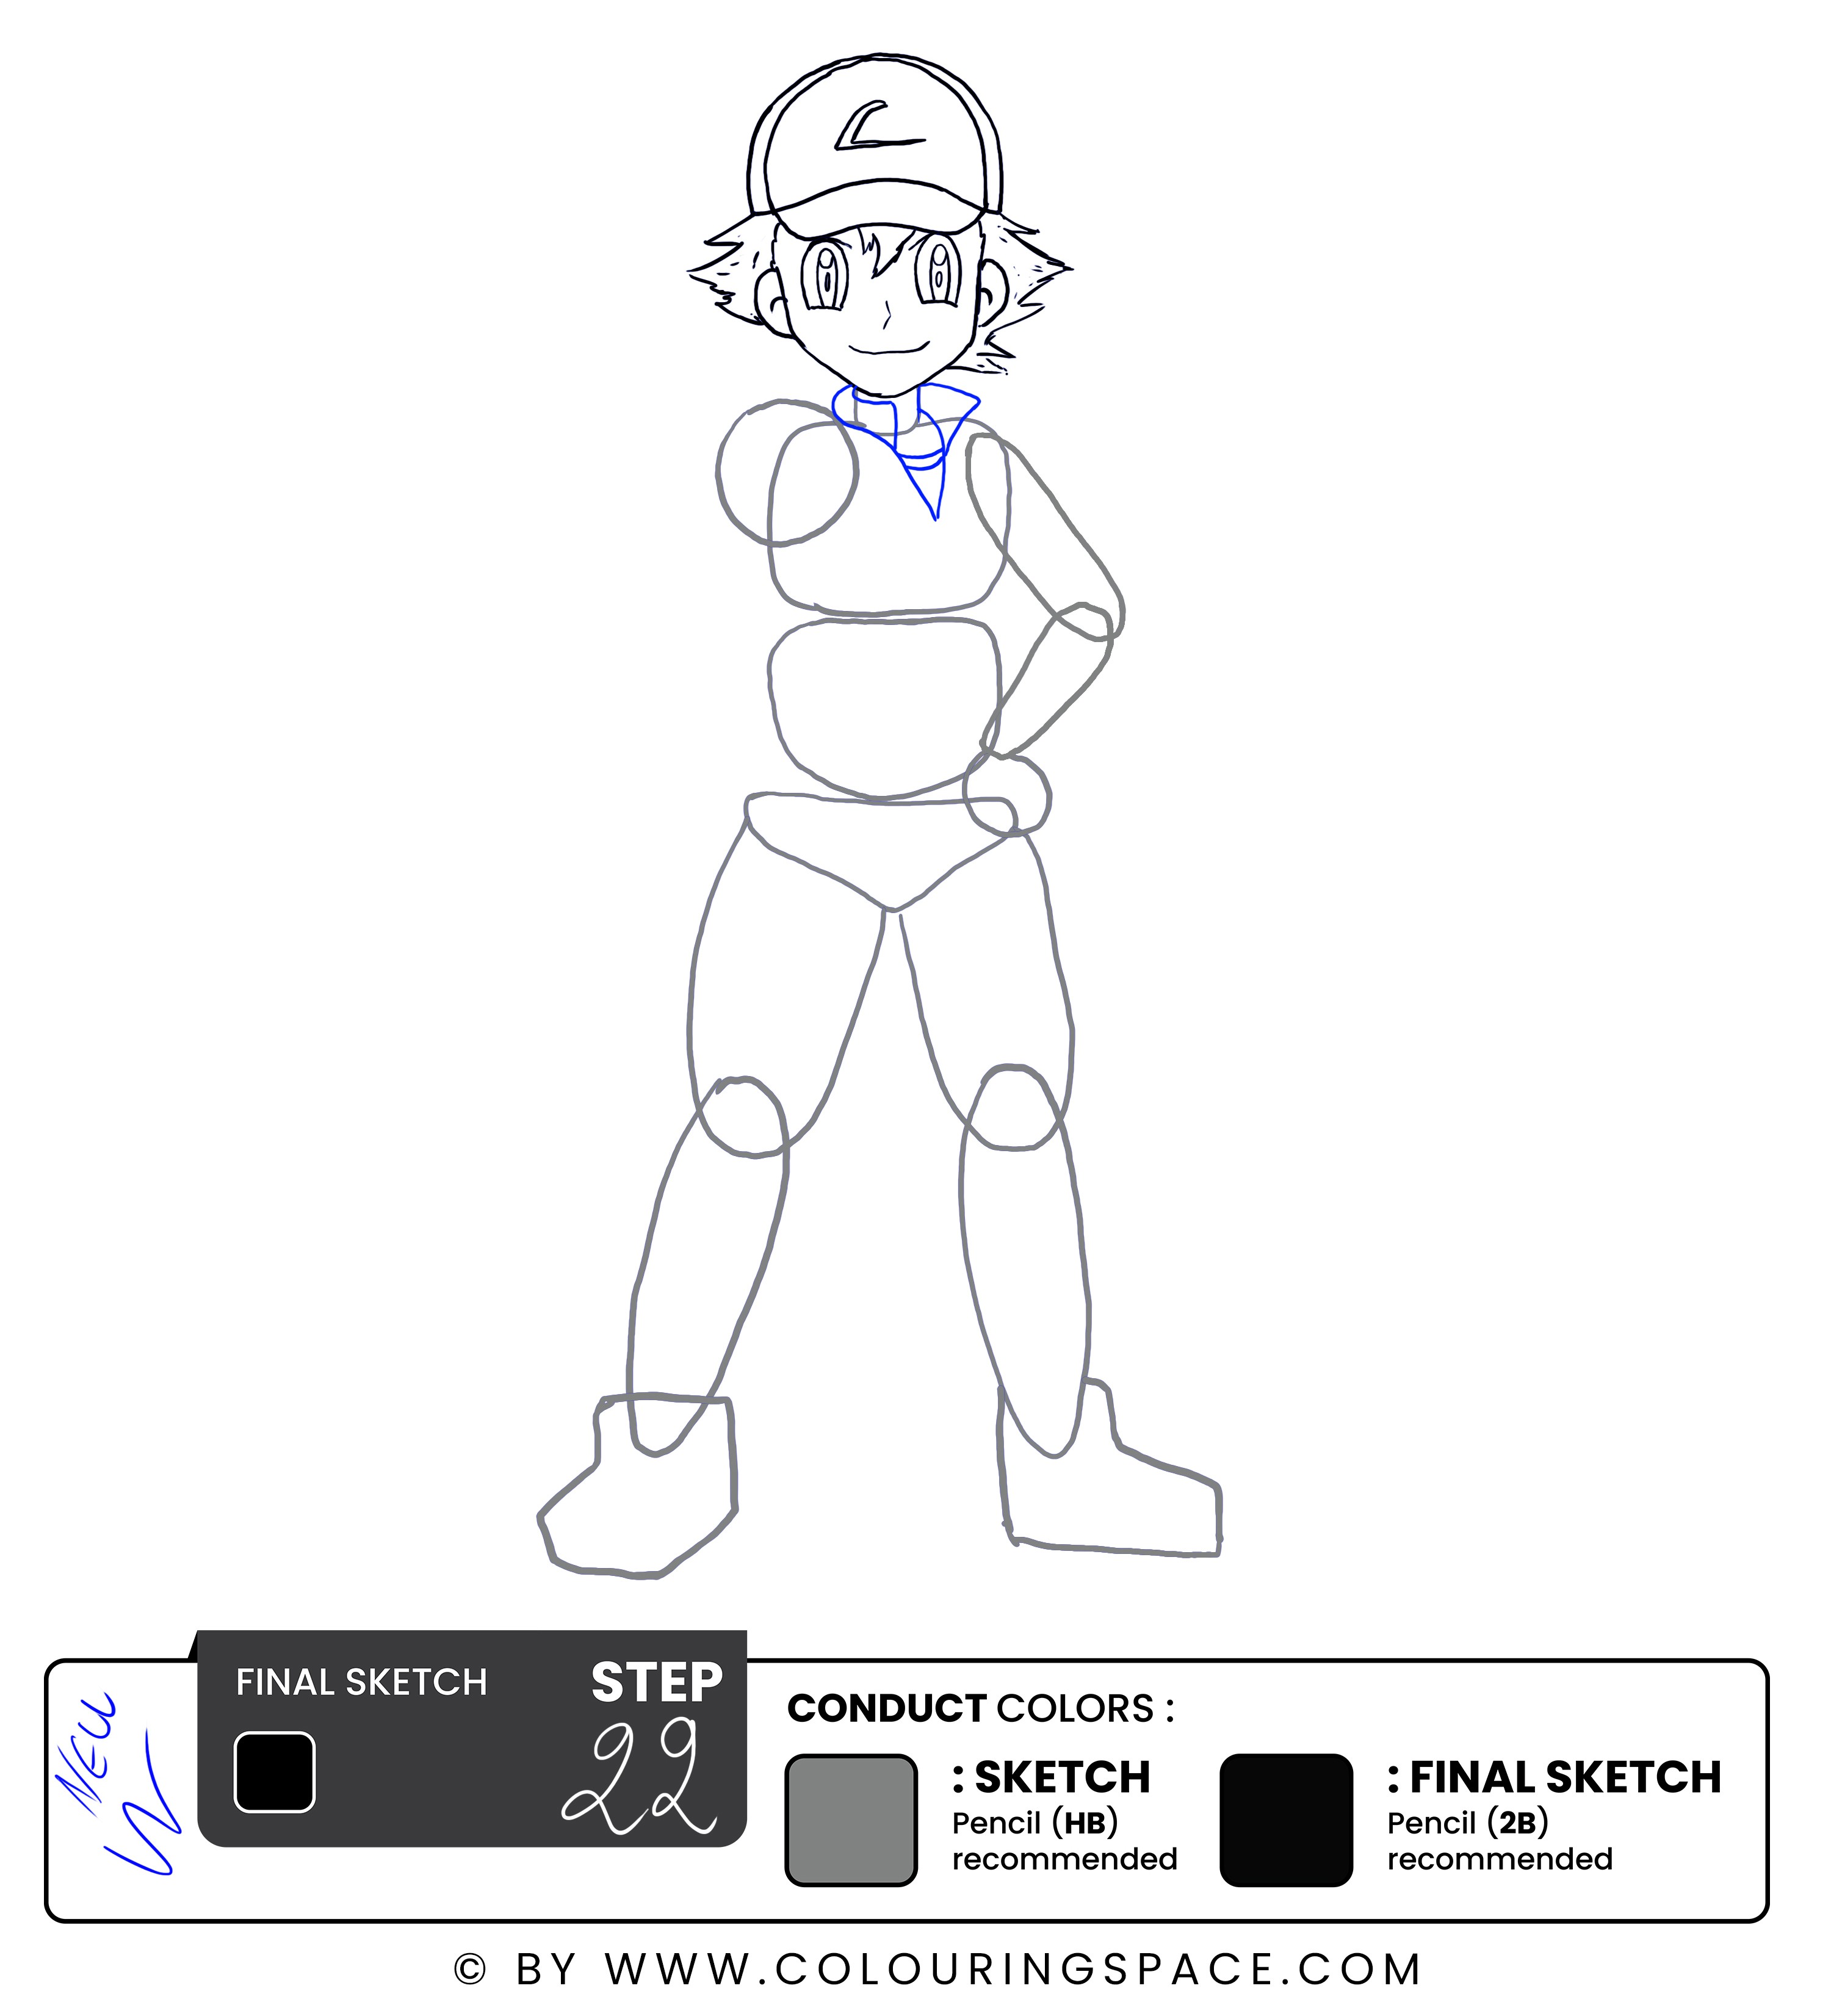
Let's draw the collar detail of his shirt.
Ash's shirt has a simple collar with two pointed ends. Start by drawing a horizontal line across his neck to indicate the position of the collar, then draw two diagonal lines extending down from the center of the line to create the pointed ends.
Add shading and texture to the collar to make sense of depth and contrast. This will help the collar appear more three-dimensional and realistic.
Don't forget the overall balance and composition of the piece. Ensure that the collar detail works well with the rest of Ash's body and that everything is in proportion.
Step 23: Draw Ash's Shirt
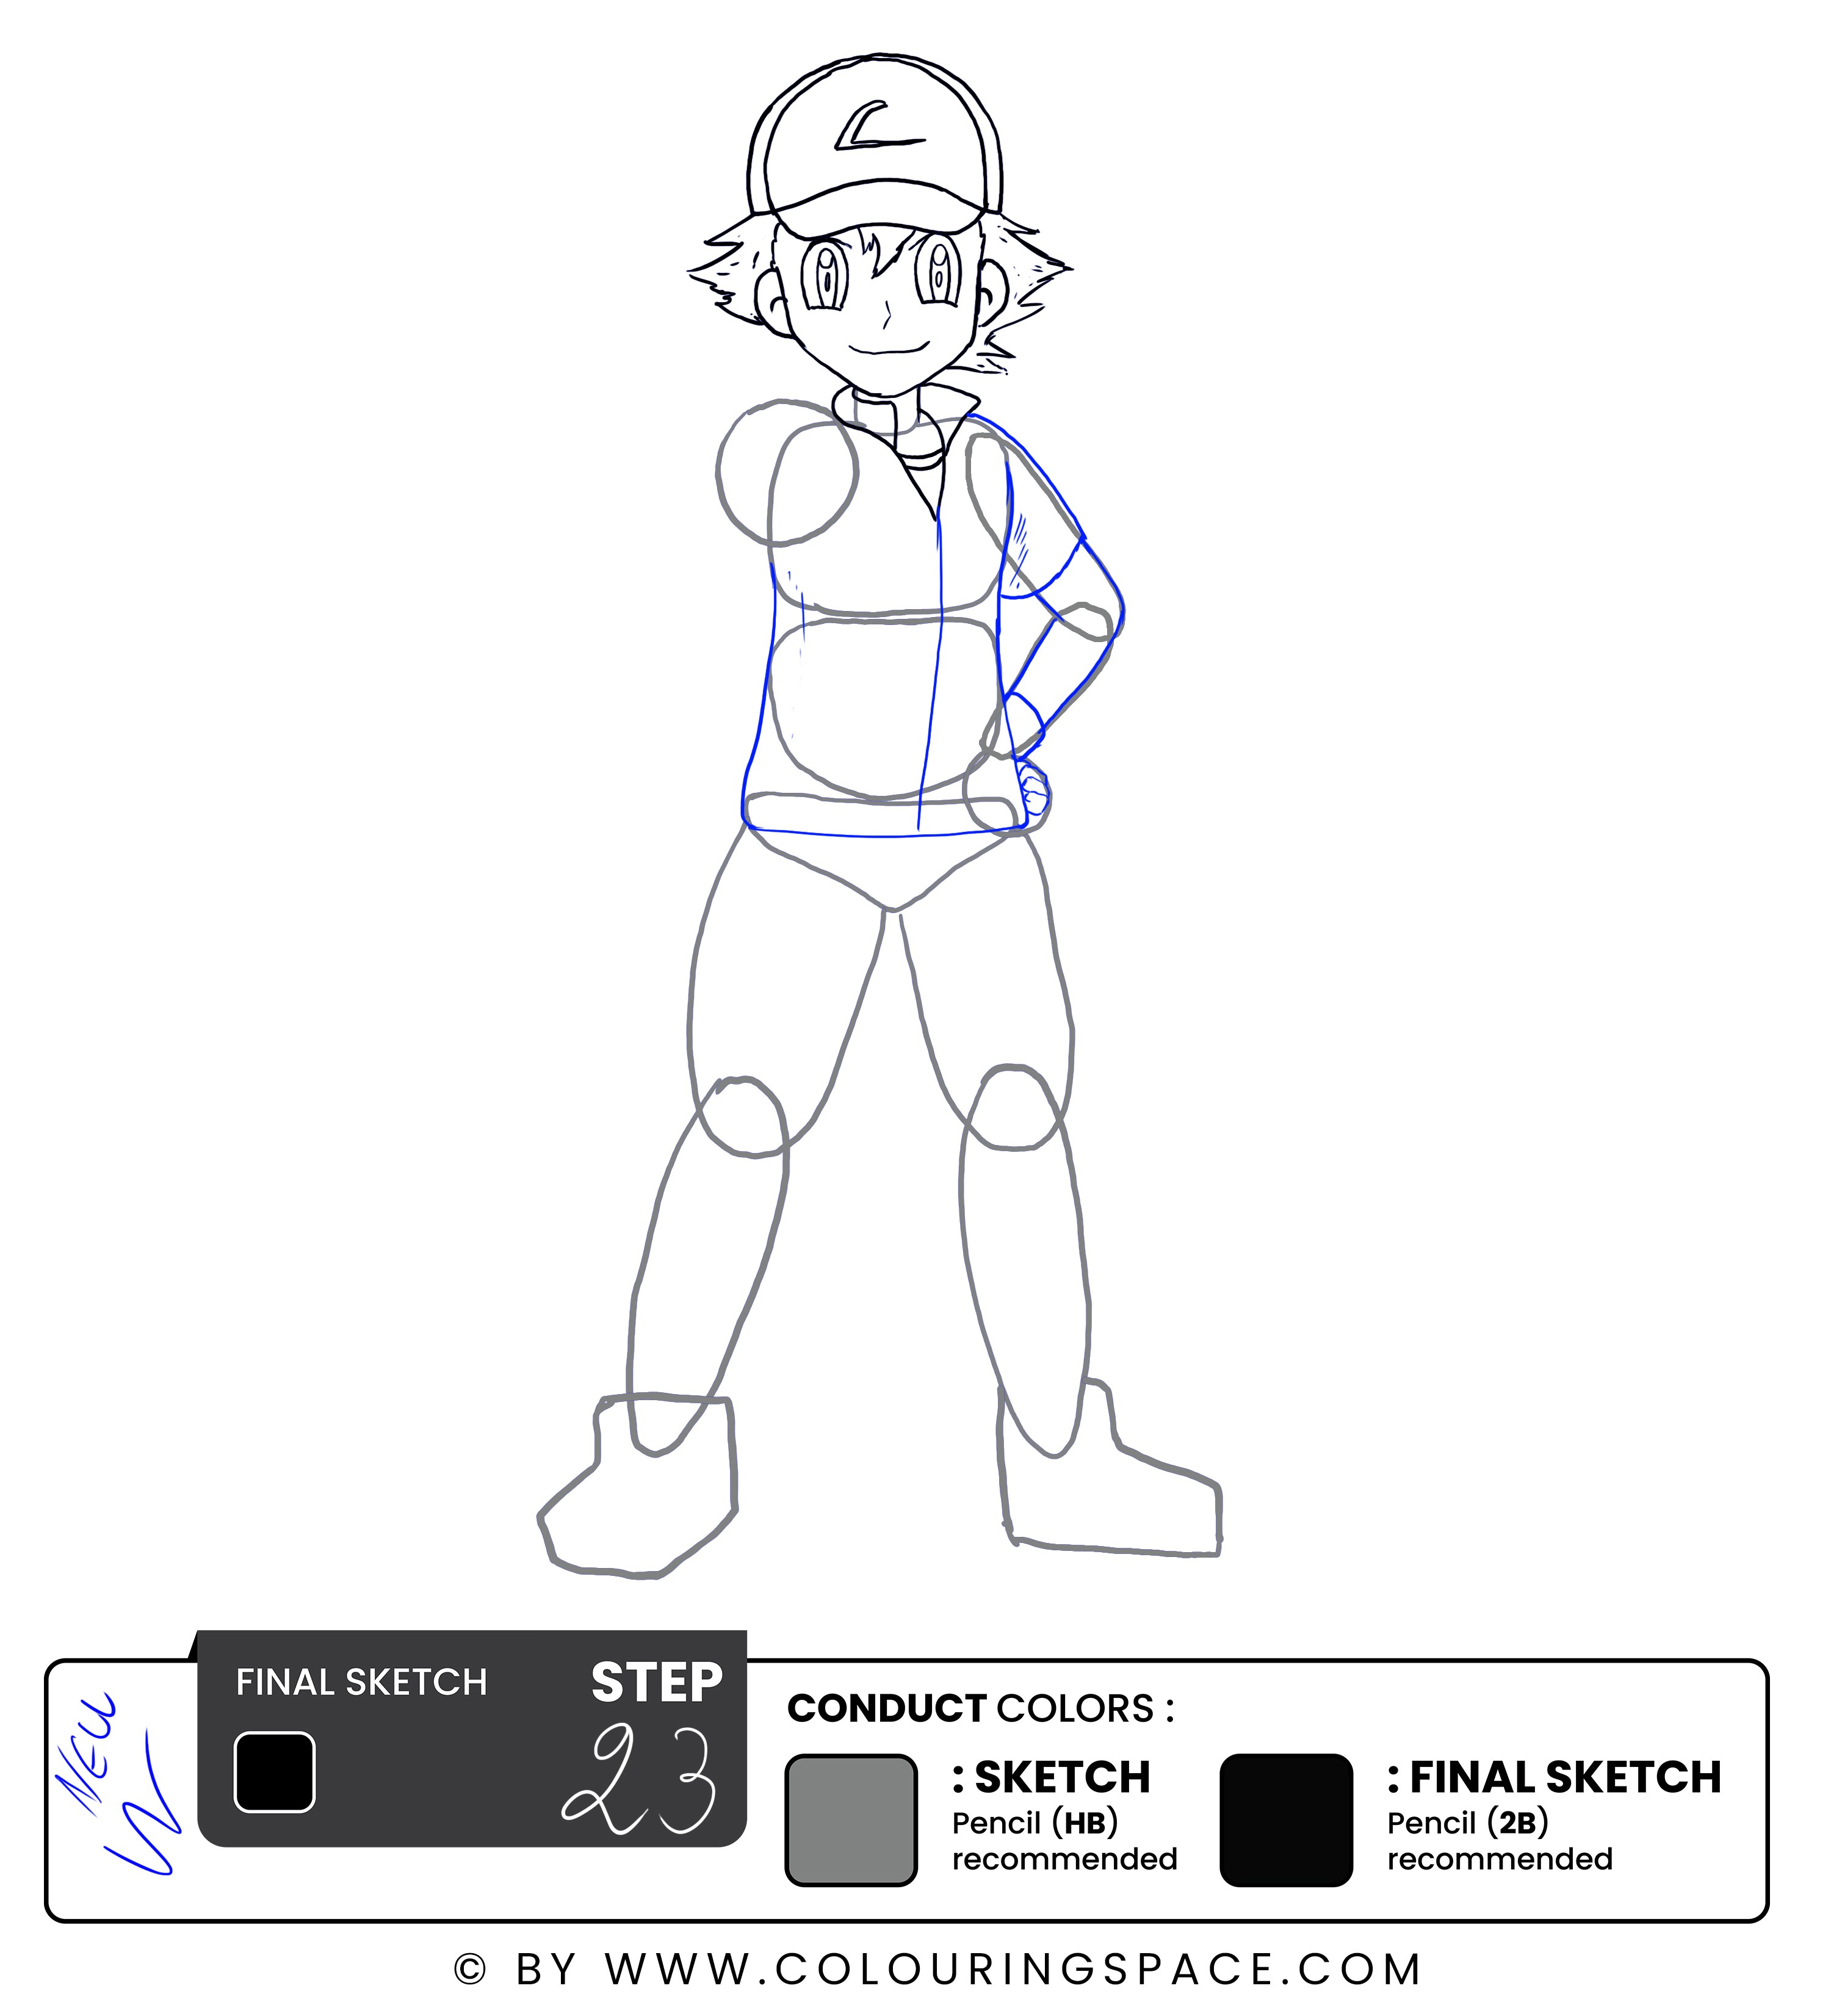
Using the rough shapes you drew earlier for the torso as a guide, draw the shirt's shape as you see fit.
Ash's shirt is usually loose-fitting and has short sleeves. It may also have some detailing or a logo on the front.
For the fingers of the hand resting on his hip, use your reference image as a guide to help you get the shape and details just right.
With Ash's shirt in place, you're getting closer to completing your drawing of Ash holding a Pokeball.
Step 24: Draw Ash's Hands and the Pokeball
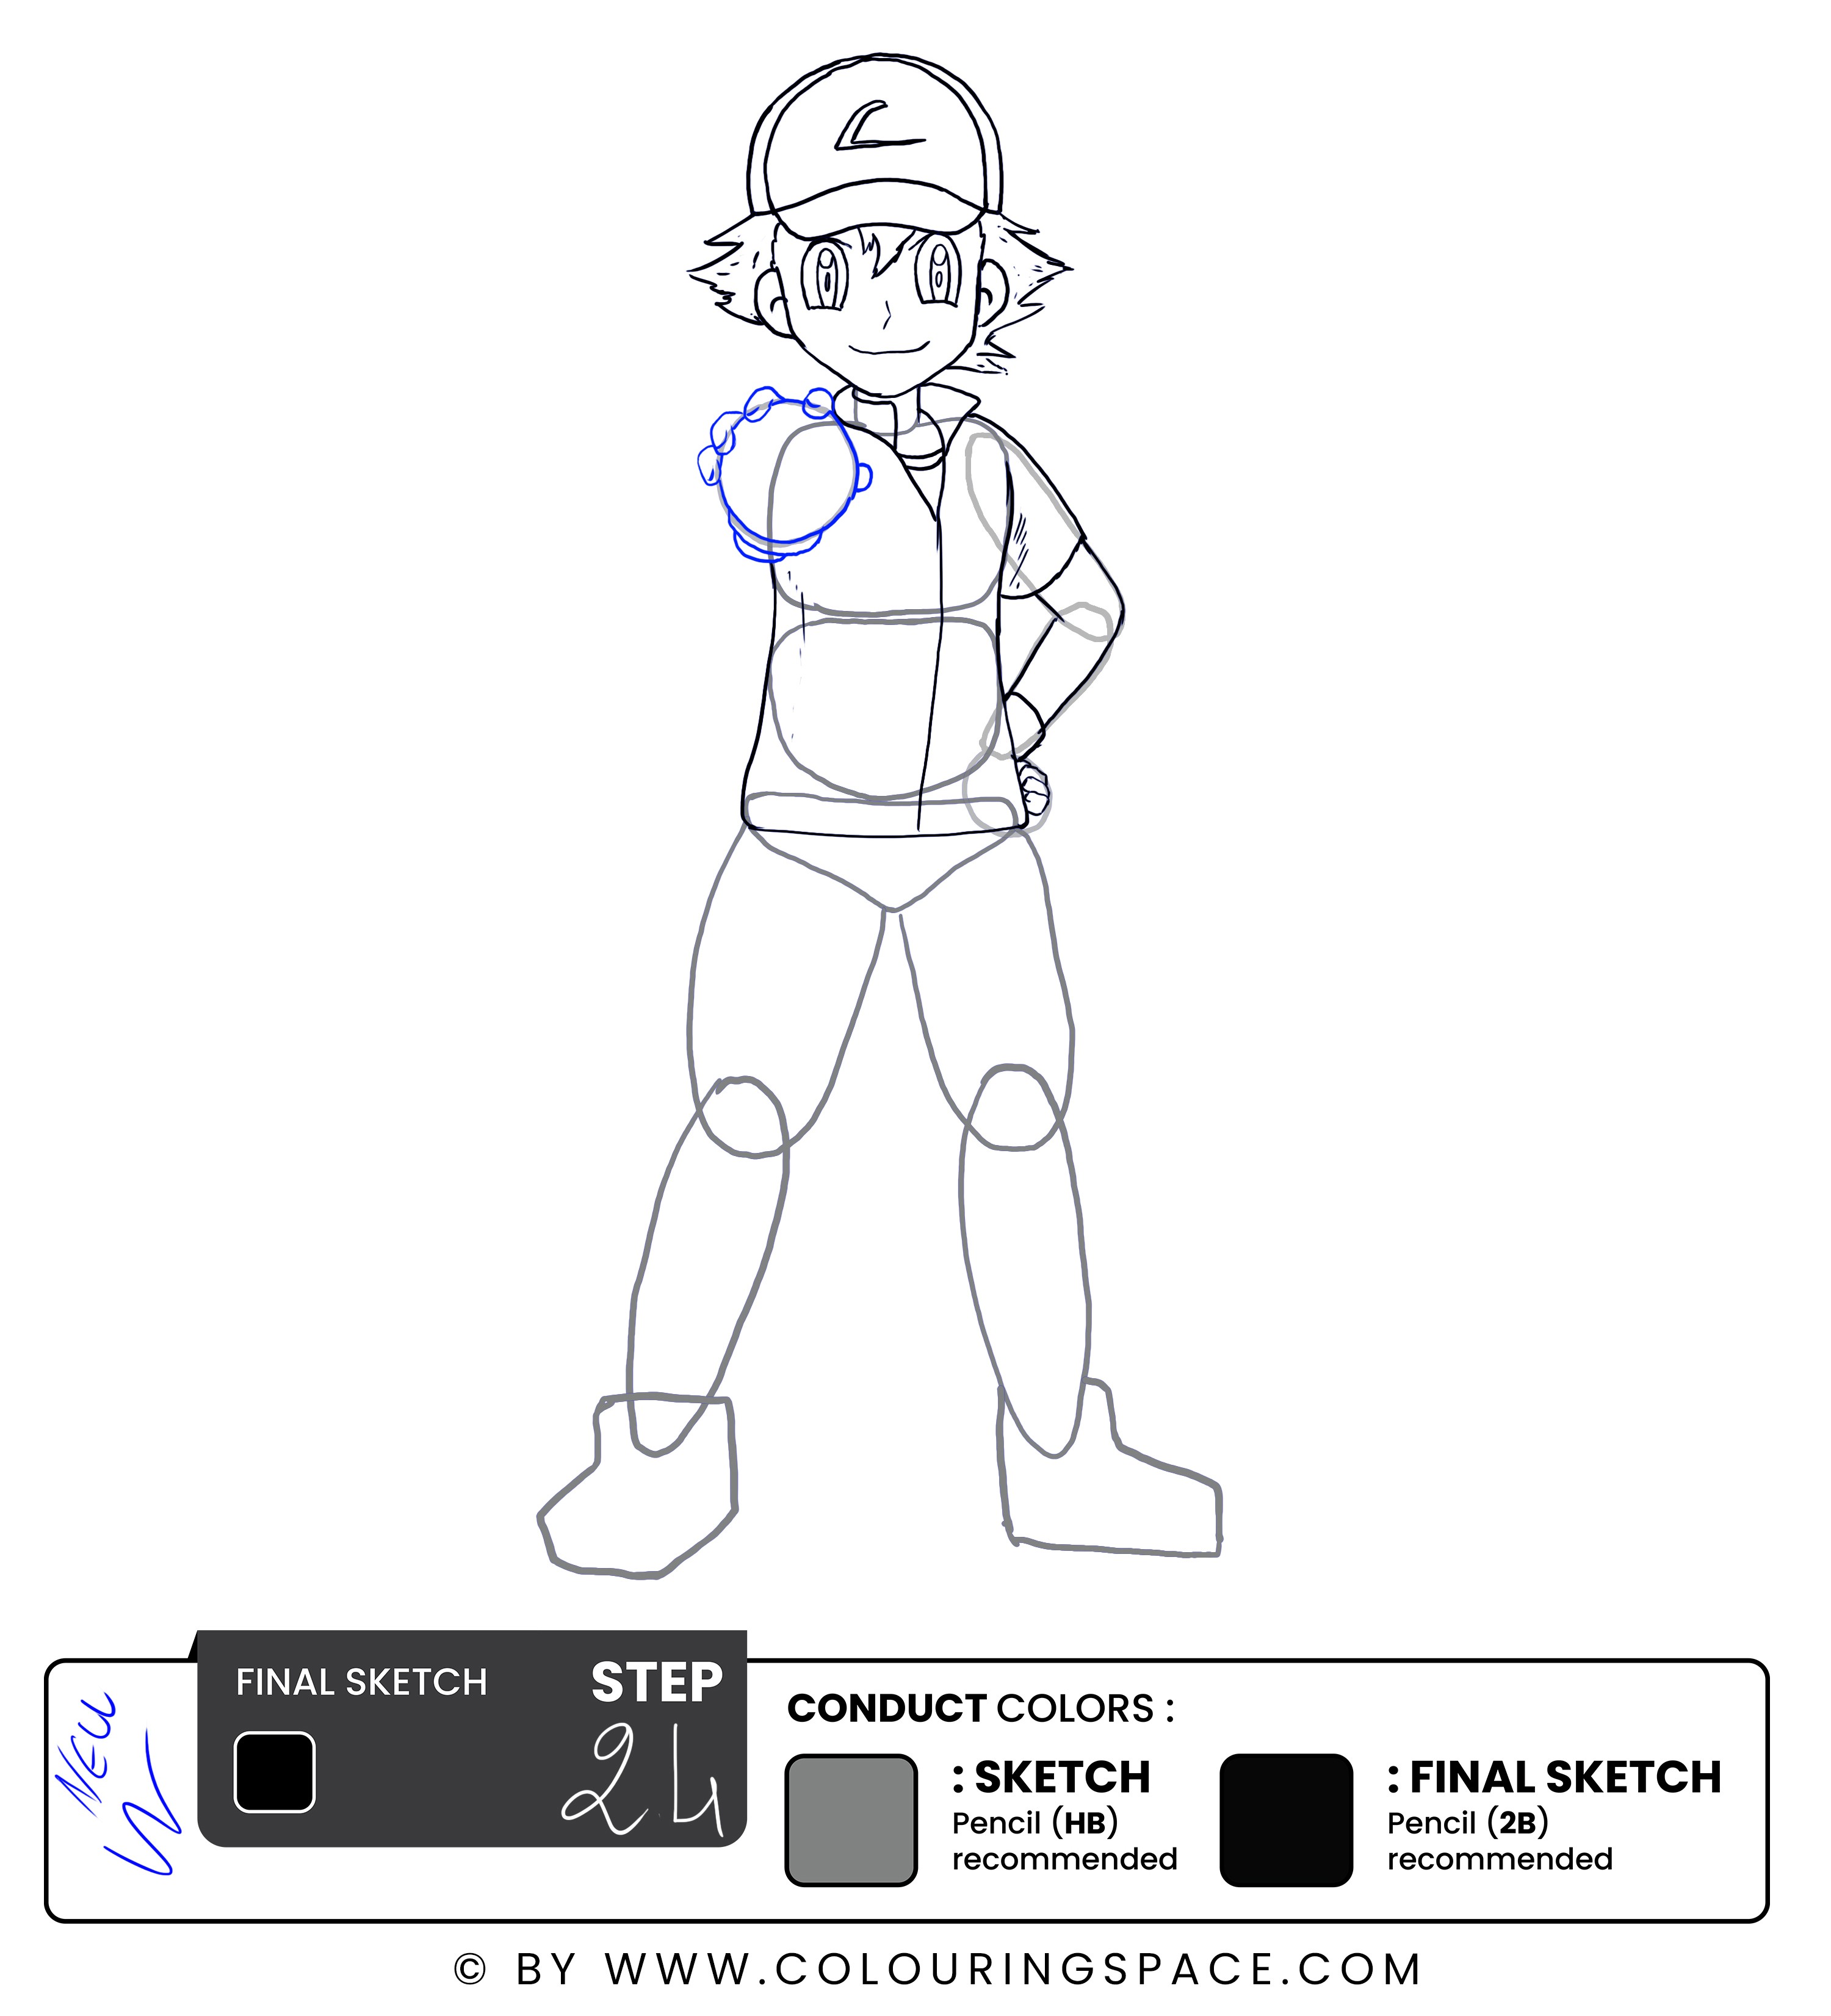
Now that you have the basic structure of Ash's body and clothing in place, it's time to add the finishing touches to your drawing by adding the details of his hands and the Pokeball he's holding.
Start by drawing the details of Ash's hands. His fingers should be slightly curved and positioned around the Pokeball as if he is gripping it tightly.
Next, draw the details of the Pokeball. A Pokeball is a circular device with a red top and white bottom.
Steps 25 & 26: Draw the Pokeball Details, then Remove the Sketch Guidelines
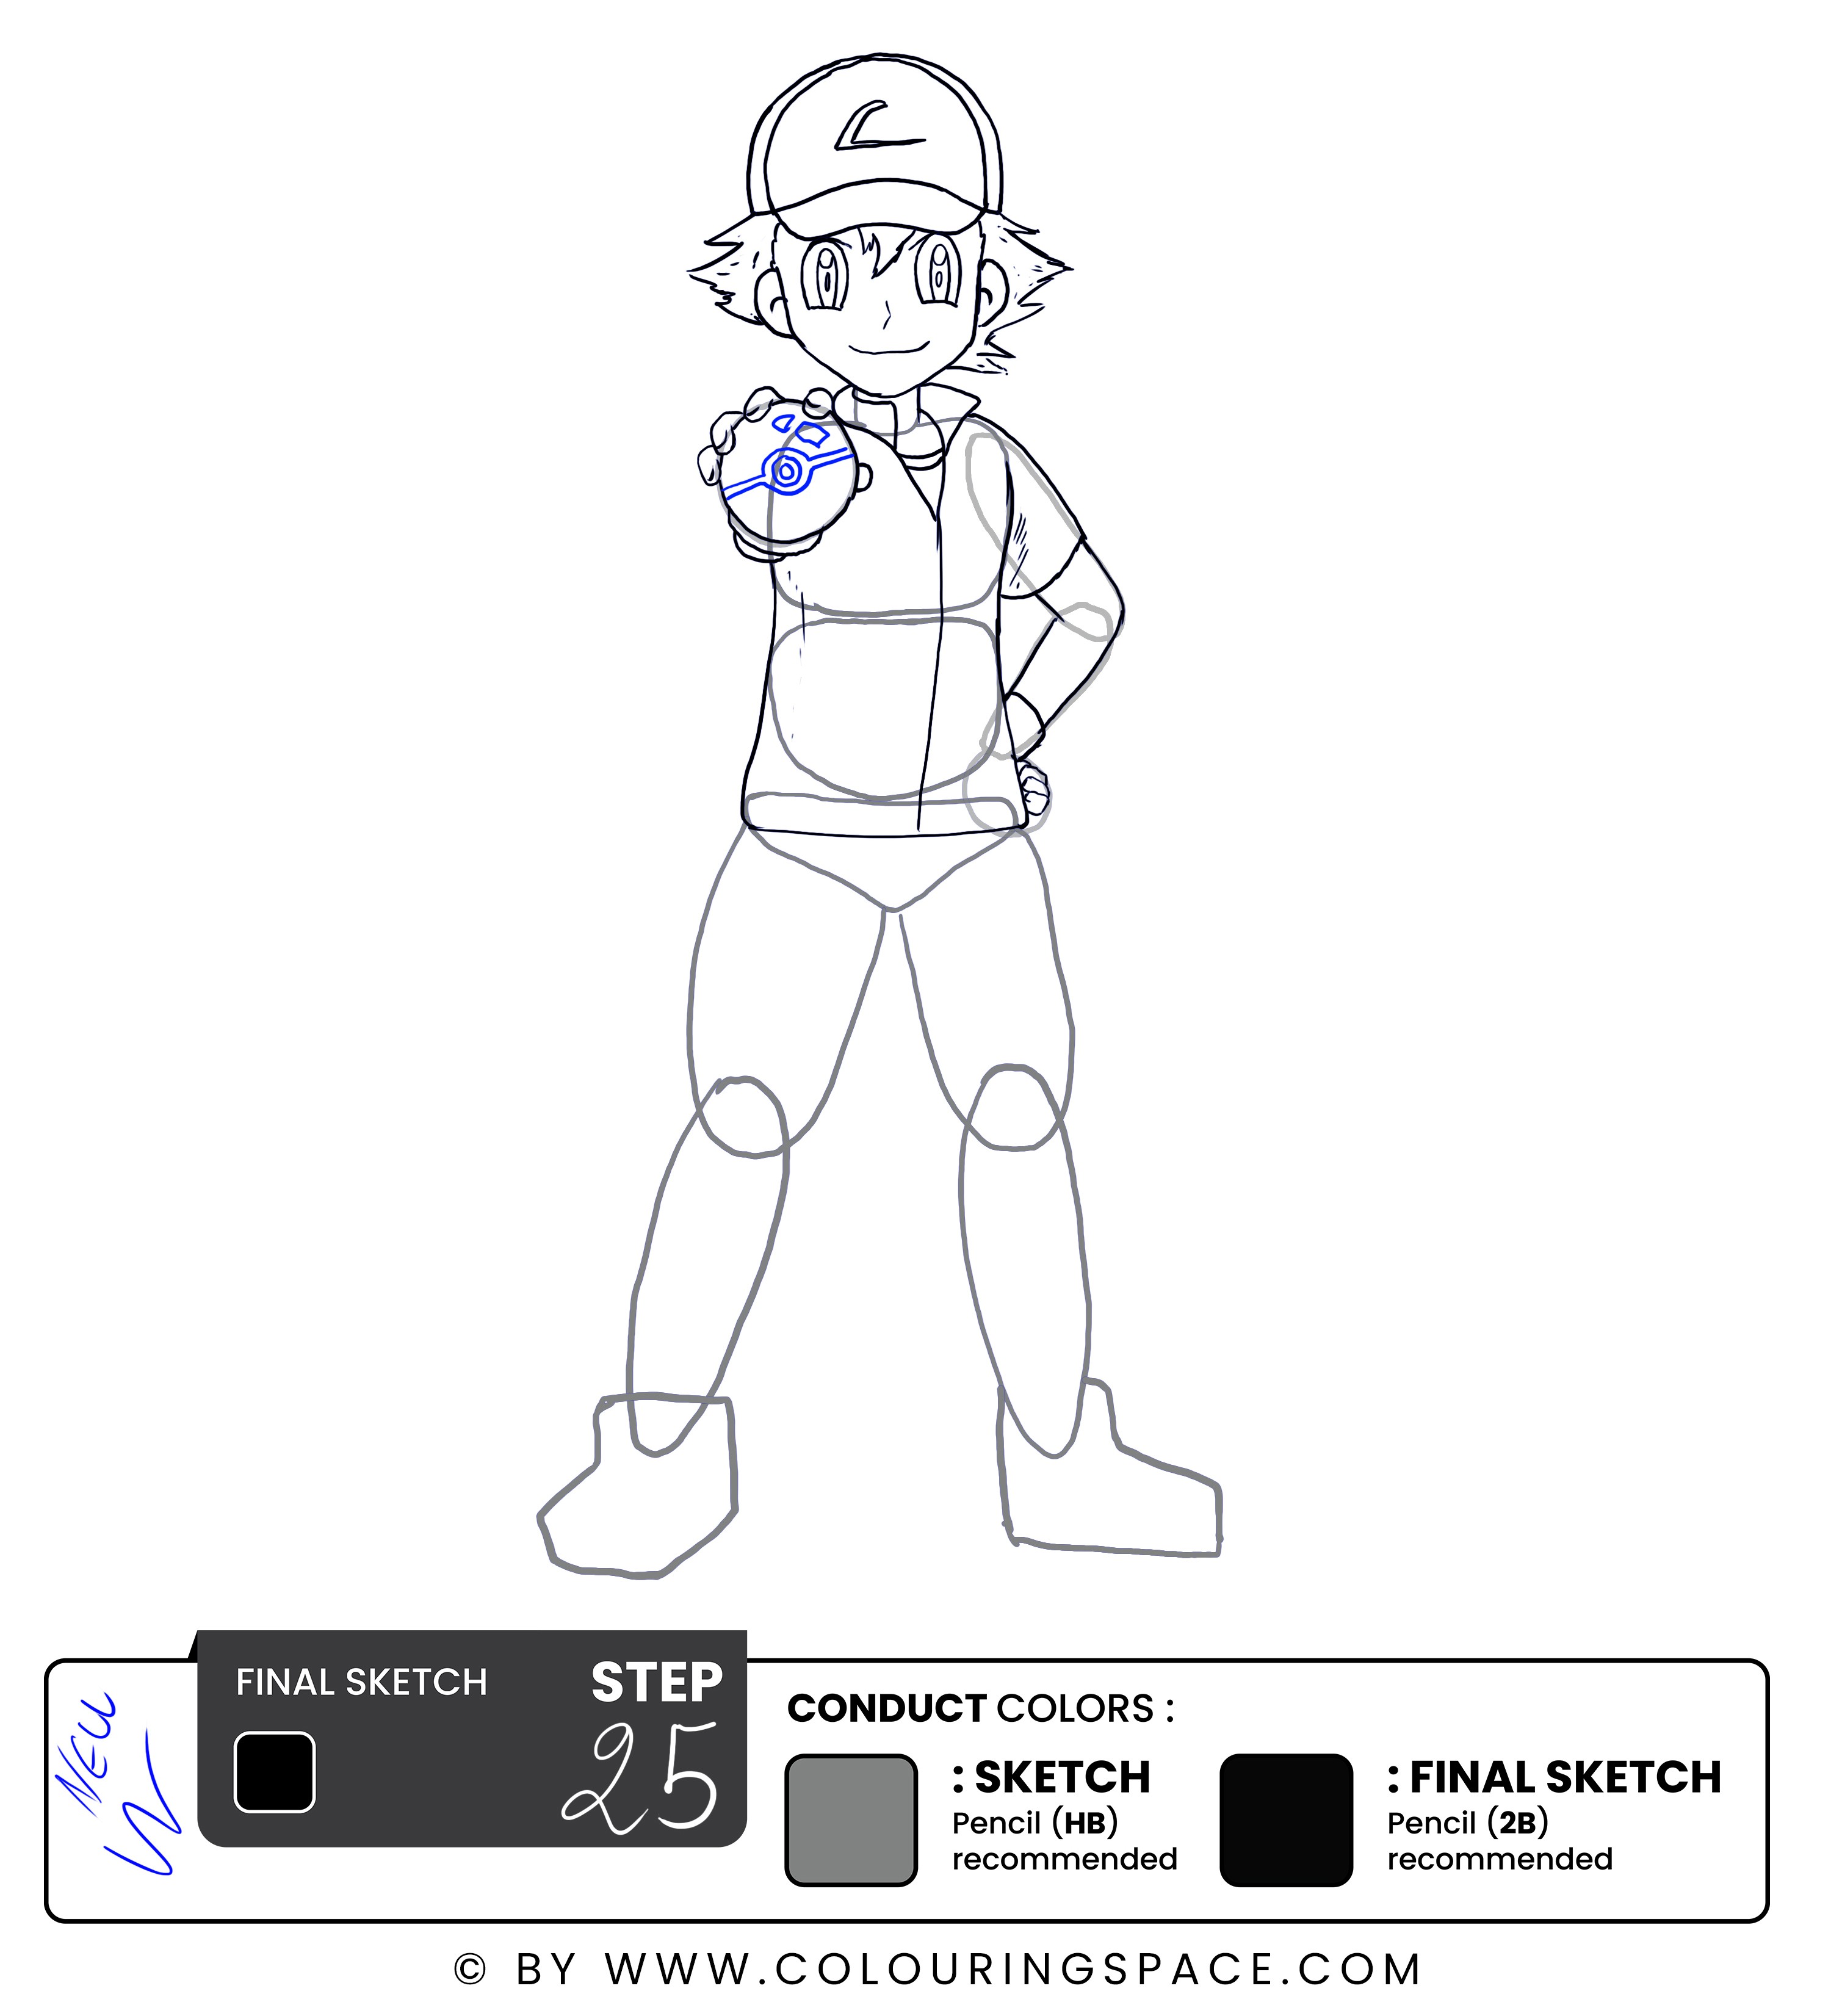
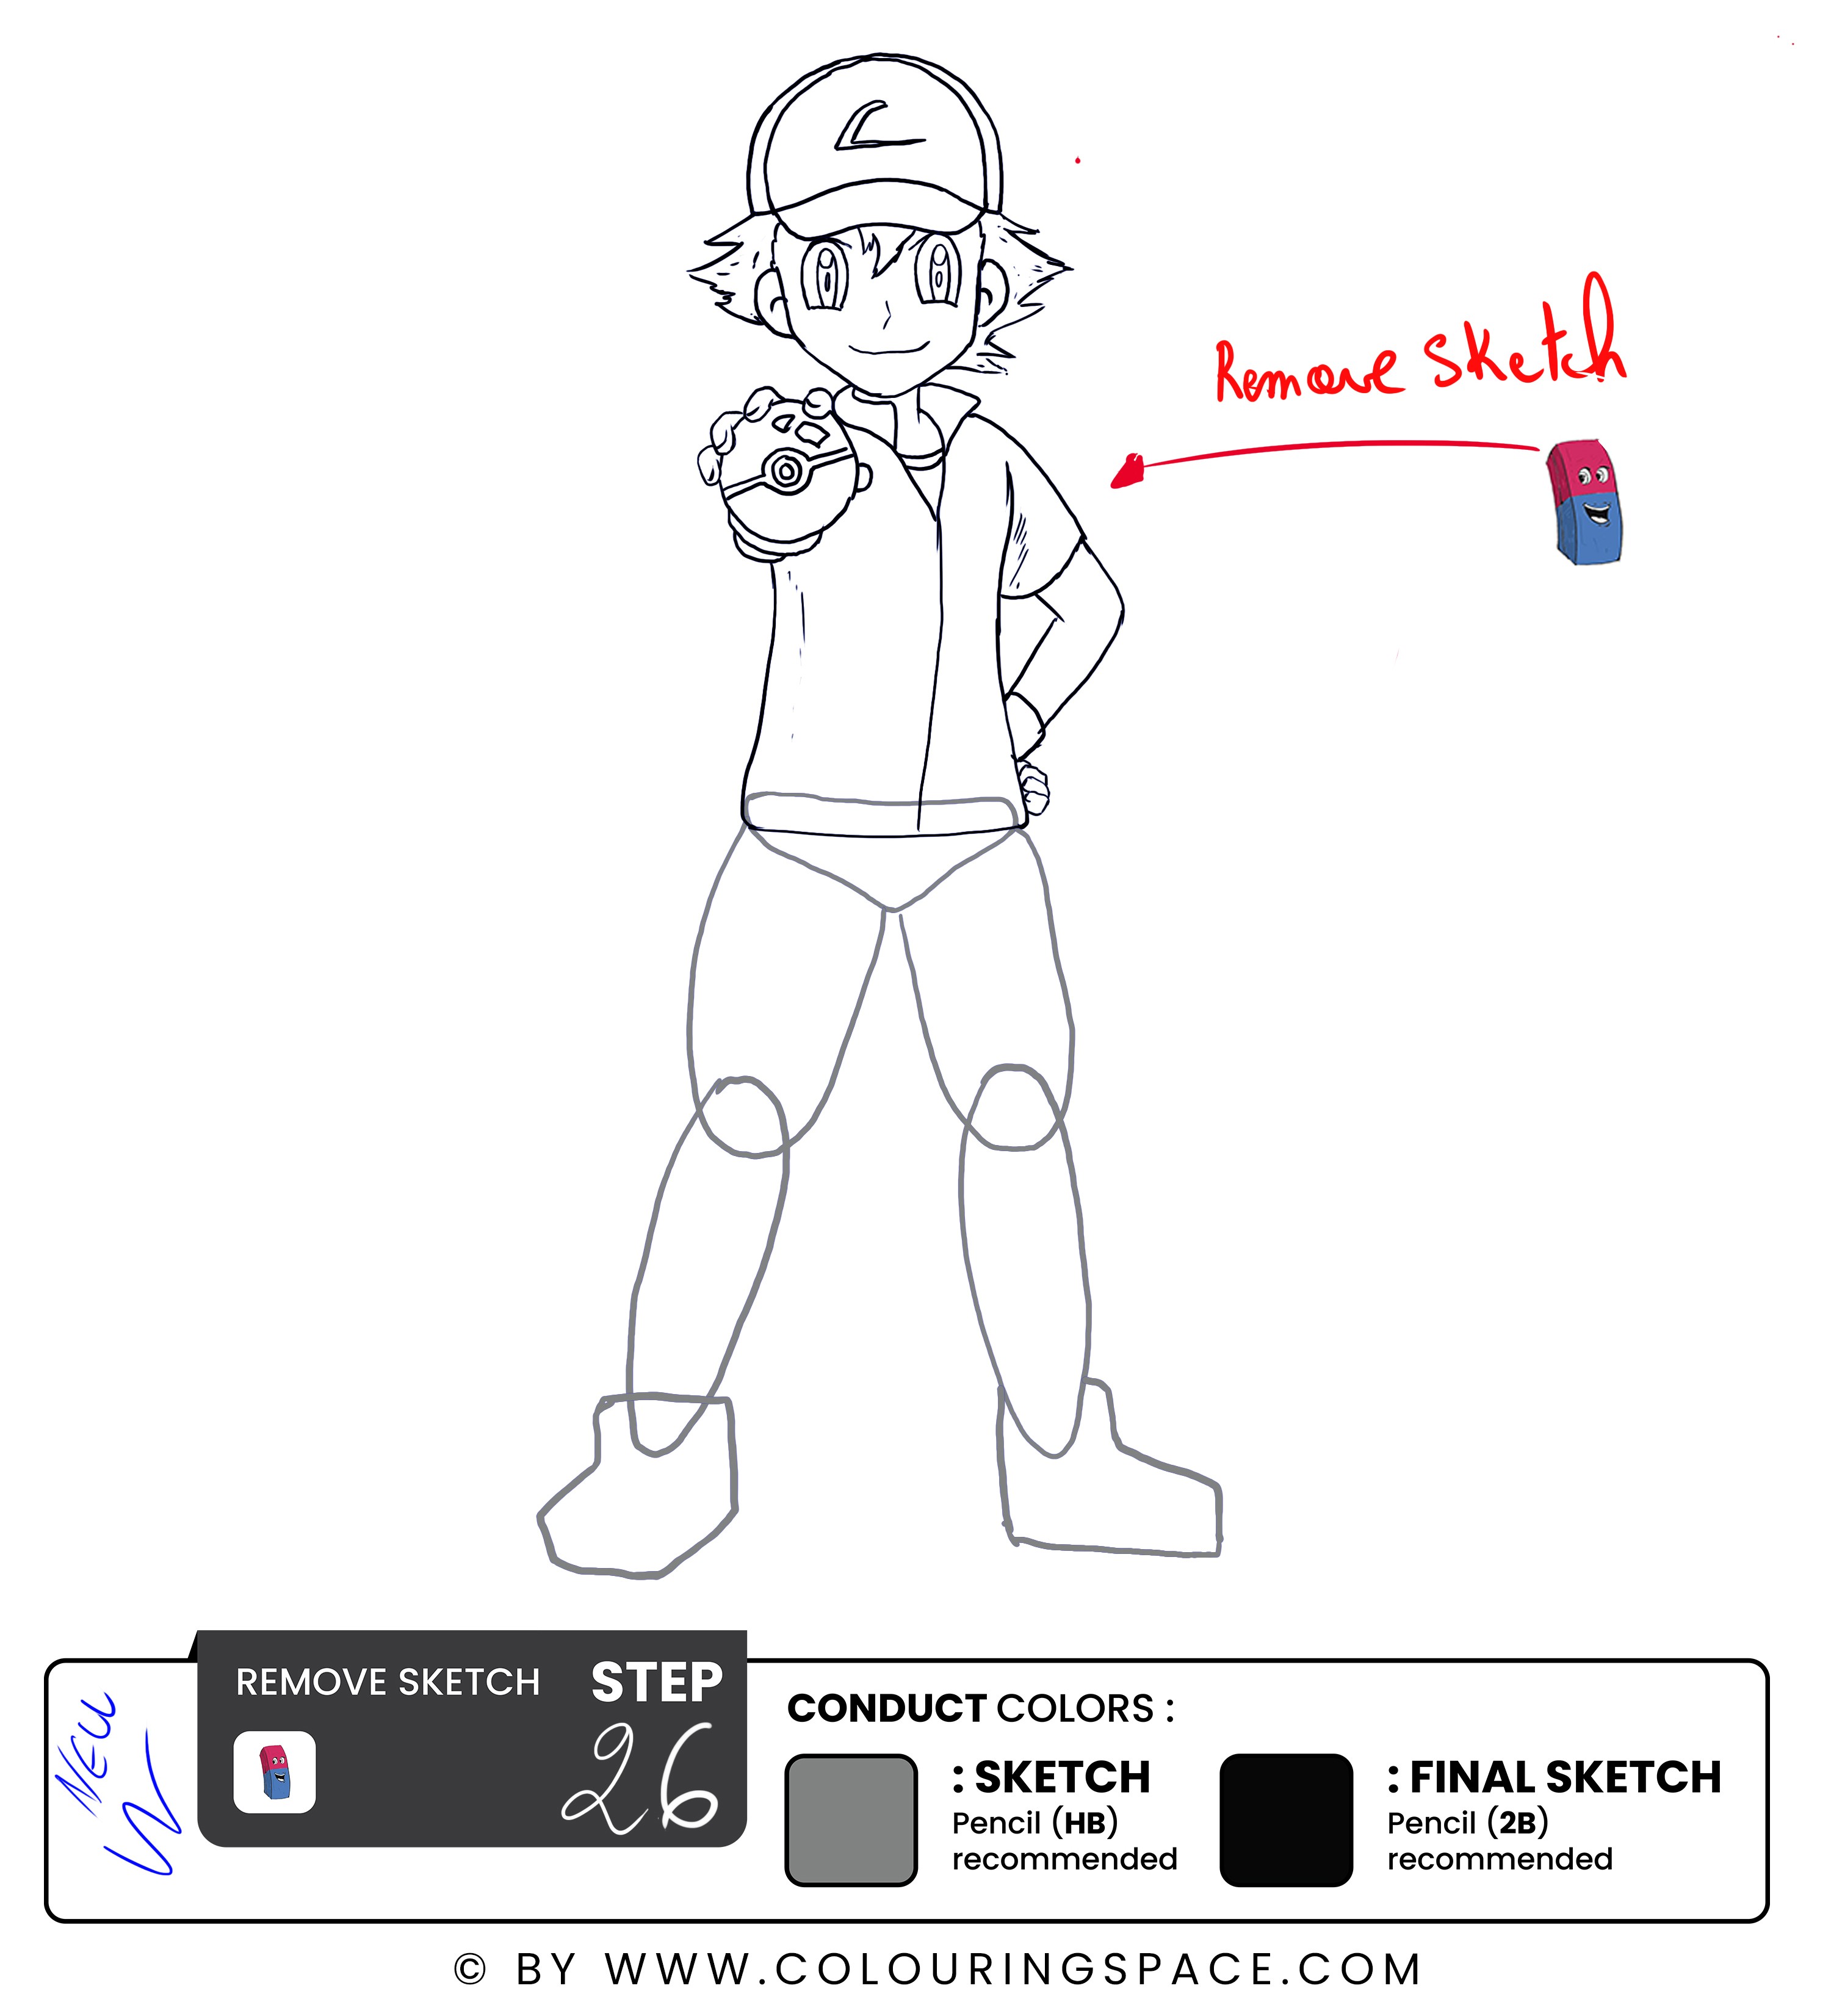
Add in the details, such as the black line that separates the two halves of the ball and the button in the center of the red top. Start by outlining the lines first, coloring is optional.
Make sure that everything works well together. Pokeball and Ash's hands are positioned in a natural way.
Once your sketch is set and done, remove the sketch guidelines.
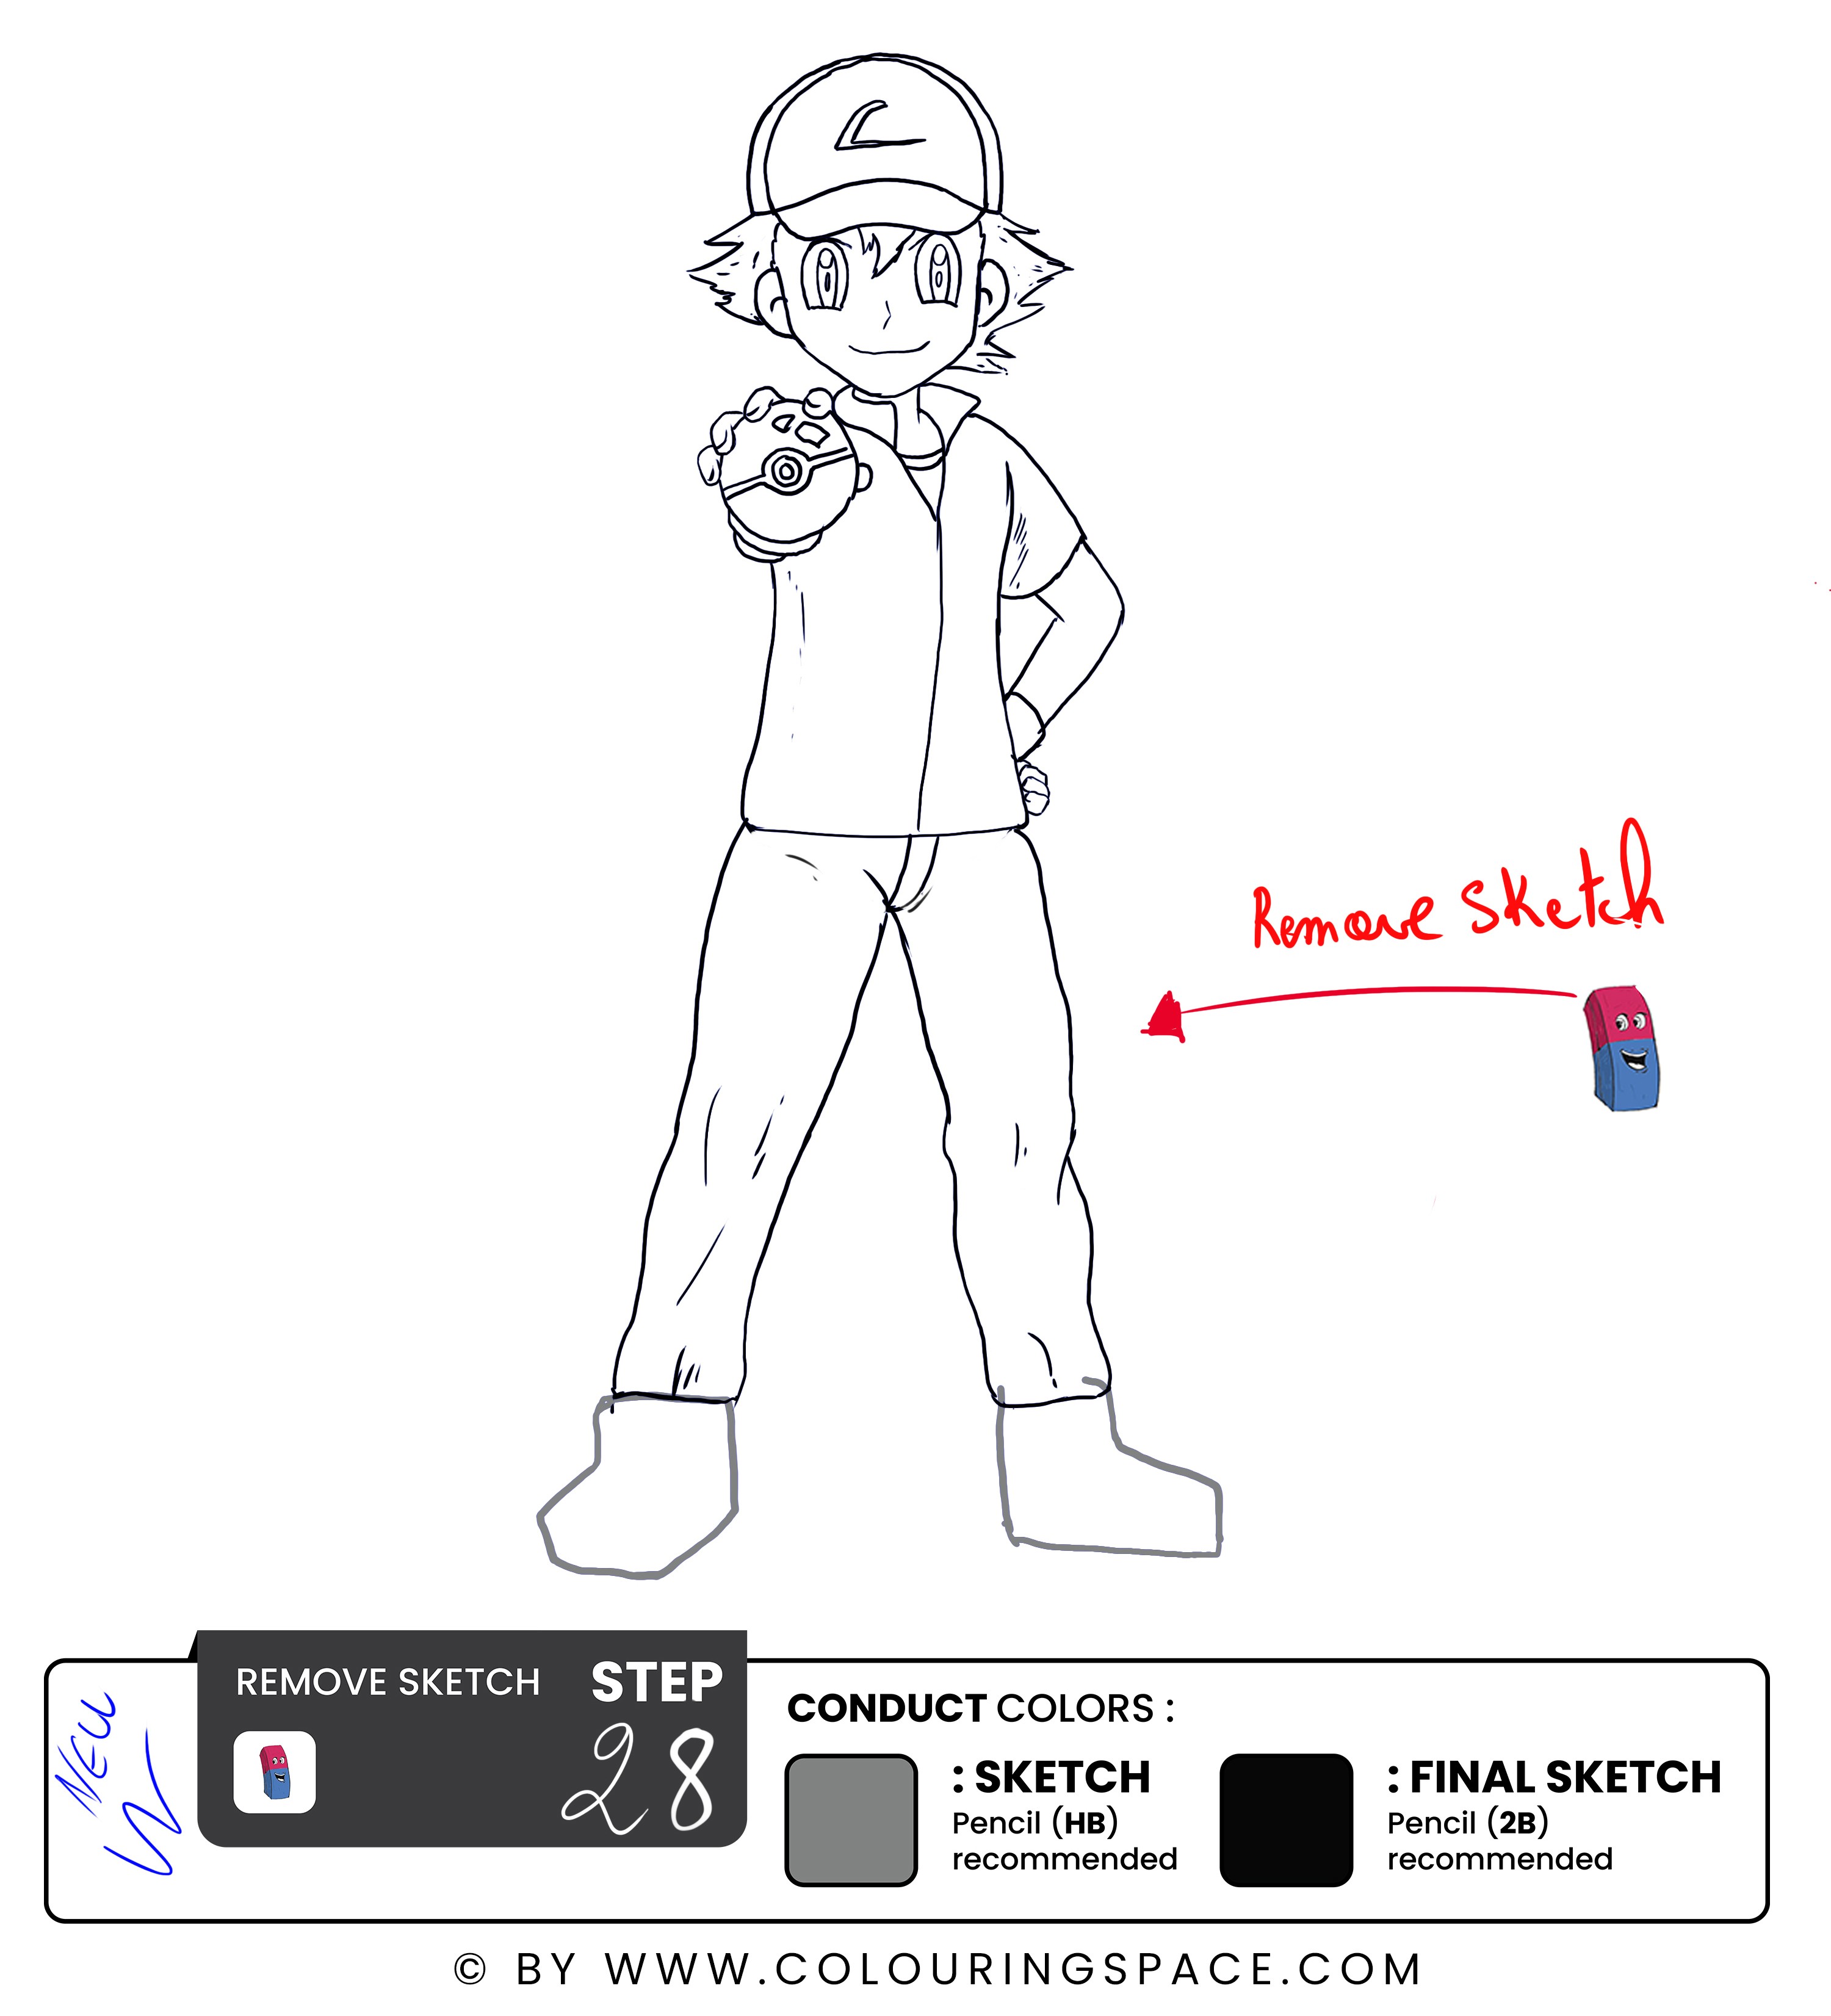
Steps 27 & 28: Outline the Pants, then Remove the Sketch Guidelines
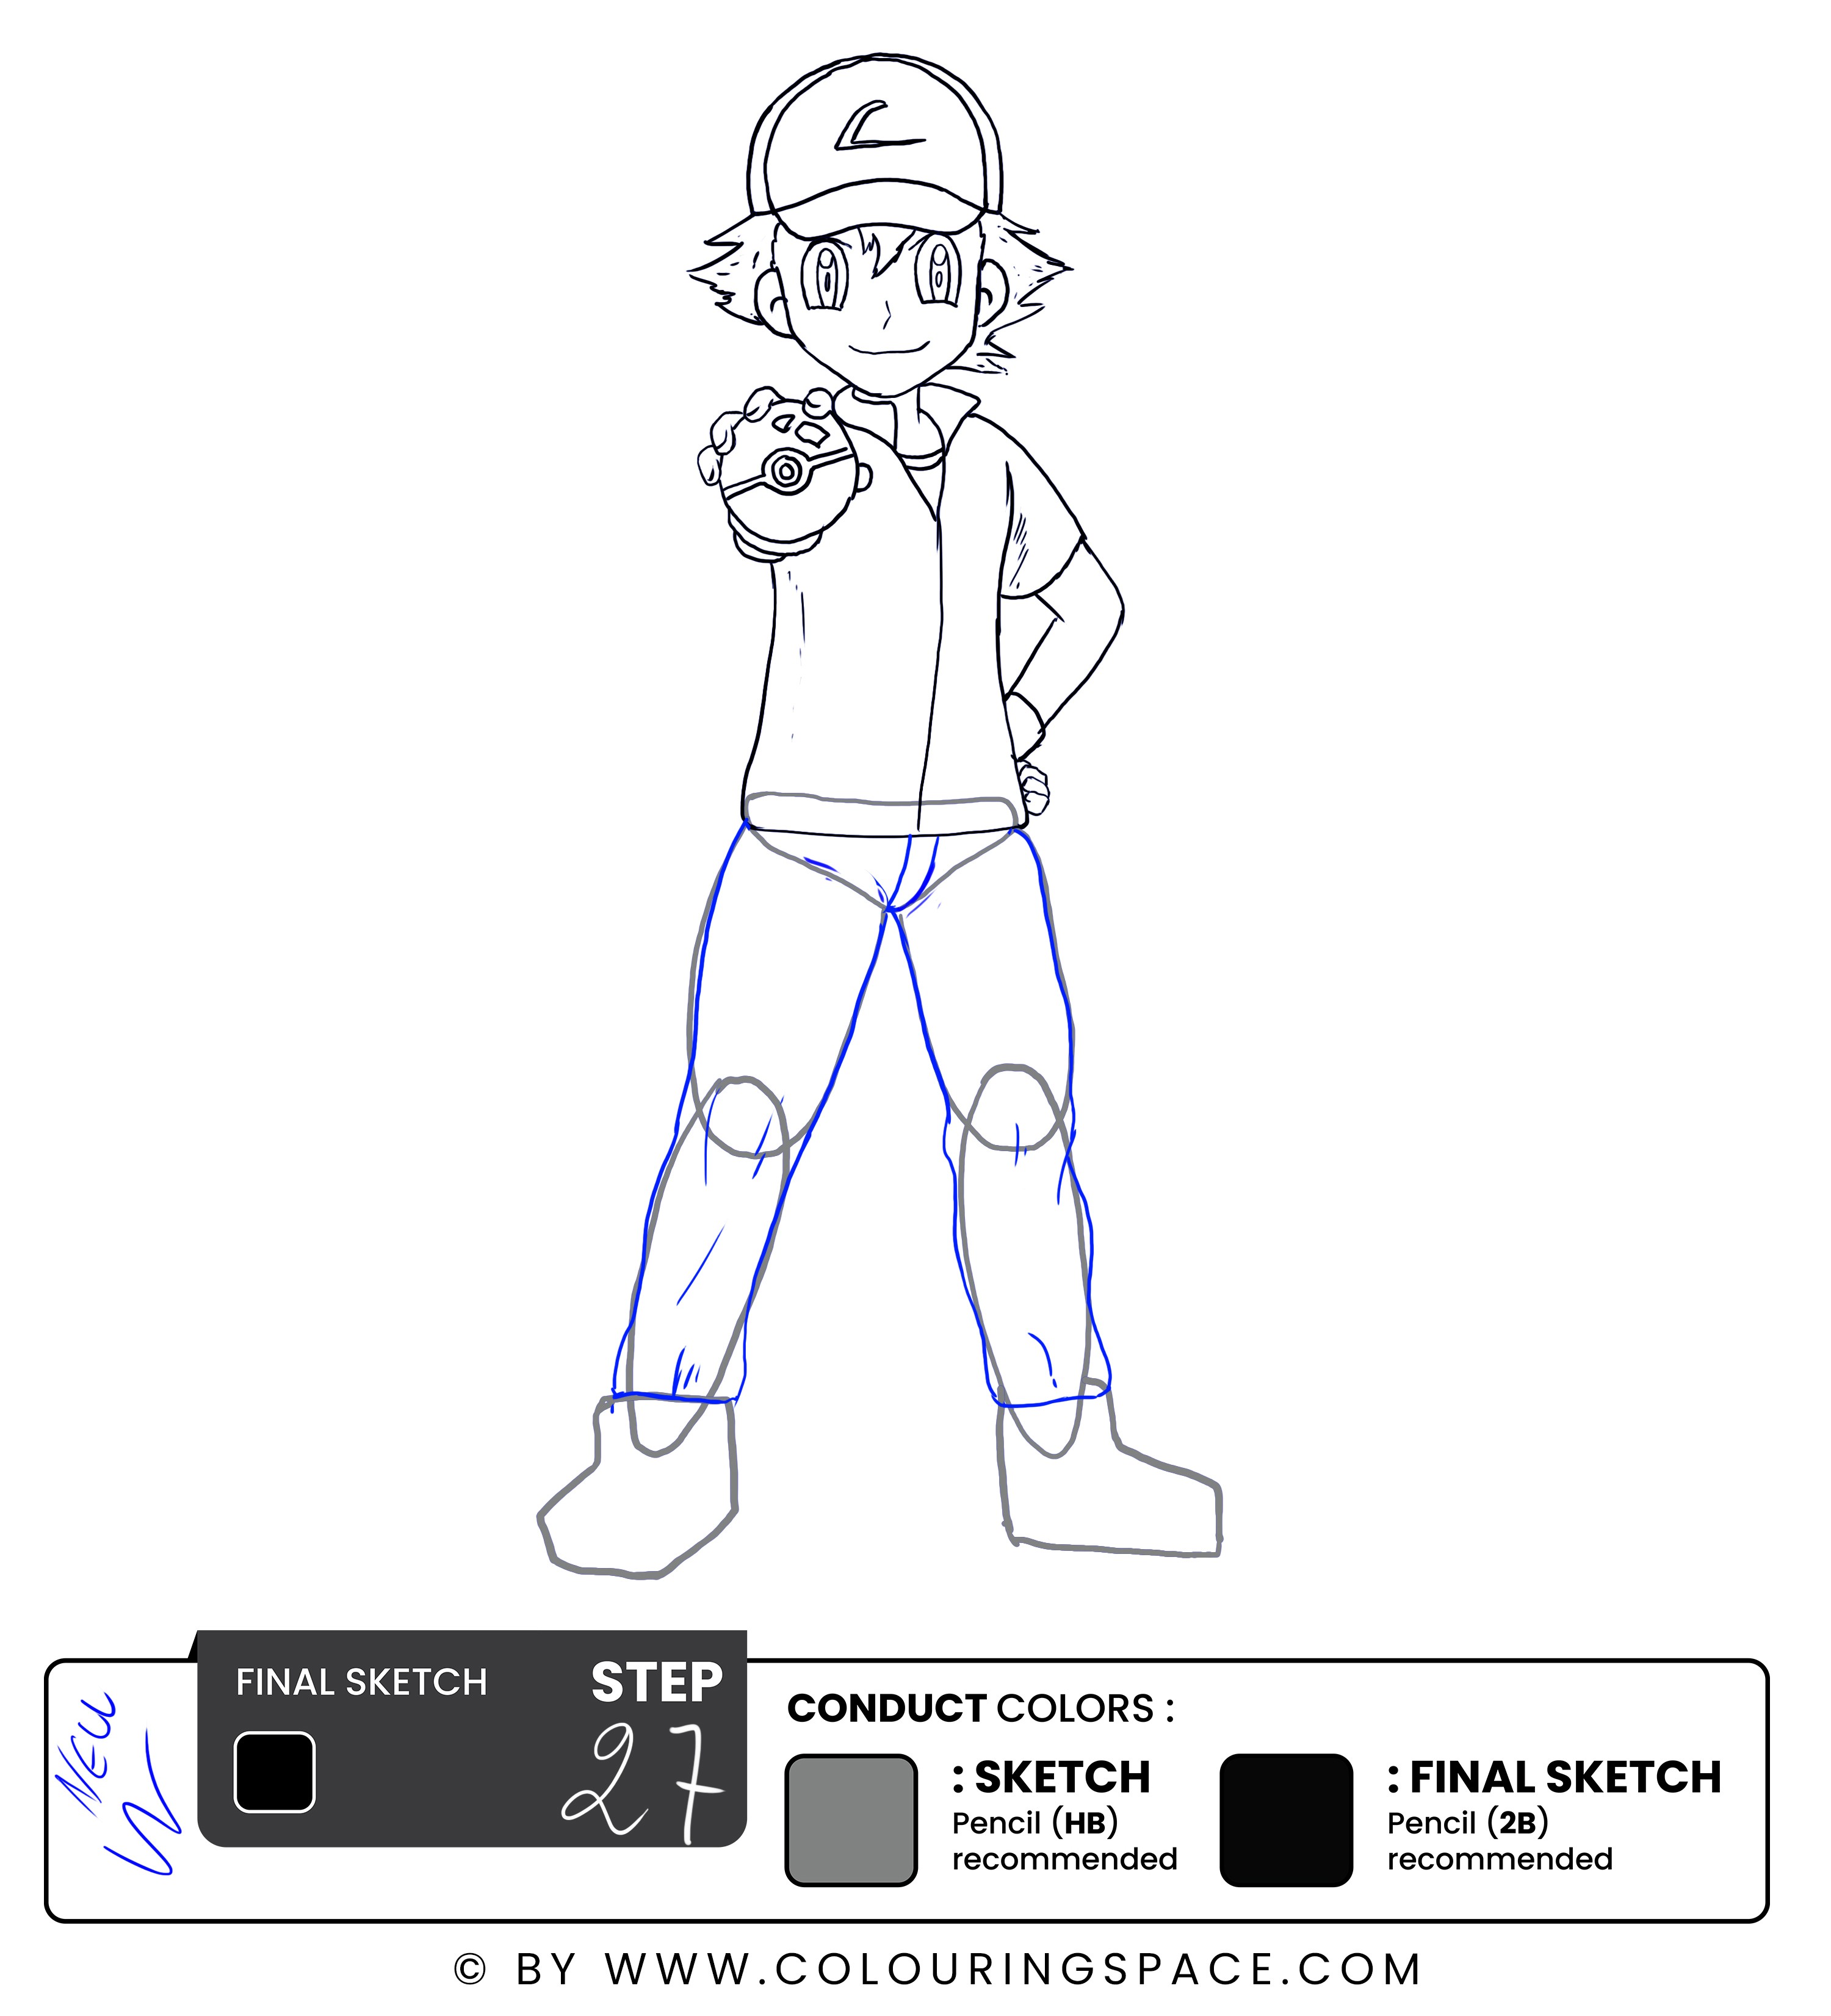
Now, it’s time for the final touches.
Outline the legs sketch to depict the pants and zipline. Make sure it fits loose, not too tight, on the legs, then make sure to add some wrinkles on the bottom.
Once that’s done, remove the sketch guidelines. Always make sure to use a clean eraser. You don’t want to smudge the final result of your sketch.
Steps 29 & 30: Finalize the Shoe Sketch, then Remove the Sketch Guidelines
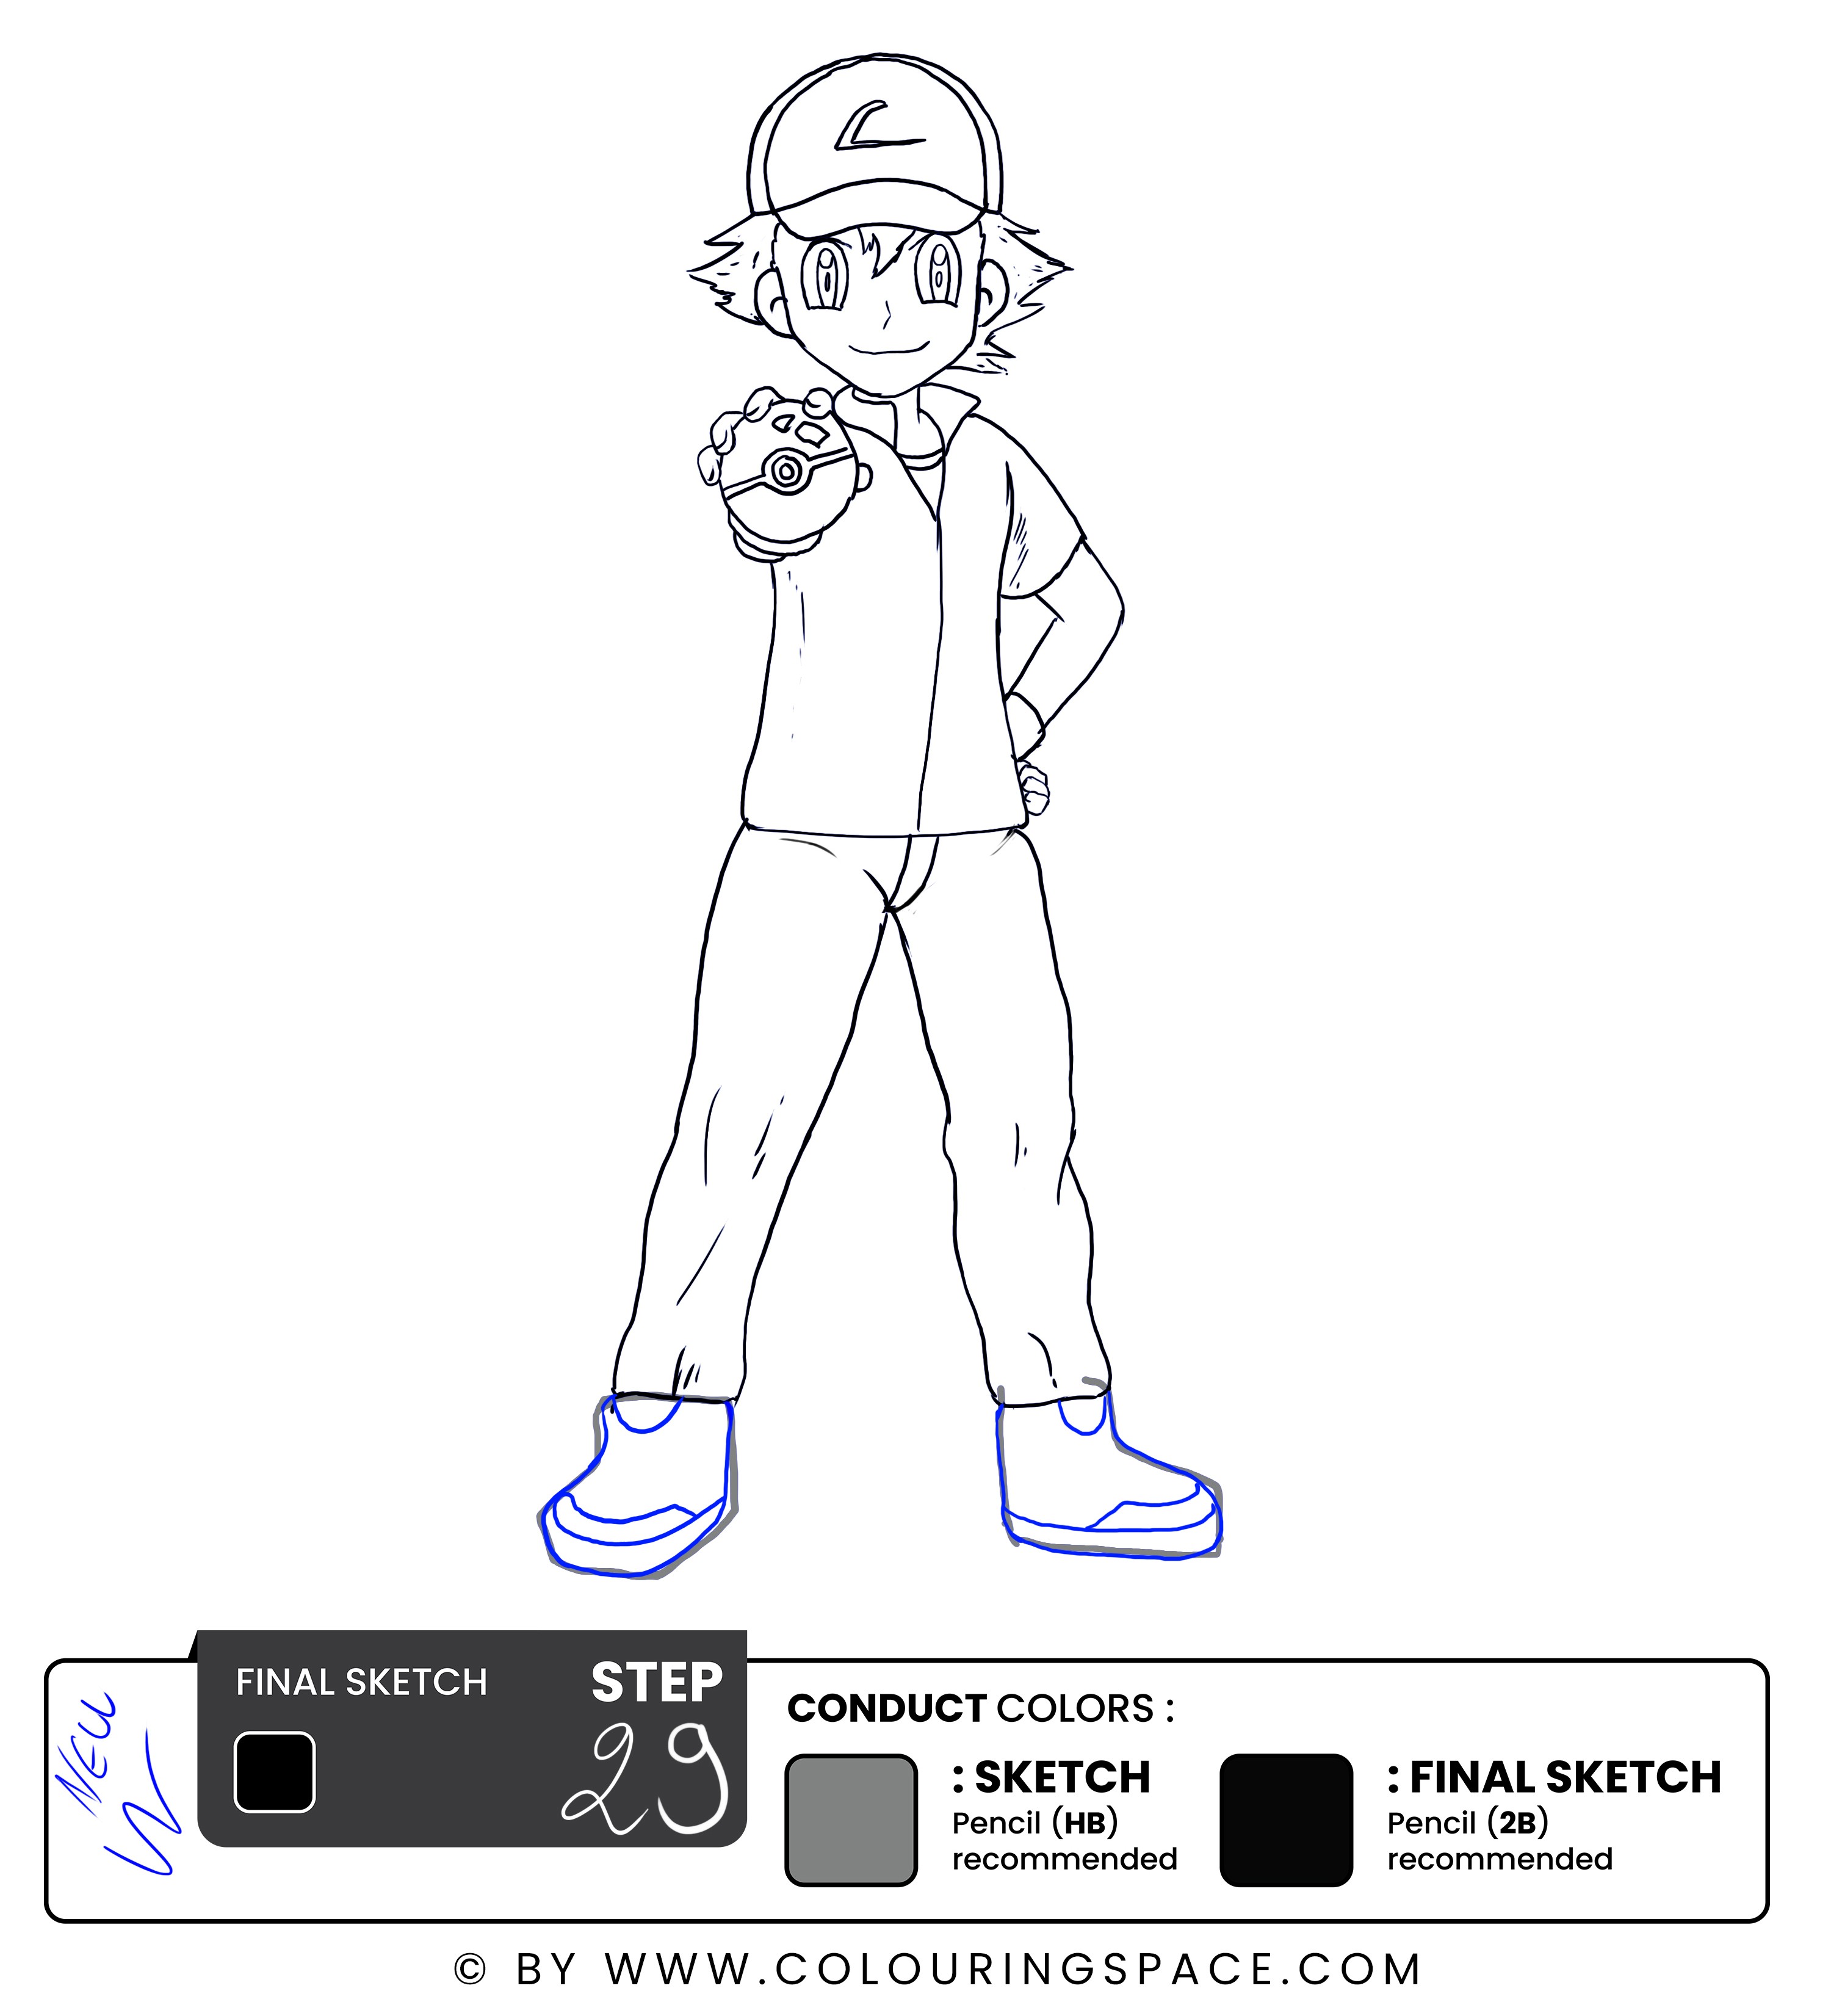
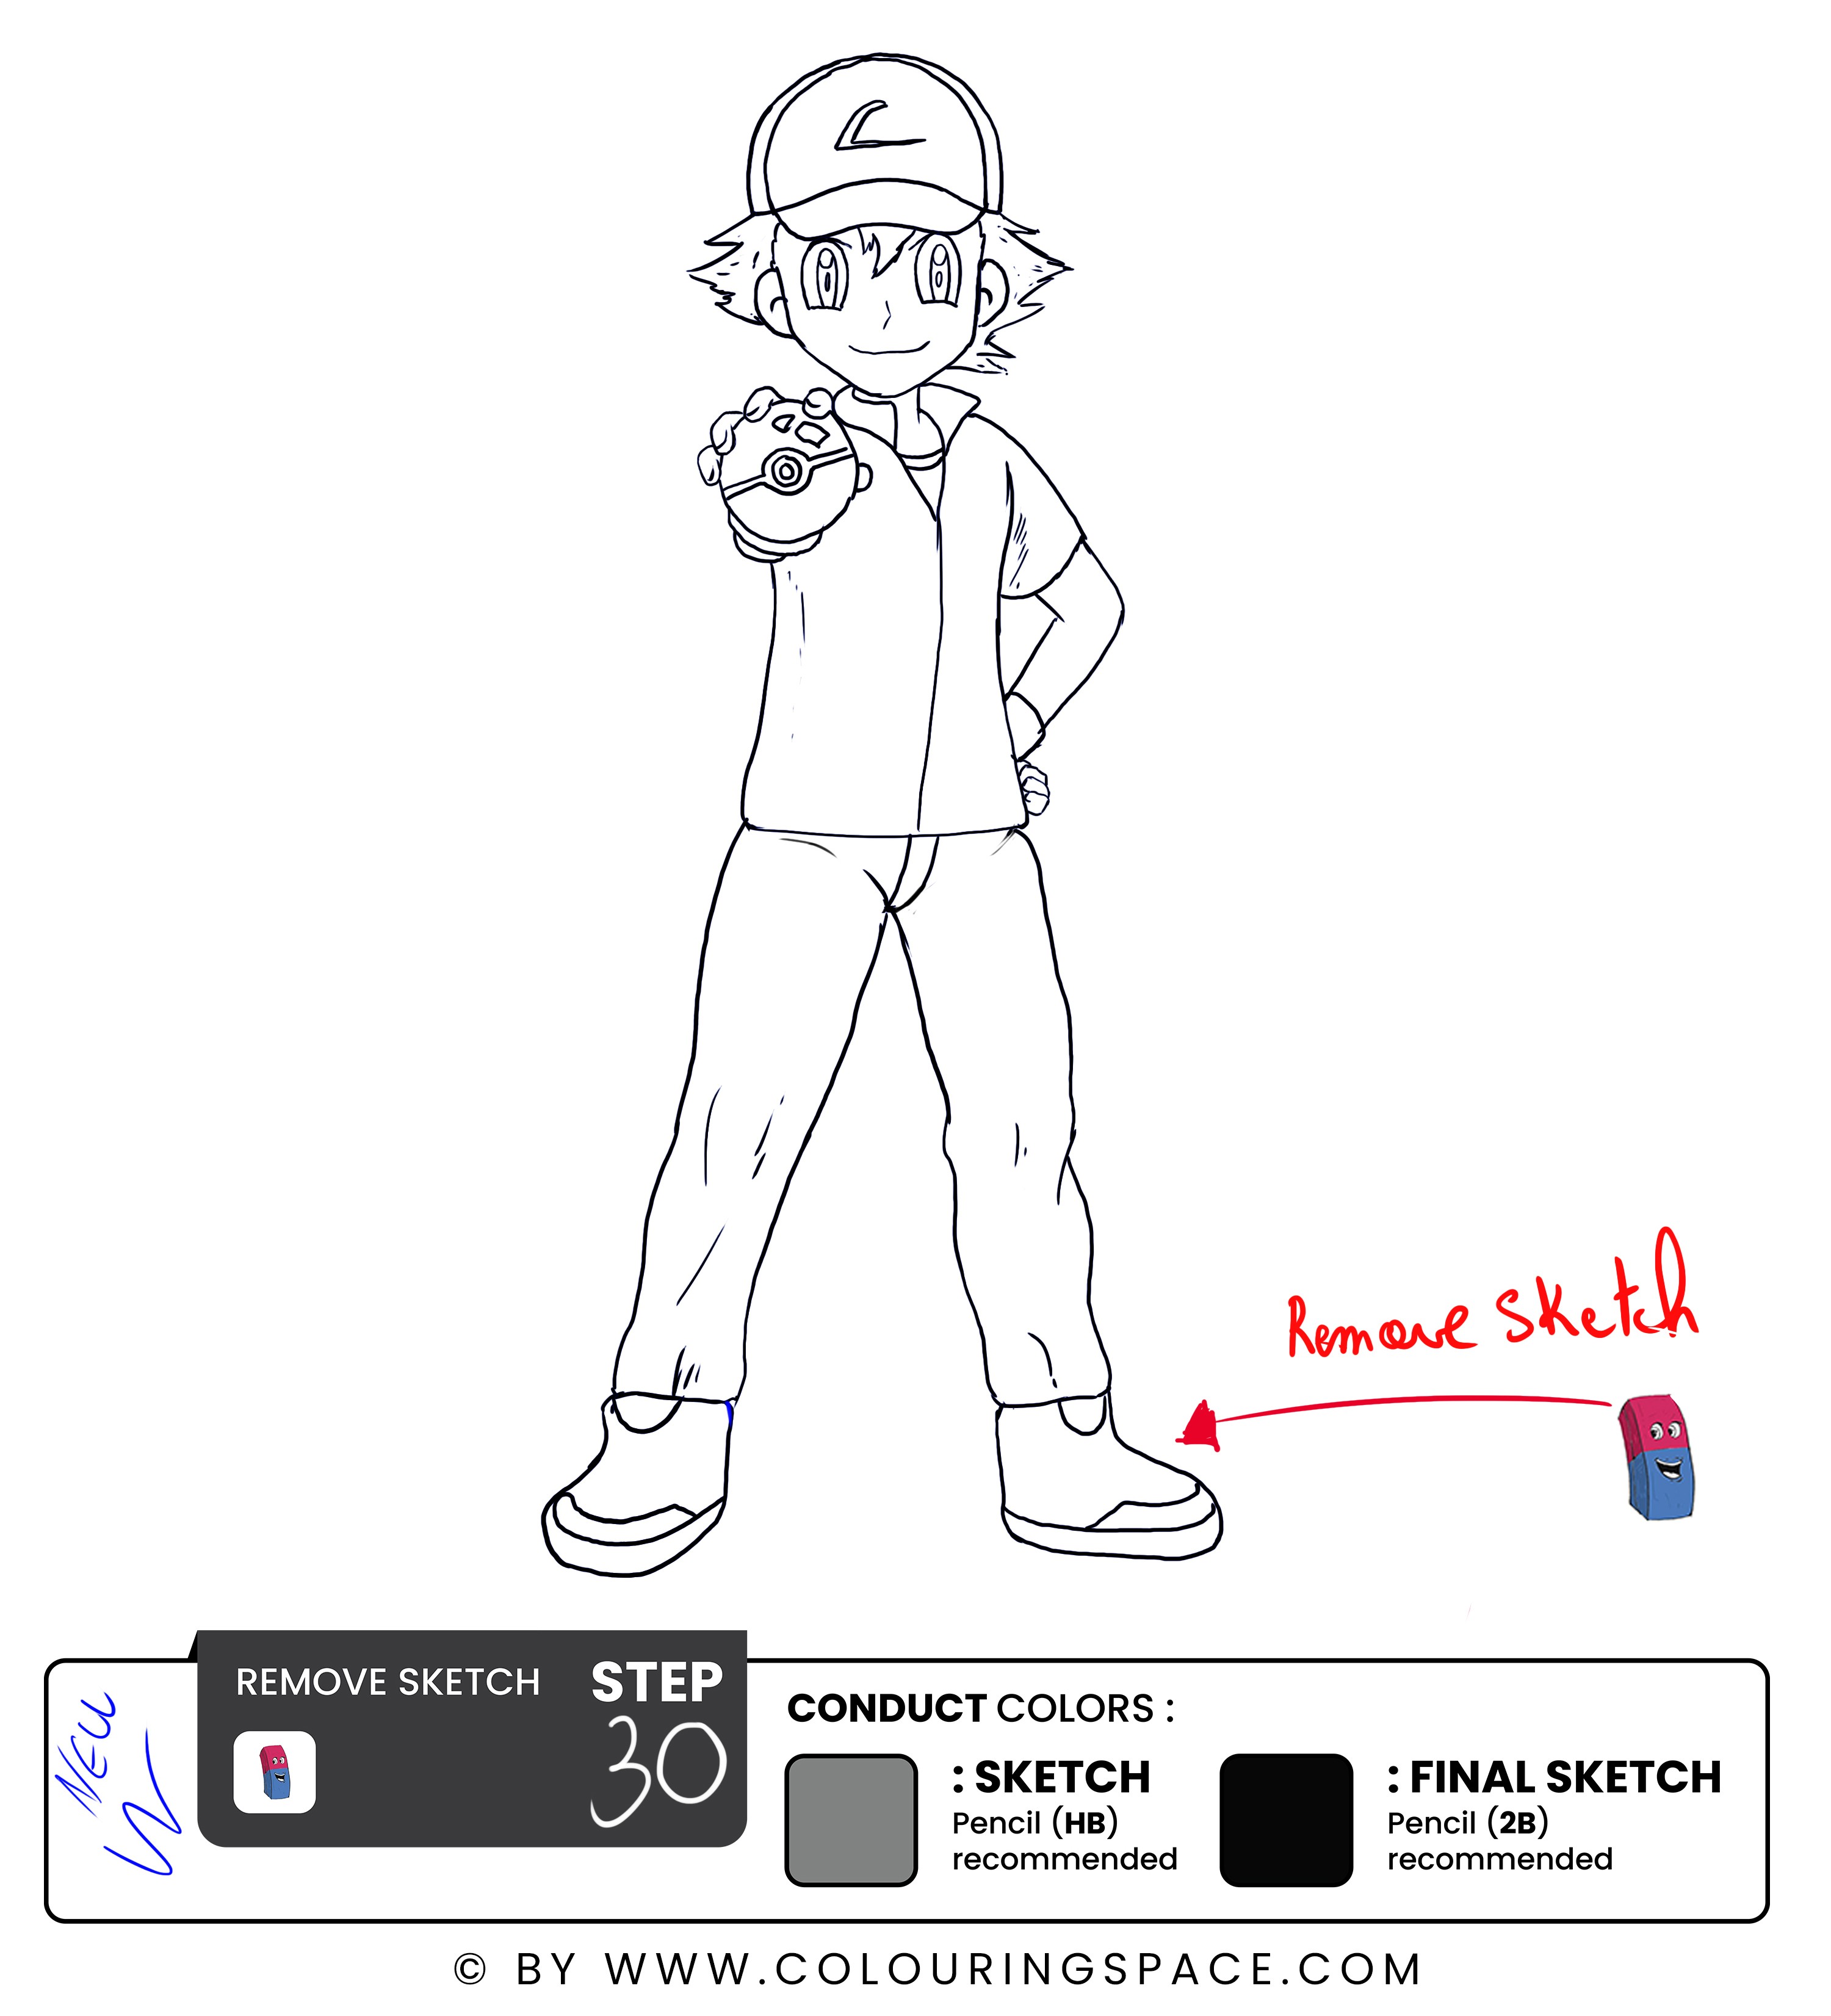
Add some details to create the shape and texture of his shoes. Ash's shoes are generally simple and sleek, with a few details such as laces or stripes.
Once you have the basic shape of Ash's shoes, add some shading and highlights to create a sense of depth and contrast. This will help the shoes appear more three-dimensional and Realistic.
With Ash's shoes in place, you're finished with your drawing of Ash holding a Pokeball.
Don't be afraid to make mistakes and try new things - that's all part of the learning process.
Let's finalize the drawing by erasing any unnecessary marks; this will help to clean up your drawing and make it look more polished and professional.
With these final touches in place, step back and admire your completed drawing of Ash holding a Pokeball. Congratulations on a job well done!
Your Drawing Is Complete; it Should Look Something Like this.
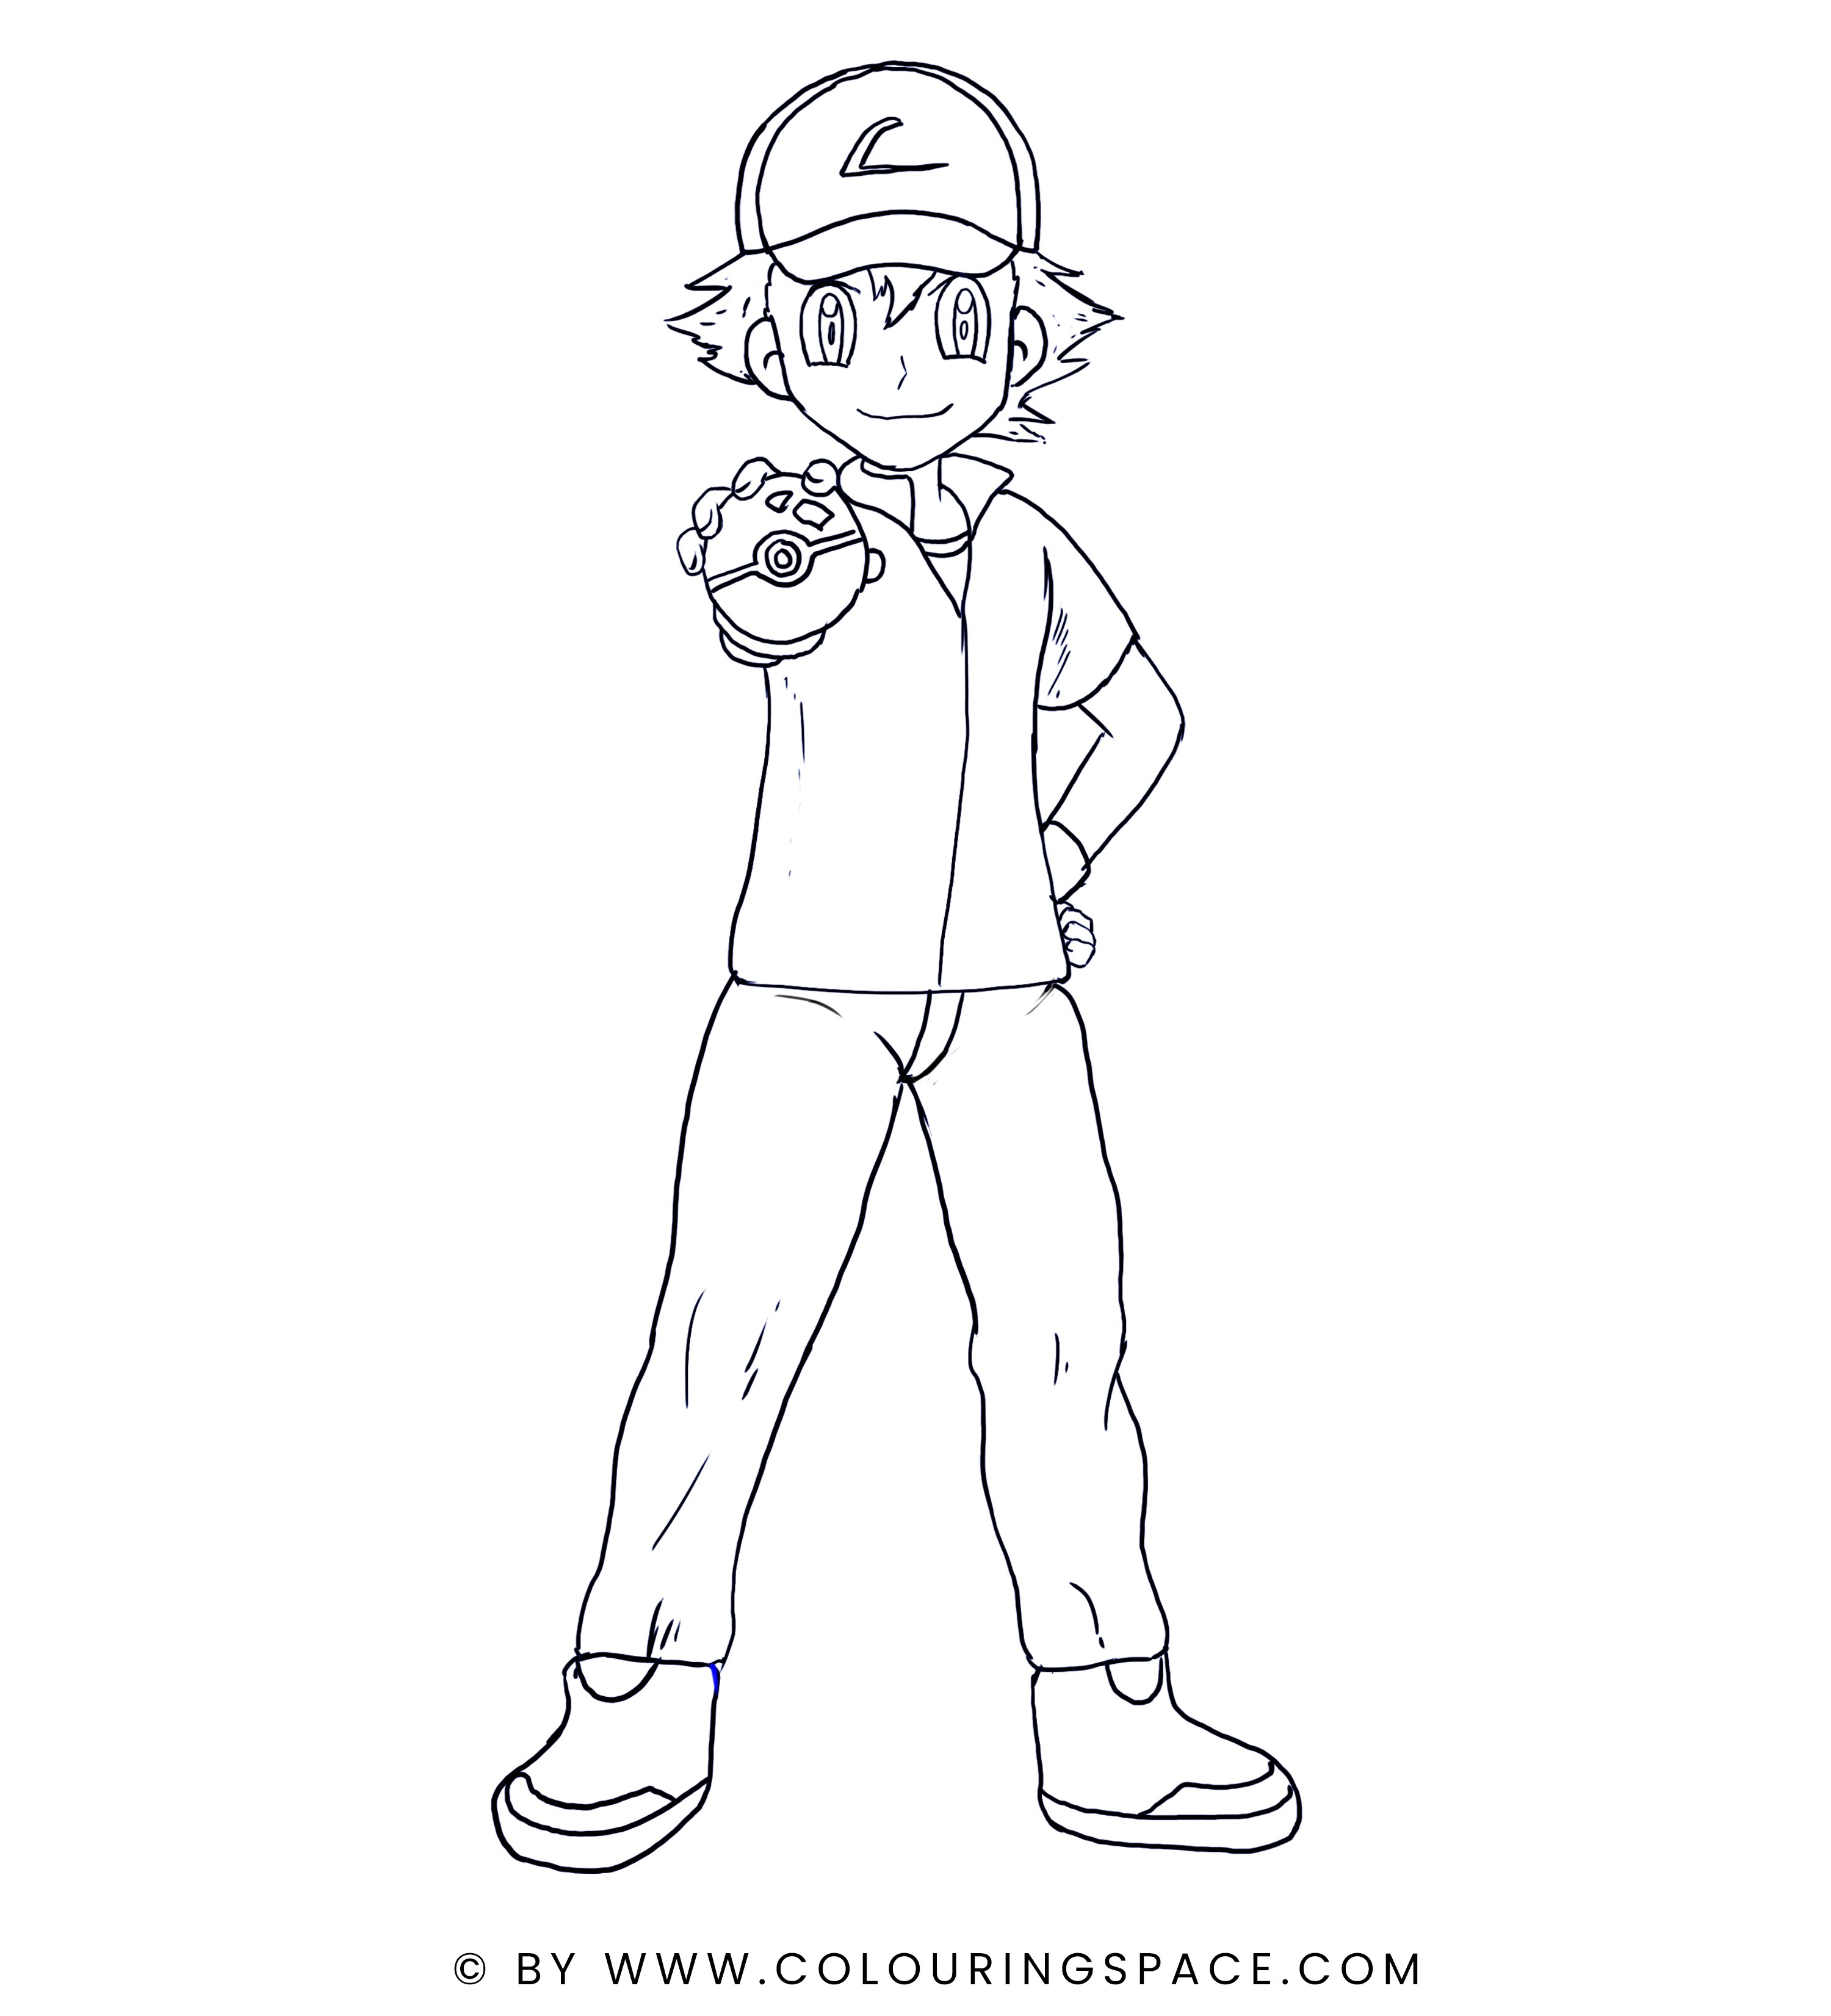
Ash with Pokeball drawing tutorial may seem daunting. But, by following these simple steps, you can create a fantastic drawing you are proud of.
From starting with basic shapes to adding details and finalizing your drawing with darker lines, each process step is essential and will help you achieve the desired result.
If you enjoyed this tutorial on drawing Ash with his iconic Pokeball, you'll love our next step-by-step guide! Don't miss out on our "Draw Baby Pikachu Easily: Step-by-Step Tutorial Guide." It's a perfect follow-up for Pokemon enthusiasts looking to expand their drawing skills. In this guide, we'll take you through a simple, easy-to-follow process to bring the adorable Baby Pikachu to life on your canvas.
Remember to have fun with the process, and don't worry too much about making mistakes - practice makes perfect. With enough persistence and dedication, you can also become a skilled artist in no time.
