Halloween Sketch Magic: Pumpkin in Hat Drawing Tips

If you're searching for a fun and creative way to celebrate Halloween, why not draw a scary Halloween pumpkin with a hat? It's a fun project perfect for all ages and a great way to get into the Halloween spirit. Here is a fun 12 steps tutorial to help you through that.
The celebration of Halloween has been observed all across the world for centuries. During this year's season, many people dress up, go to parties, and trick-or-treat. The pumpkin, carved into scary faces or other shapes, is used as decoration. This is one of Halloween's most well-known symbols.
Carved pumpkins have a long history that dates back to Celtic customs. Originally, the Celts inhabited what is now Northern France, Ireland, and the United Kingdom. On October 31st, they observed a holiday known as Samhain, which is pronounced “sow-in.”
This festival marked the end of the harvest season and the beginning of winter. The Celts had this belief that on this night, the boundary between the living and the dead became blurred. And that ghosts, as well as spirits, returned to the world of the living.
To ward off these spirits, the Celts would light bonfires and wear costumes made of animal heads and skins. They also hollowed out turnips and carved scary faces into them to use as lanterns to light their way. This was to scare away evil spirits.
When the Irish immigrants came to America in the 1800s, they brought their tradition of carving turnips. Carving pumpkins involves cutting out a design or face from the pumpkin and placing a candle inside to light it up.
Sounds fun, right?
Let's start drawing!
Step 1 - Start with a Rectangular Box.
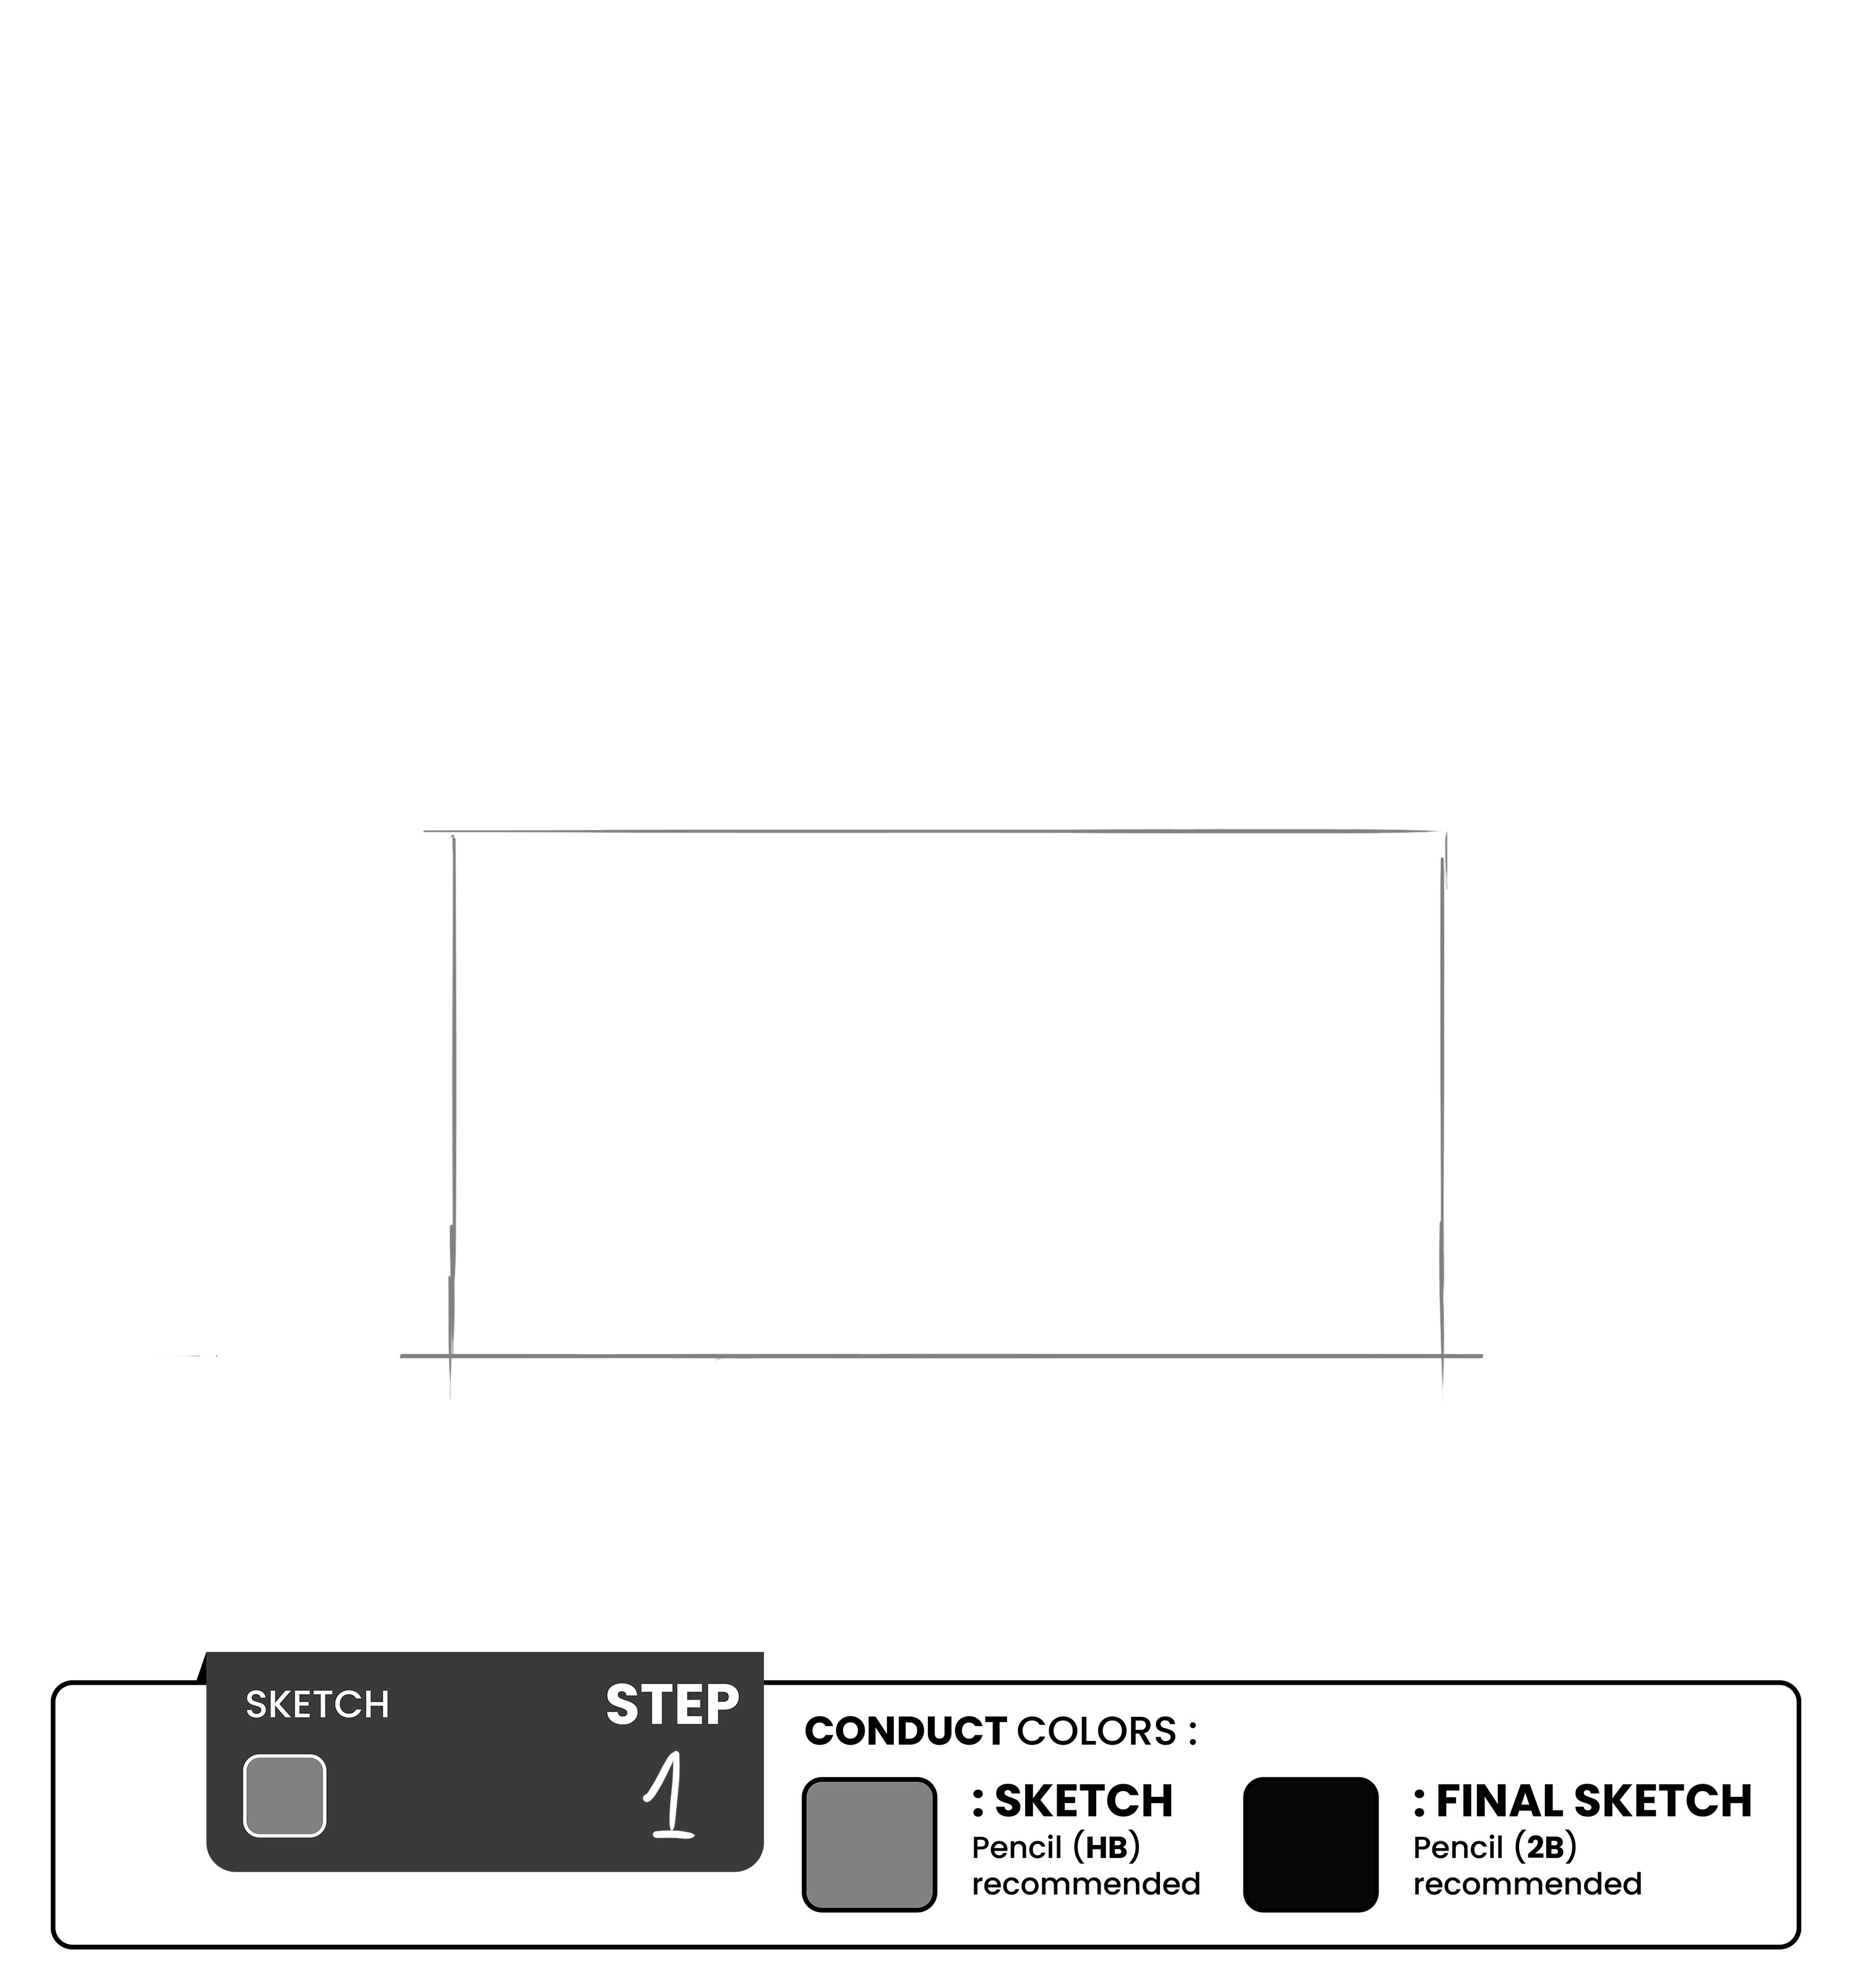
This is the easiest step so far; all you need is to draw a box that is rectangular, just like the sketch above.
We recommend it to be at least to be 6 inches long and 9 inches wide. Although this totally depends on the paper you’re using!
Step 2- Divide the Rectangle
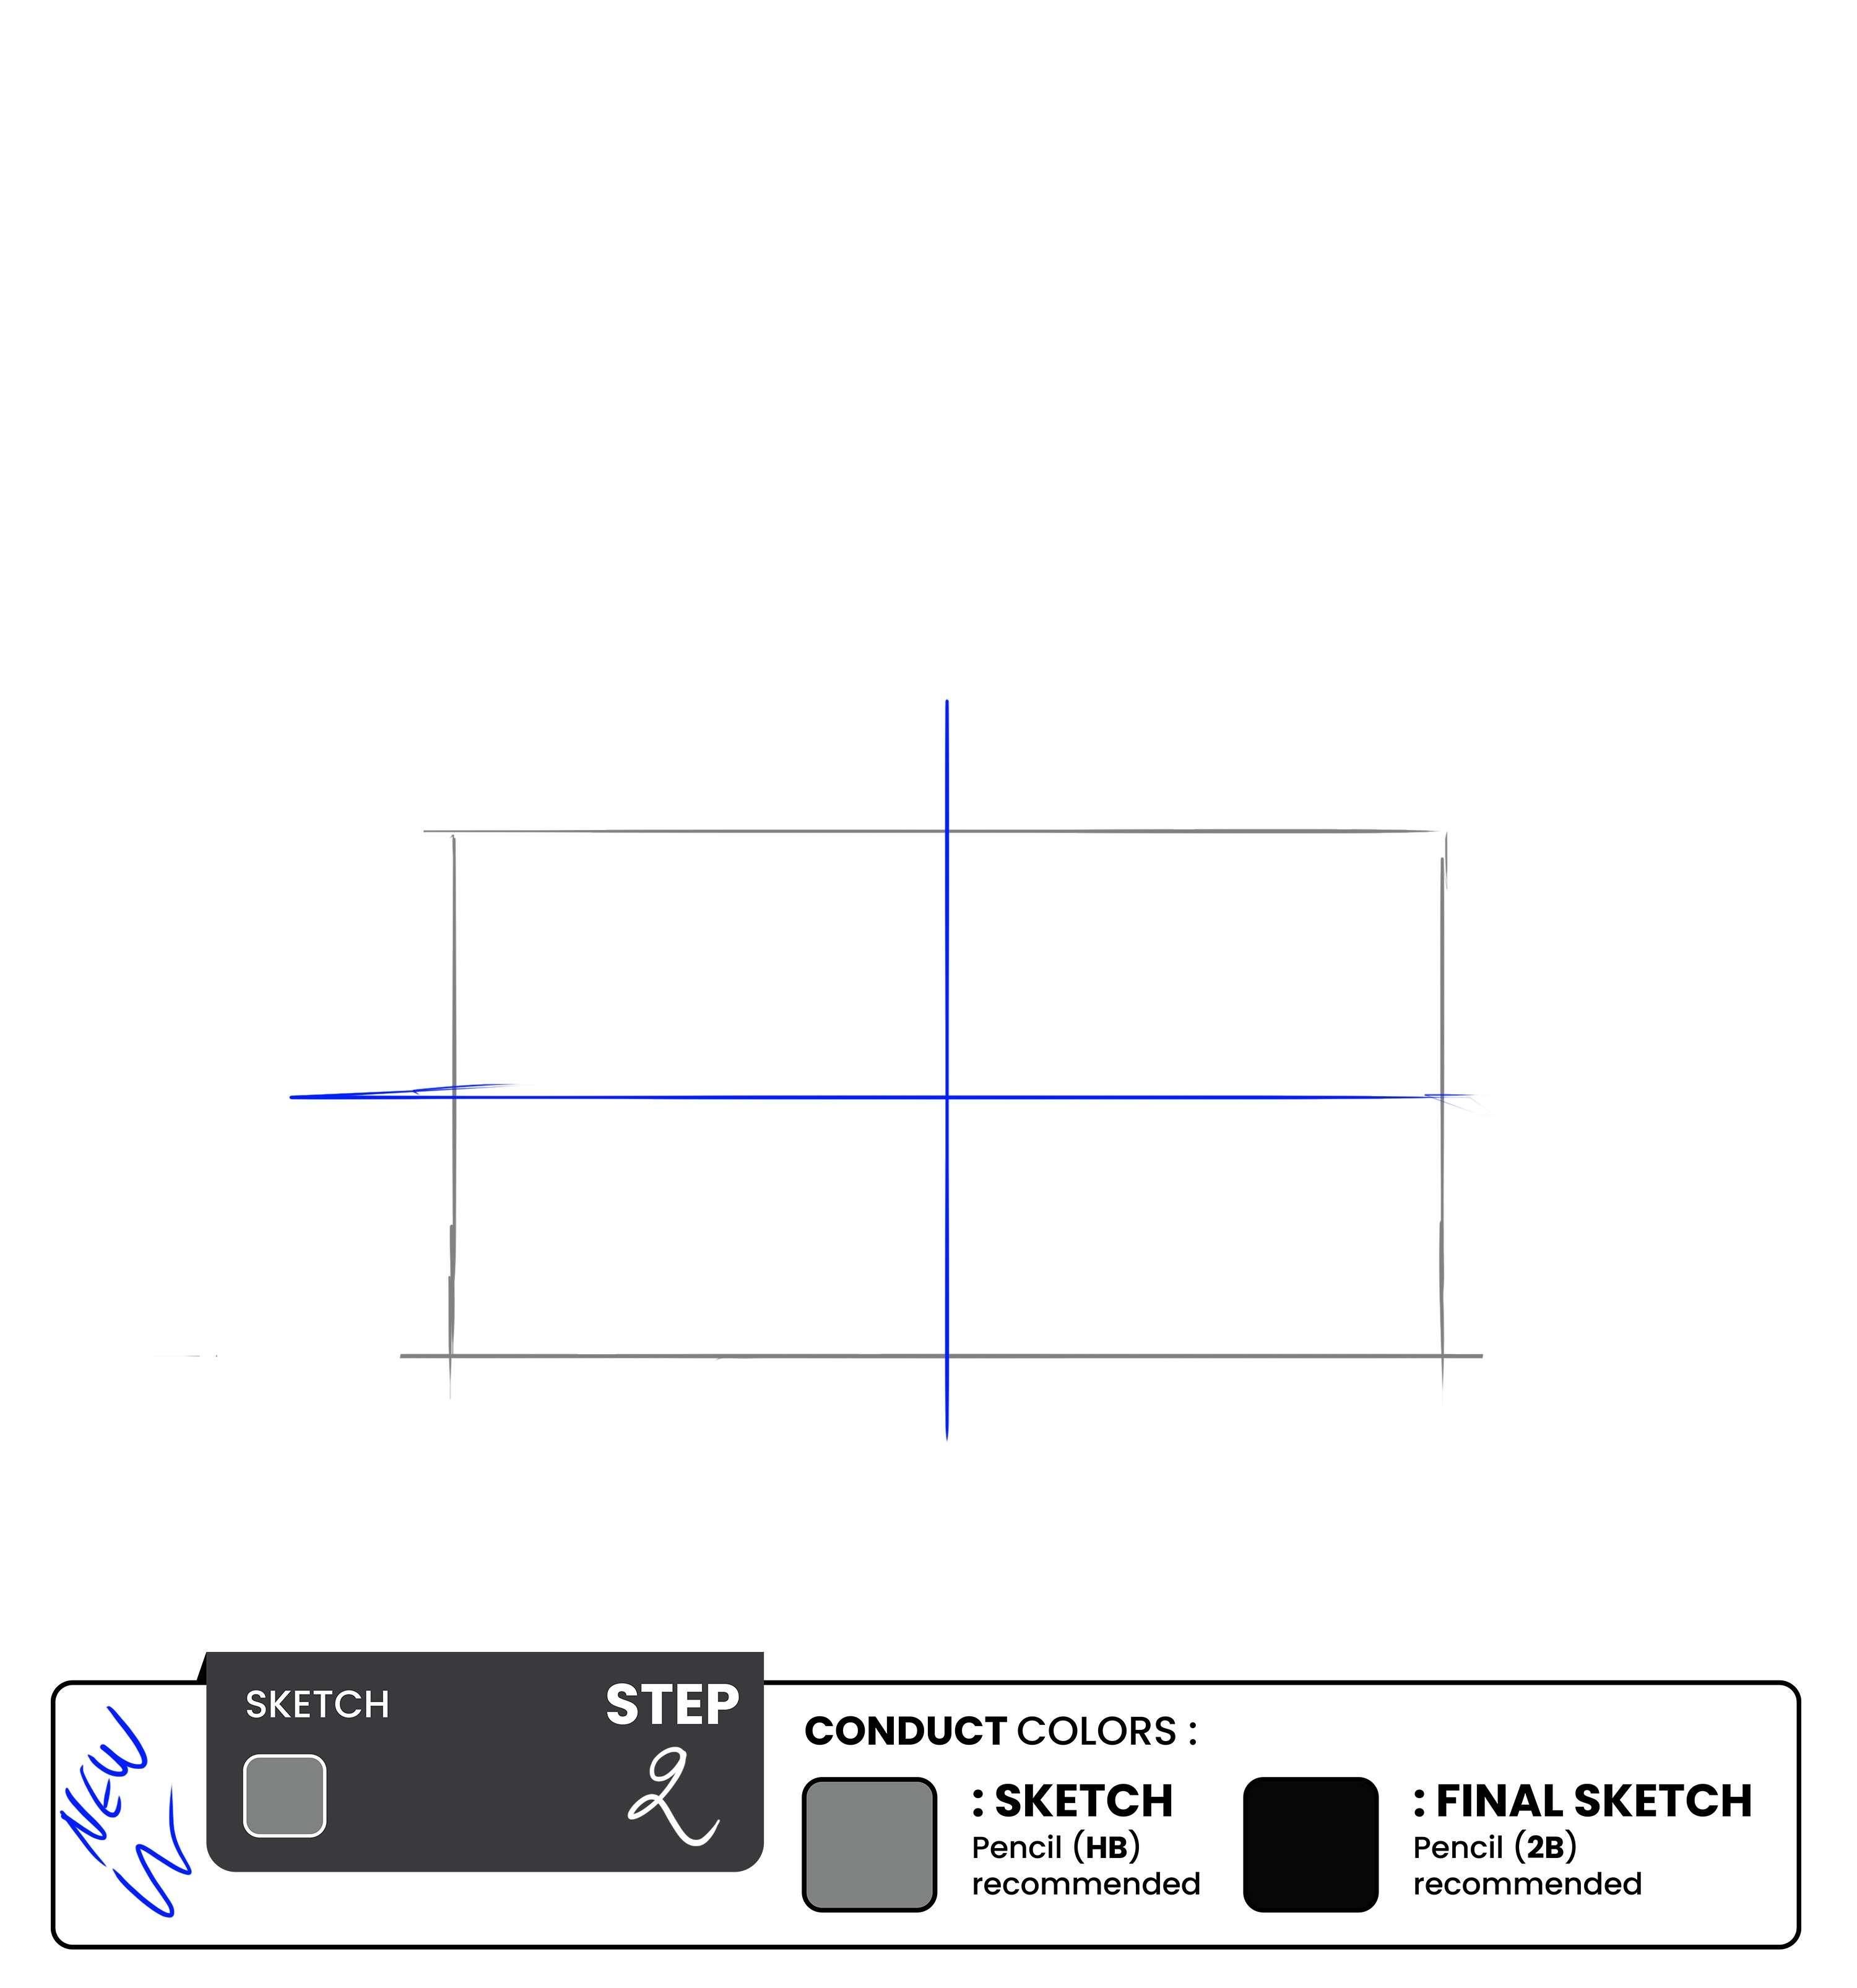
Our rectangle must be divided into four equal sections. We might begin by splitting our rectangle into two equal halves. Then we may divide each half in two.
Step 3 - Draw the Initial Sketch of the Hat
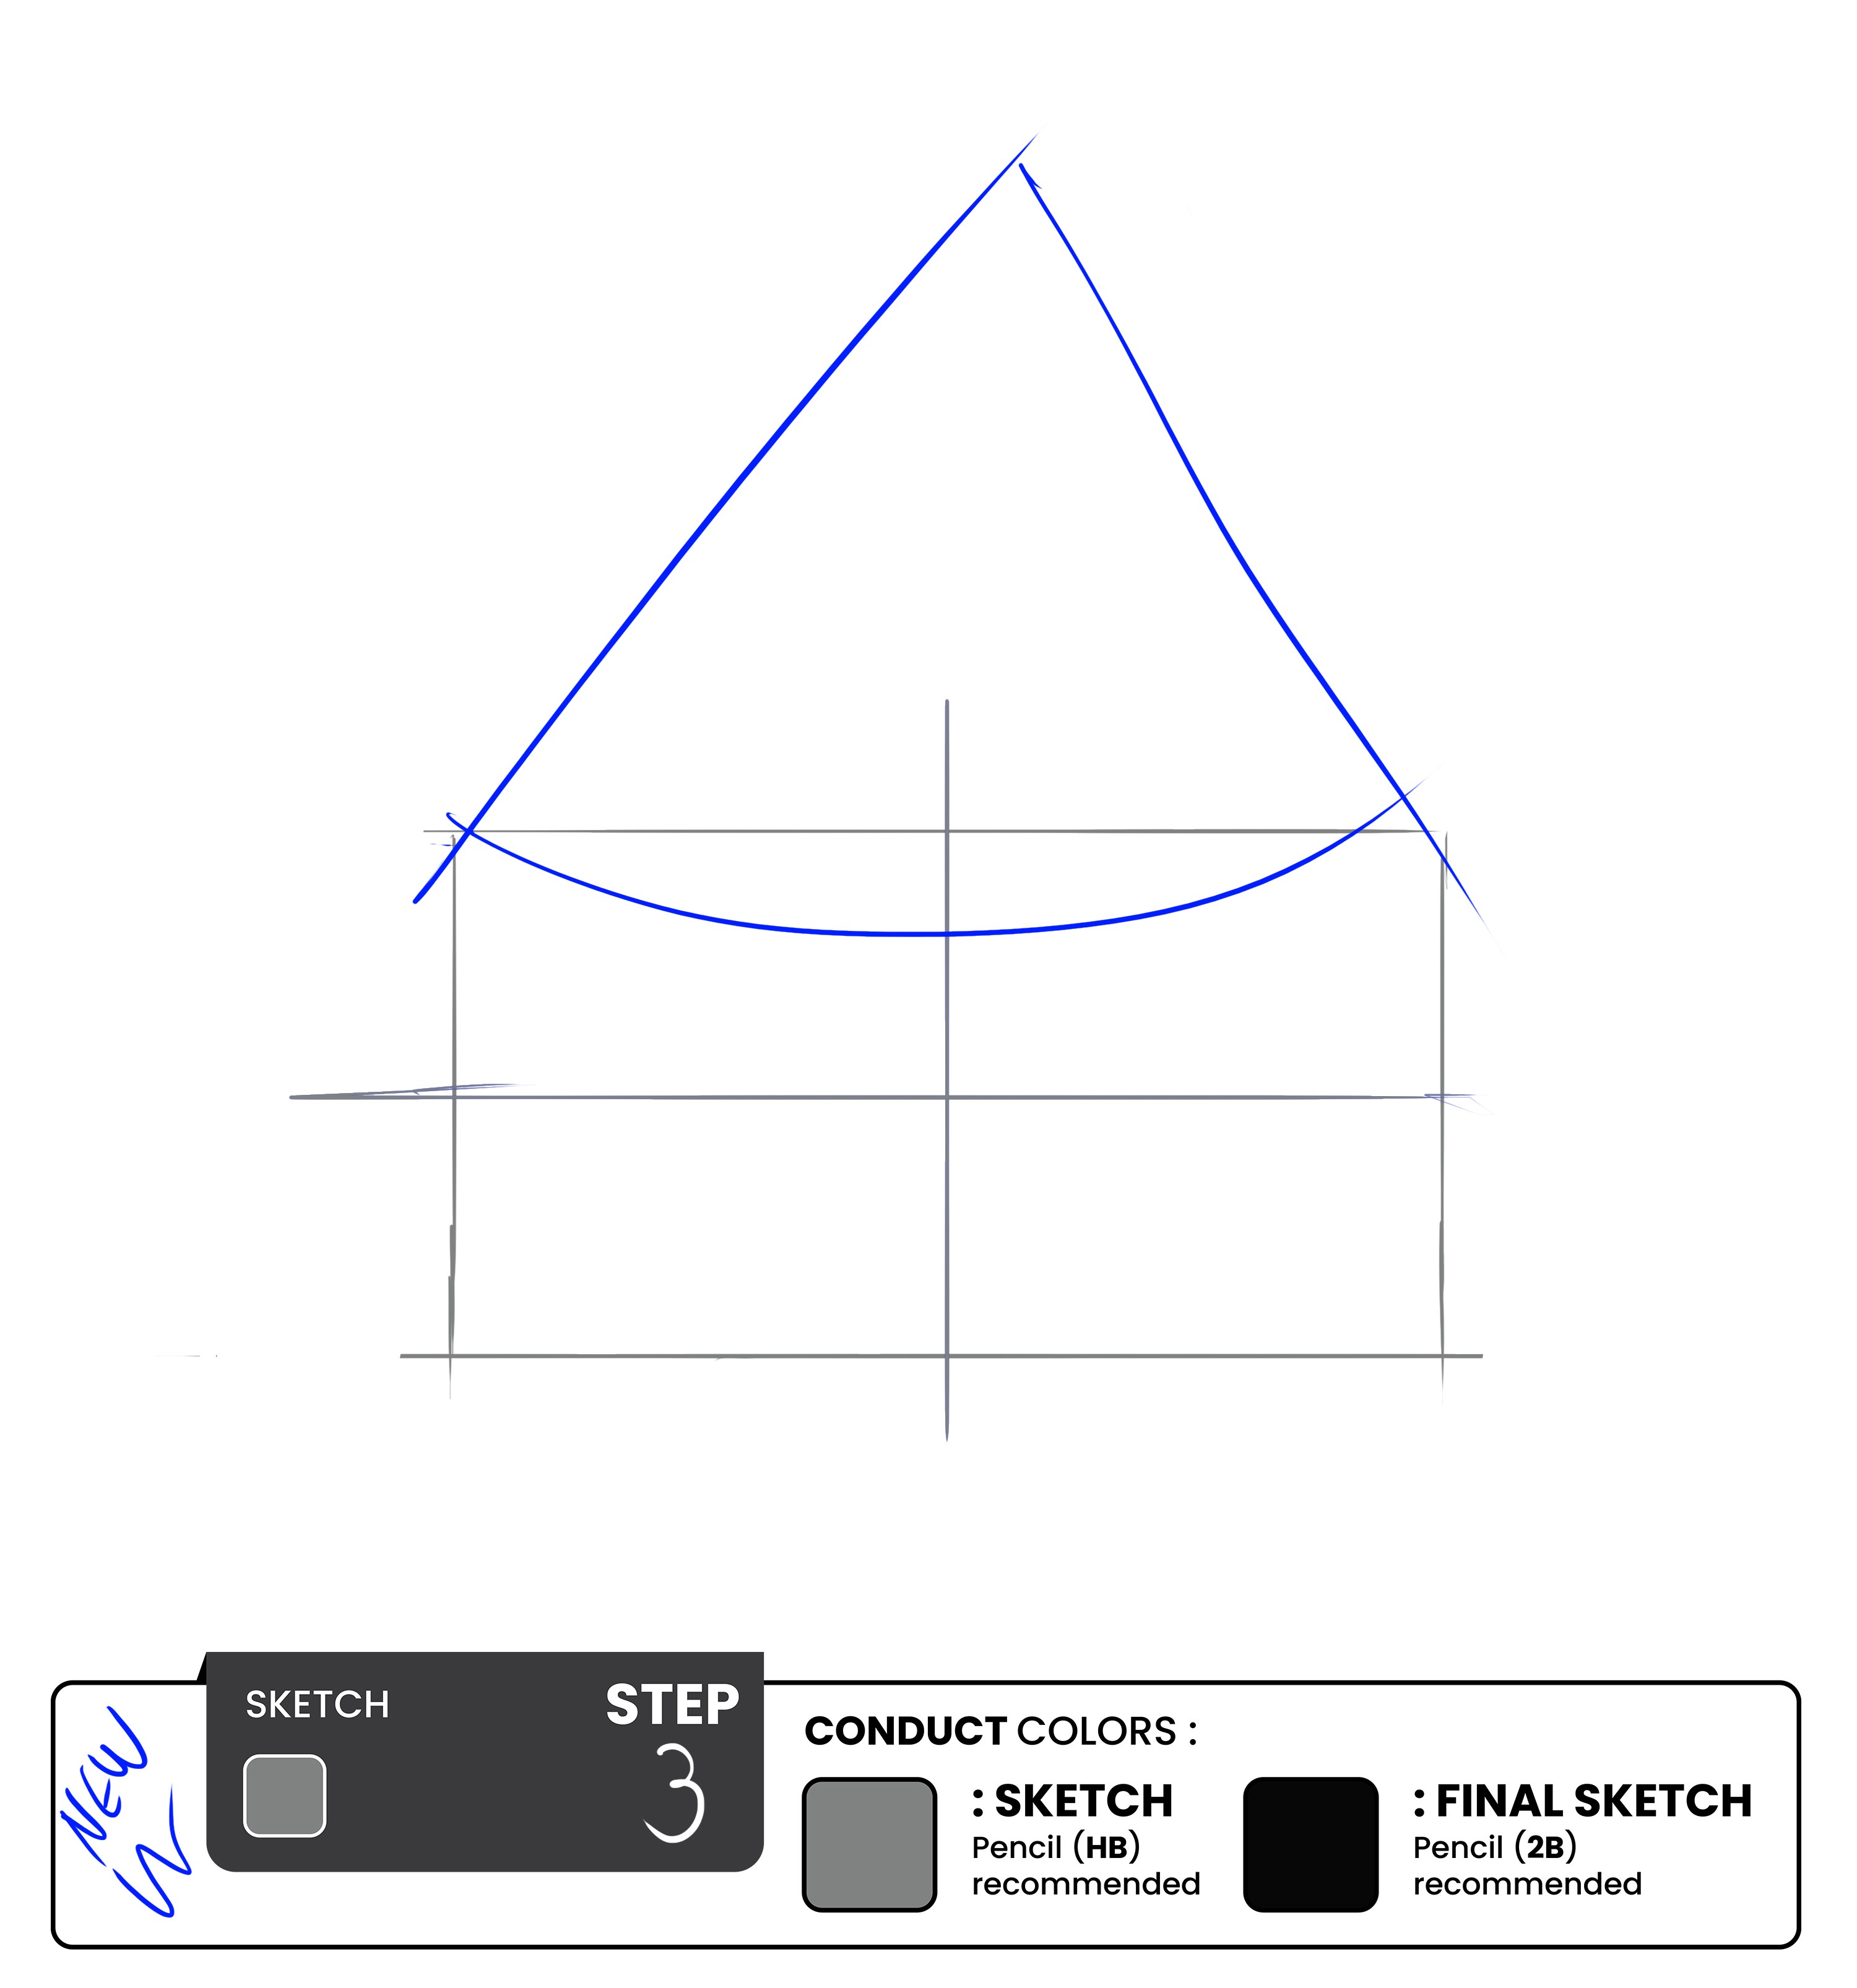
To draw the base of the hat, draw an arch. Start by visualizing the arch you want to draw in your mind. Consider the height and width of the arch and the curvature.
Next, lightly sketch the endpoints of the arch using the upper two sides of our rectangle. These dots will serve as your guide for the height and width of the arch. Make sure for the arch to not be too deep; it should cross the vertical line in the middle, not too below.
Starting at one of the dots, draw a curve that connects to the other dot. Keep your hand steady and your lines smooth. You can draw the curve continuously or in short, straight segments.
Once you have drawn the curve, draw two lines coming from the sides of the curve, meeting up in the middle. It should look like a house!
Step 4 - Draw the Eyes Outline
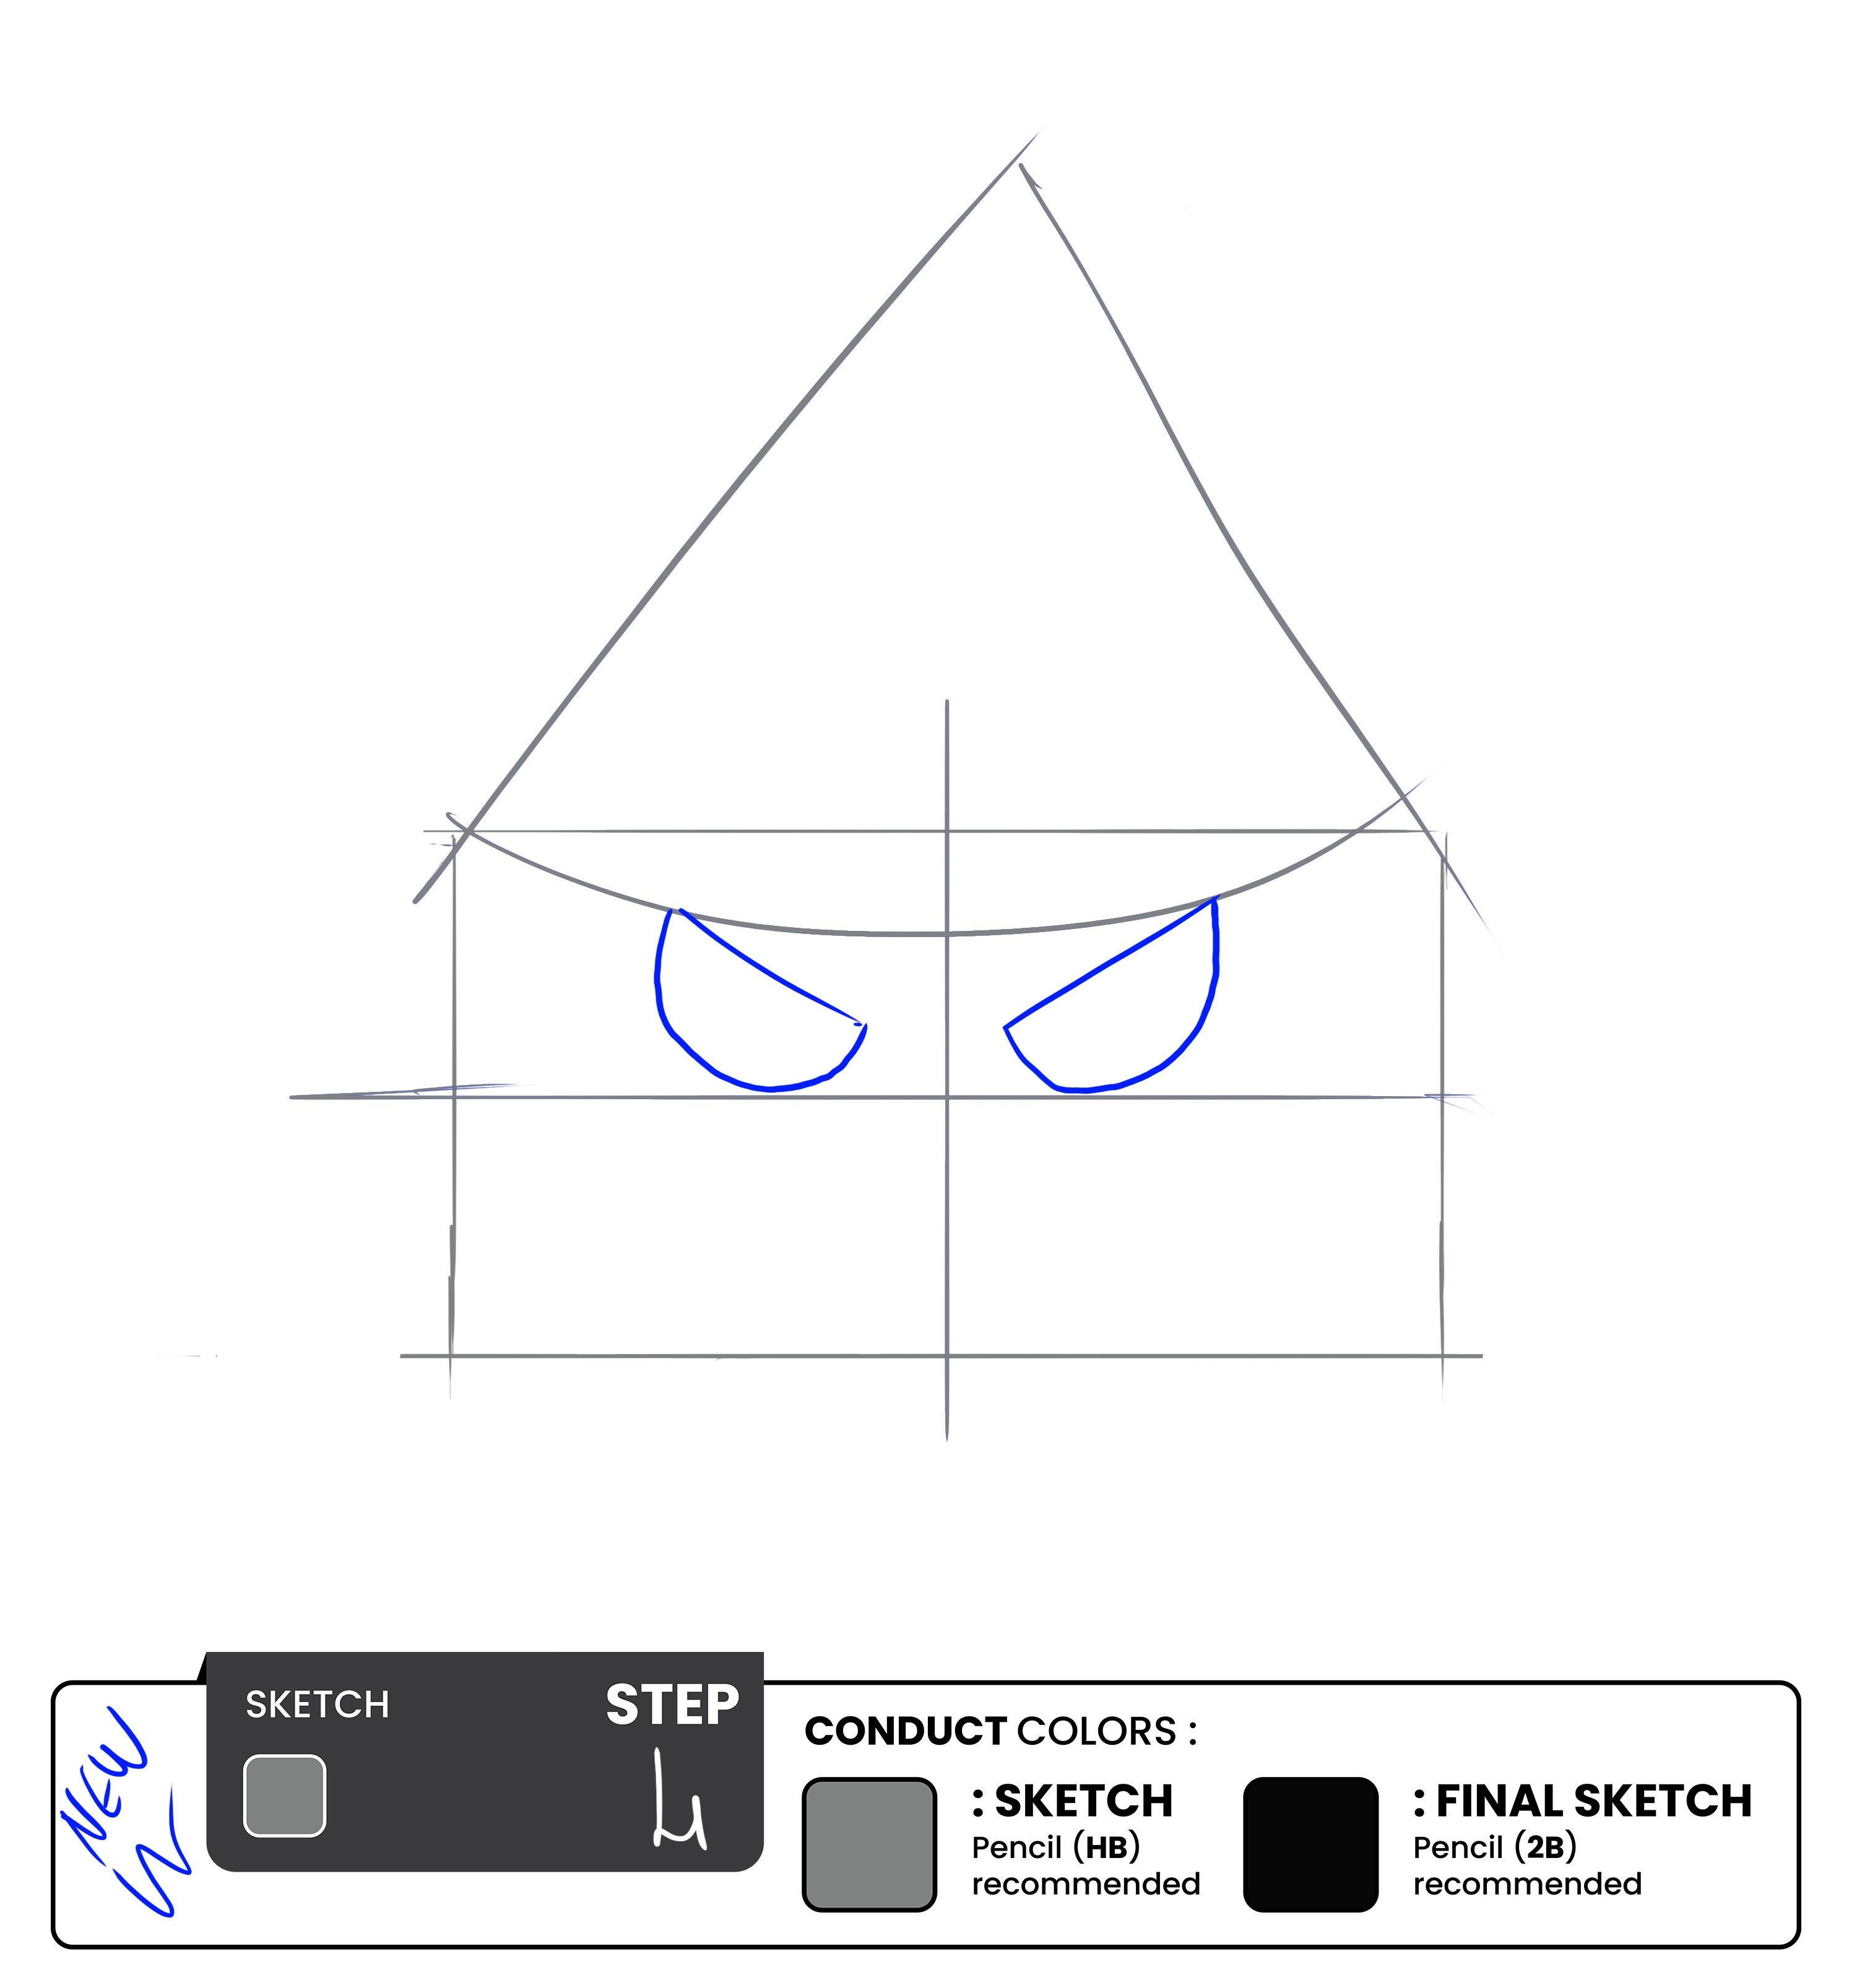
Now, the eyes’ placement is tricky. But we will help you, no worries.
Focusing on the horizontal line we have in the middle, that will be the place where the eyes will settle.
Now, using the vertical line to separate between the two, let’s start working on the left eye.
Draw a curve that has the shape of a banana without the stem. Make sure it reaches the initial arch you drew in Step 3. Now add some width to the piece by adding another curve at the top, connected to the first one on the bottom and on the arch side.
In other words, draw a bitten cookie; only the person who bit it had no teeth!
How fun is this?
Once that is done, mirror the drawing on the other side of the pumpkin’s face.
Step 5- Add The Smile.
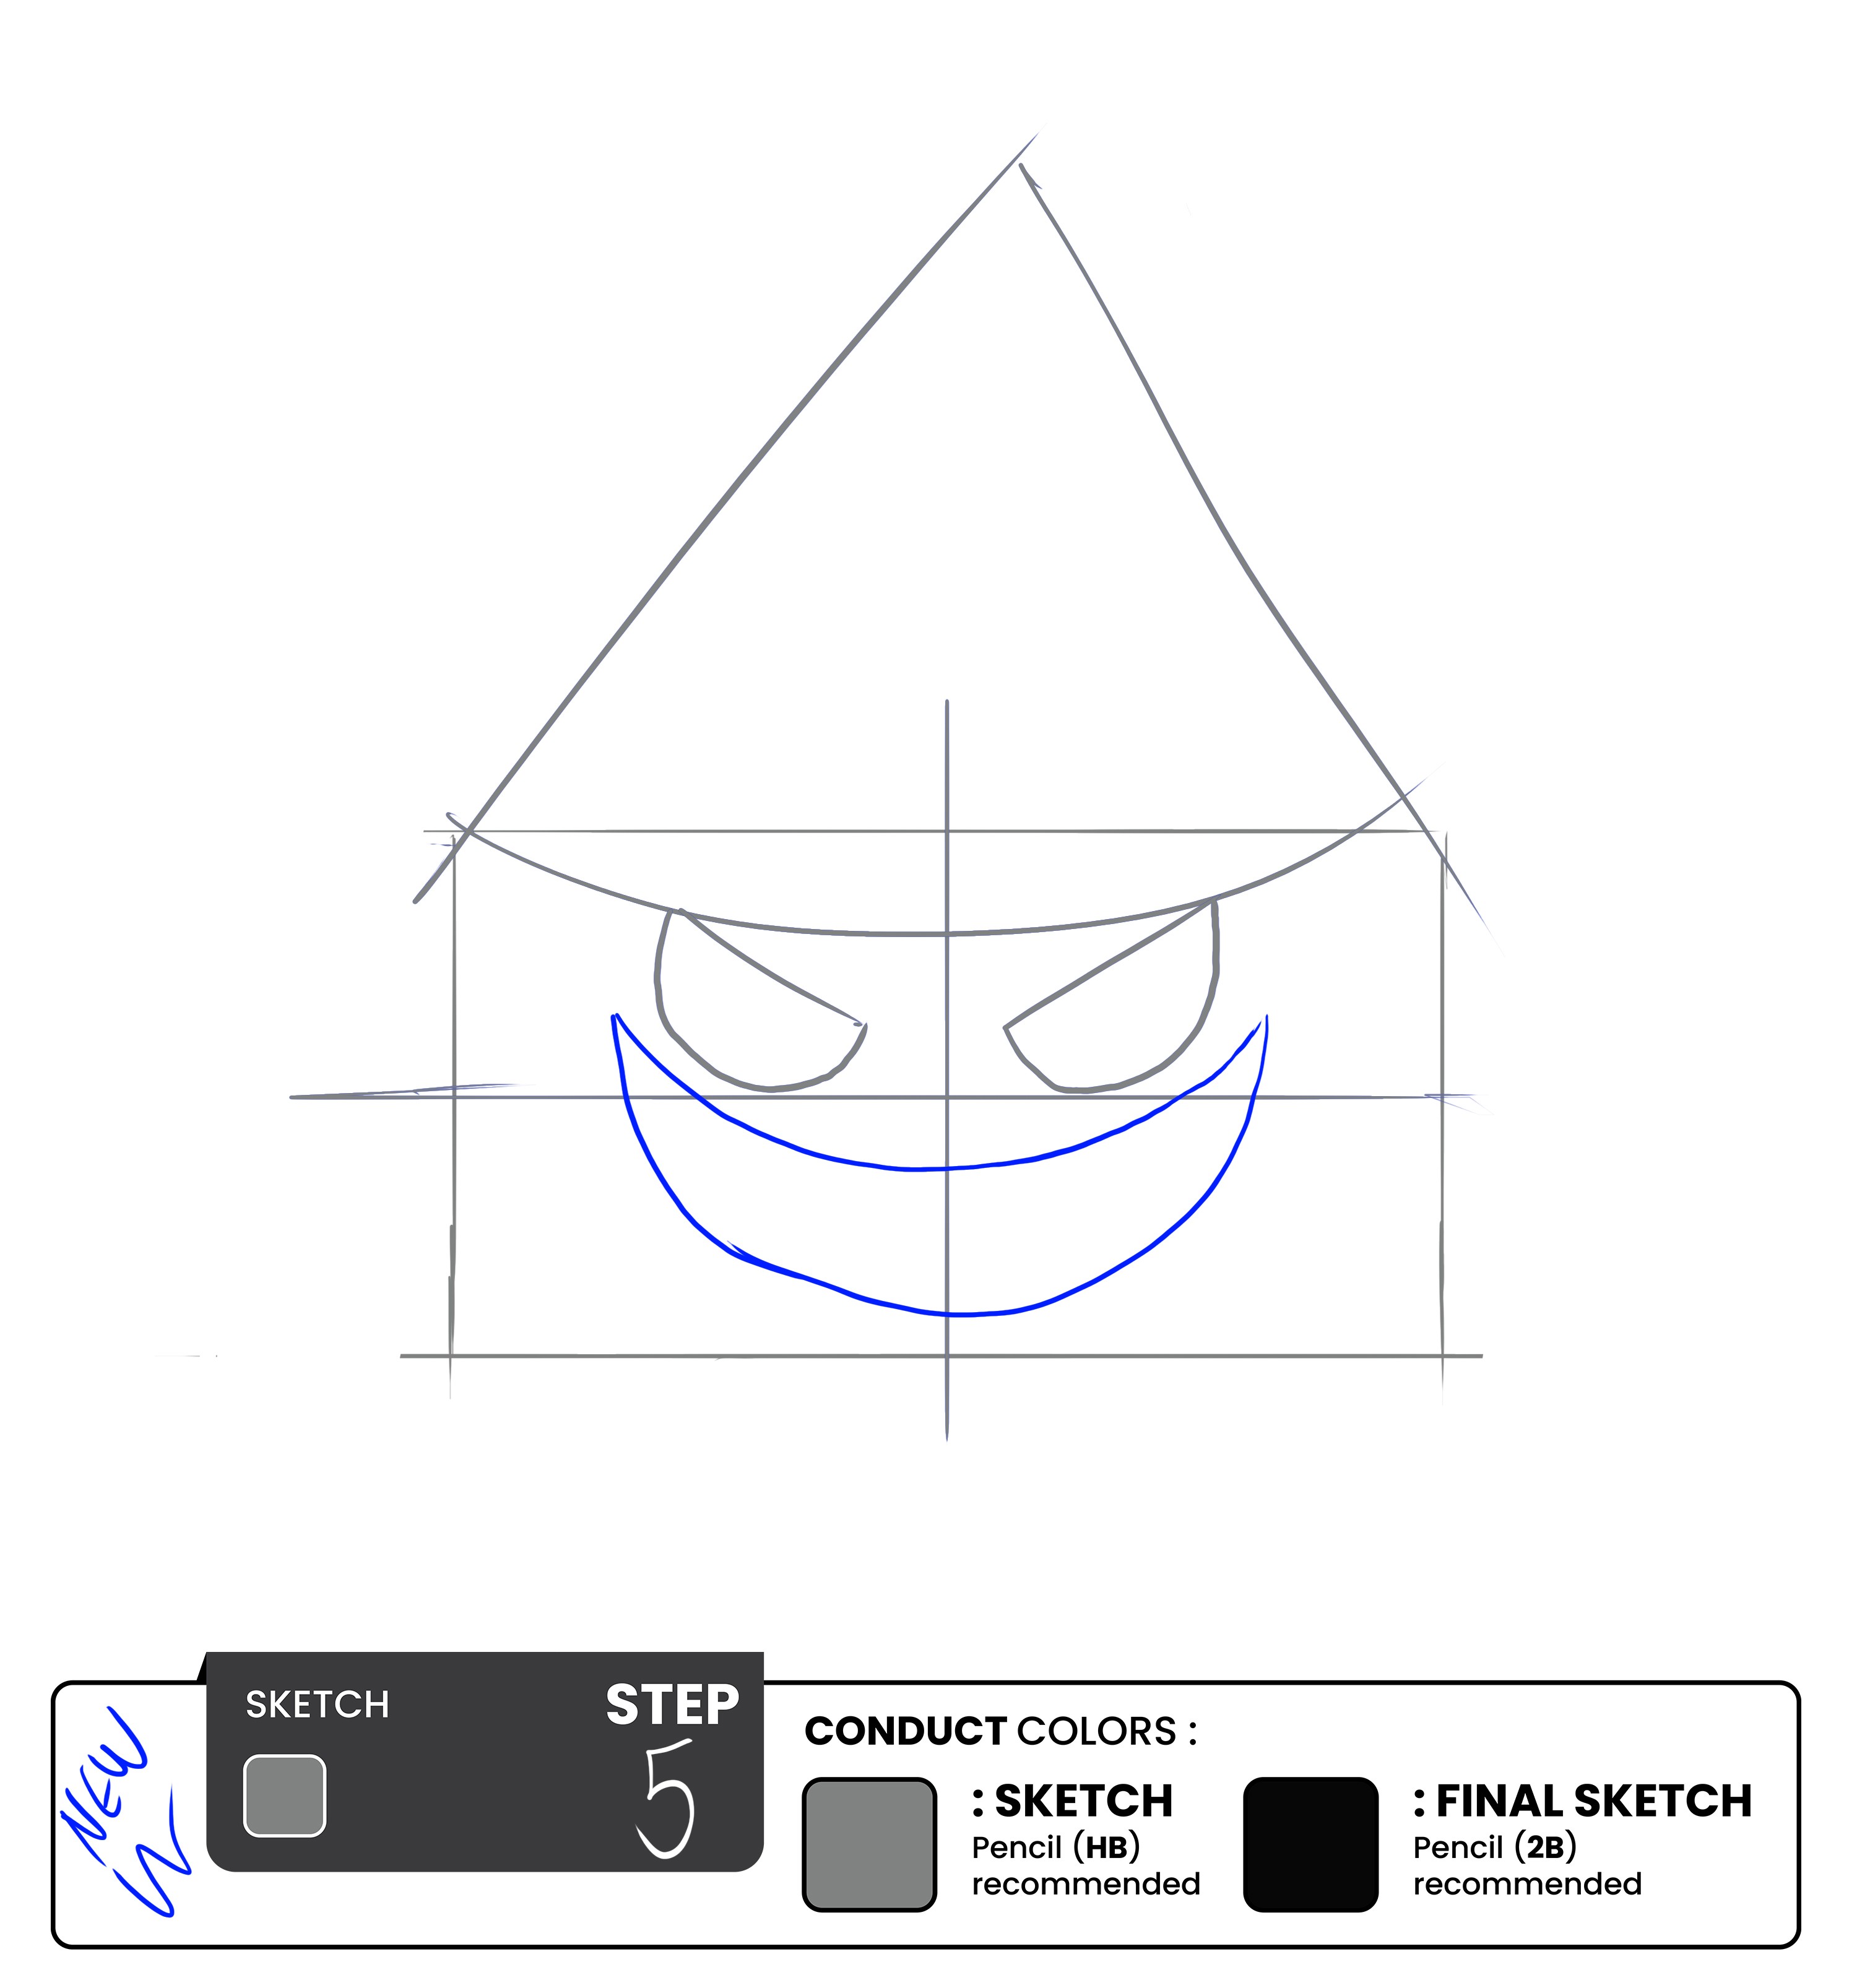
Although Halloween pumpkins have wicked, scary smiles, we will start by giving them a friendly smile and work our way to it.
Now, just below the eyes, draw two curved lines, one above the other. Make sure they meet on the upper sides to form a toothless smile.
Step 6 - Draw the Hat
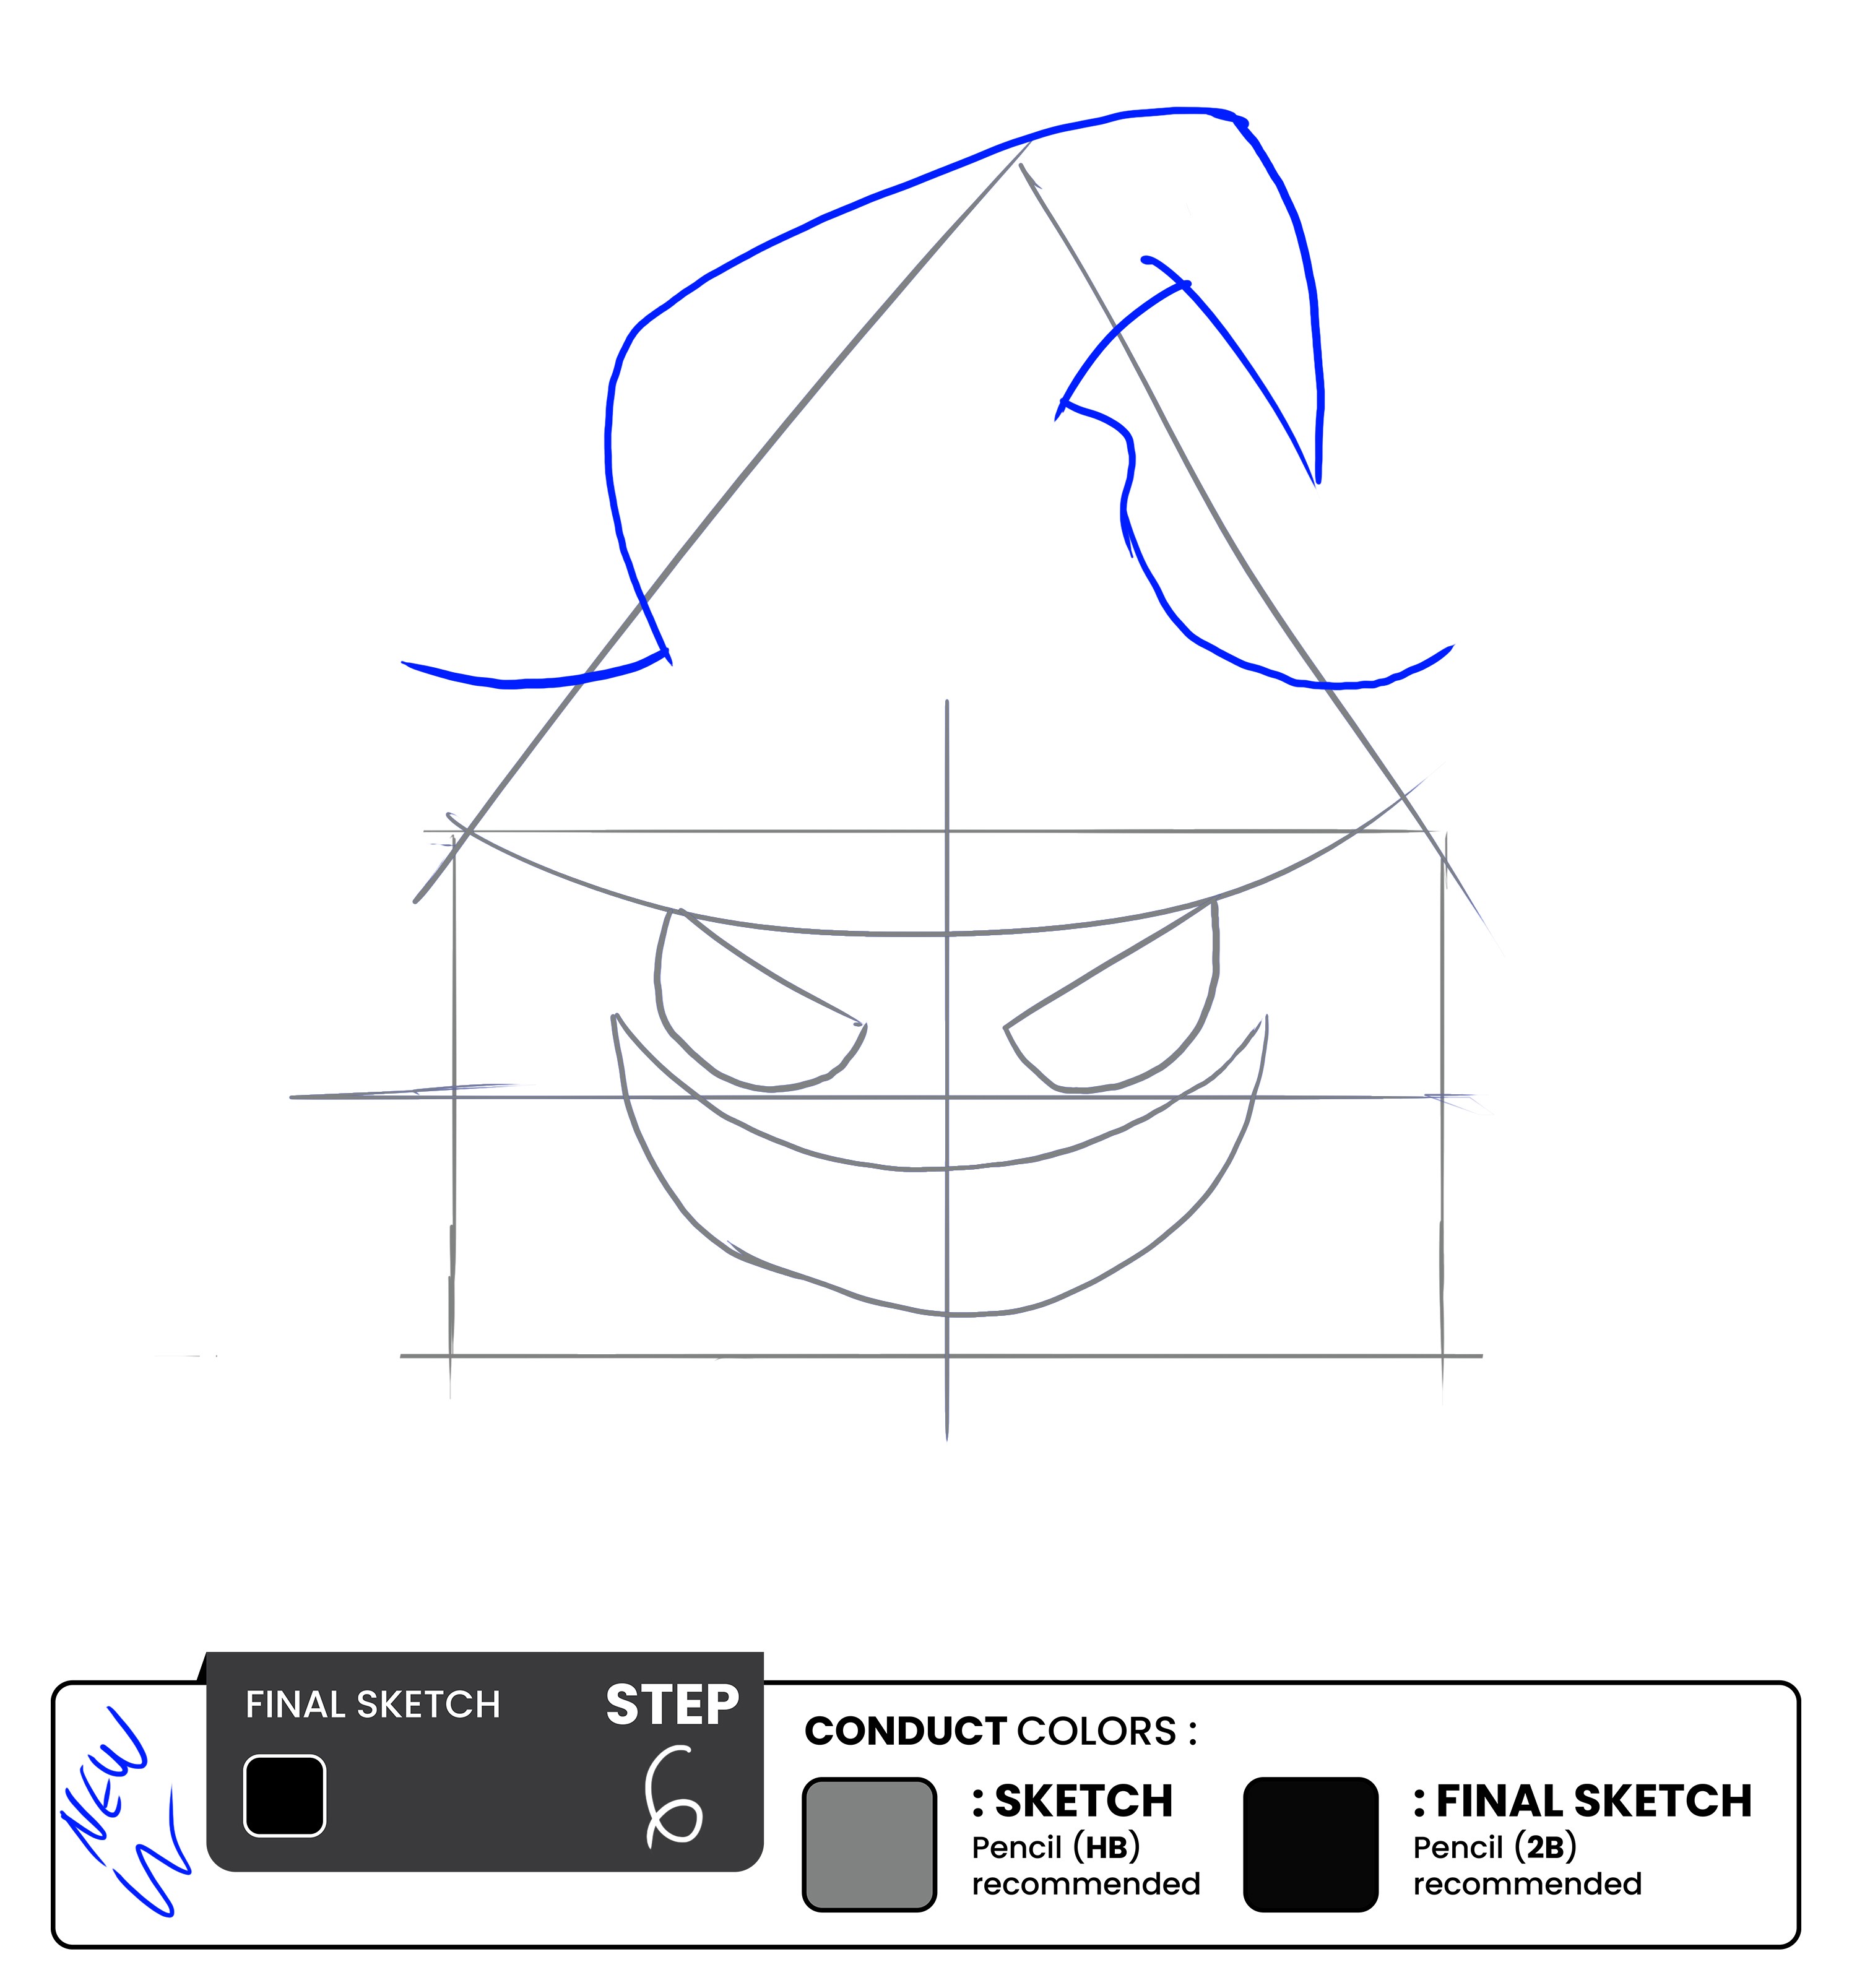
Using the upper triangle, we drew on step 3 as your guideline and draw another arch with the same starting point. This arch must be smaller and extend into a straight line. Both these elements will combine to form one side of the hat.
As for the tip of the pumpkin hat, draw information pointing downwards. It is a combination of two arches.
The first arch is vertical. The second arch should mirror the first and meet it at the tip. Another stroke comes out of the first arch’s base connecting it to the bottom of the hat.
Once you are done with the tip of the hat, it is time to draw the other side and complete the hat's shape.
Step 7 - Add a Belt
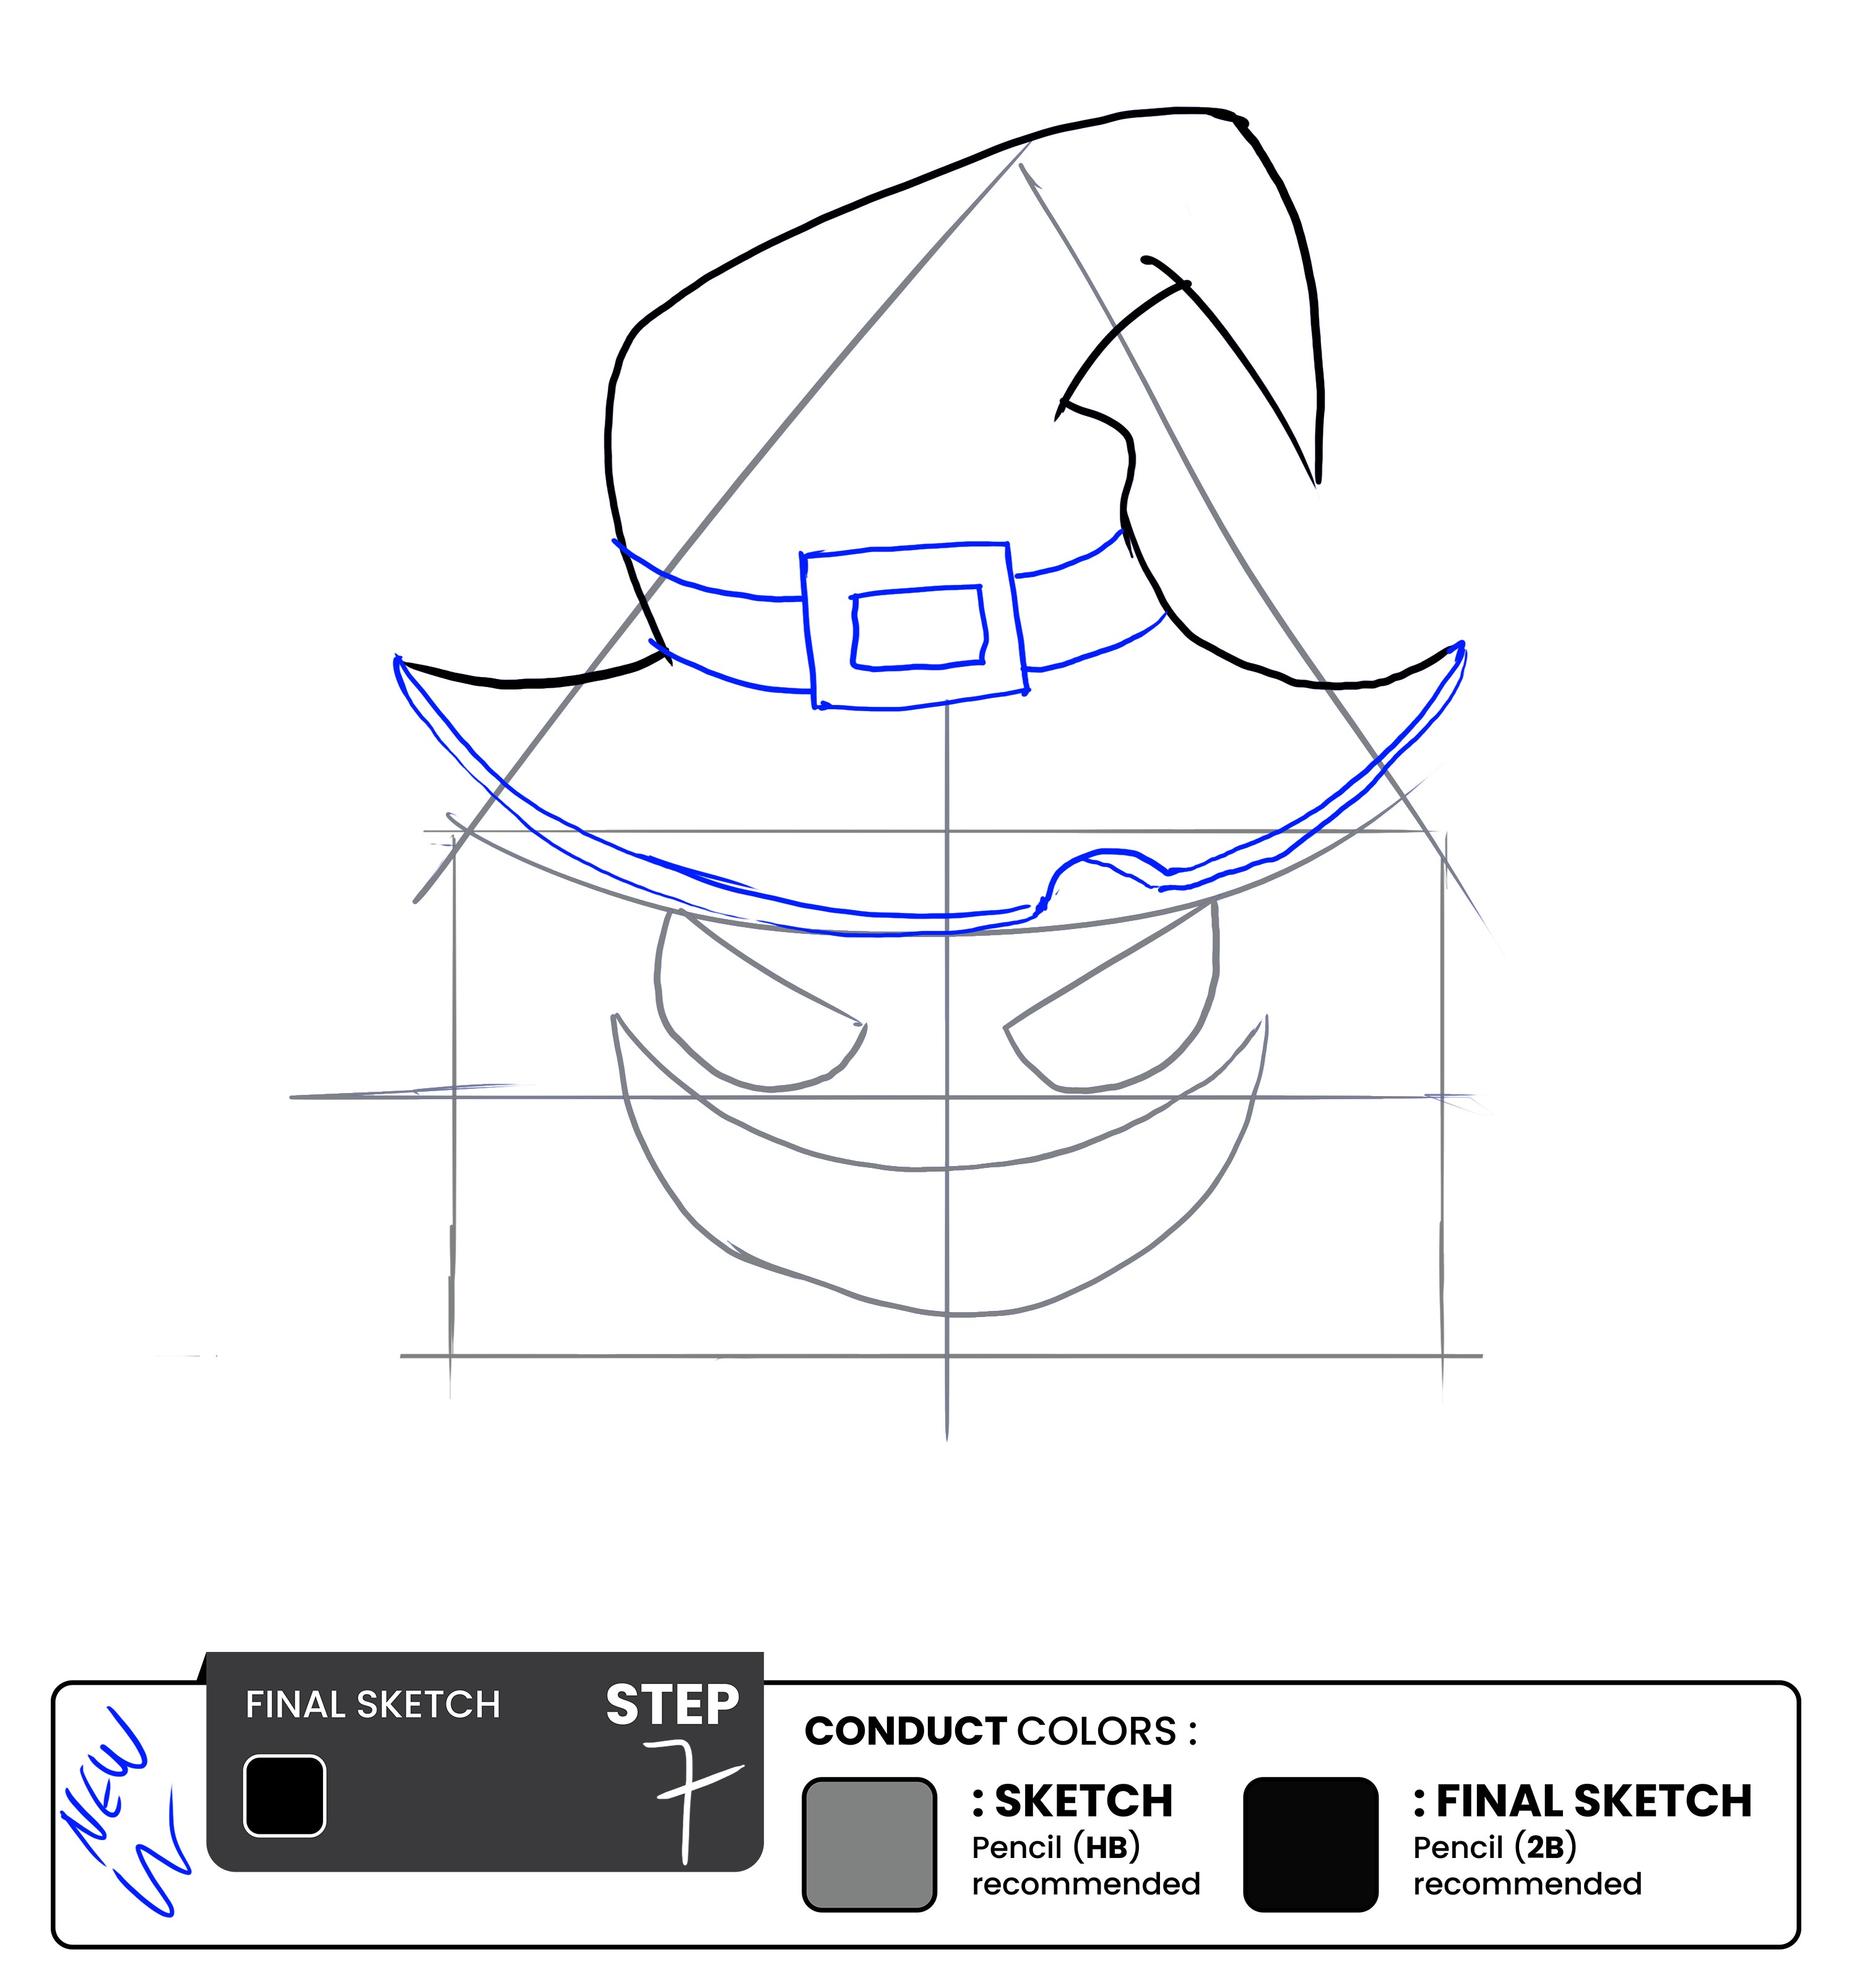
Now that you are done with the basic shape of the hat, it’s time to add a belt to it. Draw two parallel lines for the belt. Add a rectangle in the center and double-line it to create a buckle.
As for the famous cut-out in most Halloween hats, draw a semicircle. Decide the depth of the hat through two small lines you want to give to the sides of the base arch of the hat.
Double-line the base of the hat to give the illusion of depth in the drawing. Ensure you add depth to the cut-out you drew in the last step.
Step 8 - Draw the Pumpkin’s Face
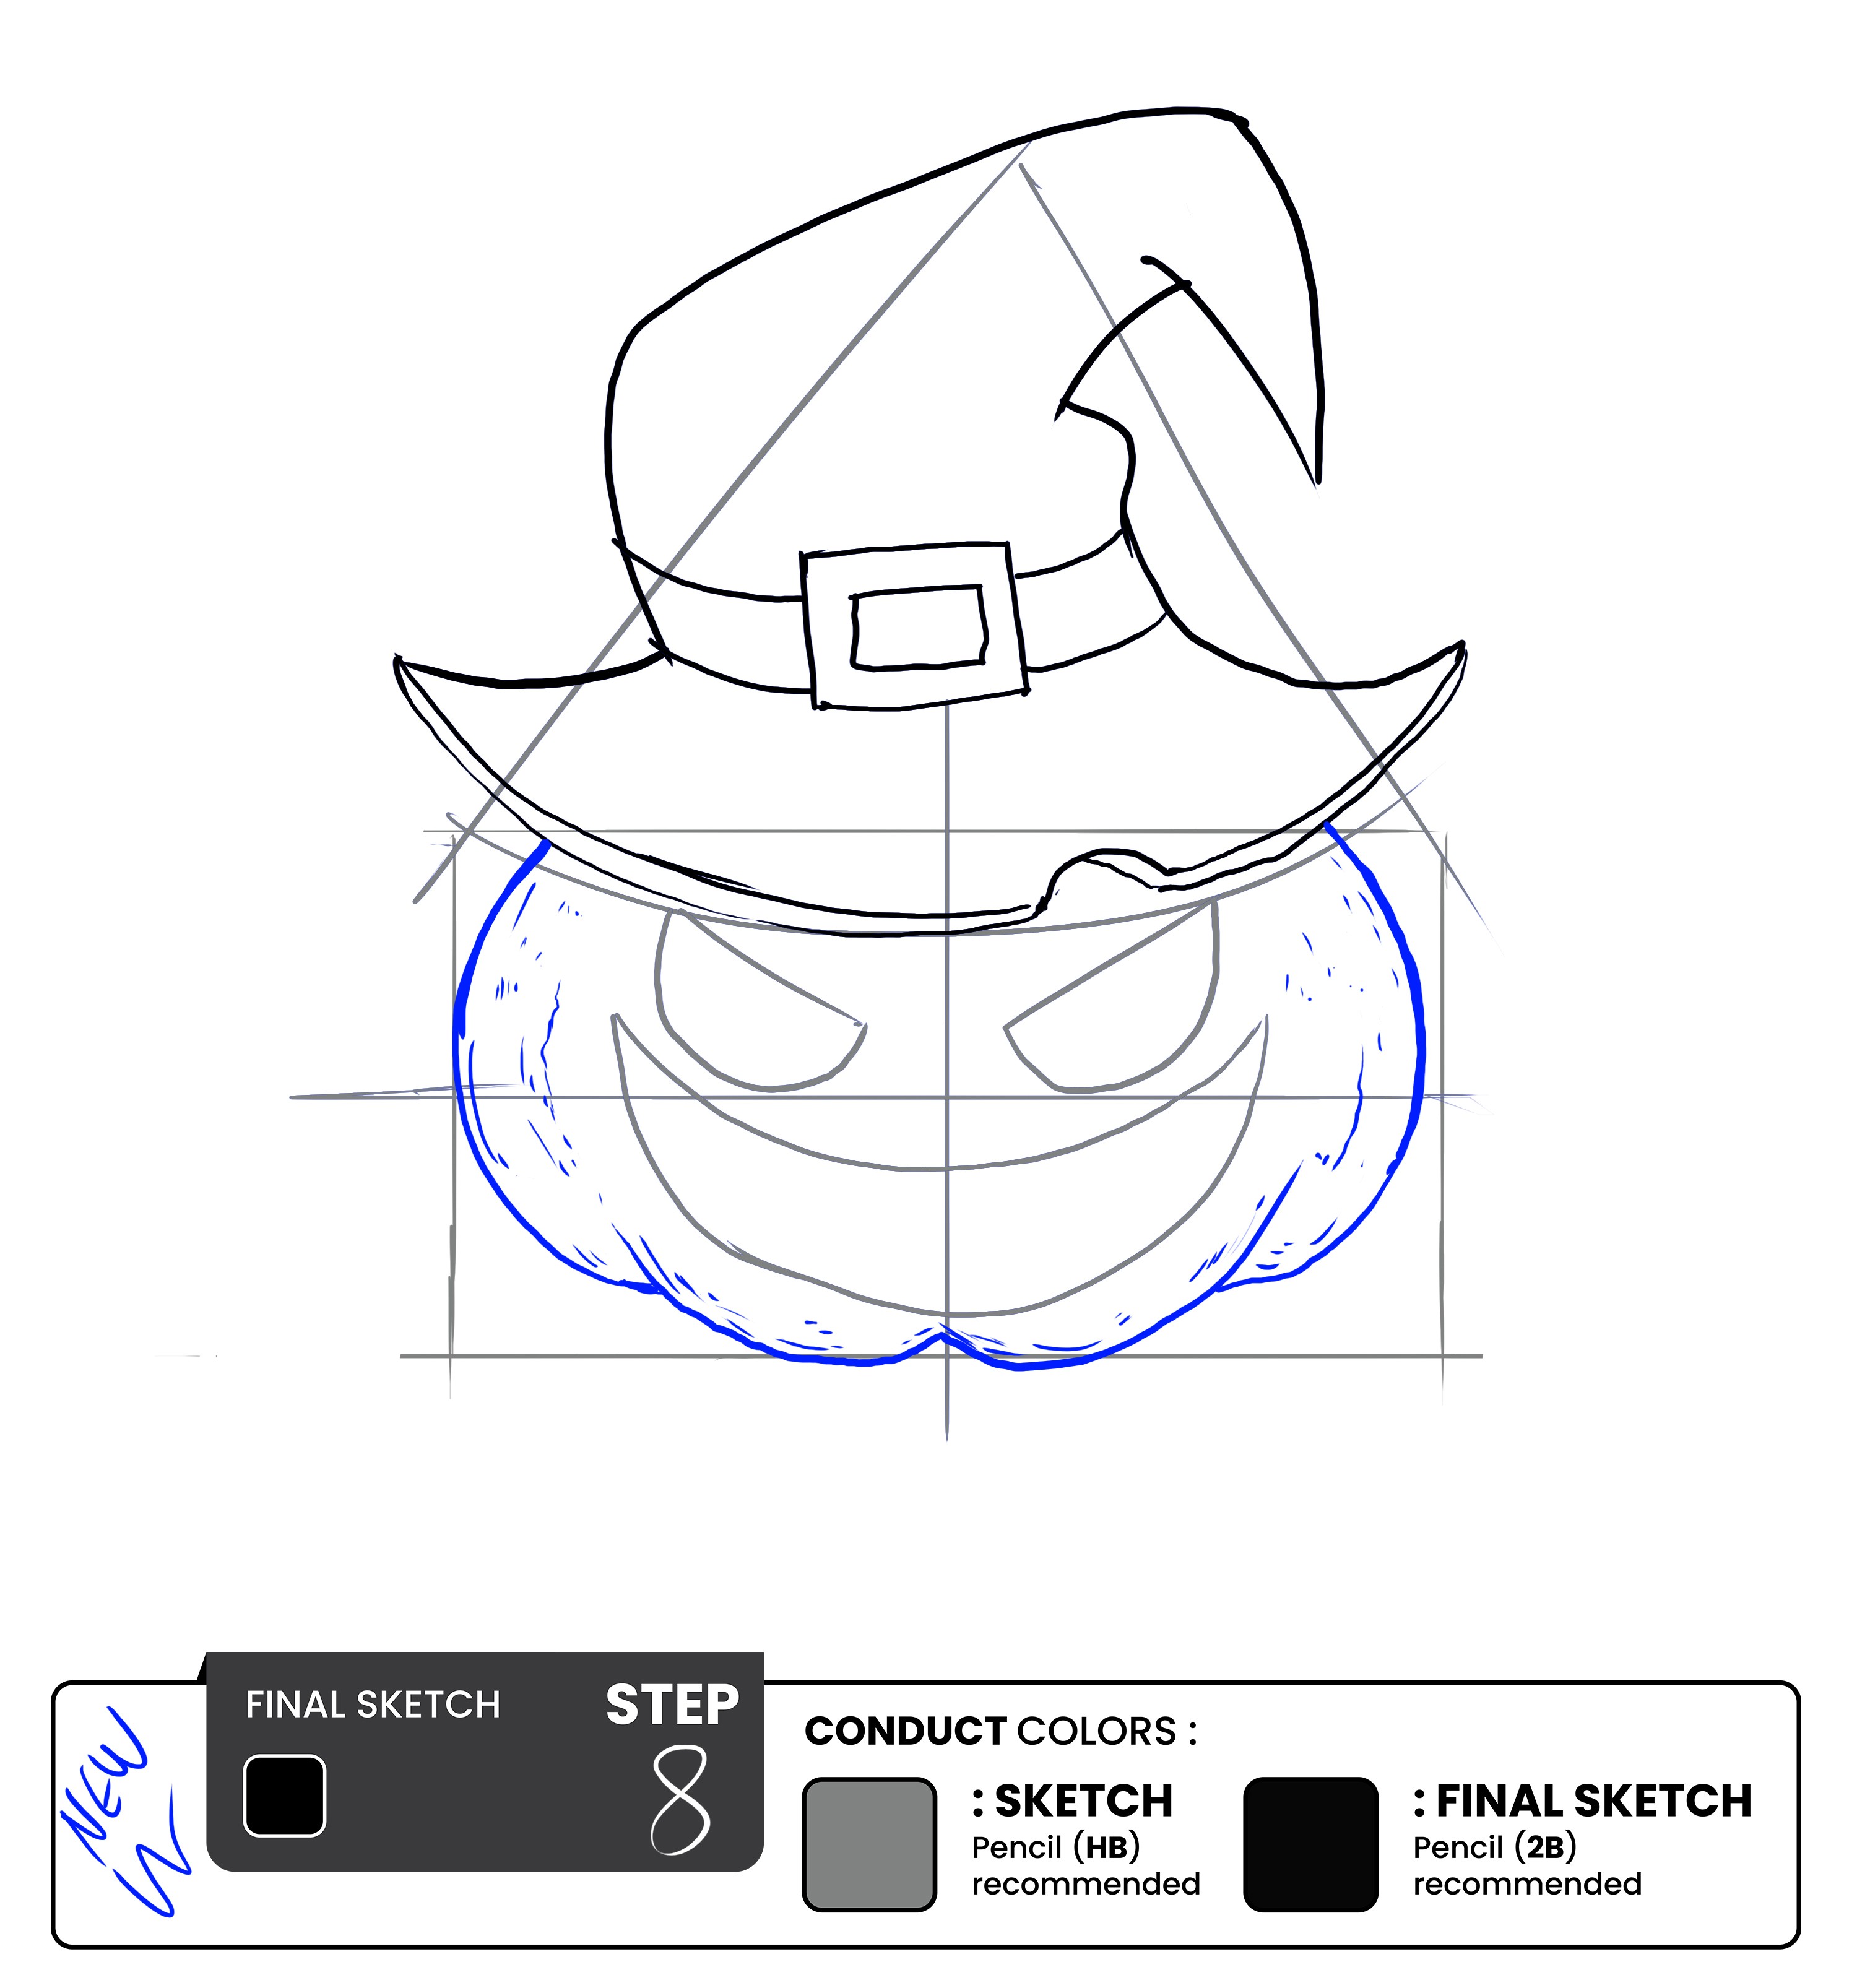
Sketch the basic shape of the pumpkin. Draw an oval shape around the facial features, and then add a slightly curved line at the bottom to create the base of the pumpkin.
Draw curved lines across the pumpkin's surface to create the ridges and bumps typical of a real pumpkin. Ensure the lines are uneven and irregular to give your pumpkin a more realistic look.
Add some shading to the cheeks to give the face more definition.
Step 9 - Remove the Sketch
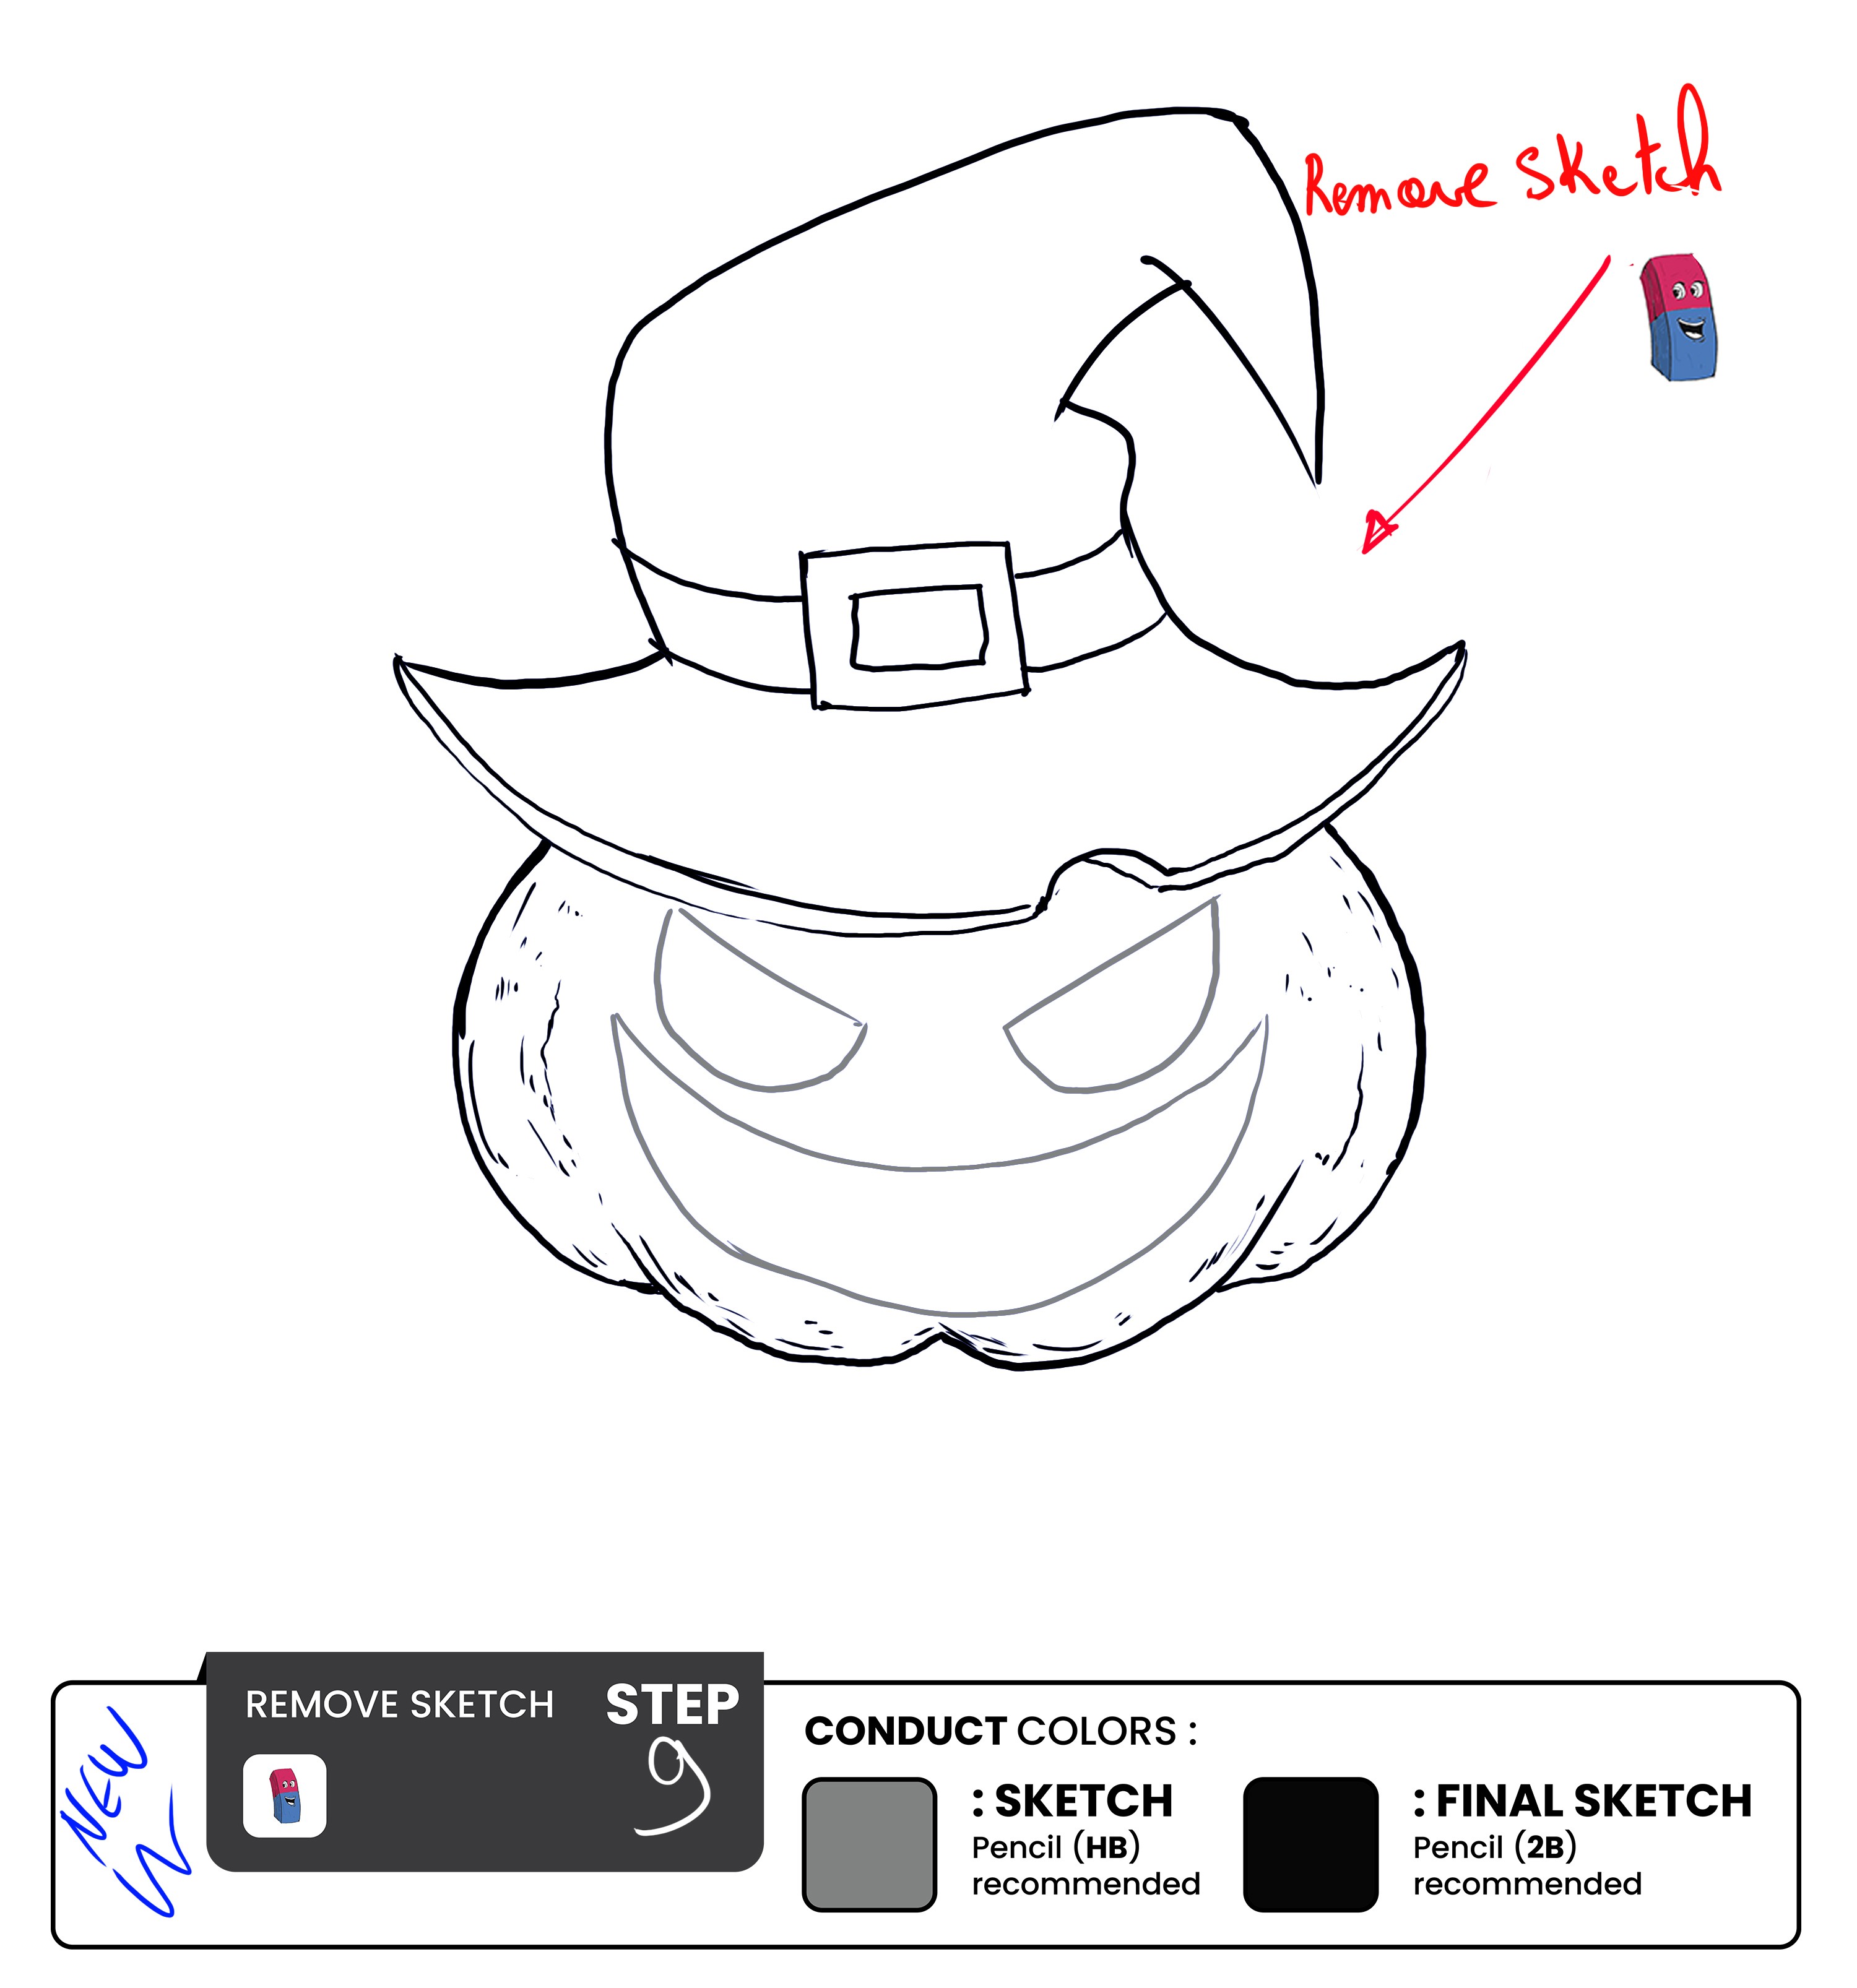
Now that we have drawn the outside details of the pumpkin take an eraser and gently remove the sketch lines. Do not remove the facial sketch just yet!
Step 10– Work the Eyes Details
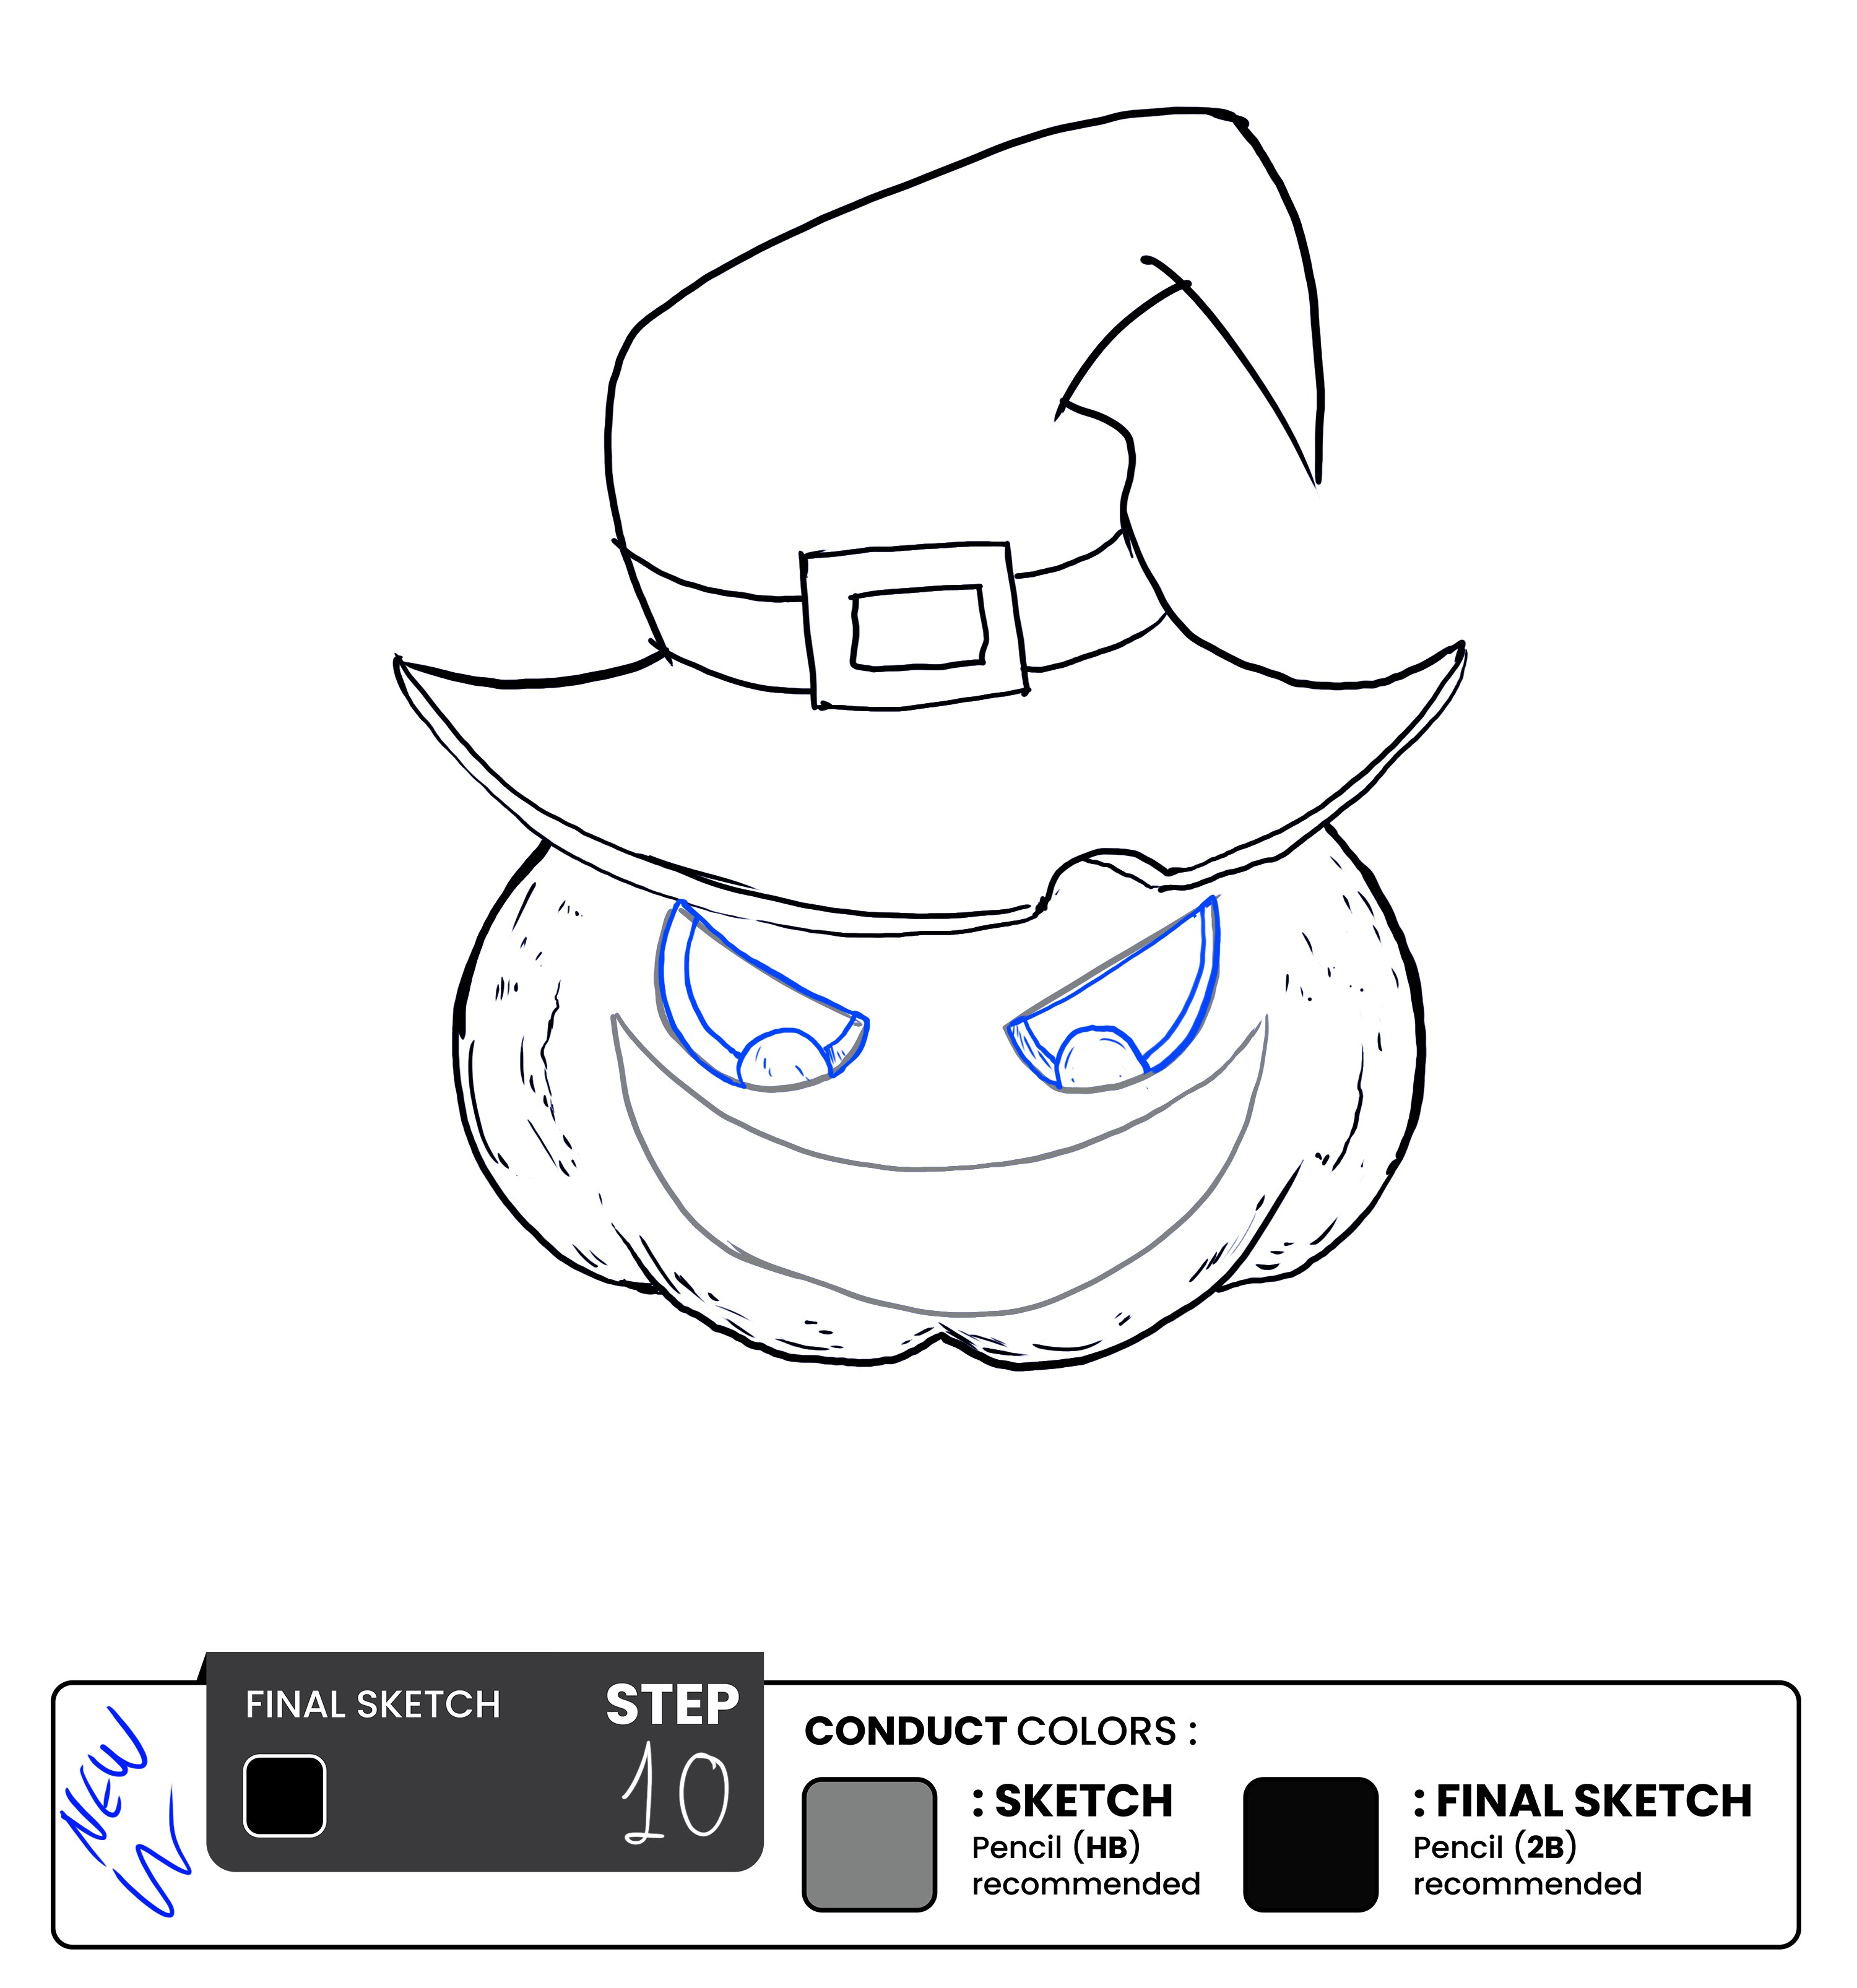
Halloween pumpkin eyes are known for their fierce look. Scary, one might even say. Let’s give it that.
In step 4, we have already drawn the sketch line to the eyes; now let’s give it more definition. First, outline the sketch using a black pen, then draw semicircles at their base. Finally, Double-line the eyes to give them depth and some detail. You just have to double-line the bigger circles.
Steps 11 & 12 - Draw the Evil Smile & Remove the Sketch
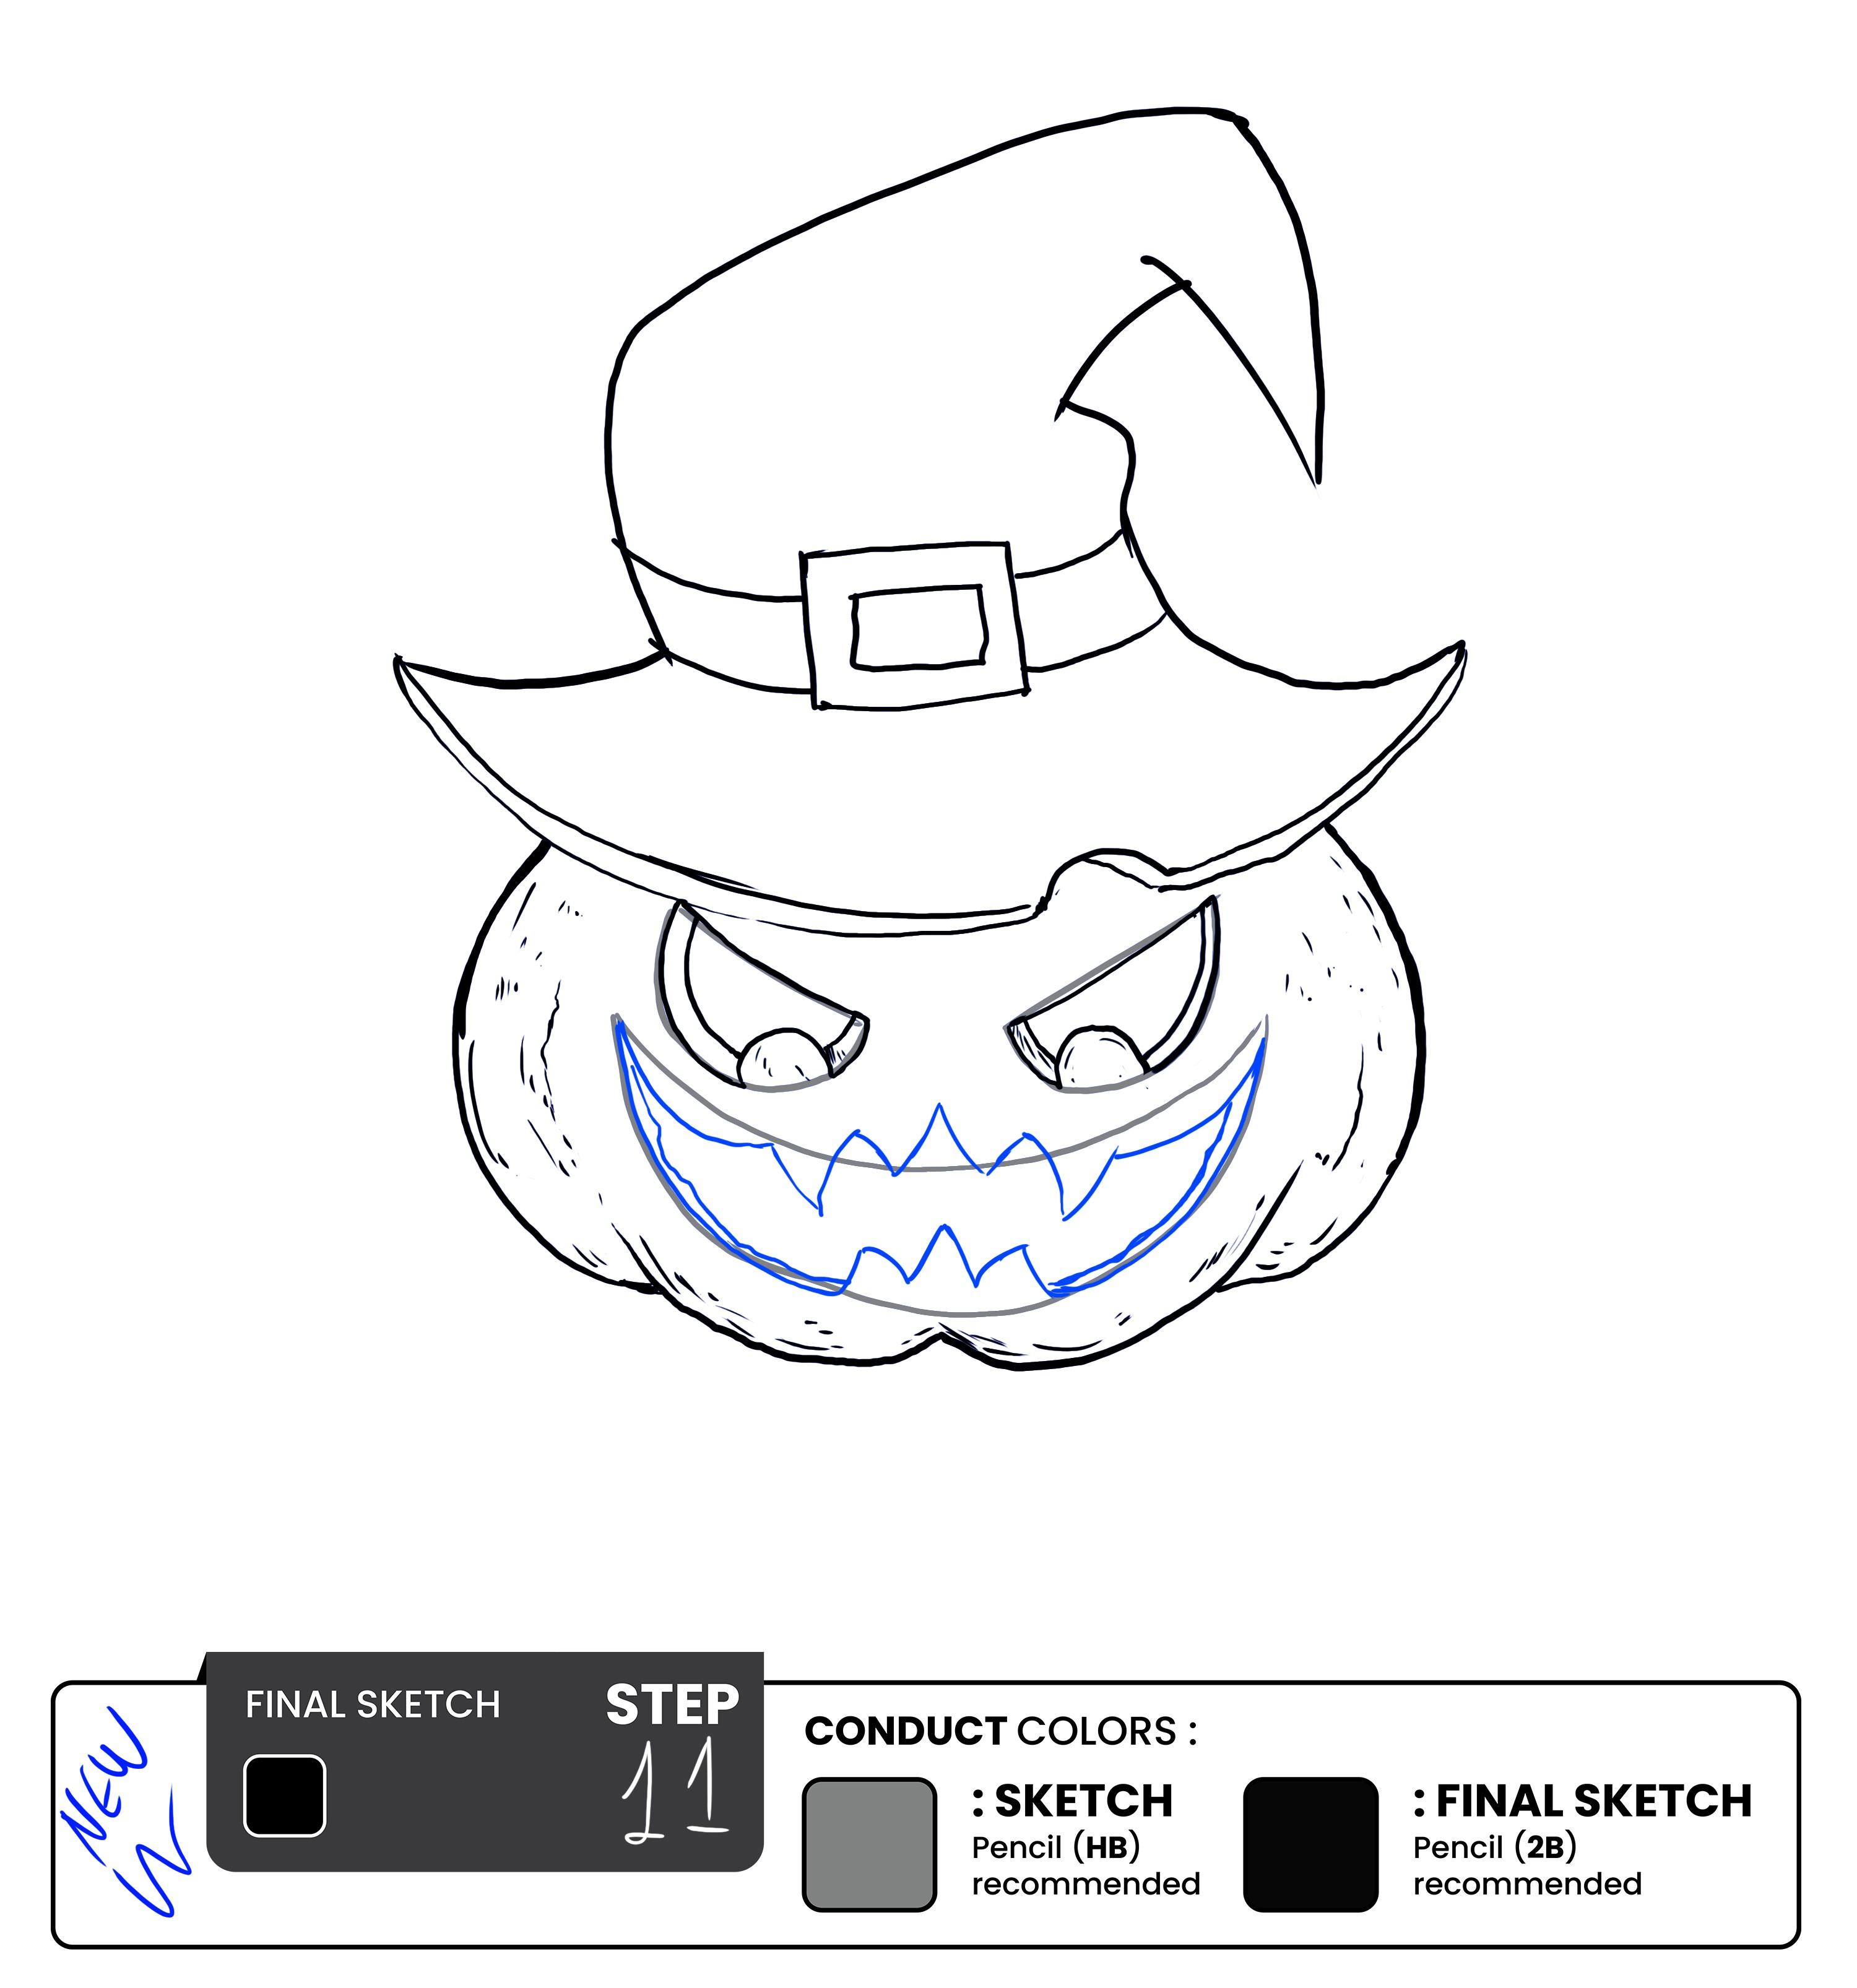
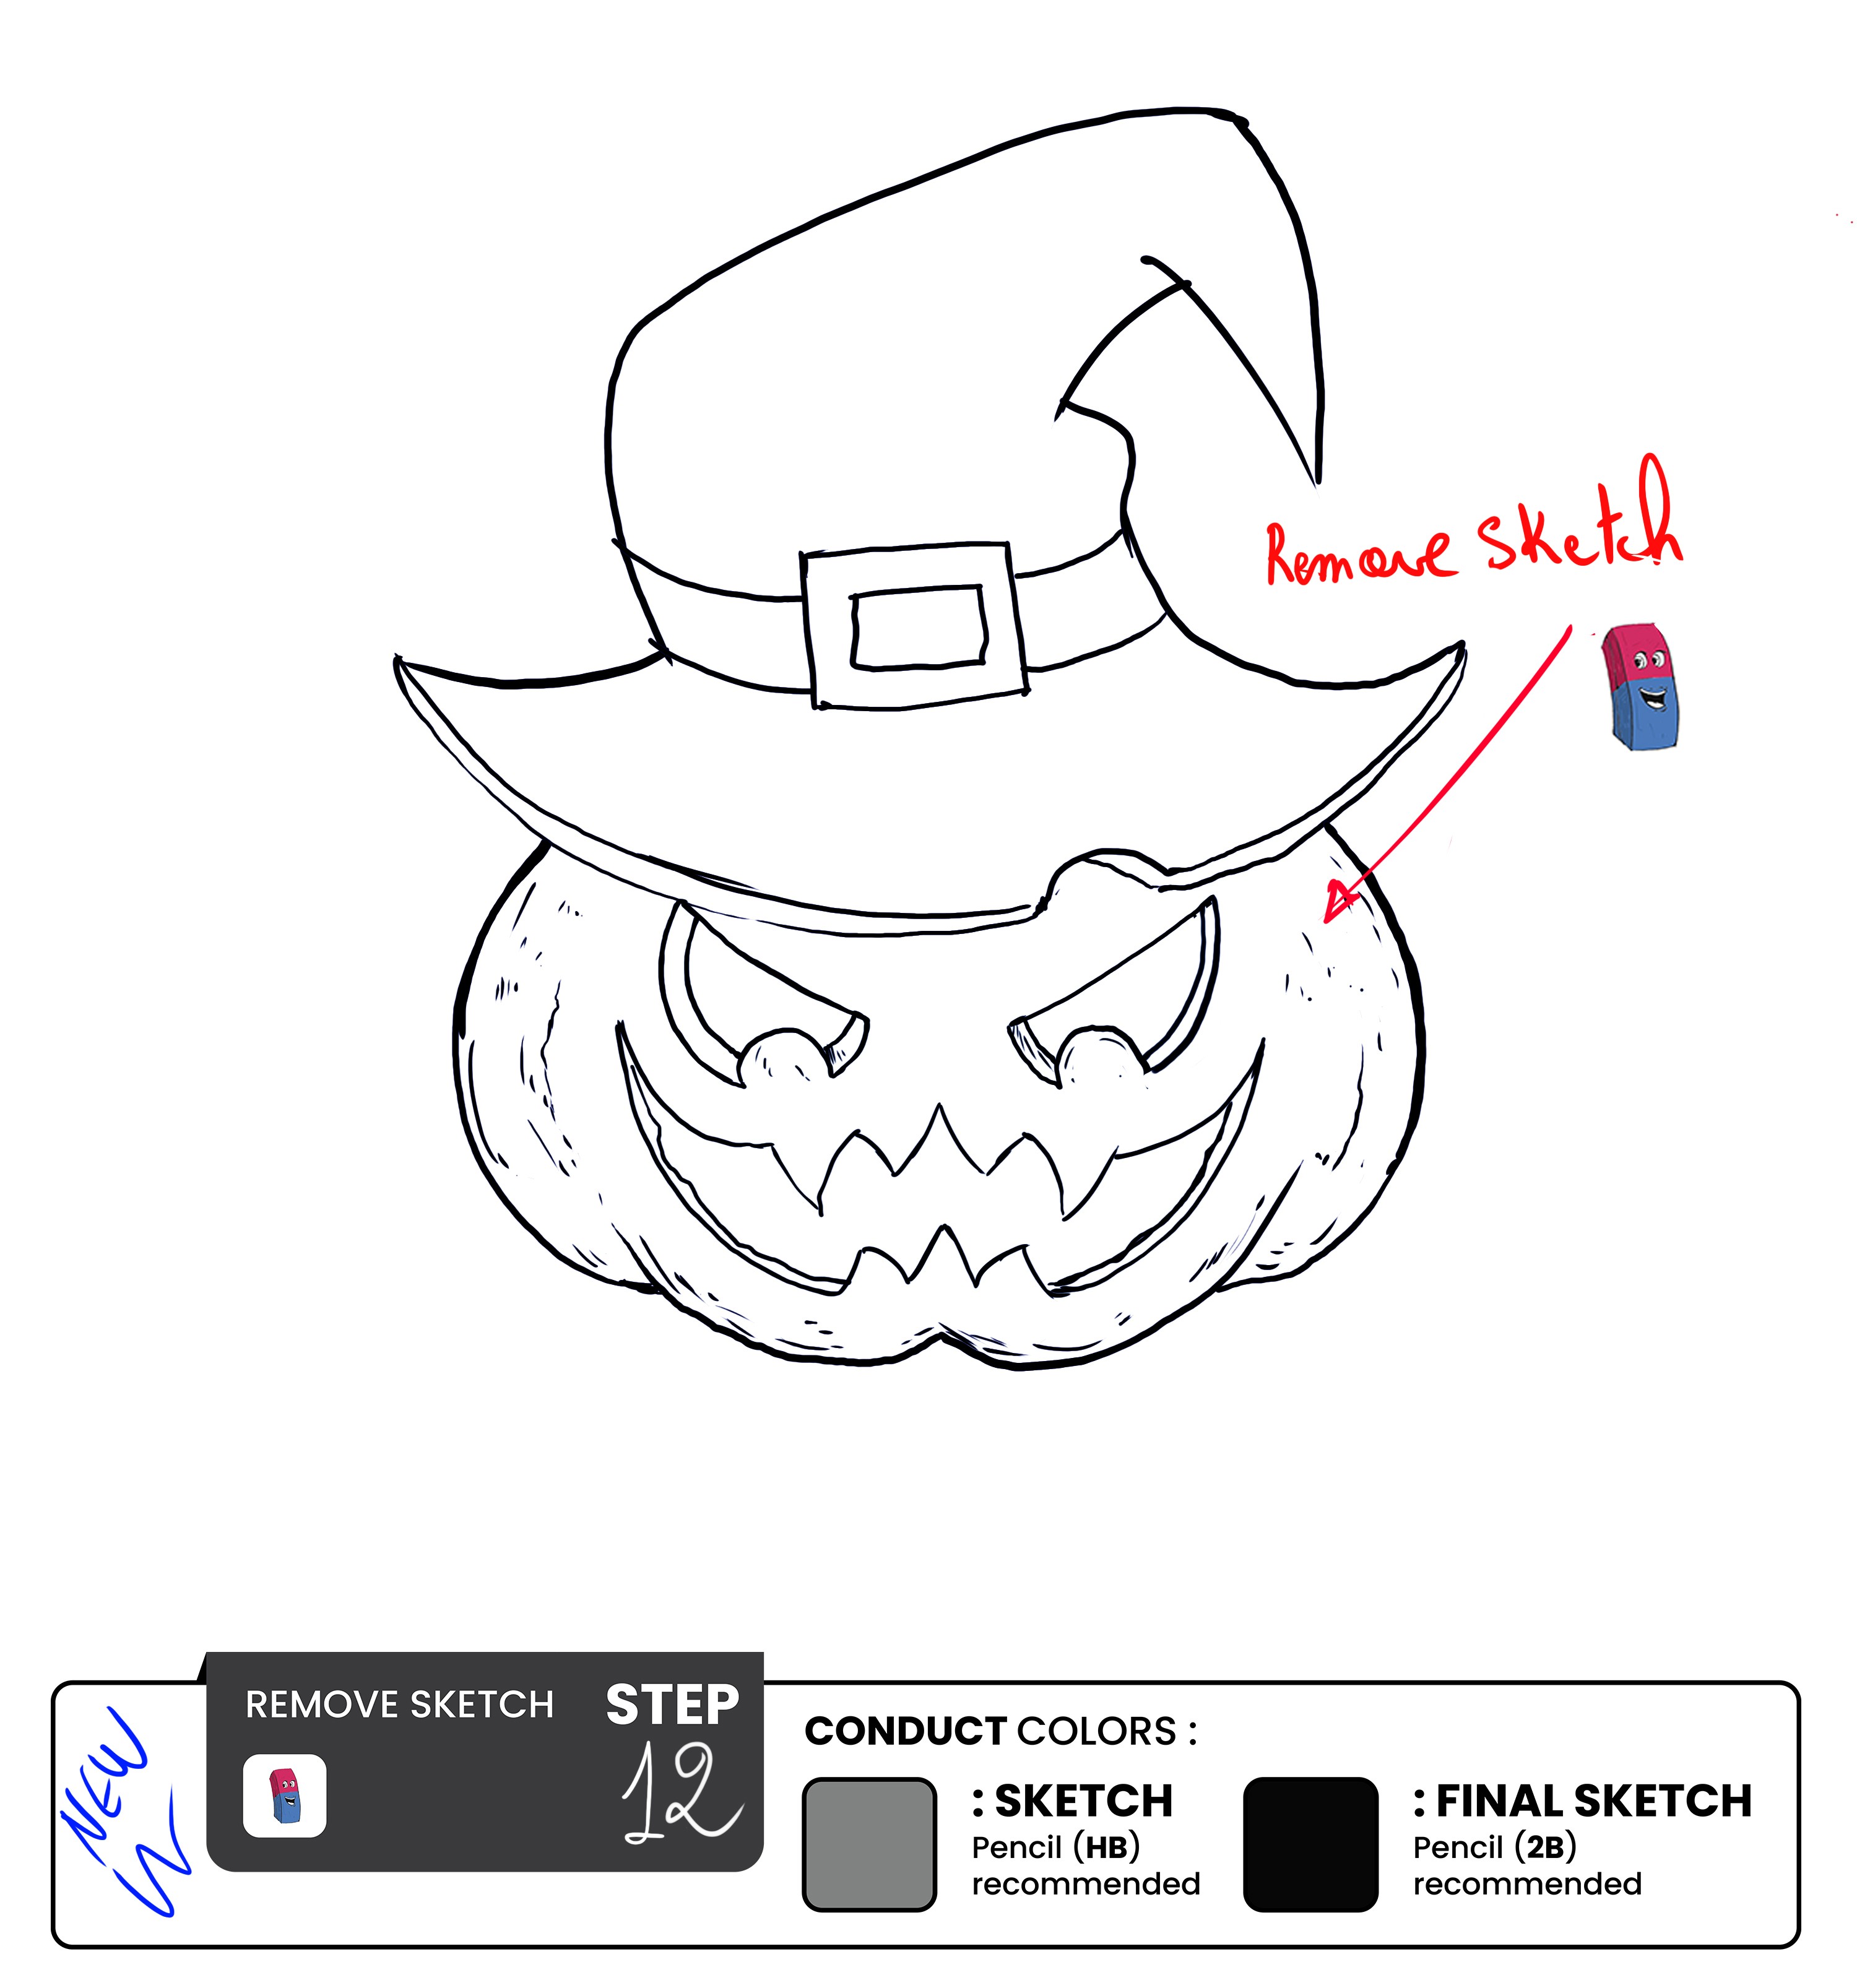
Using the sketch line, we worked on in step n°4, draw a series of sharp, pointed teeth along the inside of the mouth. These teeth can be of different sizes and shapes. The teeth should look jagged and uneven to create a creepy effect.
Draw a small curve at the bottom of the mouth to create the appearance of depth. This curve should be darker than the rest of the lines to create a shadow effect.
Draw the base of the mouth corresponding to the upper shape of the mouth. Make sure both of these meet at the corner of the mouth.
Once that’s done, take a darker pen, and overline the sketch. Once that’s done, take an eraser and remove guidelines made previously with the pencil.
Remember, erasing is an integral part of the drawing process. It allows you to refine your work and create a finished product that looks polished and professional.
That’s it! You Have Successfully Finished Drawing a Halloween Pumpkin with a Hat.
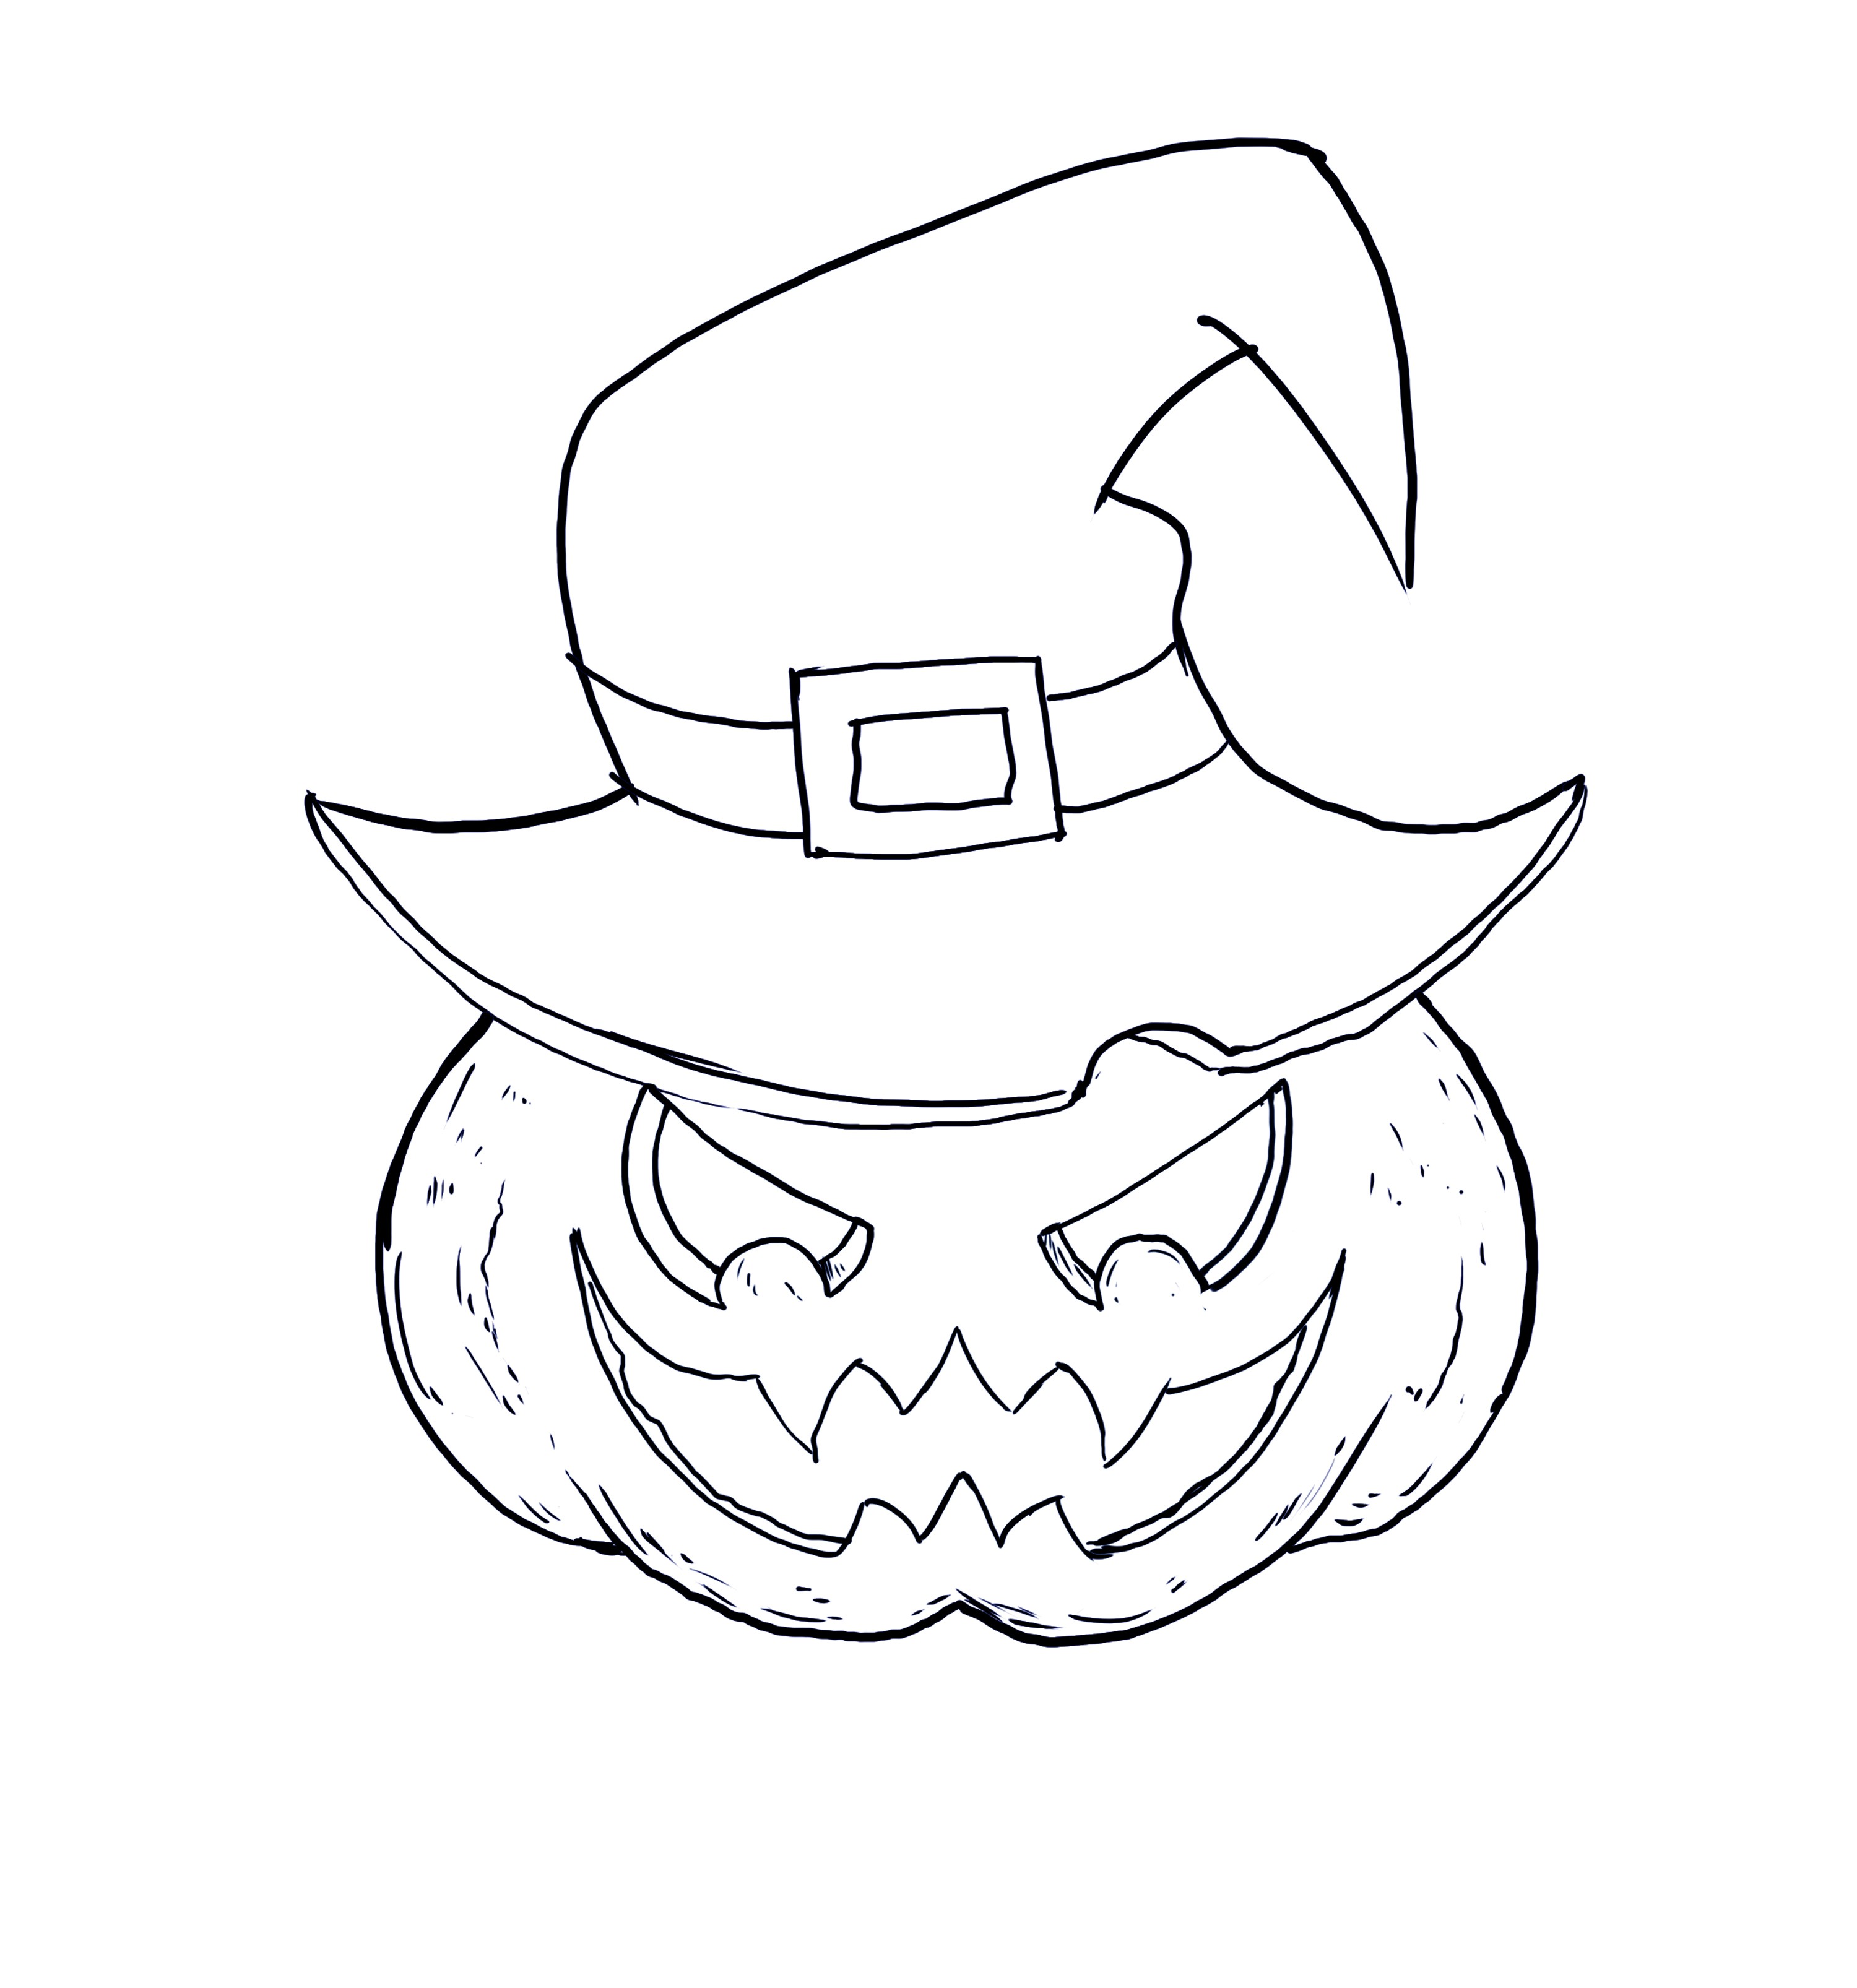
That's it! You now have a scary Halloween pumpkin with a hat. Remember to take your time and have fun with the process.
Happy drawing!
Things To Consider While Drawing Scary Halloween Pumpkin With A Hat
Once you have drawn a scary Halloween pumpkin with a hat, there are many things you can do with it. Here are a few ideas:
1. Display it
Hang your drawing on the wall or table to show your artistic skills. This is an ideal way to add some Halloween spirit to your home or office.
2. Make a card
Use your drawing as the basis for a Halloween card. Send some spooky text to friends and family to wish them a Happy Halloween.
3. Use it as a template
If you enjoy carving pumpkins, you can use your drawing as a template for your pumpkin carving. Trace the outline of your drawing onto a pumpkin, and then carve away the parts you don't need.
4. Make a sticker
Scan or photograph your drawing and print it onto sticker paper. Cut out the pumpkin and use it to decorate Halloween treat bags, notebooks, or any other surface that needs a spooky touch.
5. Create a coloring page
If you're teaching children about Halloween, you can turn your drawing into a coloring page. Print copies of the page and let the children color it with crayons or colored pencils.
6. Sell it
If you're an artist proud of your drawing, you can sell it online or at a Halloween-themed market. This is a great way to share your talent and earn extra money.
Final Words
Drawing a scary Halloween pumpkin with a hat is a creative way to celebrate Halloween. It's a simple project that can be enjoyed by people of all ages, and it's the best way to get into the spooky spirit of the holiday.
Following these steps and using your imagination can create a unique and terrifying pumpkin that will scare you.